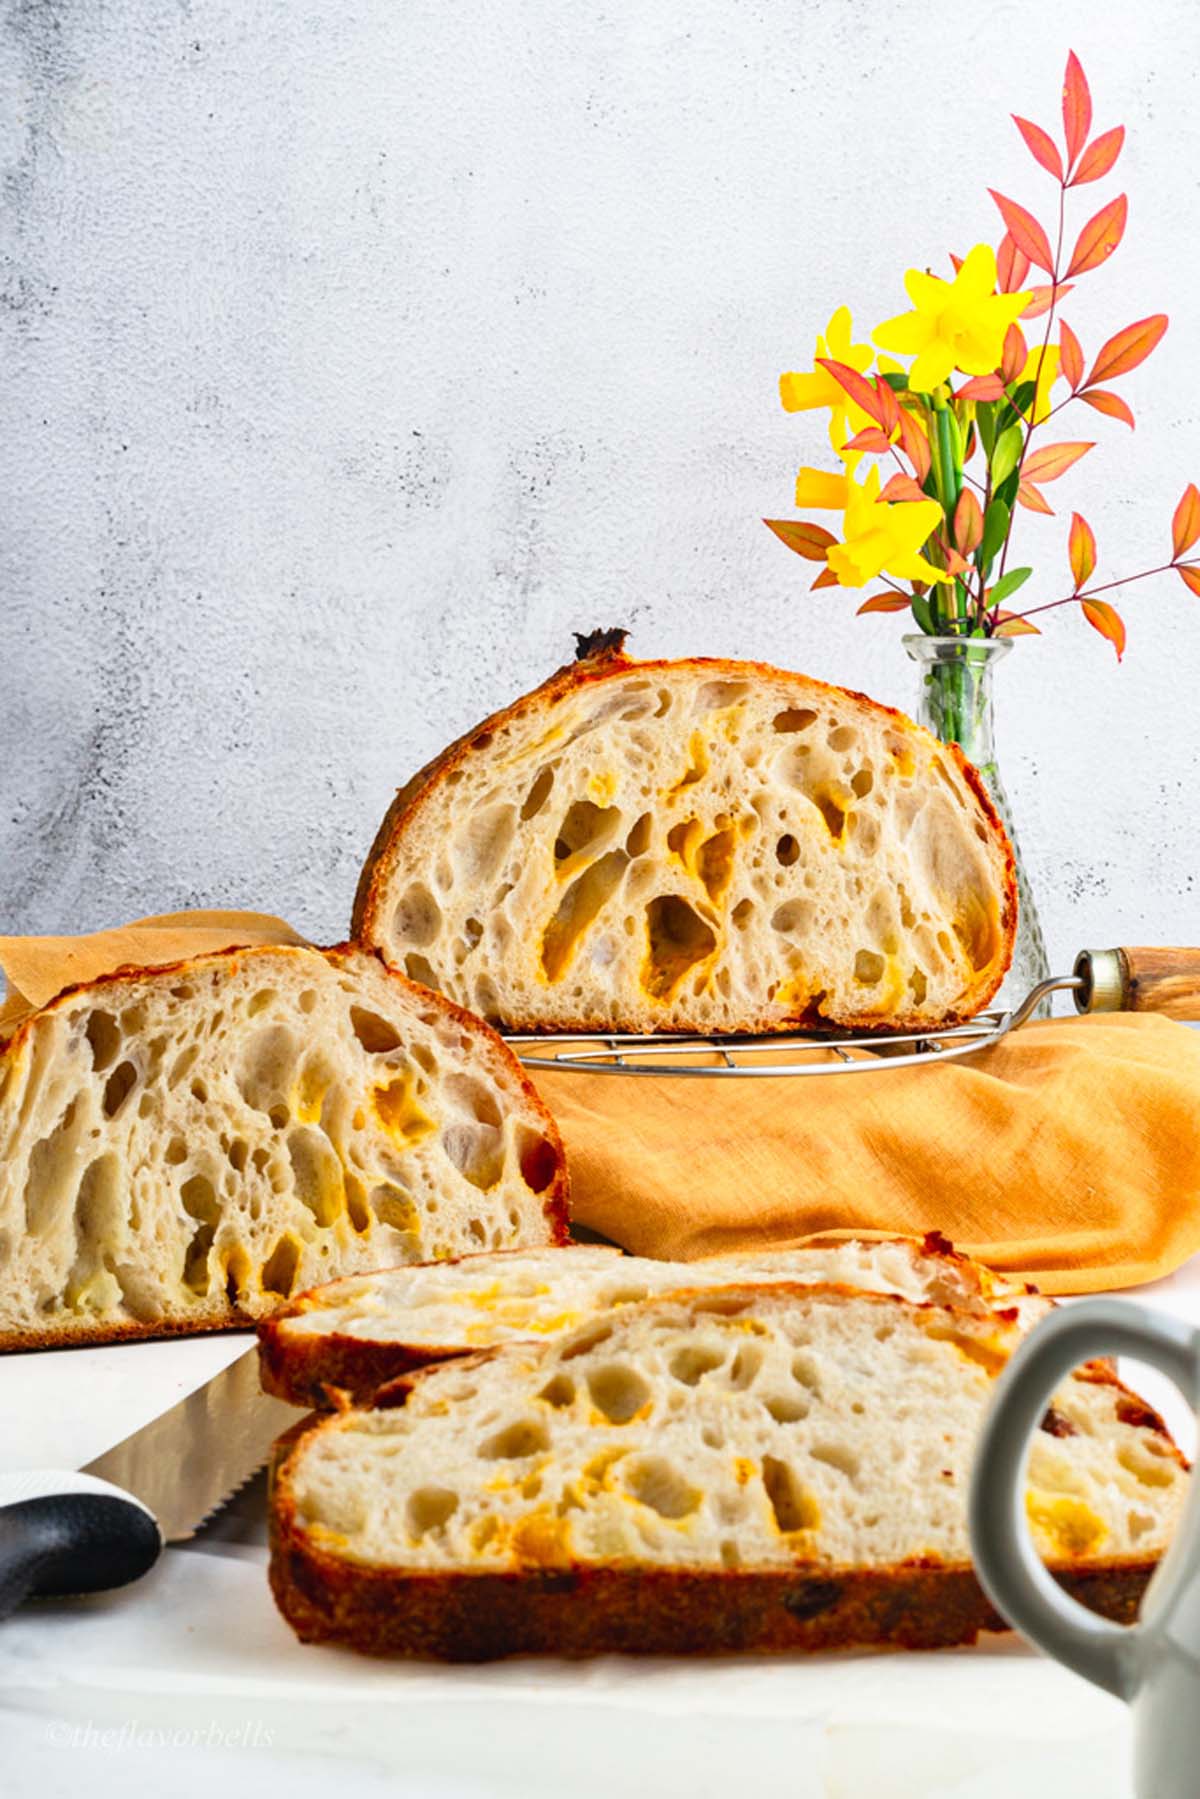
I still remember the first time I baked this cheesy sourdough bread; the aroma of bubbling cheese and golden crust filled my kitchen, making it impossible to wait for the first slice. There’s something magical about the combination of tangy sourdough and melted cheese—every bite is a perfect balance of flavor and texture. Whether you're looking for the ultimate grilled cheese sandwich base or simply want to enjoy a warm, cheesy slice straight from the oven, this recipe will not disappoint.
If you like experiment with sourdough flavors try our various sourdough discard recipes where we experiment with multiple sourdough add ins like garlic sourdough , blueberry sourdough, cinnamon raisin sourdough , etc.
Jump to:
🧂 Ingredient Notes and Substitutions
Flour Options:
Bread flour works best for this recipe due to its higher protein content, which gives the dough structure and chewiness. However, if you prefer a slightly softer texture, you can substitute up to 25% of the bread flour with all-purpose flour. Whole wheat flour can also be used, but it will result in a denser loaf—consider replacing only 20-30% of the bread flour with whole wheat and adjusting hydration as needed.
Water Adjustments:
Hydration is key in sourdough, and the water amount may need tweaking based on your flour choice. This is a 74 percent hydration recipe. Any hydration percentage from 69%-75% works magic for this recipe. The dough is pretty manageable. If using whole wheat or rye flour, you might need a bit more water as these flours absorb more liquid. Start with the recommended amount and adjust as necessary.
Sourdough Starter:
A mature, active sourdough starter ensures a good rise and flavor. If your starter is sluggish, consider feeding it a few hours before mixing your dough. If you don’t have a starter yet, you can create one in about a week or use a poolish (a pre-ferment made with commercial yeast) for a similar tangy flavor.
Salt Considerations:
Fine sea salt, Himalayan Pink salt, or kosher salt is ideal as they dissolve easily into the dough. If using table salt, slightly reduce the amount since it’s denser.
Cheese Selection:
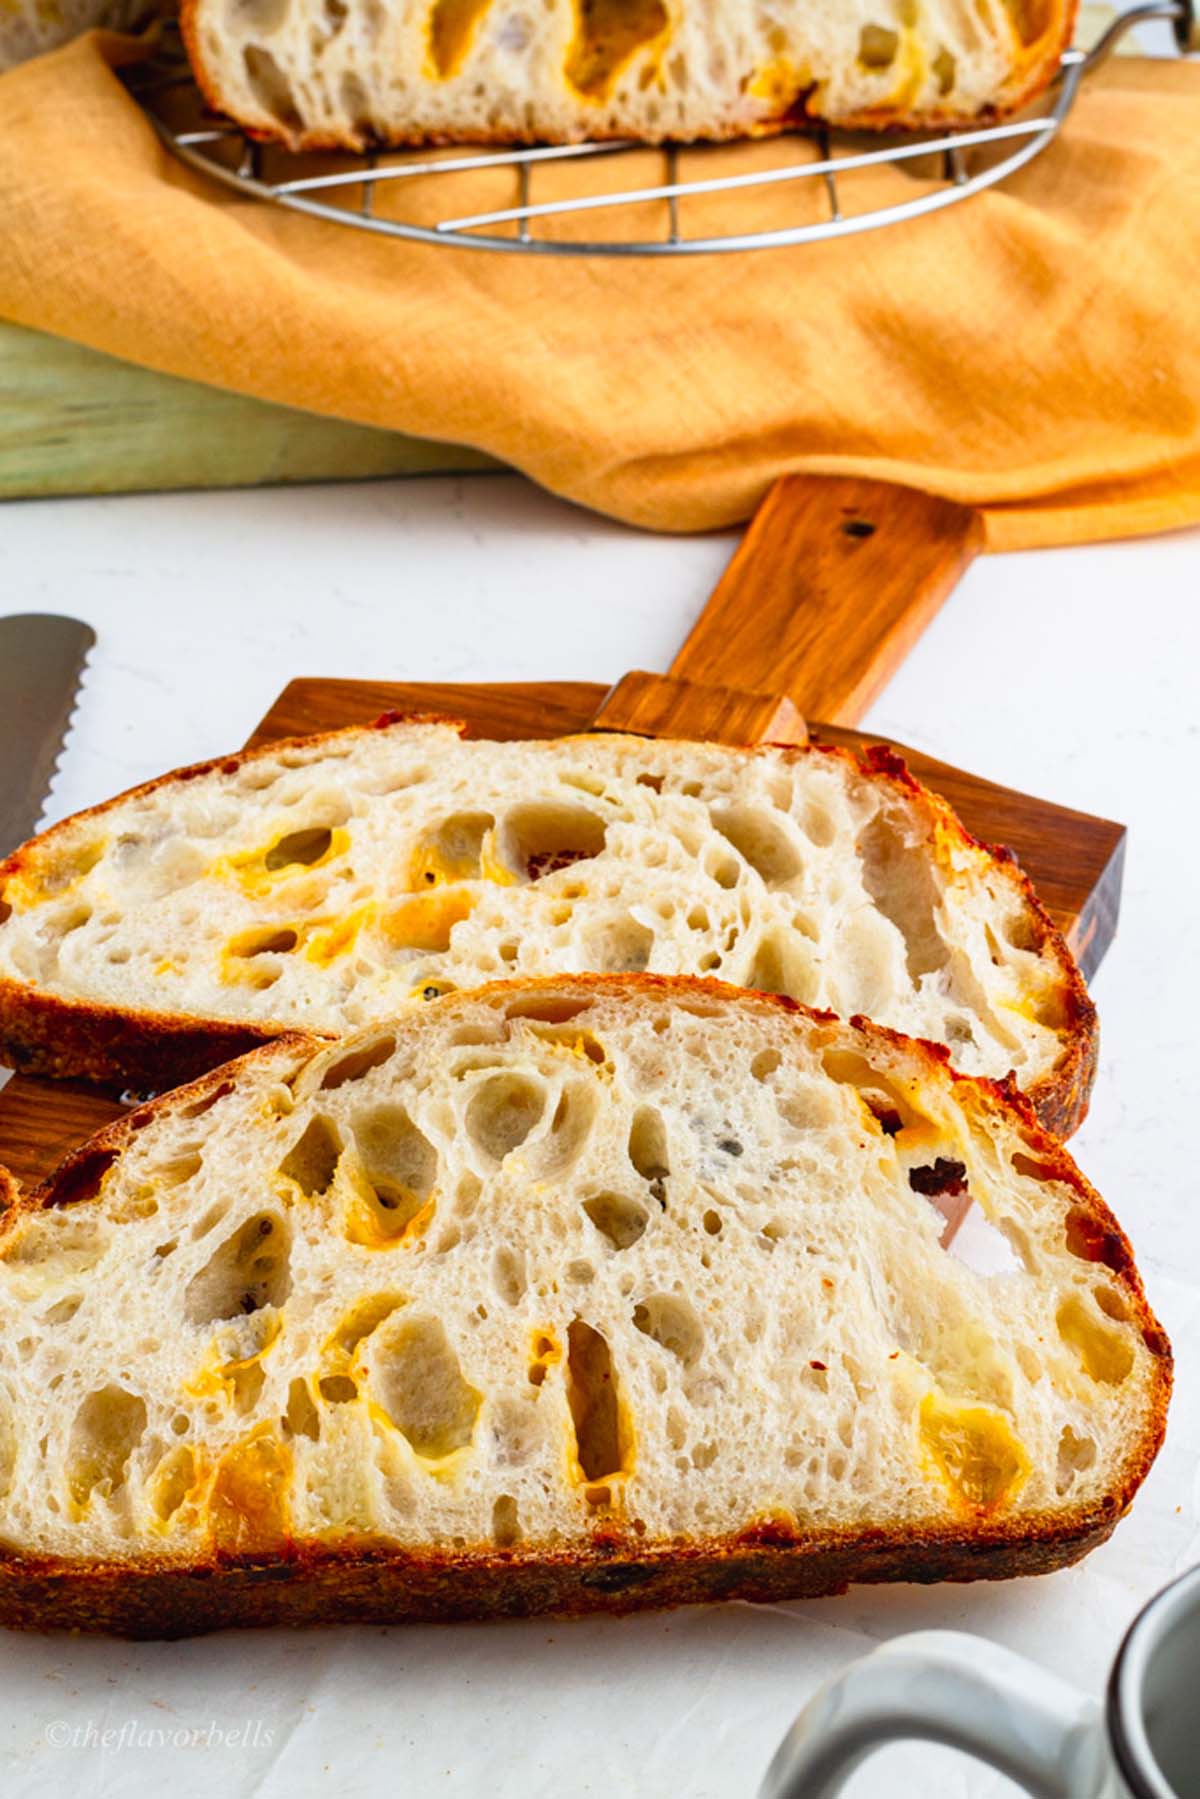
A mix of sharp cheddar cheese and mozzarella adds both flavor and a melty texture to this sourdough cheese bread. You can experiment with other cheeses—Gruyère, Gouda, or Parmesan for a nuttier depth, or blue cheese for a punchier flavor. In this cheese bread recipe avoid overly soft cheeses like Brie as they don’t hold up well in baking. If you’re dairy-free, you can use a plant-based cheese alternative, though results may vary in terms of melt and flavor.
Other Add-ins
You can also experiment with other flavors like garlic and herbs and make bread like sourdough bread with cheese and garlic and call it sourdough cheesy garlic bread, jalapeno and cheese sourdough, or make it into apull apart bread garlicand herb bread, or use only cheddar cheese to make cheddar sourdough bread.
🔪 Instructions: Cheesy Sourdough Bread Recipe
Step 1: Mix and Develop the Dough
In the bowl of a stand mixer fitted with a dough hook, combine the bread flour and most of the water (reserving a small amount for later). Mix on low speed until a rough, shaggy dough forms, then increase the speed slightly and knead for about 5-7 minutes, until the dough starts developing some elasticity. Cover the bowl with a damp towel and let it autolyse for 40 minutes—this crucial rest period allows the flour to absorb the water and kickstarts gluten development.
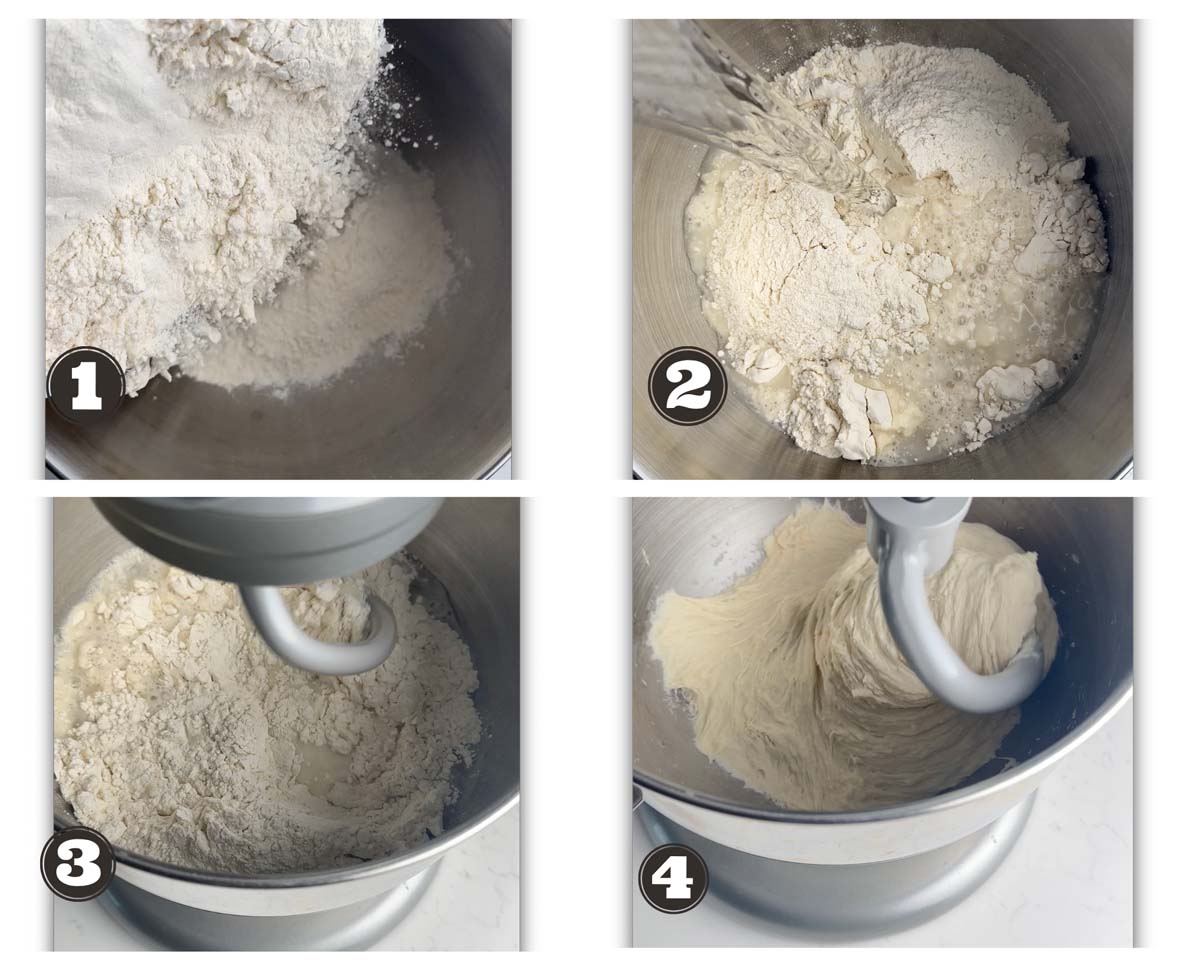
If you are not using a stand mixer simply combine flour and water in a large mixing bowl and combine them using your hands. Pay some extra effort to combine the dough and work a little bit with it to initiate gluten development.
After autolyse, add the sourdough starter and incorporate it using the pincer method—gently pinch and fold the dough multiple times to distribute the starter evenly. Next, mix the remaining water with the salt (this is called bassinage) and slowly incorporate it into the dough. This step ensures the dough remains well-hydrated while keeping its strength. Once fully combined, move on to bulk fermentation.
Step 2: Coil Folds or Stretch and Folds

Transfer the dough to a rectangular casserole or box. Now, perform four rounds of coil folds or stretch and folds, spaced about 30 minutes apart to build the gluten structure in the dough. To do a stretch and fold, grab one side of the dough, stretch it upwards, and fold it over itself. Rotate the bowl and repeat on all sides.
For a coil fold, gently lift the dough from the center with both hands, allowing the edges to tuck under as it folds onto itself. These techniques build gluten strength while maintaining dough elasticity. By the end of the fourth coil fold, the dough should become smooth and elastic.
3. Incorporating the Cheese
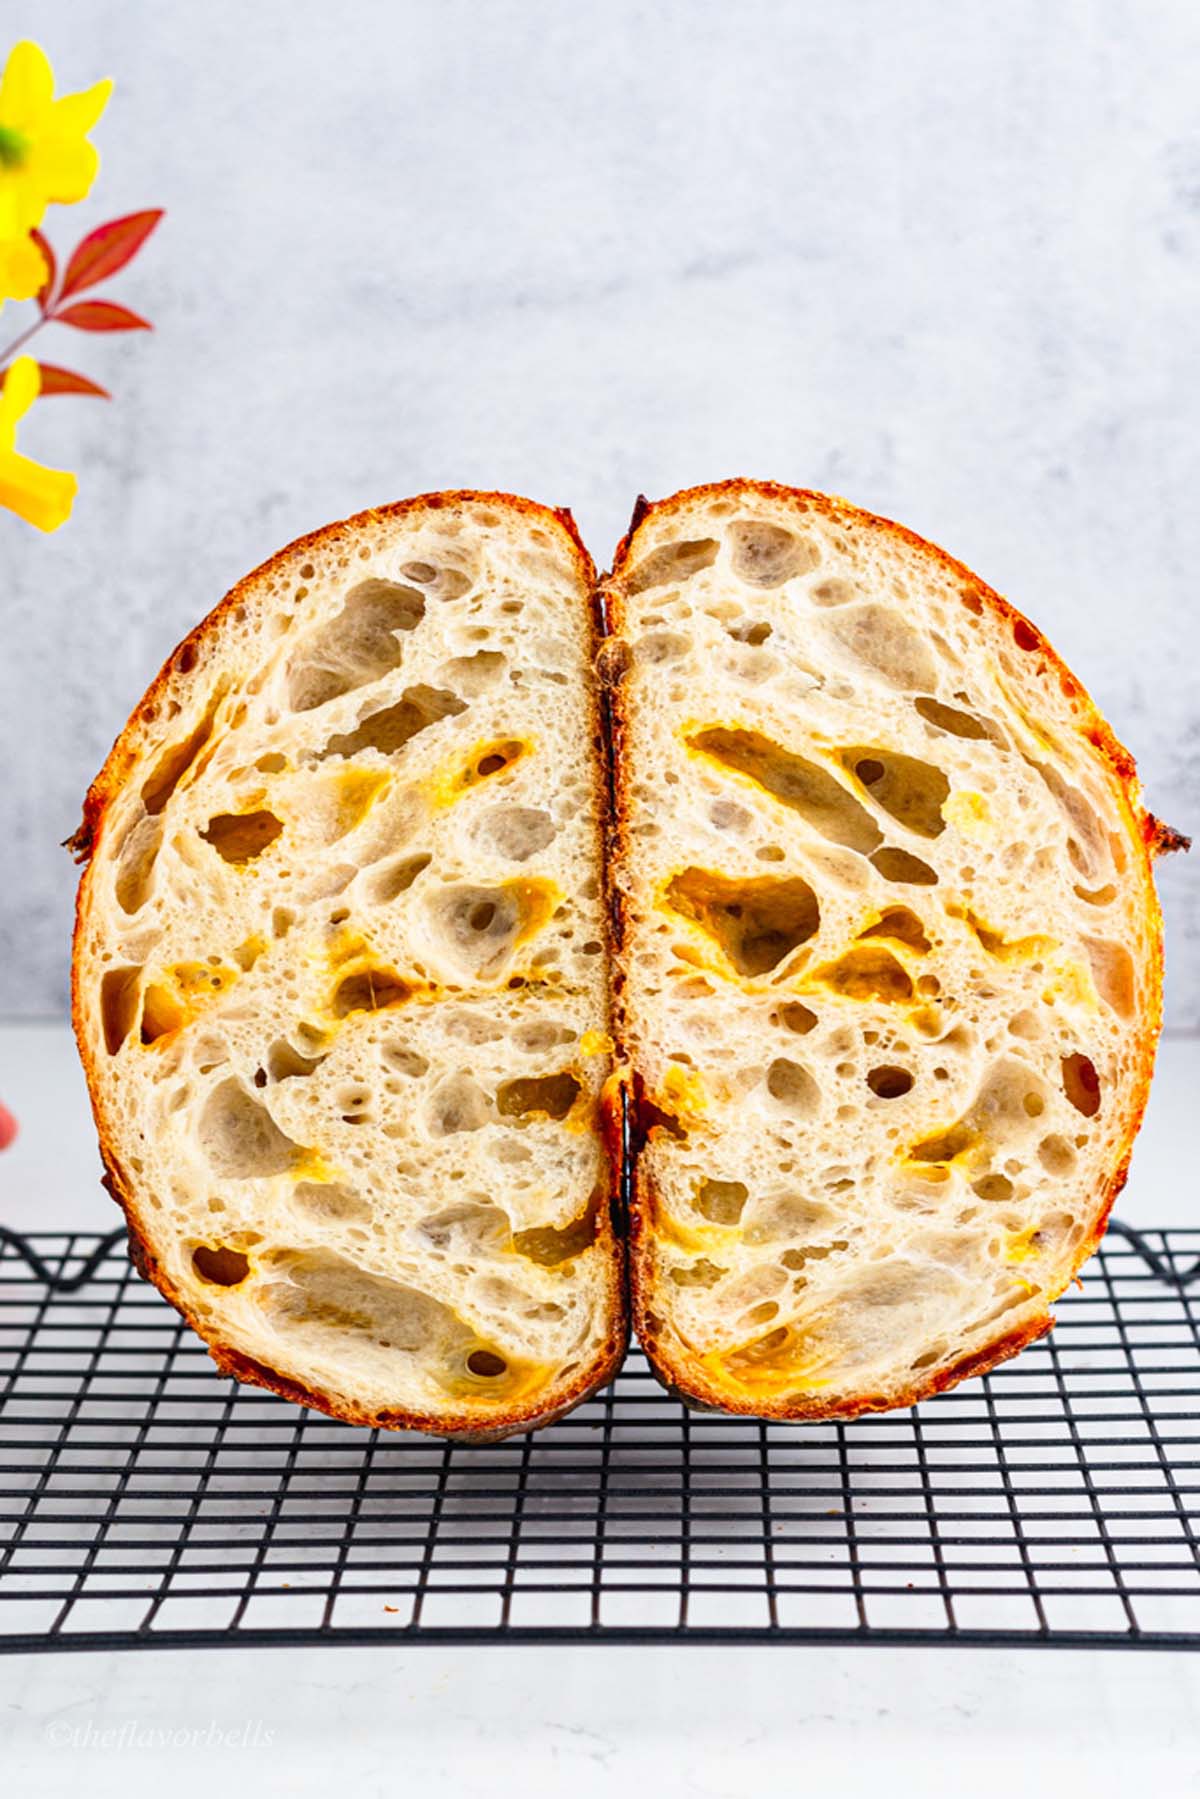
Now comes the most exciting part—adding the cheese! This step transforms your sourdough into a rich, flavorful loaf with delicious pockets of melted cheese. There are two methods for incorporating cheese into the dough, and the one you choose depends on your preferred texture and cheese distribution.
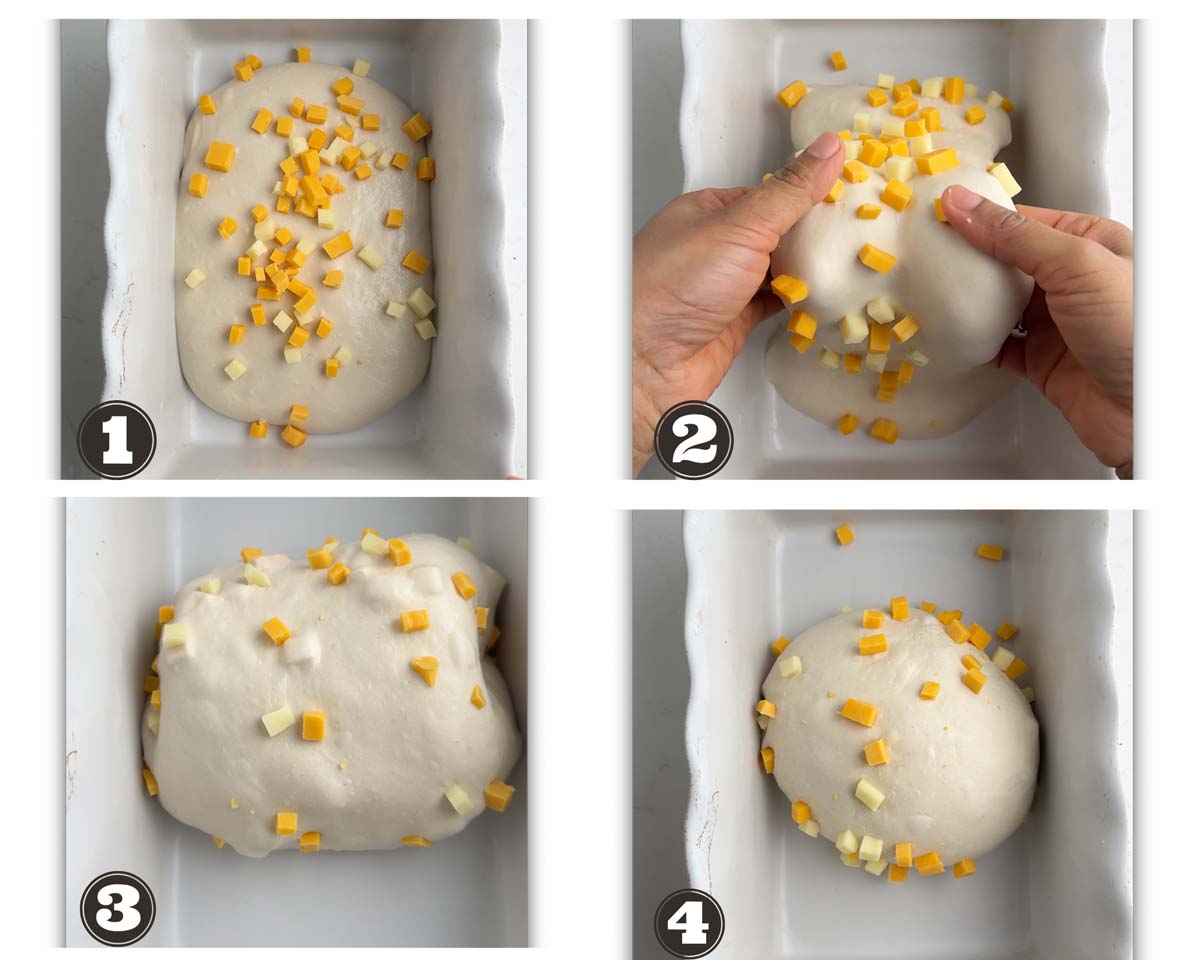
- Method 1: Mixing During Bulk Fermentation: One way to add cheese is right after the last stretch and fold, while the dough is still in its fermentation stage. To do this, gently spread the grated or cubed cheese evenly over the dough’s surface. Then, perform a coil fold or gentle stretch and fold to incorporate it.
As you fold, the cheese will naturally distribute throughout the dough, embedding itself into the structure without disrupting the gluten development. Be careful not to overwork the dough at this stage—handling it too much can cause the cheese to break down or release excess moisture, which could affect the final texture of your bread. - Method 2: Laminating Cheese During Shaping: If you prefer larger, more distinct cheese pockets in your baked loaf, you can incorporate the cheese during shaping instead. To do this, roll or stretch your dough out into a thin rectangle, then evenly sprinkle the cheese across the surface.
Fold the dough over itself, enclosing the cheese, and then shape it into a round boule or oval batard. This method creates pockets of gooey, melty cheese throughout the bread, giving every slice a rich, cheesy bite.
In this sourdough cheesy bread recipe, I have used method 1. Refer to the process images for more clarity. Whichever method you choose, be sure to handle the dough gently to maintain its structure while ensuring the cheese is evenly distributed. Once the cheese is incorporated, you’re ready to move on to the next step—final fermentation!
4. Bulk Fermentation
Cover the bowl and let the dough ferment at room temperature for about 4-6 hours, or until it looks puffier and jiggles slightly when moved. The exact time depends on the temperature of your kitchen—warmer environments speed up fermentation, while cooler ones slow it down. If needed, you can extend this step by placing the dough in the fridge overnight for cold fermentation, which enhances the flavor even more.
5. Shaping the Dough
Once your dough has completed bulk fermentation and looks airy and slightly domed, it’s time to shape it into a loaf. Gently turn it out onto a lightly floured surface, being careful not to deflate those beautiful air pockets that developed during fermentation. Start by stretching the dough slightly into a rough rectangle. Then, fold the edges toward the center, one side at a time, as if wrapping a package. Finally, roll it over so the seam is facing down—this will help create a smooth, tensioned surface that holds its shape during baking. Let the dough rest for about 20 minutes, uncovered, to relax the gluten.
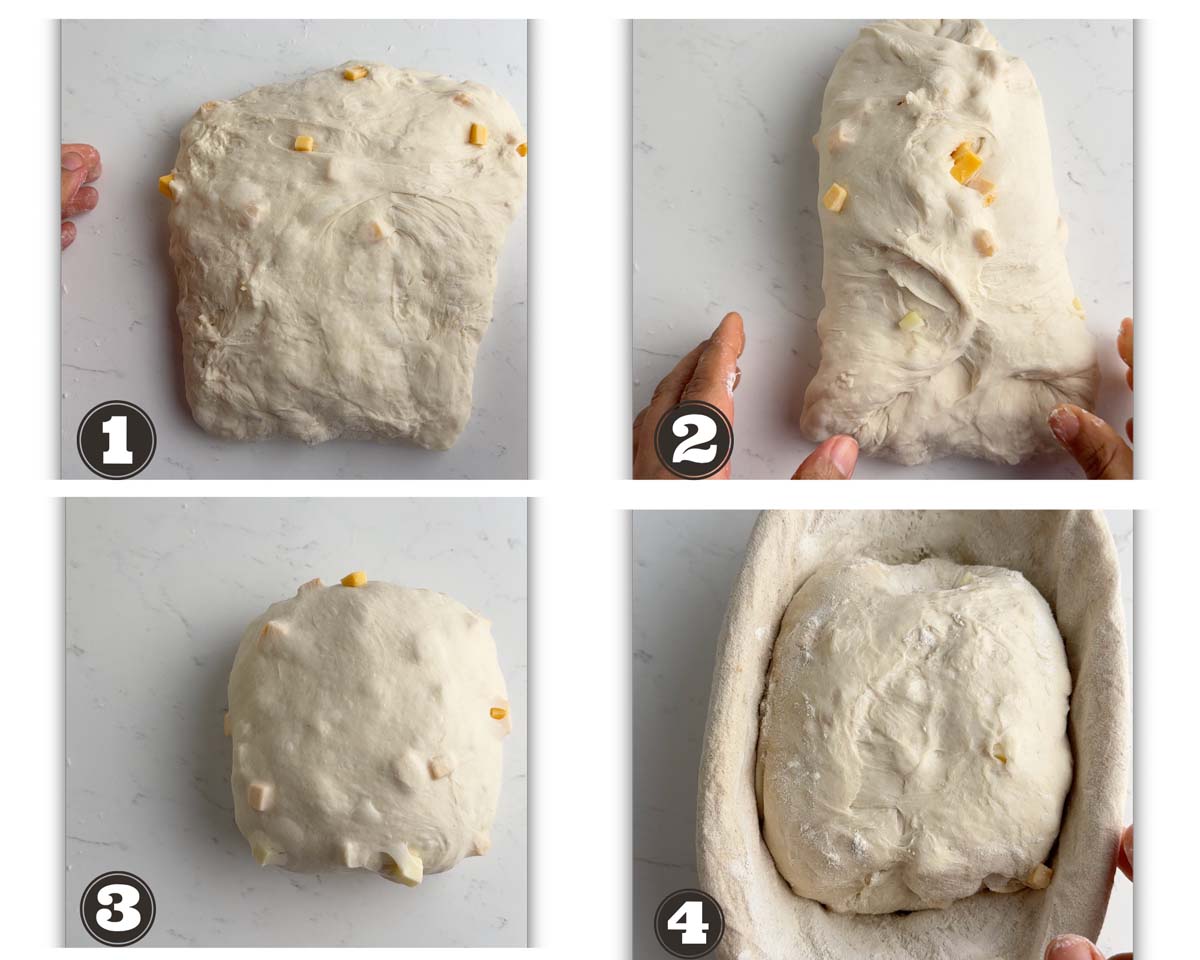
After this short rest, give it a final shape by pulling the dough taut, using gentle but firm movements. This step is crucial in achieving a well-risen sourdough loaf with a beautiful open crumb. Whether you’re going for a classic round boule or an elongated batard, shaping properly ensures your bread maintains structure during its final proof and in the oven. (Refer to the process images for more clarity)
6. Proofing the Dough
Place the shaped dough into a floured banneton (proofing basket) or a bowl lined with a clean kitchen towel dusted with flour. Cover and place the dough in the fridge for overnight cold-proof, which deepens the sourdough flavor and makes scoring easier.
If you prefer to bake the same day, cover it and let it proof at room temperature for 1-2 hours, or until slightly puffy.
7. Preheating the Oven and Scoring
When ready to bake, preheat your oven to 500°F (260°C) for at least 50 minutes with a Dutch oven inside. Once hot, carefully transfer the dough onto a piece of parchment paper, then use a sharp blade or lame to score the top. This helps control how the bread expands in the oven and gives it that beautiful, artisan look. Also give it a spray of water before transferring the loaf to the Dutch oven.
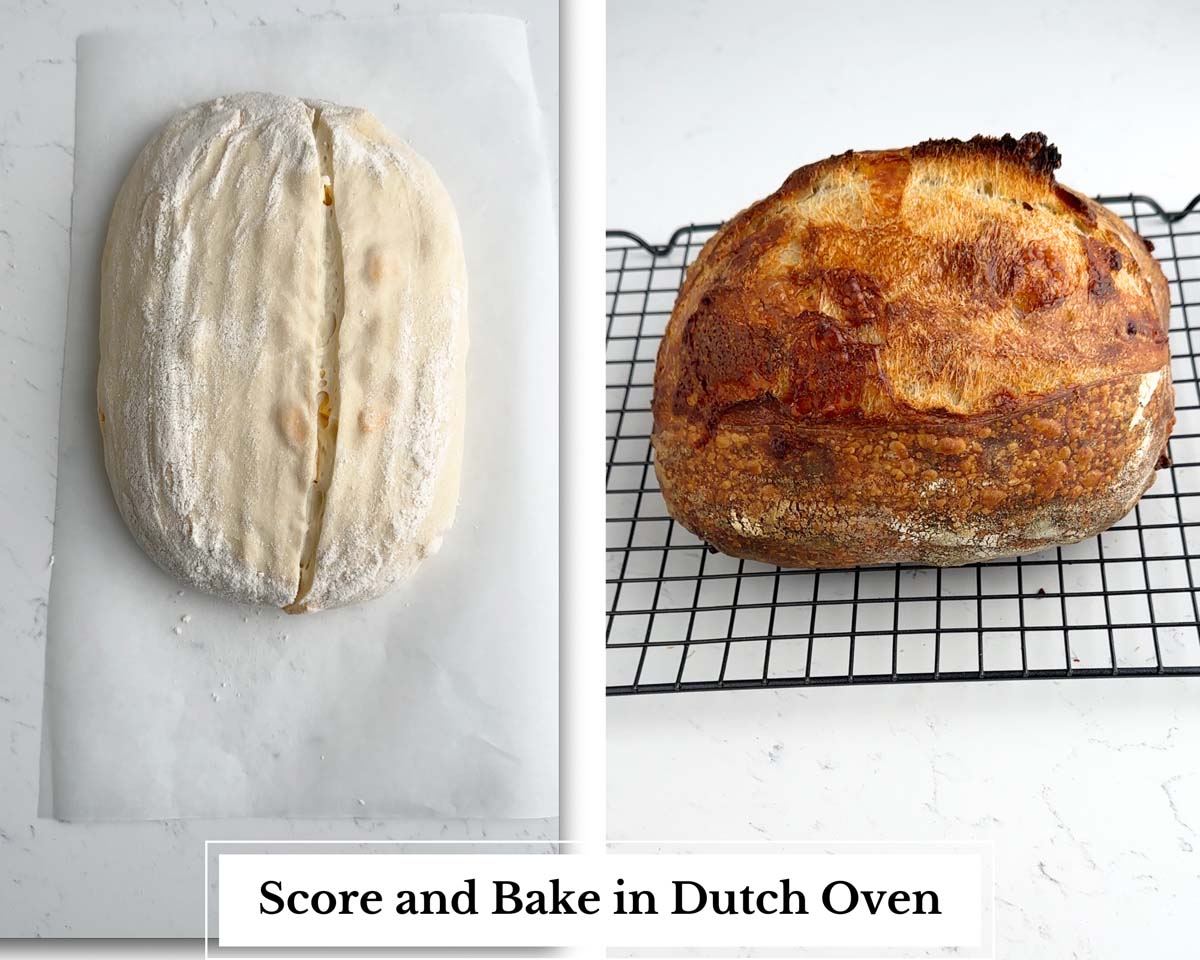
8. Baking
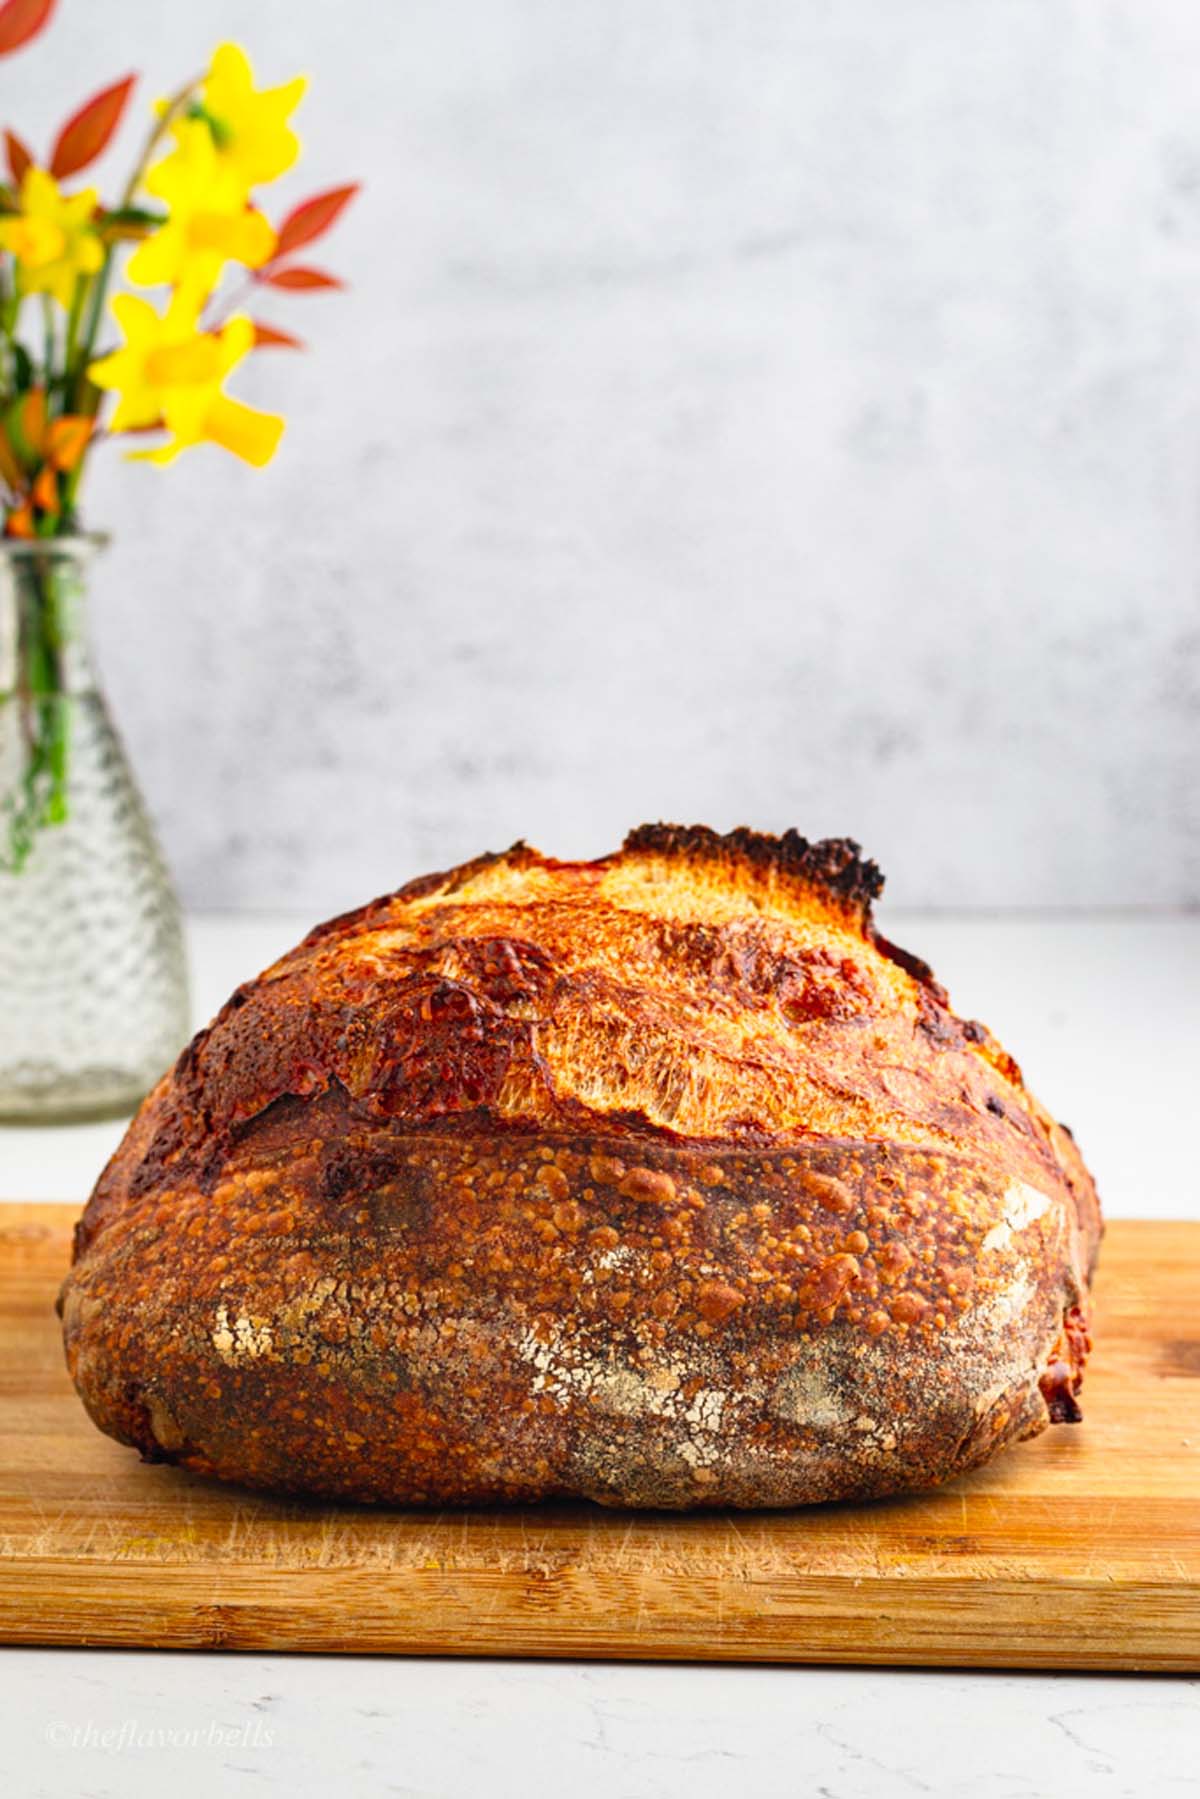
Carefully place the dough into the hot Dutch oven, cover with the lid, and bake for 20 minutes. After that, remove the lid and bake for another 15-20 minutes at 4500F ( 2320 C), or until the crust turns deep golden brown and crisp. You’ll know it’s done when it sounds hollow when tapped on the bottom.
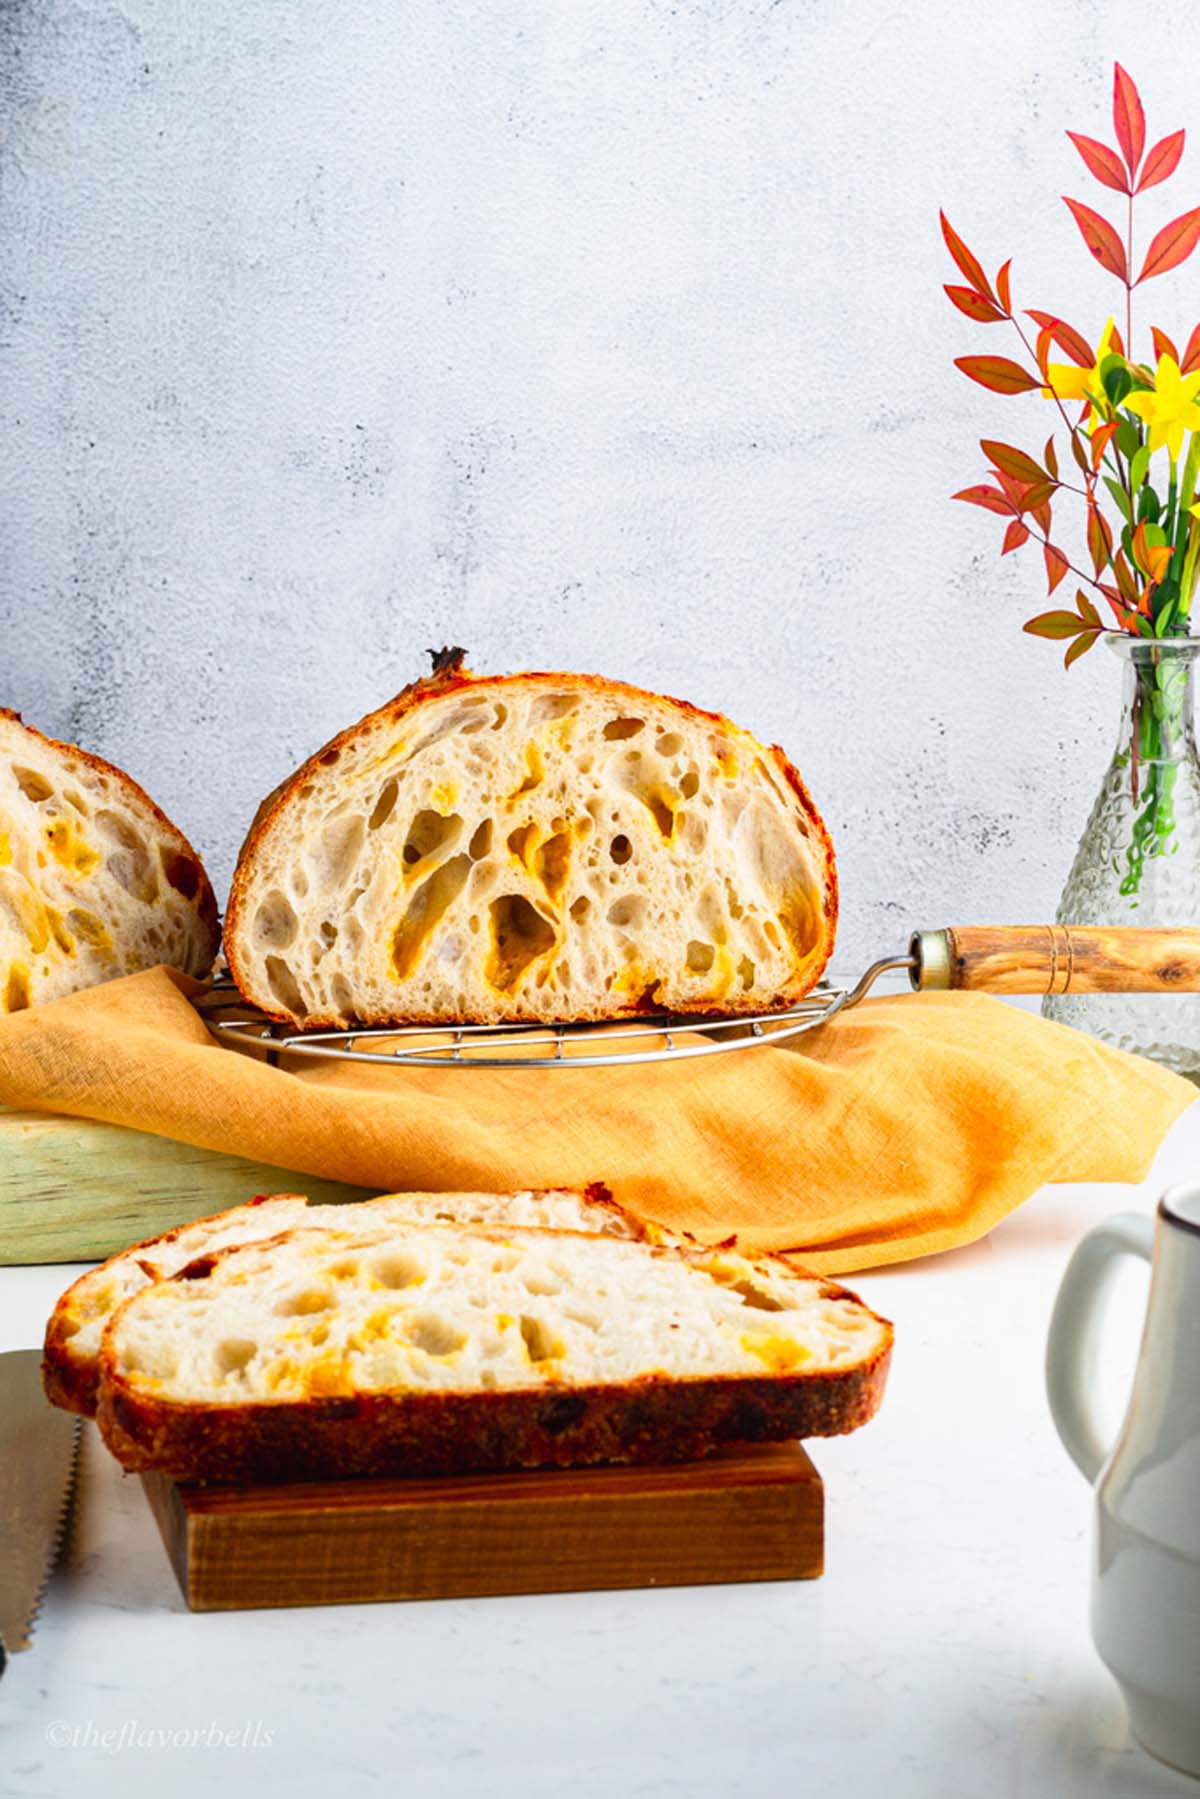
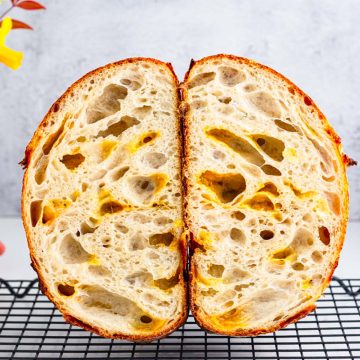
9. Cooling and Enjoying
Once out of the oven, resist the temptation to slice into it right away! Let your cheesy sourdough breadcool on a wire rack for at least 1 hour—this allows the steam to escape and the texture to set properly. After cooling, slice, enjoy, and savor the melty pockets of cheese in every bite as such or smear with garlic butter!
💭 Pro Tips
- Ensure your sourdough starter is active and bubbly before using it. A sluggish starter can lead to dense bread. Feed it 4-6 hours before baking for optimal results.
- Use cheese that melts well, like cheddar, mozzarella, or Gouda. Avoid overly oily cheeses, as they can make the dough greasy.
- Preheat your oven thoroughly. A hot oven is crucial for a good rise and crust formation.
- If you don’t have bread flour, all-purpose flour works fine, though the crumb may be slightly less chewy. For a healthier twist, substitute up to 20% of the flour with whole wheat flour.
- Don’t have cheddar? Try Monterey Jack, Swiss, or even a mix of Parmesan and mozzarella for a different flavor profile.
- Feel free to customize! Add garlic powder, herbs, or even cooked bacon bits to the dough for extra flavor.
- To prevent cheese from oozing out during baking, ensure it’s evenly distributed and sealed within the dough. You can also chill the shaped loaf for 20 minutes before baking to help the cheese set.
❓Frequently Asked Questions
When baking cheesy sourdough bread, exposed cheese on the surface can sometimes burn or become too crispy. While some browning adds flavor, burnt cheese can create bitterness.
1. One way to prevent this is by folding the cheese into the dough properly. If too much cheese is sitting on the surface, it will be more prone to burning. Instead, after the final stretch and fold, tuck in any exposed cheese as much as possible so it remains inside the dough. This helps create pockets of melty cheese rather than burnt patches.
2. Another trick is to cover your loaf with parchment paper or bake it inside a Dutch oven with the lid on for the first half of the bake. This traps steam, helping the crust develop before the cheese is exposed to direct heat. Removing the lid in the second half of baking allows the crust to brown evenly without overcooking the cheese.
3. If you love a crispy cheese crust but want to avoid burning, try brushing the surface with a little olive oil before baking. This helps create a barrier that slows down excessive browning. Also, using cheeses with a higher fat content, like Gouda or Monterey Jack, can result in better melting and less burning compared to drier cheeses like Parmesan.
4. Finally, keep an eye on the oven temperature. If your oven runs hot, consider baking at 425°F (218°C) instead of 450°F (232°C) to allow a gentler cooking process while still achieving a golden-brown crust.
Yes! While a Dutch oven is great for baking sourdough because it traps steam and helps create a crispy crust, you can still make cheesy sourdough using alternative methods.
1. One option is to use a baking stone or pizza steel along with a tray of hot water. Preheat your oven with the stone inside to create an evenly heated surface, then place your loaf directly on it when ready to bake. To generate steam, place a pan with boiling water on the lower rack—this mimics the humid environment of a Dutch oven and helps achieve a nice rise and crust.
2. Another alternative is the inverted baking pan method. Place your dough on a preheated baking sheet or stone, then cover it with a large heatproof bowl or another baking pan. This traps moisture around the bread, acting like a Dutch oven. After 20 minutes, remove the cover to allow the crust to brown.
3. If you have a roasting pan with a lid, this can also work similarly to a Dutch oven. Just be sure the pan is oven-safe at high temperatures.
Regardless of the method you choose, ensure your oven is fully preheated before baking to maximize oven spring and get that classic sourdough rise.
Choosing the right cheese for sourdough bread makes all the difference in flavor and texture. The best cheeses should have a good melt factor while also adding a depth of taste to the bread.
* A combination of cheddar and mozzarella is one of the best choices because cheddar brings bold, tangy flavor, while mozzarella adds stretch and gooey texture. If you love sharp flavors, aged cheddar, Gruyère, or smoked Gouda are excellent options. They have a nuttier and more pronounced taste that pairs beautifully with the tang of sourdough.
* For a bit of creaminess, Monterey Jack or Havarti are great choices, as they melt well without becoming too oily. If you prefer a crispy cheese crust, adding a sprinkle of Parmesan or Asiago on top before baking creates a savory, umami-packed golden crust.
* If you want to experiment, try using blue cheese for a bold, tangy kick, or add Brie or Camembert in small pieces for a rich, creamy texture. However, soft cheeses like Brie should be used sparingly, as they contain a lot of moisture and can make the dough too wet.
For those who are dairy-free, vegan cheese alternatives made from cashews or coconut oil can work, though they may not melt the same way as traditional cheese.
Ultimately, the best cheese for the cheesy sourdough bread depends on your flavor preferences and texture goals—a mix of mild, melty, and bold cheeses often works best!
🫙Storing Your Cheesy Sourdough
- For short-term storage (1-2 days), keep your sourdough cheese bread at room temperature. Wrap it in a clean kitchen towel or place it in a bread bag to maintain its crusty exterior while preventing it from drying out.
- If you need to store the bread for longer (up to 5 days), wrap it tightly in aluminum foil or place it in an airtight container and refrigerate. The fridge will help preserve the cheese and prevent spoilage but note that the crust may soften.
- To keep your cheesy sourdough fresh for weeks, slice it and wrap individual portions in plastic wrap or aluminum foil. Place the wrapped slices in a freezer-safe bag or container.
🔥 Reheating Your Cheesy Sourdough
Oven Method or air Fryer (Best for Restoring Crust):
- Preheat your oven or air fryer to 350°F (175°C).
- If the cheesy sourdough bread is frozen, let it thaw at room temperature for 15-20 minutes.
- Wrap the loaf or slices in aluminum foil to prevent drying out and warm it in the oven for 10-15 minutes. For the last 2-3 minutes, unwrap the bread to crisp up the crust.
Toaster or Toaster Oven (Quick and Easy):
- For individual slices, pop them into a toaster or toaster oven in a medium setting.
- This method works especially well for frozen slices—no need to thaw!
👩🏽🍳 Tips for Enjoying Leftover Cheesy Sourdough
- Make Croutons: Stale cheesy sourdough bread makes fantastic croutons! Cut it into cubes, toss with olive oil and your favorite seasonings, and bake at 375°F (190°C) until golden and crispy.
- Grilled Cheese Upgrade: Use your leftover slices to make an extra-cheesy grilled cheese sandwich. The sourdough’s tangy flavor pairs perfectly with melty cheese.
- Bread Pudding: Transform your cheesy sourdough bread into a savory bread pudding by combining it with eggs, milk, and additional cheese for a comforting dish.
🔗 More sourdough recipes
- Sourdough bread bowl
- Chocolate chip sourdough bread
- Sourdough discard rolls
- Sourdough discard pretzels
- Pumpkin Sourdough
- Blueberry sourdough bread
- Rye sourdough
- Sourdough Discard bread
- Sourdough Baguette
- Sourdough Ciabbatta
This recipe is a delicious way to enjoy the tangy flavor of sourdough paired with the irresistible richness of melted cheese. Don’t forget to experiment with different cheeses and add-ins to make it your own.
If you’ve tried this cheesy sourdough recipe, we’d love to hear how it turned out! Share your results in the comments below or tag us on social media with your creations. And if you’re craving more sourdough inspiration, be sure to check out our other recipes and baking tips.
Happy baking, and enjoy every cheesy, crusty bite!
CHEESY SOURDOUGH BREAD
Ingredients
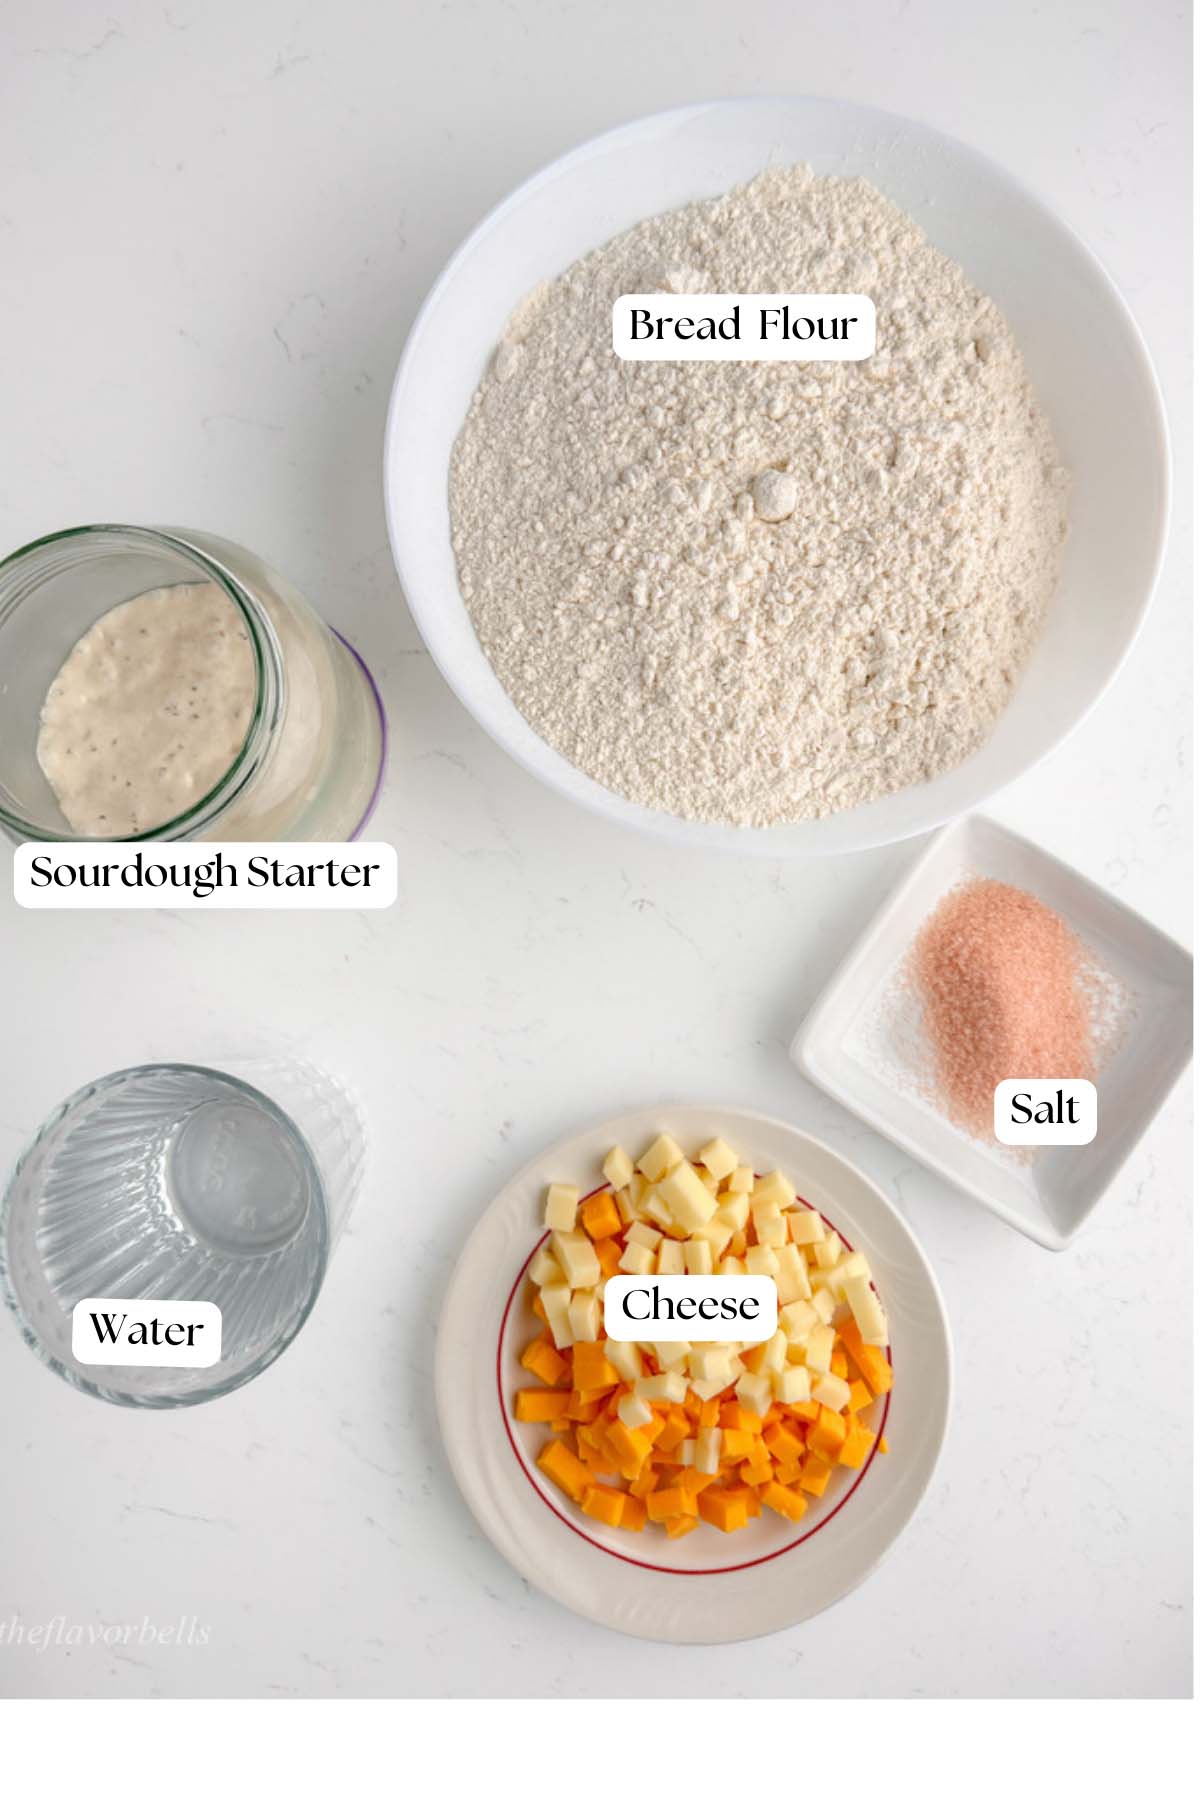
- 350 g Bread Flour (2 ¾ cups)
- 70 g sourdough starter about ¼ cup
- 260 g water divided (250+10) ( 1 cup +1 tbsp)
- 7 g Salt 1 tsp
- ⅓ Cup Cheese Cheddar Cheese + Mozzarella ( grated or finely cubed)
Instructions
Mix and Develop the Dough
- In a stand mixer with a dough hook, combine bread flour and most of the water (reserving a small amount for later). Mix on low speed until a rough, shaggy dough forms.
- Increase the speed slightly and knead for about 5-7 minutes until the dough becomes elastic.
- Cover with a damp towel and let it autolyse for 40 minutes—this allows the flour to absorb water and jumpstarts gluten development.
- If mixing by hand, combine flour and water in a large bowl and use your hands to mix thoroughly, working the dough a bit to develop gluten.
- After autolyse, add the sourdough starter and use the pincer method—pinching and folding the dough repeatedly to distribute it evenly.
- Dissolve salt in the remaining water (bassinage) and slowly incorporate it into the dough, ensuring even hydration while maintaining strength.
- Once everything is well mixed, move on to bulk fermentation.
Coil Folds or Stretch and Folds
- Transfer the dough to a rectangular dish or box.
- Perform four rounds of coil folds or stretch and folds at 30-minute intervals to build gluten strength.
- Stretch and fold method: Grab one side of the dough, stretch it upwards, then fold it over itself. Rotate the bowl and repeat on all sides.
- Coil fold method: Lift the dough from the center with both hands, allowing the edges to tuck under as it folds onto itself.
- By the final round, the dough should be smooth, elastic, and well-structured.
Incorporating the Cheese
- Add the cheese after the final stretch and fold.
- Add cheese mix into the dough now by spreading the cheese over the surface and performing a gentle coil fold. As you fold, the cheese will naturally distribute throughout the dough, embedding itself into the structure without disrupting the gluten development.
- Be careful not to overwork the dough at this stage—handling it too much can cause the cheese to break down or release excess moisture, which could affect the final texture of your bread.*
- Be careful not to overwork the dough—this can weaken its structure and prevent a good rise.
Bulk Fermentation
- Cover the bowl and let the dough ferment at room temperature for 4-6 hours. It should become puffier and slightly jiggly when moved.
- Warmer environments speed up fermentation, while cooler ones slow it down.
- If you prefer a deeper sourdough flavor, place the dough in the fridge overnight for a cold fermentation.
Shaping the Dough
- Once the dough has completed bulk fermentation, gently transfer it onto a lightly floured surface.
- Stretch the dough into a rough rectangle.
- Fold the edges toward the center, one side at a time, like wrapping a package.
- Flip it over so the seam is facing down—this creates surface tension, helping the loaf hold its shape.
- Let it rest for 20 minutes, then perform a final shaping to ensure a well-risen loaf with a good open crumb. You can shape it as a batard or a boule.
Proofing the Dough
- Place the shaped dough into a floured banneton (proofing basket) or a bowl lined with a floured kitchen towel.
- Cover and refrigerate for an overnight cold proof—this enhances flavor and makes scoring easier. (If baking the same day, let the dough proof at room temperature for 1-2 hours until it looks slightly puffy.)
Preheating the Oven and Scoring
- Preheat the oven to 500°F (260°C) for at least 50 minutes with a Dutch oven inside.
- Once ready, carefully transfer the dough onto a piece of parchment paper.
- Use a sharp blade or lame to score the top—this helps control how the bread expands in the oven.
- Lightly spray the dough with water before transferring it to the Dutch oven.
Baking
- Place the dough into the hot Dutch oven, cover with the lid, and bake for 20 minutes.
- Remove the lid and bake for another 15-20 minutes at 450°F (232°C) until the crust is deep golden brown and crisp.
- To check for doneness, tap the bottom of the loaf—it should sound hollow.
Cooling and Enjoying
- Once baked, transfer the loaf to a wire rack and let it cool for at least 1 hour before slicing.
- This resting time allows the texture to set properly and prevents steam from making the bread gummy.
- Slice, enjoy, and savor the melty, cheesy pockets in every bite!
Notes
- Preheat your oven well in advance to ensure a strong rise and a crispy, golden crust of the sourdough cheese bread. A properly heated oven makes all the difference in achieving that perfect bake.
- Make sure your sourdough starter is lively and active before using it. A weak starter can result in dense bread, so feed it about 4-6 hours before mixing your dough for the best results.
- Choose the right cheese—cheddar, mozzarella, and Gouda melt beautifully, while oily cheeses may make the dough greasy.
- Experiment with cheese varieties if you don’t have cheddar. Monterey Jack, Swiss, or even a mix of Parmesan and mozzarella can create a unique flavor twist.
- If bread flour isn’t available, all-purpose flour can be used, though the texture may be slightly softer. For added nutrition, replace up to 20% of the flour with whole wheat.
- Customize your loaf! Add-ins like garlic powder, dried herbs, or even cooked bacon bits can elevate the flavor profile of your cheesy sourdough.
- Prevent cheese from leaking out by distributing it evenly within the dough and sealing it well. Chilling the shaped loaf for 20 minutes before baking can also help the cheese stay in place.
- *If you prefer larger, more distinct cheese pockets in your baked loaf, you can incorporate the cheese during shaping instead. To do this, roll or stretch your dough out into a thin rectangle, then evenly sprinkle the cheese across the surface. Fold the dough over itself, enclosing the cheese, and then shape it into a round boule or oval batard. This method creates pockets of gooey, melty cheese throughout the bread, giving every slice a rich, cheesy bite.
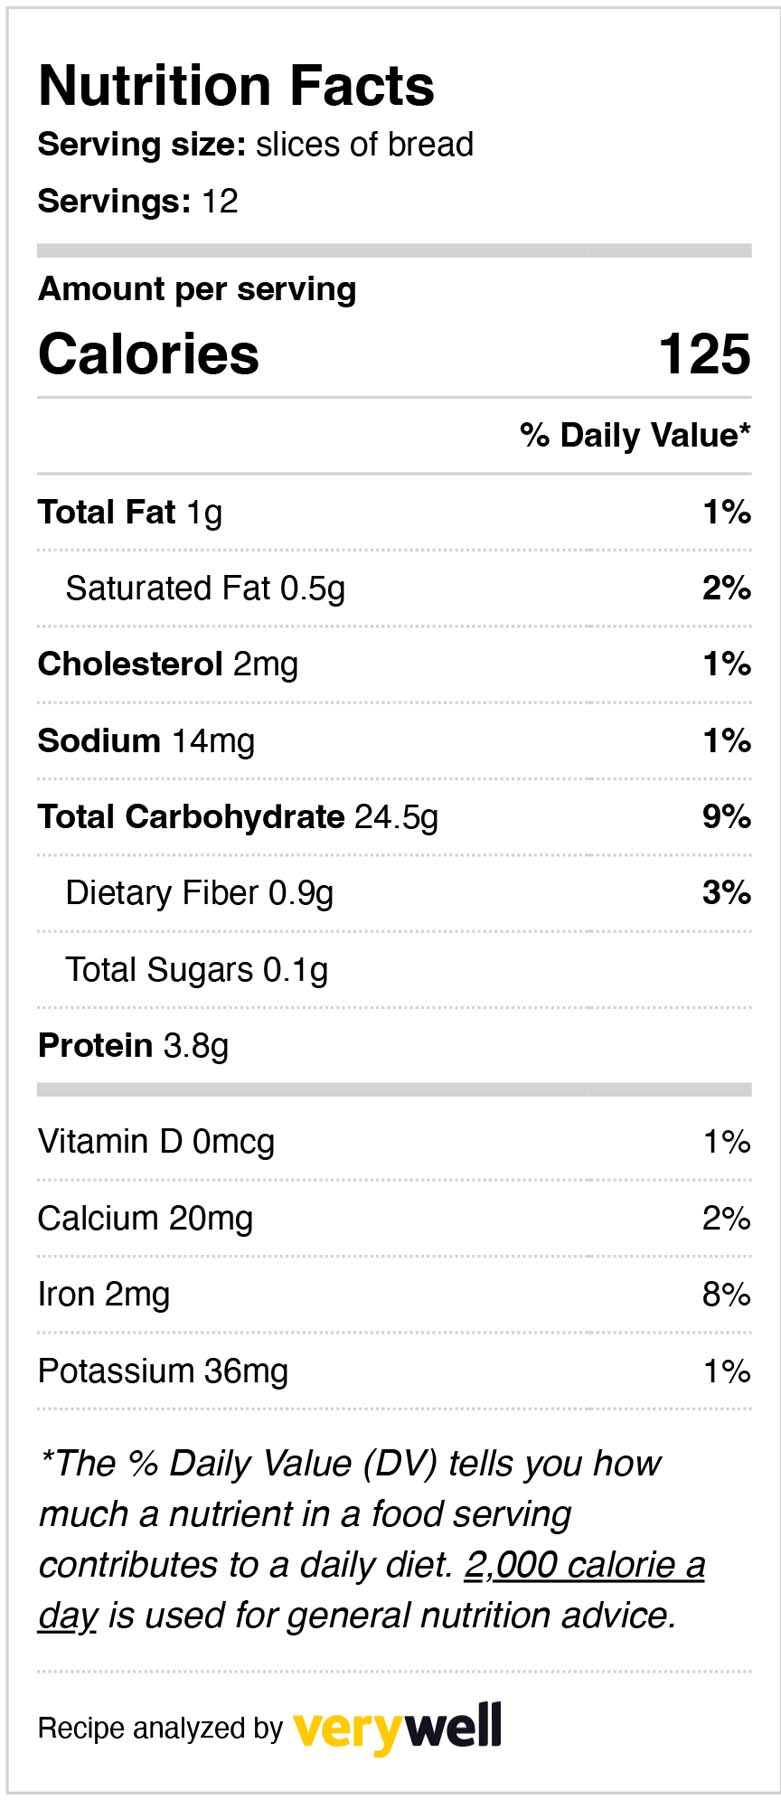
📋Nutrition Facts


Dhaniya
I love how versatile this bread can be—perfect for sandwiches, as a side dish, or just enjoyed on its own.