Nothing says cozy fall baking like a warm, golden loaf of pumpkin sourdough bread—a perfect blend of tangy sourdough and subtly sweet pumpkin. This pumpkin sourdough recipe not only adds a seasonal twist to traditional sourdough but also enhances the bread’s softness, color, and flavor. This recipe also incorporates pumpkin spice flavors, giving sourdough a sweet aromatic twist.

Jump to:
Whether you’re a seasoned sourdough baker or just starting, this easy homemade pumpkin sourdough bread will fill your kitchen with irresistible aromas and deliver a perfect crispy crust with a tender, flavorful crumb.
This Pumpkin Sourdough Bread is a naturally fermented artisan bread made with pumpkin puree, active sourdough starter, pumpkin pie spice, honey, and bread flour.
Do not confuse it with pumpkin bread recipe or a sourdough pumpkin bread- both of them are quick bread and more of a dessert recipes baked in a loaf pan. Here we are making a sourdough artisan bread packed with the flavor of pumpkin and warm spices!
🧐Why try this recipe?
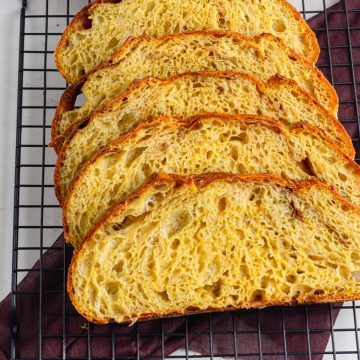
- This bread boasts a beautifully golden-orange hue, a soft and moist crumb, and a crisp, crackly crust.
- It is packed with swirls of warm pumpkin spice and ground cinnamon. You can call it pumpkin cinnamon sourdough bread.
- Addition of pumpkin enhances the flavor and enriches the dough with extra moisture and nutrients, making it softer and more tender than classic sourdough.
🧂 Ingredient Notes & Substitutions

- Flour Choices: While bread flour provides the best structure and chewiness, you can substitute all-purpose flour for a slightly softer texture. If you want a heartier loaf, consider replacing up to 20% of the flour with whole wheat flour, but be prepared for a denser crumb.
- Sourdough Starter: You do not need any sort of pumpkin sourdough starter. A 100% hydration standard ripe sourdough starter works best. If you don't have an active starter, you can try using sourdough discard, but the rise and flavor development will be different.
- Salt Considerations: Fine sea salt is ideal for even distribution, but you can use kosher salt (slightly increase the amount) or Himalayan salt for a mineral boost. Avoid iodized table salt, as it can inhibit fermentation.
- Pumpkin Purée: Canned pumpkin puree is the most convenient option, but be sure to use 100% pure pumpkin without additives. Homemade pumpkin puree works just as well—just roast and blend pumpkin flesh until smooth. If your puree is particularly watery, strain it slightly to maintain the right dough consistency. I like cooking it with honey and pumpkin spice to lose moisture and enhance the flavor.
- Sweeteners: Honey adds a mild sweetness and enhances browning, but you can swap it with maple syrup for a more robust fall flavor or agave syrup for a vegan option. Brown sugar can be replaced with coconut sugar or white sugar, but the flavor profile may change slightly.
- Spices & Flavoring: Pumpkin spice and cinnamon give this bread a warm, cozy aroma, but you can customize it with nutmeg, allspice, cardamom, or cloves for a unique twist. If you prefer a plain pumpkin sourdough, simply omit the spices.

🎃How I Make Pumpkin Puree at Home
Making your own pumpkin puree at home is simple and adds a fresh, rich flavor to your sourdough bread. Unlike canned versions, homemade puree often has a slightly higher water content, so be mindful of hydration adjustments when using it in your dough.
Steps to Make Pumpkin Puree:
- Choose the Right Pumpkin – Opt for sugar pumpkins or pie pumpkins rather than large carving pumpkins, as they have a sweeter, smoother flesh.
- Prepare the Pumpkin – Wash the pumpkin thoroughly, then cut it in half and scoop out the seeds and stringy fibers. Save the seeds for roasting!
- Roast Until Tender – Place the pumpkin halves cut-side down on a baking sheet lined with parchment paper. Roast at 375°F (190°C) for 40–50 minutes or until the flesh is soft and easily pierced with a fork.
- Scoop and Blend – Once cooled, scoop out the flesh and blend it in a food processor or mash it with a fork until smooth. If the puree seems too watery, strain it through a cheesecloth or let it sit in a fine-mesh sieve for a few minutes to remove excess moisture. I Like to manually squeeze out any excess moisture left.
- Store for Later – Use the puree immediately or store it in an airtight container in the refrigerator for up to 5 days. For longer storage, freeze it in portions for up to 3 months.
This homemade puree adds a rich, natural sweetness to your healthy pumpkin sourdough bread, making your fall baking even more flavorful! 🍂🎃
👩🏽🍳 Equipment Needed for pumpkin sourdough bread recipe
To achieve the best results for your pumpkin sourdough bread recipe, having the right tools can make the process smoother and more efficient. Here’s what you’ll need:
- Mixing Bowls: A set of large mixing bowls is essential for combining ingredients and allowing the dough to rest during fermentation. Glass or stainless steel works best.
- Kitchen Scale: Precision is key in sourdough baking, and a digital kitchen scale ensures accurate measurements, especially for flour, water, and sourdough starter.
- Dutch Oven: A cast iron Dutch oven with a lid helps trap steam, creating the perfect environment for a crispy, golden crust. If you don’t have one, a baking stone with a steam tray can work as an alternative.
- Banneton (Proofing Basket): A banneton basket helps shape the dough during the final rise while promoting airflow for a beautifully textured crust. If you don’t have one, a bowl lined with a well-floured kitchen towel is a great substitute.
- Scoring Knife (Lame): A bread lame or sharp razor blade allows you to score the dough before baking, controlling its expansion and giving the loaf an artisan-style look.
- Bench Scraper: Helps with handling and shaping the sticky dough, making it easier to work with.
- Silicone Spatula or Dough Whisk: Useful for mixing ingredients without overworking the dough.
- Parchment Paper: Makes transferring the dough into the Dutch oven easier and prevents sticking.
🔪 Step By step Instructions
Preparing the Dough
In a large mixing bowl, combine your active sourdough starter, pumpkin puree, and honey with the measured quantity of water. Stir everything together until well mixed. In another bowl measure bread flour and and add salt. Combine well using a whisk. Then gradually add the bread flour to the wet ingredients. Use a dough wisk or the back of a wooden ladle to combine the dough. Continue mixing until no dry patches of flour remain. The dough will feel sticky and shaggy at this stage—that's completely normal!
Use a silicone spatula or your wet hands to bring it together into a rough mass. Clean the bowl sides using a plastic bench scraper or by running wet fingers around the bowl sides. Cover the bowl with a damp towel and let it rest for a few minutes to allow the ingredients to start blending naturally.

Autolyse
Once the dough has come together, let it rest for about 30–45 minutes. This resting period, known as the autolyse phase, allows the flour to fully absorb the moisture and begin gluten development, making the dough easier to handle later. You don’t need to do anything at this stage—just let time do its magic! You’ll notice the dough becoming softer and slightly more elastic by the end of this rest.
Stretch and Folds

Instead of kneading, you’ll develop strength in the dough through a series of stretch and folds. Every 30 minutes, perform a stretch and fold by grabbing one side of the dough, stretching it upward, and folding it over itself. Rotate the bowl and repeat this process on all four sides. Do this about 3–4 times over the next 2 hours. Each fold helps build structure, making the dough more elastic and airier. By the final fold, you should notice it becoming smoother and stronger.
Bulk Fermentation
Cover the bowl with a plastic wrap or a kitchen towel, and let the dough ferment at room temperature for about 4–6 hours, depending on the warmth of your kitchen. You’re looking for the dough to become puffy, airy, and increase in size by about 50%—not necessarily double. If your kitchen is cooler, fermentation will take longer, so be patient and watch for signs of readiness rather than relying strictly on time.
Shaping the Dough

Once bulk fermentation is complete, gently turn the dough out onto a lightly floured surface. In a small bowl, mix together brown sugar, ground cinnamon, and pumpkin spice.
As you pre shape the dough into a boule (round shape) sprinkle a light layer of the sugar-spice mix onto the dough before making each fold. This ensures beautiful pumpkin-spiced swirls inside the bread. Fold the edges toward the center, flip the dough over, and use your hands to create surface tension by tucking it under itself. Be gentle—avoid pressing too hard so you don’t deflate those lovely air pockets!
Now, cover it and let it rest on the counter for 5 minutes. Then flip and do final shaping. I shaped it into a batard. You can also shape it into a pumpkin shaped sourdough bread by shaping it into a round boule and tying threads around it to give an effect of pumpkin grooves.
Final Proof
For the final proof, place the shaped dough into a banneton (proofing basket) lined with a floured towel, seam-side up. You have two options:
- If you want to bake the same day: Room Temperature Proof: Let the dough sit for 1–2 hours until slightly puffy but still holding shape.
- For next day baking: Overnight Cold Proof: Cover and refrigerate the dough for 8–12 hours. This slow fermentation enhances flavor and makes scoring easier before baking.
Scoring
When ready to bake, carefully turn the dough onto a piece of parchment paper. Using a bread lame (sharp blade), score the top with a design of your choice. A simple single slash allows for controlled expansion, while decorative patterns add an artisan touch. Choose what you like.

Baking
Preheat your oven to 475°F (245°C) with a Dutch oven inside for at least 30 minutes to ensure it’s thoroughly heated. Carefully place the dough (on parchment paper) into the hot Dutch oven, cover with the lid, and bake for 20 minutes.
Then, remove the lid, reduce the oven temperature to 445°F (230°C), and continue baking for another 20 minutes until the crust turns a deep golden brown and crisp. Once baked, transfer the loaf to a wire rack and let it cool completely before slicing—this allows the crumb to set properly and prevents gumminess.
💭Tips for Success
- Hydration Adjustments
The moisture content of pumpkin puree can vary, affecting the dough's hydration. If your dough feels too sticky and difficult to handle, reduce the added water slightly. On the other hand, if it feels too dry or stiff, incorporate small amounts of water until it reaches a soft, pliable consistency. Adjustments may be needed based on whether you're using homemade or canned pumpkin puree, as homemade tends to be waterier.
- Flavor Variations
Enhance the warm, spiced flavors of your pumpkin sourdough by adding ingredients like extra cinnamon, nutmeg, ginger, or cloves for a bolder taste. For texture and richness, mix in chopped pecans, walnuts, or sunflower seeds. Dried fruits like raisins, cranberries, or chopped dates can add natural sweetness, while a sprinkle of pumpkin seeds on top gives a delightful crunch. For a more indulgent twist, try folding in chocolate chips!

🫙Storage Recommendations
To keep your pumpkin spice sourdough bread fresh, store it in a linen bread bag, a paper bag, or wrapped in beeswax wrap to allow airflow while preventing it from drying out.
Avoid plastic bags, as they trap moisture and can make the crust soggy. For longer storage, slice the bread and freeze it in an airtight container, then toast slices as needed. If your loaf starts to go stale, repurpose it into French toast, croutons, or bread pudding!
🍽 Serving Suggestions
Now, enjoy your beautifully baked, sweet and aromatic homemade pumpkin sourdough bread in creative ways! Spread it with maple butter or cinnamon honey, use it to make decadent pumpkin spice French toast, or transform it into a warm, spiced bread pudding. For a cozy fall treat, try it as the base for a sourdough pumpkin trifle or toasted with a drizzle of salted caramel and a scoop of vanilla ice cream. However you enjoy it, this bread is perfect for indulging in comforting, sweet recipes!

🔗More sourdough Bread recipes
- Blueberry sourdough
- Sourdough Croissants
- Sourdough Breadsticks
- Rye sourdough Bread Recipe
- Easy Sourdough Challah
- Sourdough Bagels Recipe
- How to make all-purpose Flour Sourdough bread
Baking pumpkin sourdough bread is a perfect way to embrace fall sourdough baking, filling your kitchen with warm spices and the comforting aroma of homemade bread. This sourdough bread is not dominantly sweet in taste, but has sweet undertones from the pumpkin and has the warm aroma from the spices.
If you’ve never tried baking with pumpkin before, this is your sign to start! Whether you follow this recipe as is or add your own creative twists—fall is the perfect time to experiment.
I’d love to hear about your baking journey! Share your experiences, tips, or variations in the comments. Let’s celebrate the cozy magic of fall sourdough baking together. 🍂🍞
Pumpkin sourdough
Ingredients
- 350 g Bread flour (about 2 ¾ cups)
- 70 g Ripe sourdough starter (about ¼ cup)
- 6 g salt (1 tsp)
- 125 g Pumpkin Puree (½ cup)
- 7 g Honey (1 tsp)
- 12 g brown sugar (1 Tbsp)
- 1 g pumpkin spice ( ½ tsp)
- 1 g ground cinnamon (½ tsp)
Instructions
Preparing the Dough
- In a large bowl, mix active sourdough starter, pumpkin puree, honey, and water until well combined.
- In a separate bowl, whisk together bread flour and salt.
- Gradually add dry ingredients to the wet mixture, stirring with a dough whisk or the back of a wooden ladle.
- Mix until no dry flour patches remain; the dough will be sticky and shaggy.
- Use a silicone spatula or wet hands to bring the dough together into a rough mass.
- Clean the bowl sides with a plastic bench scraper or wet fingers.
- Cover with a damp towel and let it rest for a few minutes.
Autolyse
- Allow the dough to rest for 30–45 minutes.
- This phase helps the flour absorb moisture and develop gluten naturally.
- The dough will become softer and more elastic by the end of the rest.
Stretch and Folds
- Strengthen the dough using a series of stretch and folds instead of kneading.
- Every 30 minutes, stretch one side of the dough upward and fold it over itself.
- Rotate the bowl and repeat on all four sides.
- Perform 3–4 rounds of stretch and folds over the next 2 hours.
- The dough will become smoother and more elastic after the final fold.
Bulk Fermentation
- Cover the bowl and let the dough ferment at room temperature for 4–6 hours.
- The dough should increase in size by about 50% and become puffy and airy.
- If your kitchen is cooler, fermentation will take longer—watch for visual cues rather than time.
Shaping the Dough
- Gently turn the dough onto a lightly floured surface.
- Mix brown sugar, cinnamon, and pumpkin spice in a small bowl.
- Pre shape the dough into a boule (round) or batard (oval), sprinkling the sugar-spice mix as you fold.
- Fold edges toward the center, flip, and create surface tension by tucking the dough under itself.
- Handle gently to maintain air pockets.
- Now, cover it and let it rest on the counter for 5 minutes.
- Once it has rested, flip the dough and conduct a final shaping.
Final Proof
- Place the shaped dough into a floured towel-lined banneton, seam-side up.
- Choose proofing method:
- o Same-day baking: Proof at room temperature for 1–2 hours until slightly puffy.
- o Next-day baking: Cover and refrigerate for 8–12 hours for enhanced flavor and easier scoring.
Scoring
- When ready to bake, turn the dough onto parchment paper.
- Use a bread lame to score the surface—either a single slash or a decorative pattern.
Baking
- Preheat oven to 475°F (245°C) with a Dutch oven inside for at least 45 minutes.
- Carefully place dough with parchment paper into the hot Dutch oven, cover with the lid, and bake for 20 minutes.
- Remove the lid, reduce temperature to 445°F (230°C), and bake for another 20-22 minutes.
- Once golden brown and crisp, transfer to a wire rack and let it cool completely before slicing to set the crumb.
Notes
- Hydration Adjustments – Pumpkin puree varies in moisture content, so tweak the water amount for the right dough consistency.
- Flavor Variations – Add spices, nuts, dried fruits, or even chocolate chips for a unique twist.
- Storage Recommendations – Keep it fresh in a breathable wrap or freeze slices for later enjoyment.
- Give this recipe a try and make it your own! I’d love to hear how your fall sourdough baking turns out—share your experiences, variations, or favorite ways to enjoy this autumn-inspired loaf.
📋Nutrition Facts


Leave a Reply