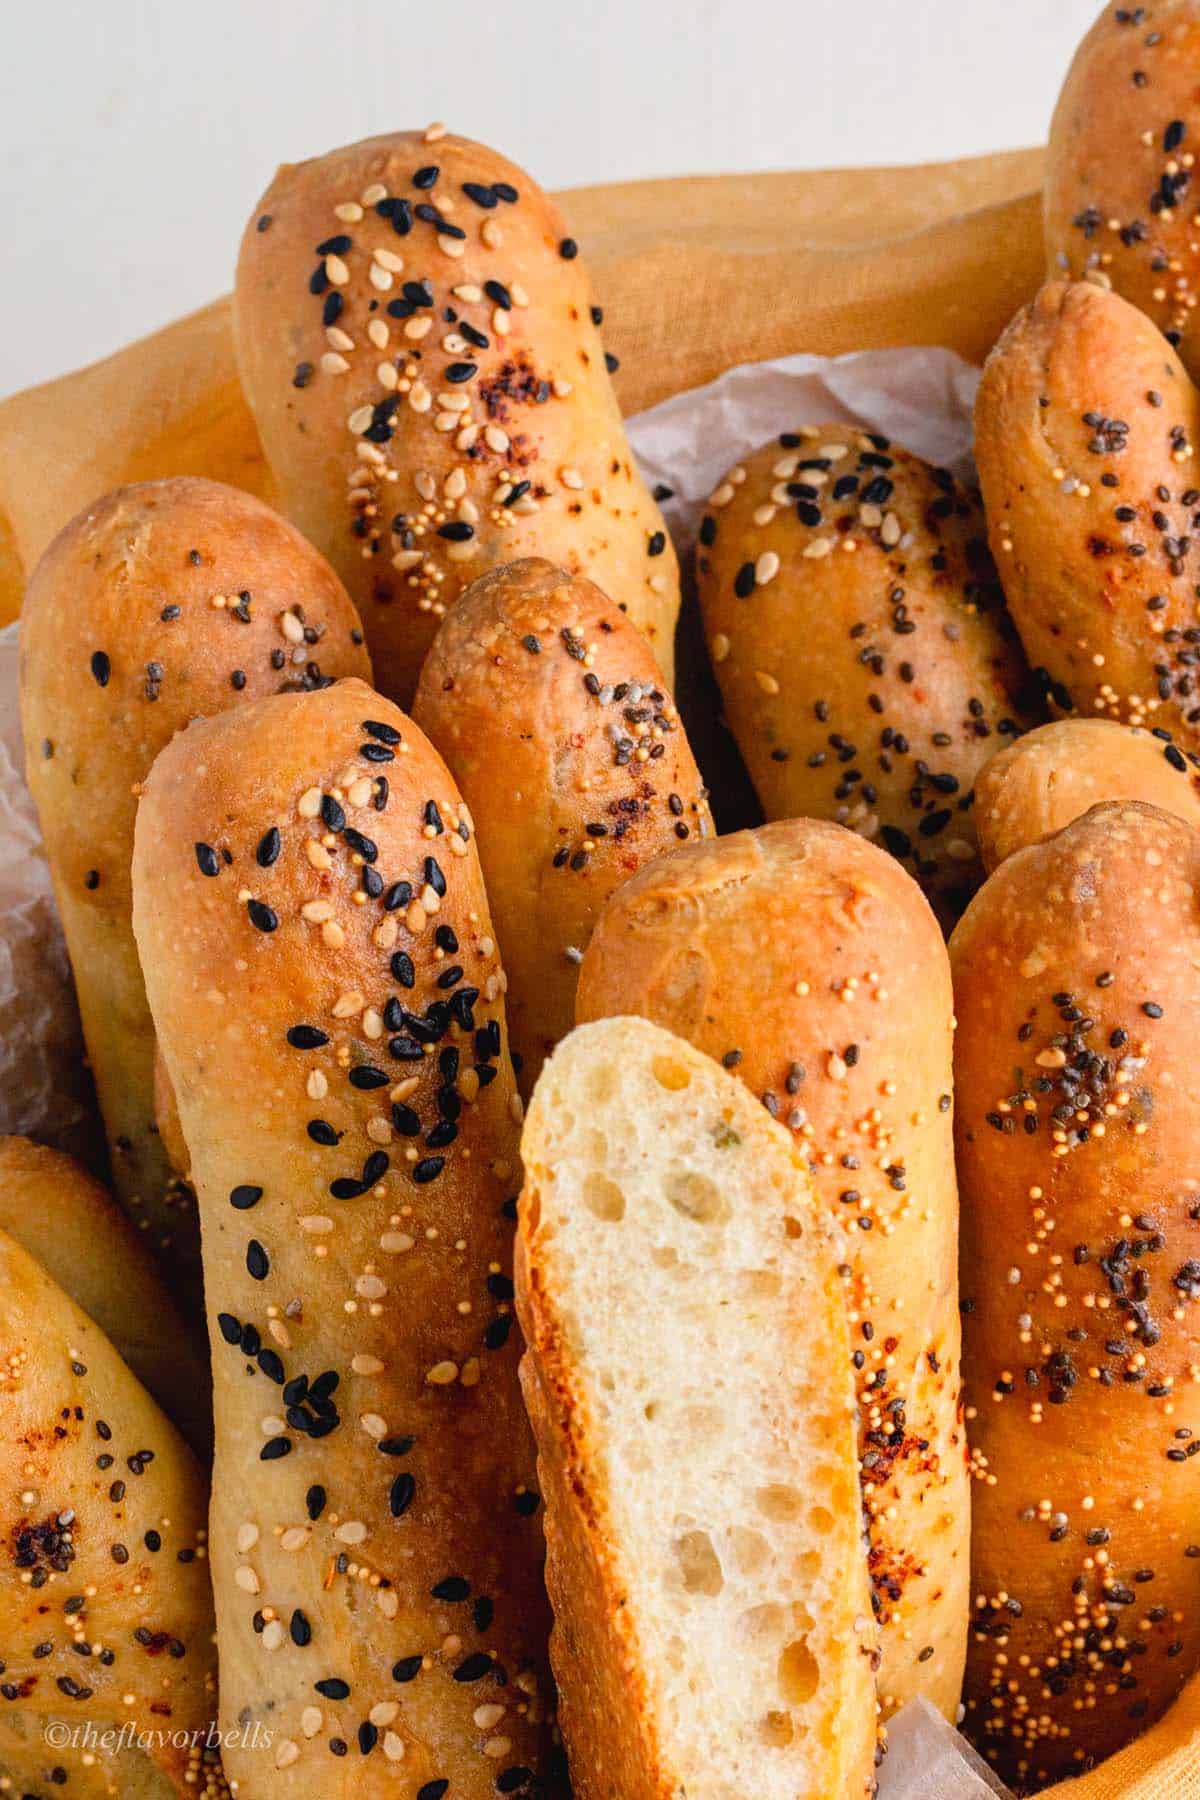
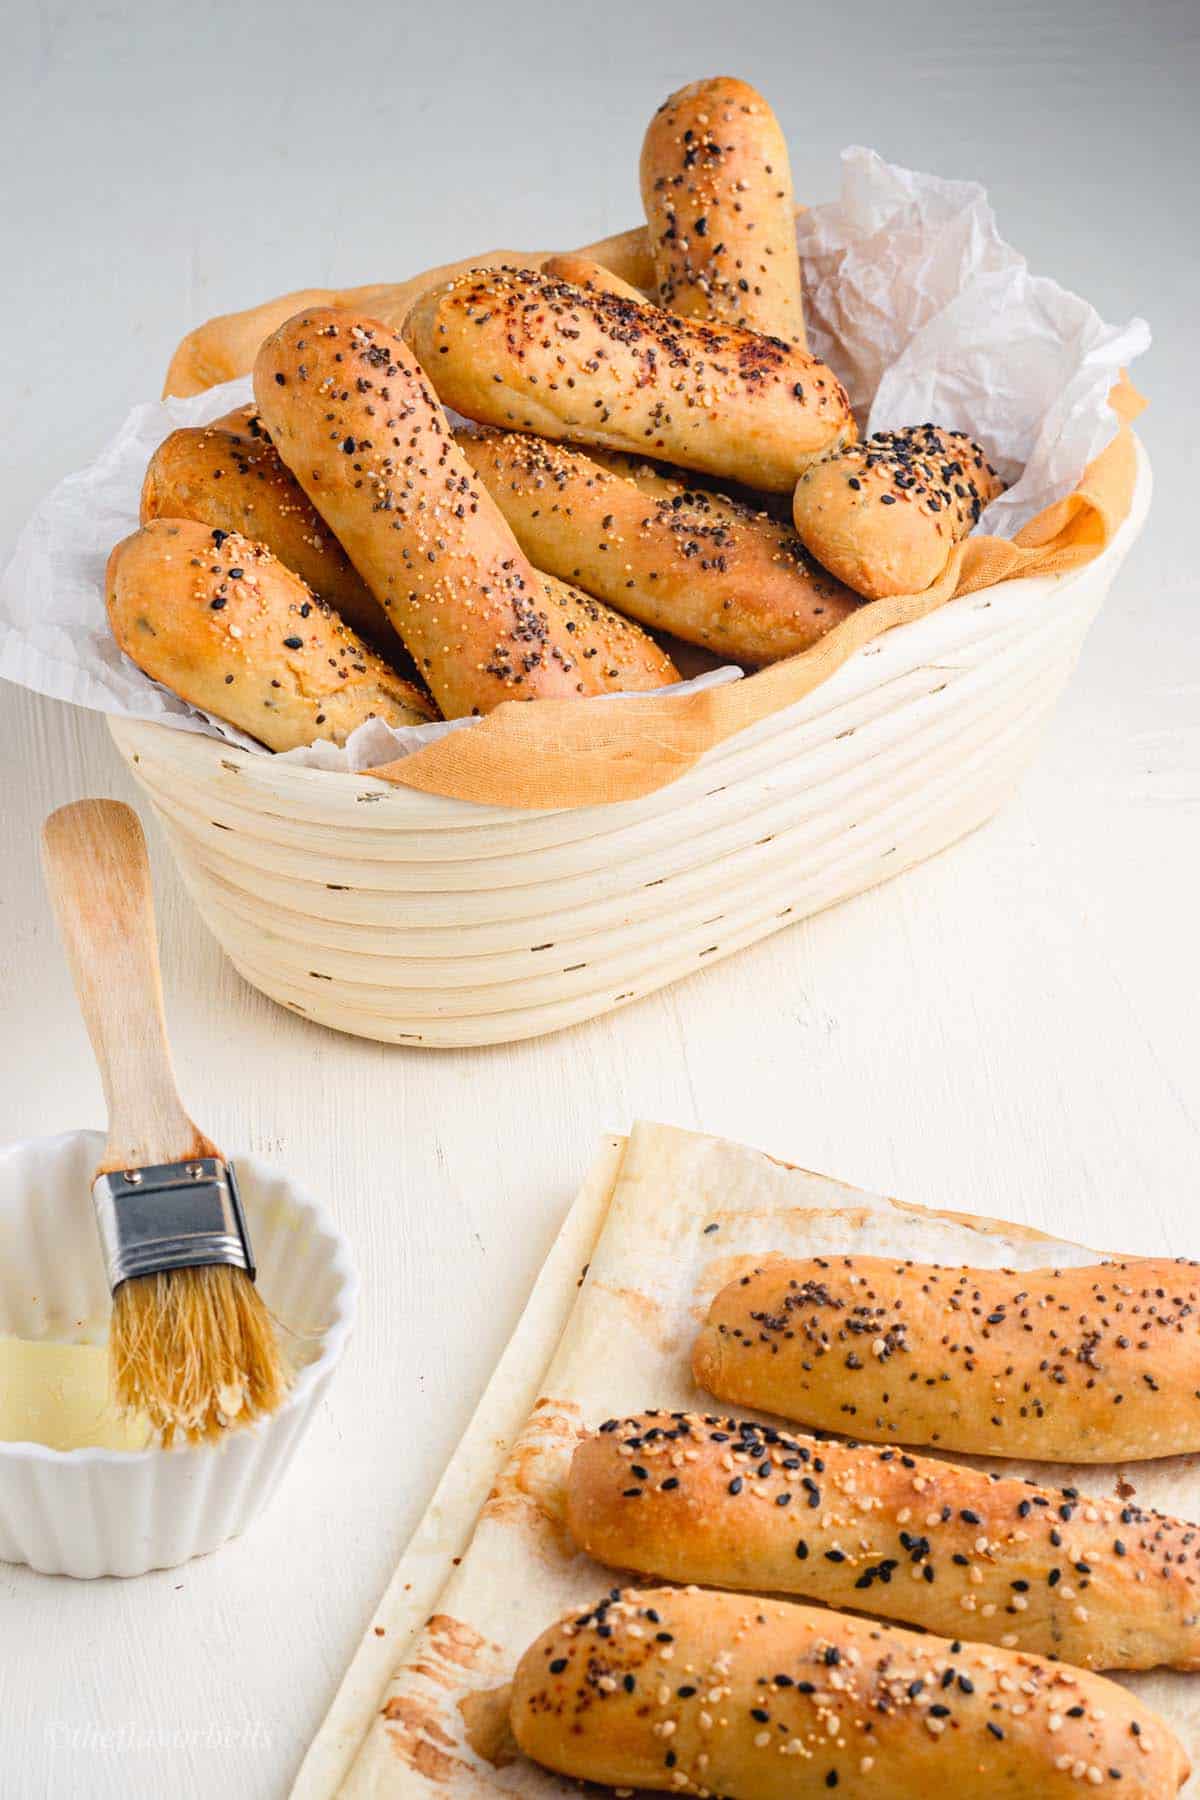
These garlic and Italian herb-flavored sourdough breadsticks have a super flavorful and tender crumb. Also, these are topped with a mix of seeds that jazz up the crust. They are super easy to make and go great as a side dish.

After the sourdough baguettes and ciabatta bread let us make a very simple sourdough recipe using the ripe sourdough starter.
Jump to:
- 🥖 What’s unique about these sourdough breadsticks
- 🔪 Equipment’s required
- 🍶 Ingredients for making sourdough breadsticks
- 🍞 Procedure to make sourdough breadsticks
- 🫙Storage Instructions
- 💭Pro Tips
- 🍽 More sourdough recipes
- 📝 Recipe card: Sourdough Breadsticks
- Sourdough Breadsticks | Garlic and herb flavored
- 📋 Nutrition Facts
🥖 What’s unique about these sourdough breadsticks
- This is an easy homemade soft sourdough breadsticks recipe but you can also convert it into a sourdough discard breadstick. (Refer to recipe notes)
- The perfect flavor from the long fermentation and the addition of garlic powder and dried herbs in the dough.
- The crumb is super soft and light.
- The crust is topped with crunchy and healthy seeds.
- These sourdough breadsticks are vegan.
- Highly customizable, be it in terms of flavoring the crumbs, topping the crust, or the texture of the crust. You can bake these as soft sourdough breadsticks or crispy.
🔪 Equipment’s required
To make these sourdough breadsticks you will need these kitchen tools and equipment:
- A stand mixer
- A large bowl
- Bench scraper
- Parchment paper
- Baking sheet
- Pastry brush
🍶 Ingredients for making sourdough breadsticks
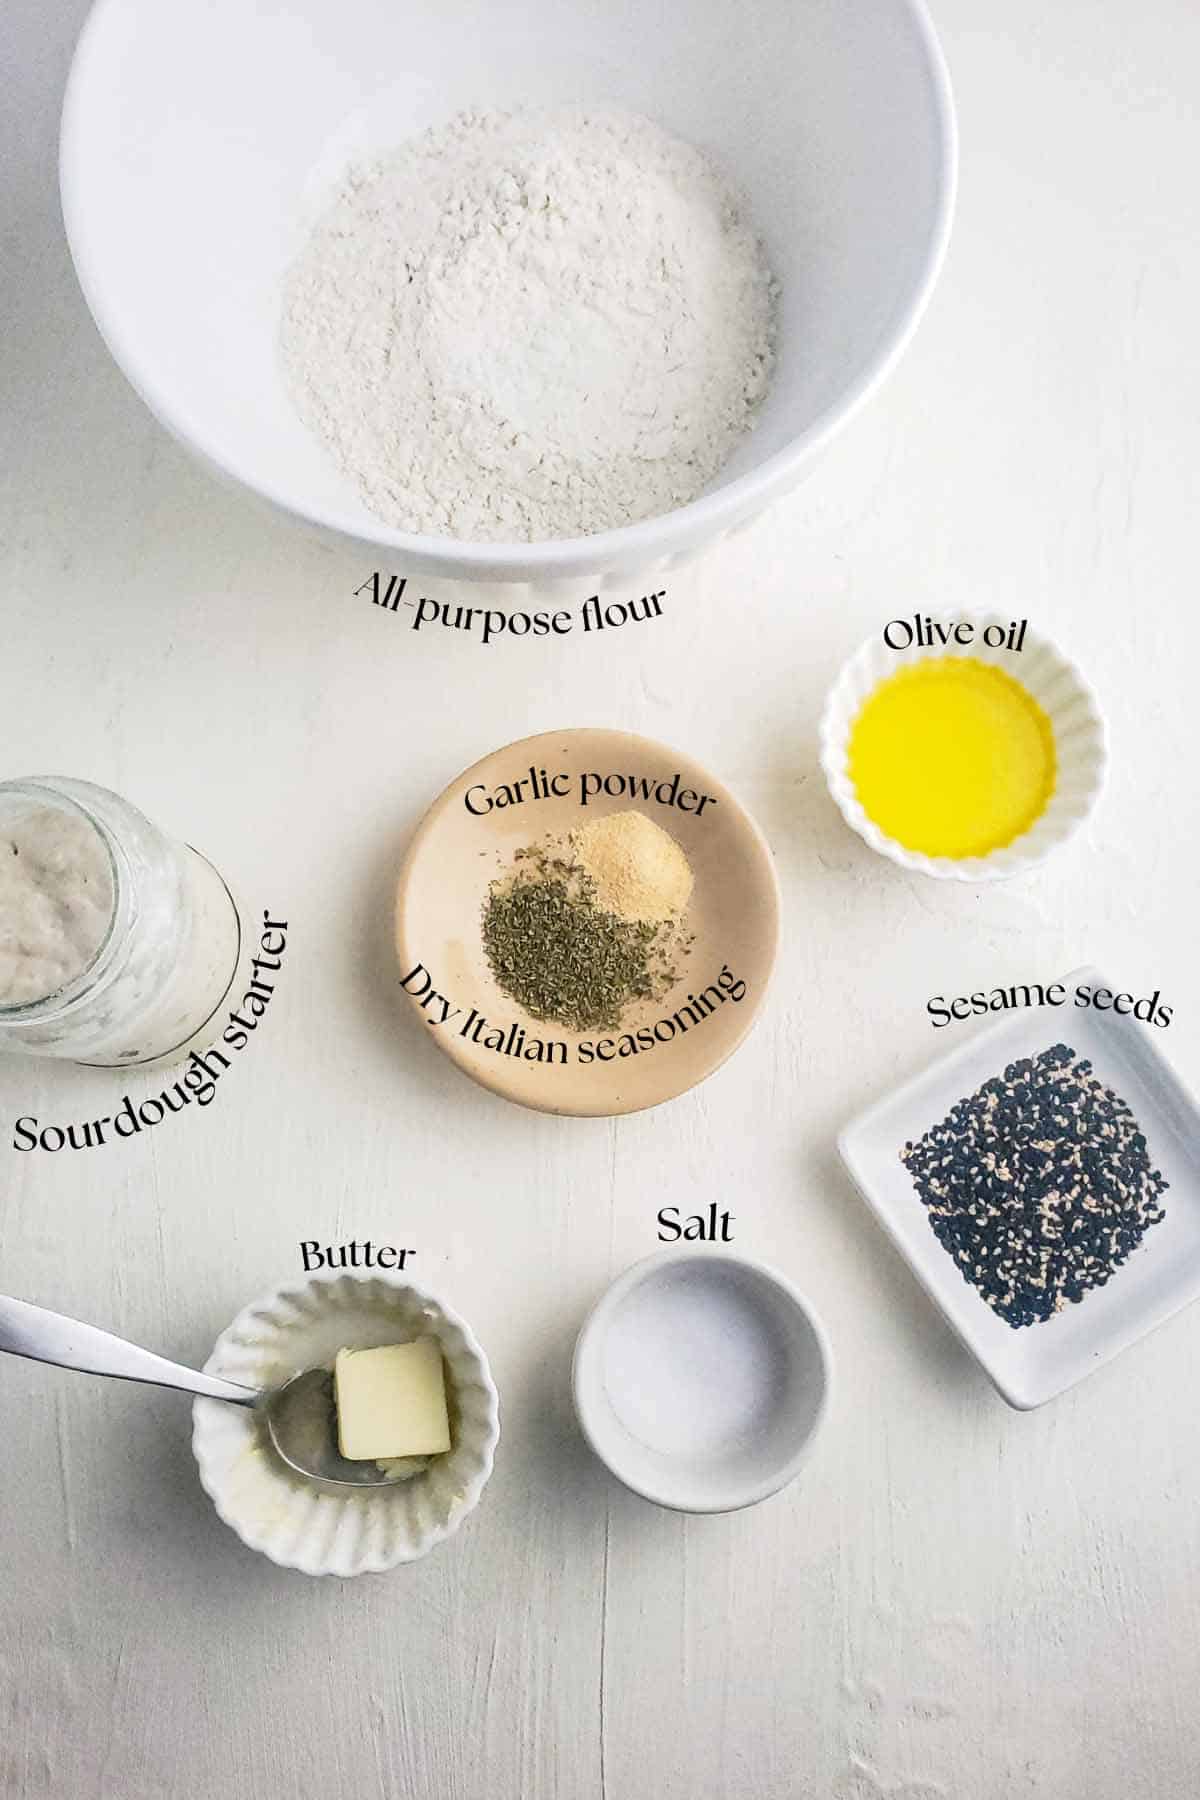
All-purpose flour
I have used all-purpose flour for developing this sourdough breadsticks recipe. I wanted to keep this recipe approachable. You can certainly use bread flour if you like. Also, you can easily substitute one-fourth of a cup of flour with whole wheat flour without worrying about altering the hydration.
If you intend to add more, then you might have to adjust the hydration of the dough accordingly.
Olive oil
Olive oil imparts a great flavor as well texture to the bread. It helps to keep the crumbs somewhere between tender and chewy, but they are more tender crumbs.
Olive oil just acts as a tenderizer in the breadsticks and can be replaced with any fat. You can replace olive oil with any other type of vegetable oil of your choice, or you could use butter.
Water
Use chlorine-free water to facilitate maximum wild yeast activity in the dough. You can adjust the water temperature according to your kitchen’s ambient temperature. If it is super cold in your place, use slightly warm water. The ideal water temperature should be around 80-85 oF to facilitate optimum enzymatic activity in the flour.
If you want to make rich and tender breadsticks, you can also substitute half of the water with whole milk.
Sourdough starter
The sourdough starter should be active and ripe. It simply means that the sourdough starter should have peaked its activity and is just ready to be used. I have tested this recipe with a mature starter and this is a no yeast breadsticks recipe. So, if your starter is just new, try adding some commercial yeast.
Flavorings
I have added salt, garlic powder, and dry Italian seasoning for flavoring the breadsticks. You can skip other seasonings and just go with salt if you want or add flavors of your choice. You can add garlic and parmesan cheese to make garlic parmesan sourdough breadsticks.
Or just use some garlic powder to make garlic butter sourdough breadsticks.

Toppings for breadsticks
You can use whatever toppings you like. I have used some sesame seeds ( black and white sesame seeds ), chia seeds, and poppy seeds. A few other sourdough breads sticks topping ideas:
- Everything bagel seasoning
- Garlic parmesan
- Sea salt
- Zaatar
- Sesame seeds mix, etc.
🍞 Procedure to make sourdough breadsticks
Step 1 Making the dough

Before making the dough, make sure that the sourdough starter has reached its maximum activity (peak). Then start measuring the ingredients and set aside.
In a bowl add a measured quantity of water and sourdough starter. Use a whisk to mix the sourdough starter in the water. And set the wet ingredients aside.
Then take the bowl of the stand mixer, and add all the dry ingredients, i.e. flour, salt, garlic powder, and dried herbs to it. Use a whisk to mix everything evenly. Now add the olive oil to the flour mixture and use your hands to laminate the flour with olive oil. Stop when it is fully combined. The flour should form a ball when pressed in a fist. That is when you know that it's time to add the wet ingredients.
Add the sourdough starter and water mixture to the bowl and place it on a stand mixer with a dough hook attachment.
Step 2 Kneading the dough

Start kneading in a stand mixer at speed 2 (KitchenAid). Knead for 7-8 minutes until the dough comes together. Now bump up the speed to 6 on KitchenAid. Keep kneading until the dough leaves the sides of the stand mixer bowl and becomes smooth.
The dough will not be sticky at all and separate itself from the sides of the bowl. Now remove the dough into a greased bowl.
For Kneading the sourdough breadsticks dough with hands
In a bowl combine the dry and wet ingredients. Use the back of a wooden ladle to combine them to form a dough mass. Now use your hands to mix the dough mass such that no dry patch of flour is left. Just ensure to hydrate every bit of flour. It should not take more than 2 minutes.
Now scrape the sides of the bowl with wet hands and cover the bowl with a cling wrap or a kitchen towel. Let it rest for 45 minutes. This process is called fermentolyse. This resting will initiate gluten development in the dough and makes the kneading process easy.
After the rest, remove the dough onto the flour-dusted work surface and start kneading. Then fold the dough on itself and turn it 90 degrees and gain fold on itself. Lift and turn again and fold on itself. Keep kneading like this for 8-9 minutes.
You can dust more flour if required, but do not add too much flour. Just trust the process and keep kneading. The dough would cease to be sticky and will form a smooth dough at the end of the kneading process.
Lift the dough and place it in a greased bowl.
Step 3 Proofing the breadsticks dough
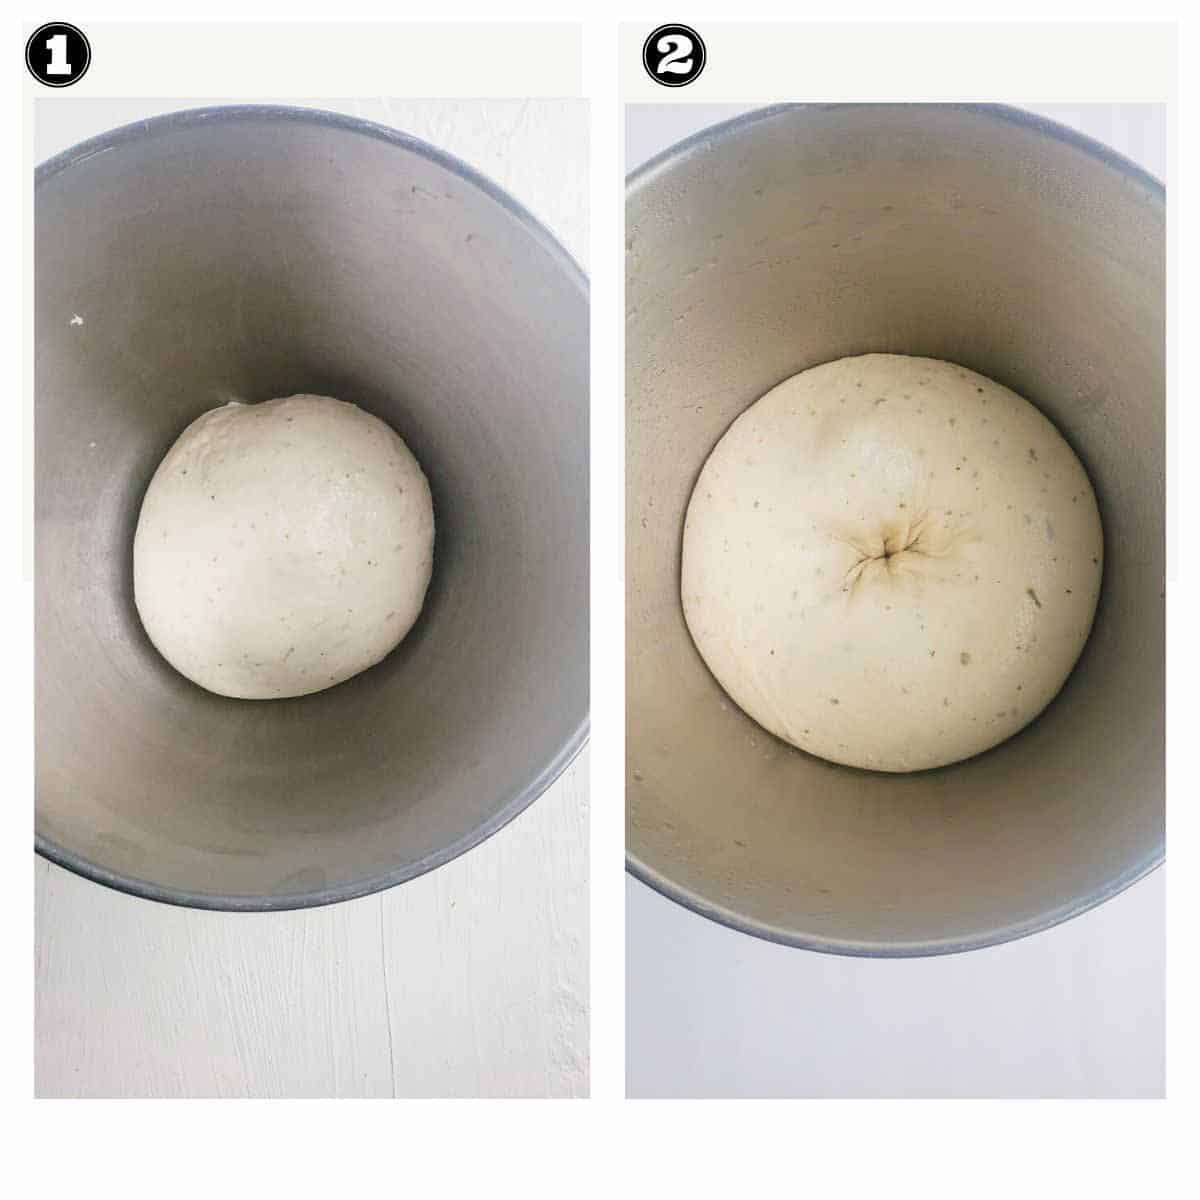
Cover the dough with a cling wrap or a kitchen towel and let it ferment until it doubles up in volume. In winter place the bowl in a warm corner of your kitchen. I like to place mine in the oven with the lights turned on. You can also use the yogurt mode on the instant pot to proof the bread sticks dough.
The exact time required for bulk fermentation will vary on the ambient temperature and vigor of the sourdough starter.
It should take anywhere between 4 to 5 hours for this stage but can take longer. So do not panic just wait until the dough doubled up.
Step 4 Shaping the sourdough breadsticks
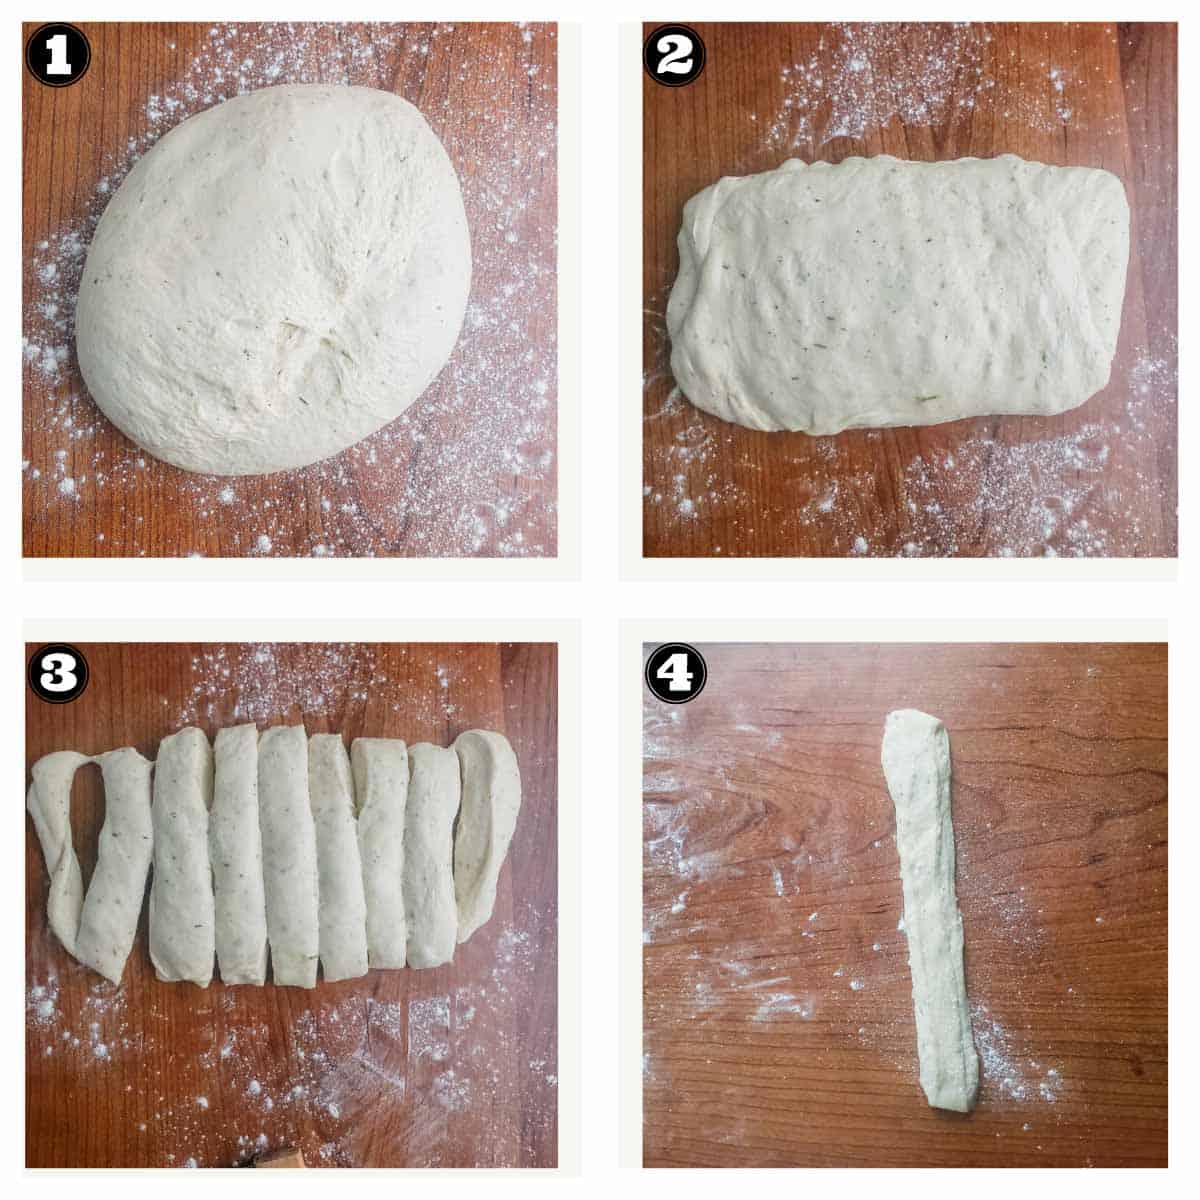
When the dough has doubled in volume it is time to shape them into breadsticks. Transfer the dough onto the floured work surface and shape it into a rectangular block of about an inch thickness.
Then use a dough scraper or a pizza cutter to divide it into 9 equal stripes of dough.
Grab a strip of dough and seal the cut edges using your fingertips. Then roll it into a thin long strip of about 12 inches. Place aside and cover with a kitchen towel while you work with the second piece of dough. Similarly, roll all the strips into a thin baguette-like shape and place them parallel to one another. Then use a bench scraper to cut them all from halfway through and make 18 bread sticks from the 9 long sticks.
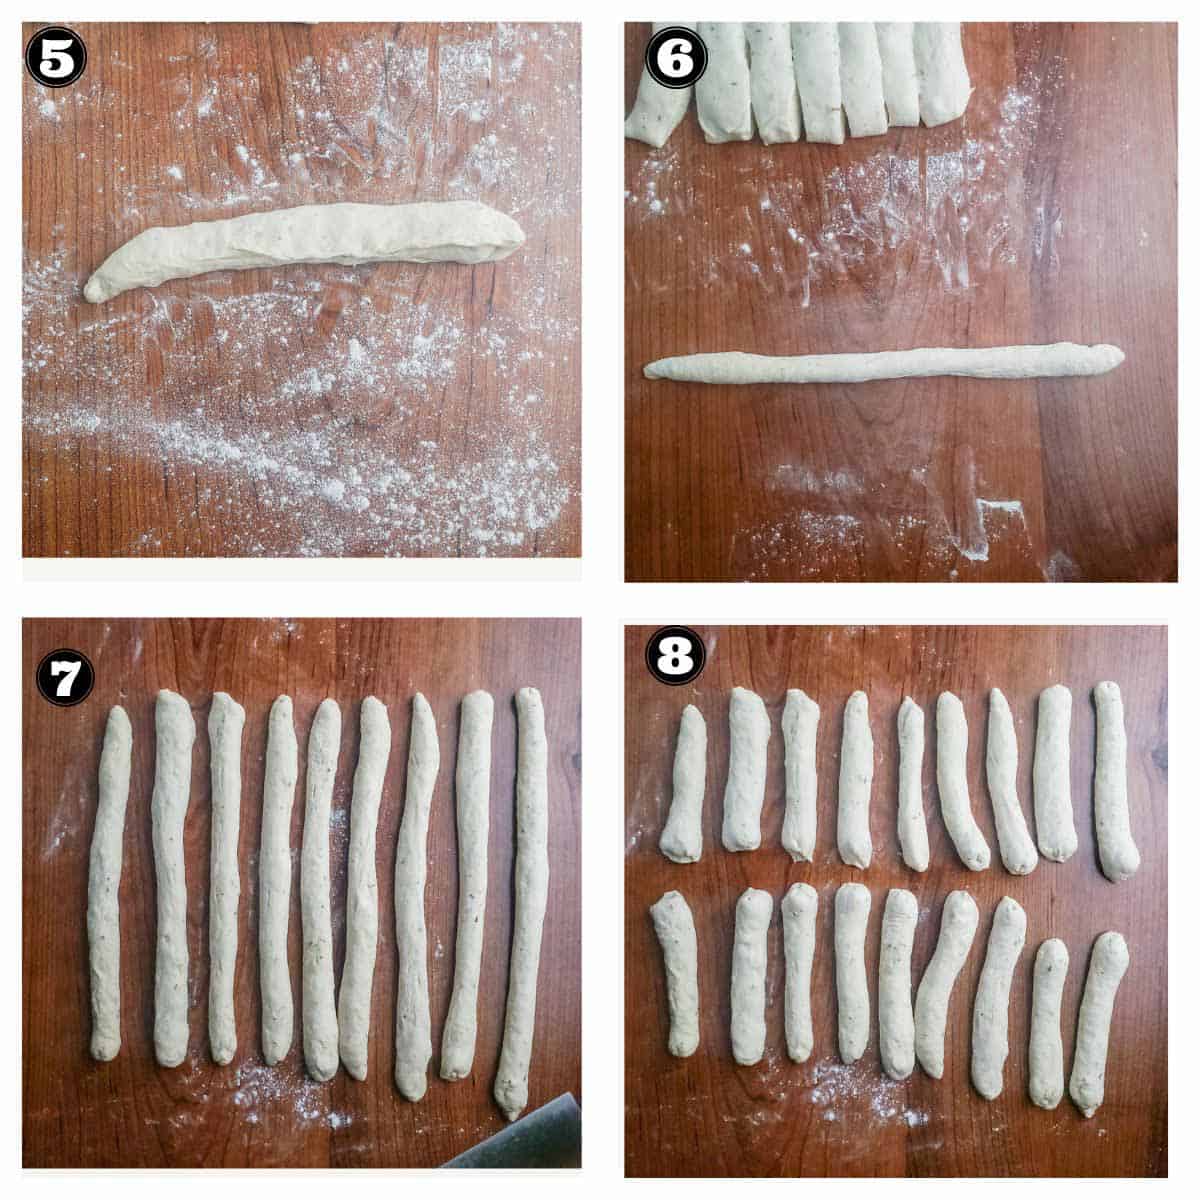
Then seal the open edges of the divided sticks and gently lift each shaped breadstick and place it on a parchment-lined baking sheet.
Step 5 Proof the breadsticks
After you have placed all the breadsticks on a parchment-lined baking sheet cover them with a kitchen towel or a tea towel and place the baking sheet in a warm corner of your kitchen.
Let the breadstick proof until they puff up a little and become fuller.
Step 6 Topping and baking the breadsticks
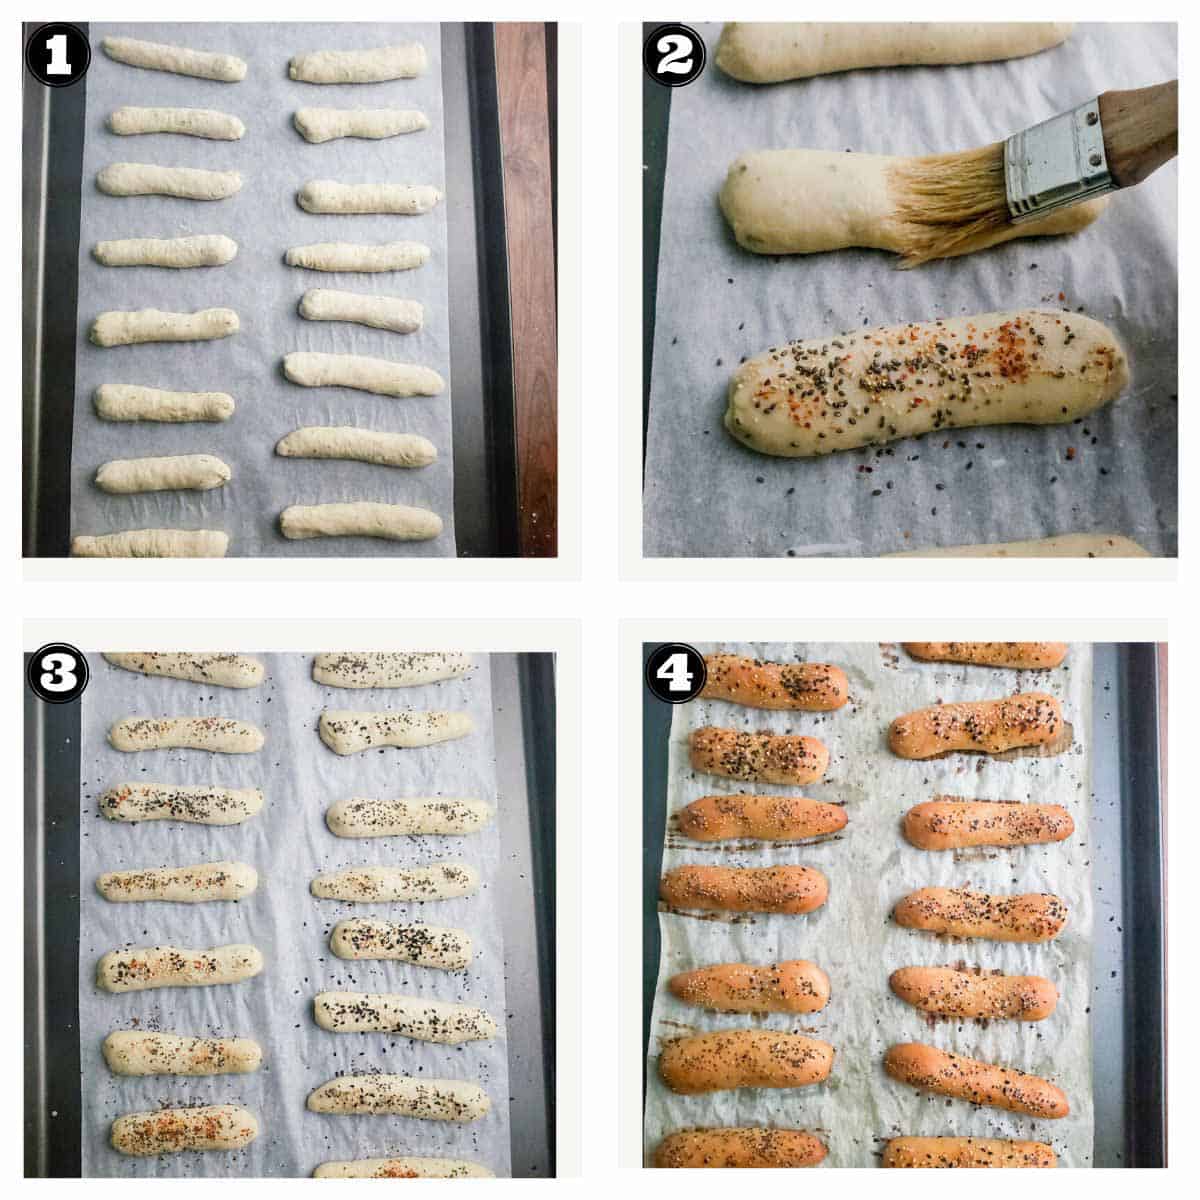
Now preheat the oven to 400 oF. Brush with a pastry brush or spray the proofed breadsticks with water and sprinkle the toppings of your choice. You can also use milk to spray on the breadsticks for a better color.
Bake the breadsticks at 400 oF for 20-22 minutes or until they turn golden. As you take the baking tray out of the oven, brush the breadsticks with melted butter to keep them soft.
Then transfer them to a cooling rack and let them cool for 15 minutes before serving.
Variations of sourdough breadsticks
There are various possible variations of sourdough bread sticks. Let us discuss a few briefly:
- Sourdough Grissini recipe: These will be thin long pencil-like dipping sticks made using the sourdough starter.
- Sourdough discard breadsticks: if you want to make sourdough breadsticks, follow the same recipe, but increase the amount of sourdough discarded to 30 percent. Also, ensure that you use to bring the refrigerated sourdough discard to room temperature and it should resume some of the activity.
- Soft and tender breadsticks: To make super soft and tender breadsticks, use butter instead of olive oil and also replace half of the water with milk.
- Variations based on the flavoring like garlic parmesan breadsticks, sesame breadsticks, sea salt sourdough breadsticks, sourdough cheese sticks, etc.

🫙Storage Instructions
The sourdough breadsticks have a longer shelf life than the commercial yeast breadsticks because they are more acidic. Hence, food-spoiling bacteria and molds do not develop that easily.
Also, it has a thicker crust that prevents them from getting dry. Homemade sourdough bread sticks can last 4-6 days at room temperature if stored properly.
It is best stored wrapped in a cotton cloth or a cotton bread bag. Place it in a cool corner of your kitchen or inside a bread box.
It is not advisable to refrigerate the bread sticks. Though you could freeze it if you baked it in bulk and want to store them for longer. Place them in a freezer-safe airtight container or freezer-safe bag, with air removed. Now warp it with a double layer of foil, mark the date and place it in the freezer.
💭Pro Tips
Keep note of the following to execute this sourdough baguette recipe to perfection.
- Always use a weighing machine to measure the ingredients for accuracy.
- Make sure that the sourdough starter is ripe and bubbly.
- Substitute one-fourth of a cup of flour with whole wheat flour without worrying about altering the hydration.
- Use chlorine-free water to facilitate maximum wild yeast activity in the dough.
- To make tender and soft breadsticks replace water with whole milk and olive oil with 3 tablespoon of unsalted butter.
- Make sure that you follow the texture dough and not the timeline. The timeline will vary depending on the ambient temperature and the vigor of the sourdough starter.
- Use 35 percent room temperature sourdough discard to make sourdough discard breadsticks.
🍽 More sourdough recipes
A few Bread recipes with sourdough starter and other ways to use sourdough starter are linked below:
- The best garlic sourdough bread recipe
- Jalapeño Cheddar sourdough: A spicy cheese sourdough bread!
- Sourdough Rolls | No-yeast quick dinner rolls using sourdough starter
- The best Sourdough doughnuts recipe with Cinnamon sugar
- Sourdough chocolate bread recipe: Easy and delicious !
- How to make sourdough hot dog buns from scratch?
- How to make the basic sourdough batard?
- Sourdough Ciabatta
Hope you will like this sourdough bread sticks recipe. Share your results and opinions in the comment section below. Also, subscribe to never miss a recipe.
Till then
Bake it Delicious!
📝 Recipe card: Sourdough Breadsticks

Sourdough Breadsticks | Garlic and herb flavored
Equipment
- A stand mixer
- A large bowl
- Bench scraper
- Parchment paper
- Baking sheet
- Pastry brush.
Ingredients
- 300 g all-purpose flour (slightly less than 2 ½ cups)
- 25 g olive oil about 2 tbsp
- 200 g water ¾ cup + 1 tbsp
- 60 g sourdough starter
- 9 g salt 1 ½ tsp
- 1 teaspoon Garlic powder
- 1 teaspoon Italian seasoning
- 3 tablespoon of toppings of your choice (optional)
Instructions
Step 1 Making the dough
- Before making the dough, ensure that the sourdough starter has reached its maximum activity (peak).
- Then start measuring the ingredients and set aside.
- In a bowl add a measured quantity of water and sourdough starter. Use a whisk to mix the sourdough starter in the water. Set aside.
- Then take the bowl of the stand mixer, and add all the dry ingredients, i.e. flour, salt, garlic powder, and dried herbs to it. Use a whisk to mix everything evenly.
- Now add the olive oil to the flour mixture and use your hands to laminate the flour with olive oil. Stop when it is fully combined. The flour should form a ball when pressed in a fist. That is when you know that it's time to add the wet ingredients.
- Add the sourdough starter and water mixture to the bowl and place it on a stand mixer with a dough hook attachment.
Step 2 Kneading the dough
- Start kneading in a stand mixer at speed 2 (KitchenAid).
- Knead for 7-8 minutes until the dough comes together.
- Now bump up the speed to 6 on KitchenAid. Keep kneading until the dough leaves the sides of the stand mixer bowl and becomes smooth. The dough will not be sticky at all and separate itself from the sides of the bowl.
- Now remove the dough into a greased bowl.
Step 3 Proofing the breadsticks dough
- Cover the dough with a cling wrap or a kitchen towel and let it ferment until it doubles up in volume. In winter place the bowl in a warm corner of your kitchen. I like to place mine in the oven with the lights turned on. You can also use the yogurt mode on instant pot to proof the bread sticks dough.
- The exact time required for bulk fermentation will vary on the ambient temperature and vigor of the sourdough starter.
- It should take anywhere between 4 to 5 hours for this stage but can take longer. So just wait until the dough doubles up.
Step 4 Shaping the breadsticks
- When the dough has doubled in volume transfer it onto the floured work surface and shape it into a rectangular block of about an inch thickness.
- Then use a dough scraper or a pizza cutter to divide it into 9 equal stripes of dough.
- Grab a strip of dough and seal the cut edges using your fingertips.
- Then roll it into a thin long strip of about 12 inches.
- Place aside and cover with a kitchen towel while you work with the second piece of dough. Similarly, roll all the strips into a thin baguette-like shape and place them parallel to one another.
- Then use a bench scraper to cut them all from halfway through and make 18 bread sticks from the 9 long sticks.
- Then seal the open edges of the divided sticks.
- Gently lift each shaped breadstick and place it on a parchment-lined baking sheet.
Step 5 Proof the breadsticks
- After you have placed all the breadsticks on a parchment-lined baking sheet cover them with a kitchen towel or a tea towel and place the baking sheet in a warm corner of your kitchen. Let the breadstick proof until they puff up a little and become fuller.
Step 6 Topping and baking the breadsticks
- Now preheat the oven to 400 oF.
- Brush with a pastry brush or spray the proofed breadsticks with water and sprinkle the toppings of your choice.
- Bake the breadsticks at 400 oF for 20-22 minutes or until they turn golden.
- When ready, remove the baking tray out of the oven and brush the breadsticks with melted butter to keep them soft.
- Then transfer them to a cooling rack and let them cool for 15 minutes before serving.
Notes
- Always use a weighing machine to measure the ingredients for accuracy.
- Make sure that the sourdough starter is ripe and bubbly.
- Substitute one-fourth of a cup of flour with whole wheat flour without worrying about altering the hydration.
- Use chlorine-free water to facilitate maximum wild yeast activity in the dough.
- To make tender and soft breadsticks replace water with whole milk and olive oil with 3 tablespoon of unsalted butter.
- Make sure that you follow the texture dough and not the timeline. The timeline will vary depending on the ambient temperature and the vigor of the sourdough starter.
- Use 35 percent room temperature sourdough discard to make sourdough discard breadsticks.
- You can also use milk to spray on the proofed breadsticks for a better color.
- For Kneading the sourdough breadsticks dough with hands: In a bowl combine the dry and wet ingredients. Use the back of a wooden ladle to combine them to form a dough mass. Now use your hands to mix the dough mass such that no dry patch of flour is left. Just ensure to hydrate every bit of flour. It should not take more than 2 minutes. Now scrape the sides of the bowl with wet hands and cover the bowl with a cling wrap or a kitchen towel. Let it rest for 45 minutes. This process is called fermentolyse. This resting will initiate gluten development in the dough and makes the kneading process easy. After the rest, remove the dough onto the flour-dusted work surface and start kneading. Then fold the dough on itself and turn it 90 degrees and gain fold on itself. Lift and turn again and fold on itself. Keep kneading like this for 8-9 minutes. You can dust more flour if required, but do not add too much flour. Just trust the process and keep kneading. The dough would cease to be sticky and will form a smooth dough at the end of the kneading process. Lift the dough and place it in a greased bowl.
📋 Nutrition Facts


Suhasini Arora
Today I made it for the second time. My breadsticks turned hard the last time, so this time I only baked them for 18 minutes. The breadsticks were soft and tender, just the way I like.