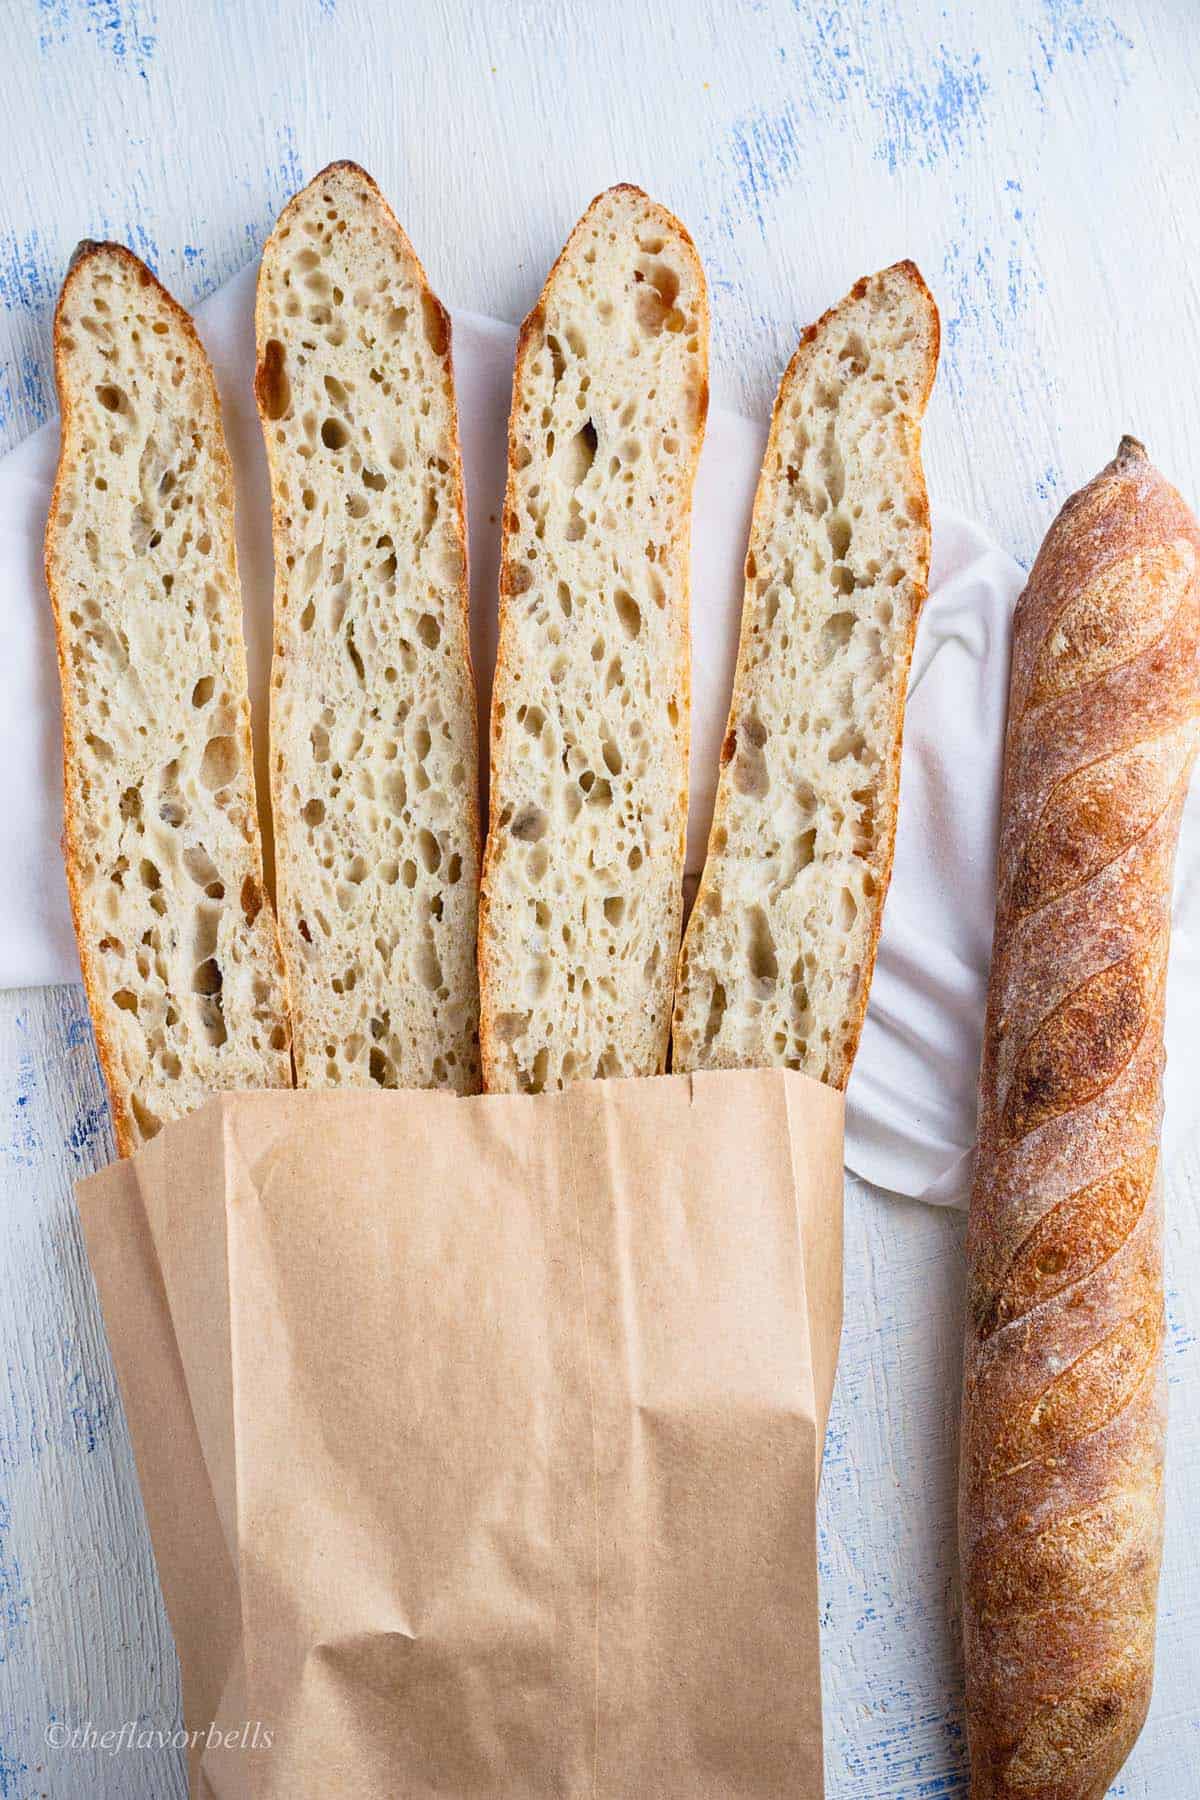
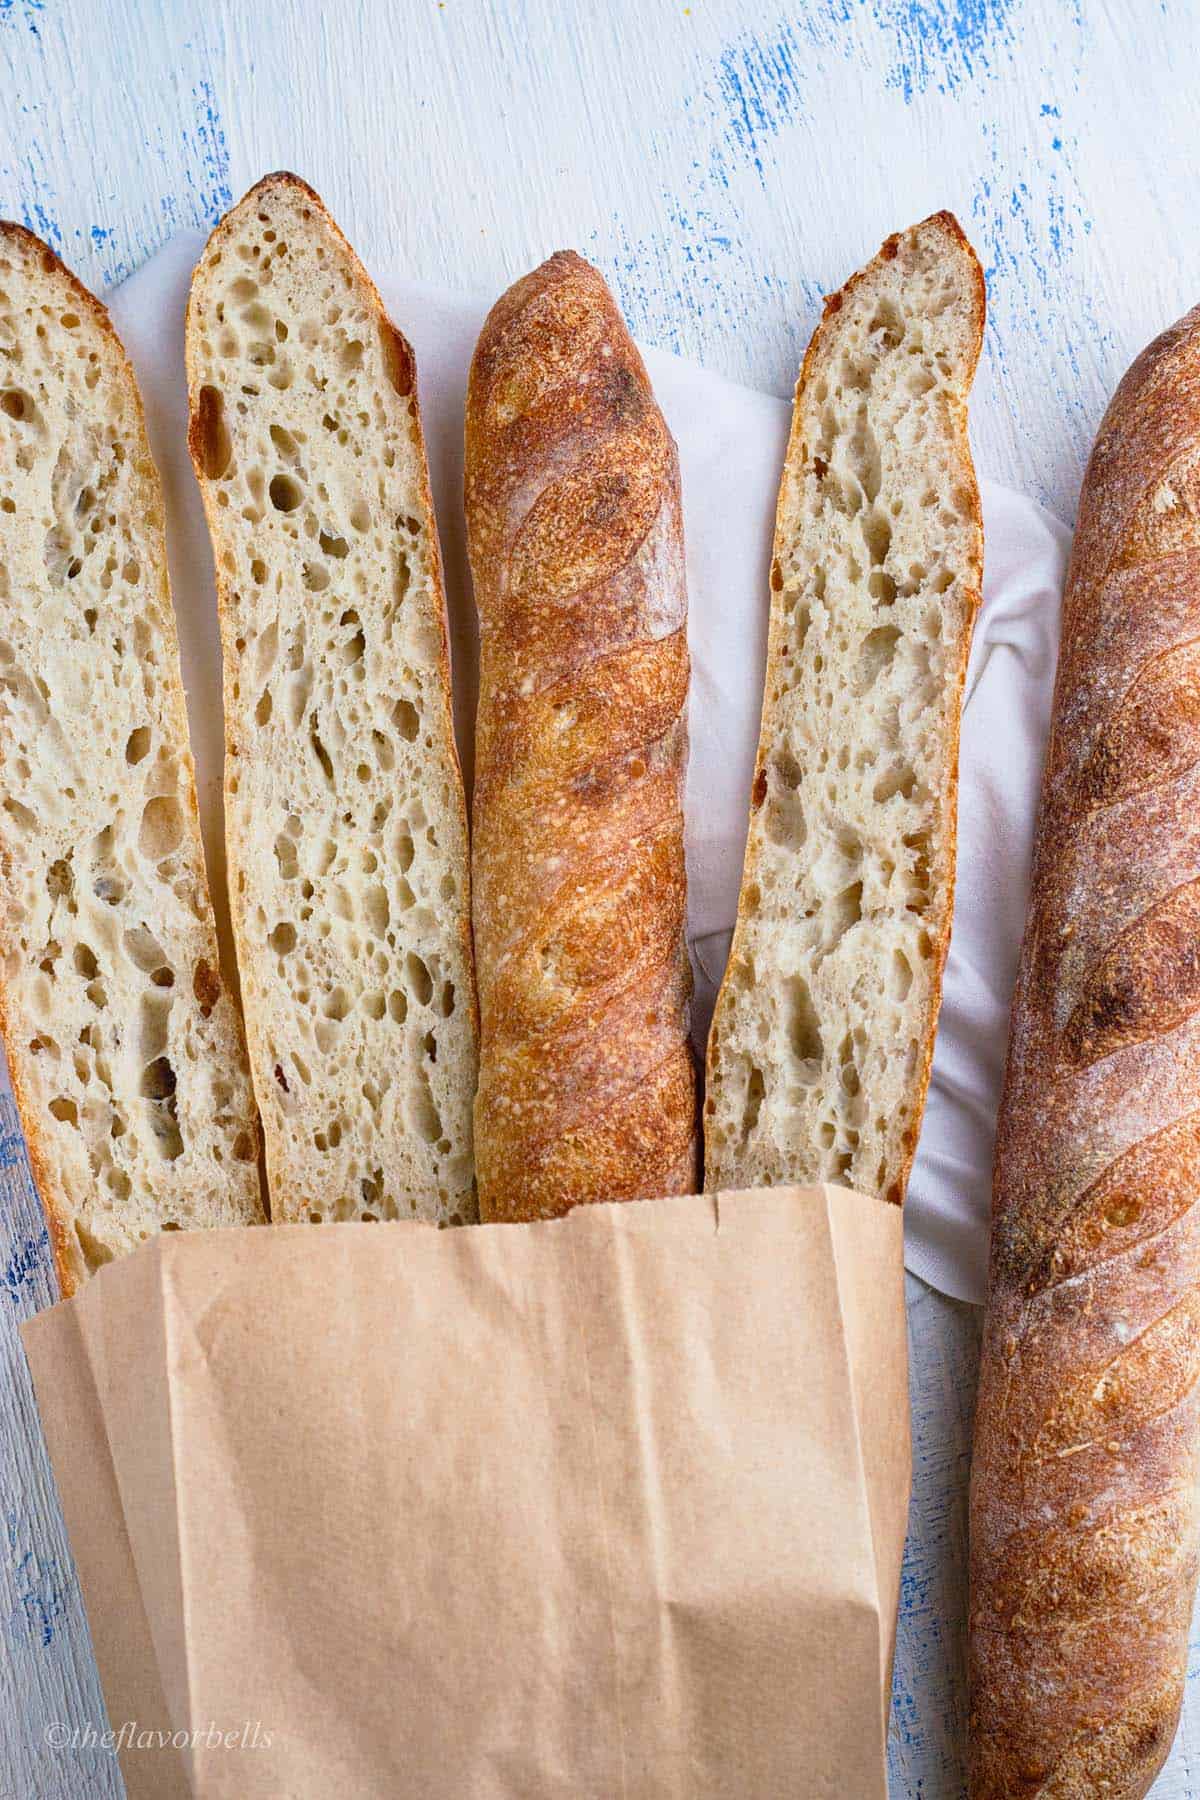
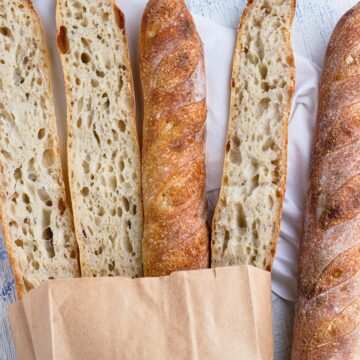
This no-knead, same-day sourdough baguette recipe yields a super crispy and delicious crust with soft and open crumbs. Just grab your ripe sourdough starter and get making these beautiful and easy French baguettes.
Conventionally we start a baguette recipe with a levain. Levain makes for tastier and better-crusted baguettes. But adds a long time to our timeline as well. So, I wanted to share a very easy sourdough baguette that you can make in the timeline of normal sourdough bread.
This is a very simple no-levain sourdough French baguette recipe. I hope you will like it.
Jump to:
- Why should you try making this sourdough baguette recipe?
- 🍶 Ingredients required for the sourdough baguette recipe
- 🍞 Step-by-step instructions to make sourdough baguettes
- ⏰ Baking Timeline for the sourdough Baguette Recipe
- 🫙Storage Instructions
- 💭Pro Tips
- ❓Frequently Asked Questions
- 🍛 More sourdough recipes
- 📝 Recipe card: Sourdough Baguette recipe
- Sourdough Baguette Recipe
- 📋Nutrition Facts
Why should you try making this sourdough baguette recipe?
- This is a simple and easy recipe. No-levain recipe.
- Same-day sourdough baguette recipe.
- This is a no-knead recipe. Just a few stretches and folds!
- Crispy golden crust with soft, open, and chewy crumbs.
- Perfect for sandwiches, crostini, or serve along soups and stews.
- Cold fermentation enhances the flavor and texture of this baguette bread.
- Easier to digest than the commercial yeast baguette.
French Baguette is one of my hubby’s favorite sourdough bread recipes. He lived in France for 3 years and often craves them. Hence, I often make them. And this quicker baguette recipe is what I use. Now, let’s start the sourdough baguette recipe.
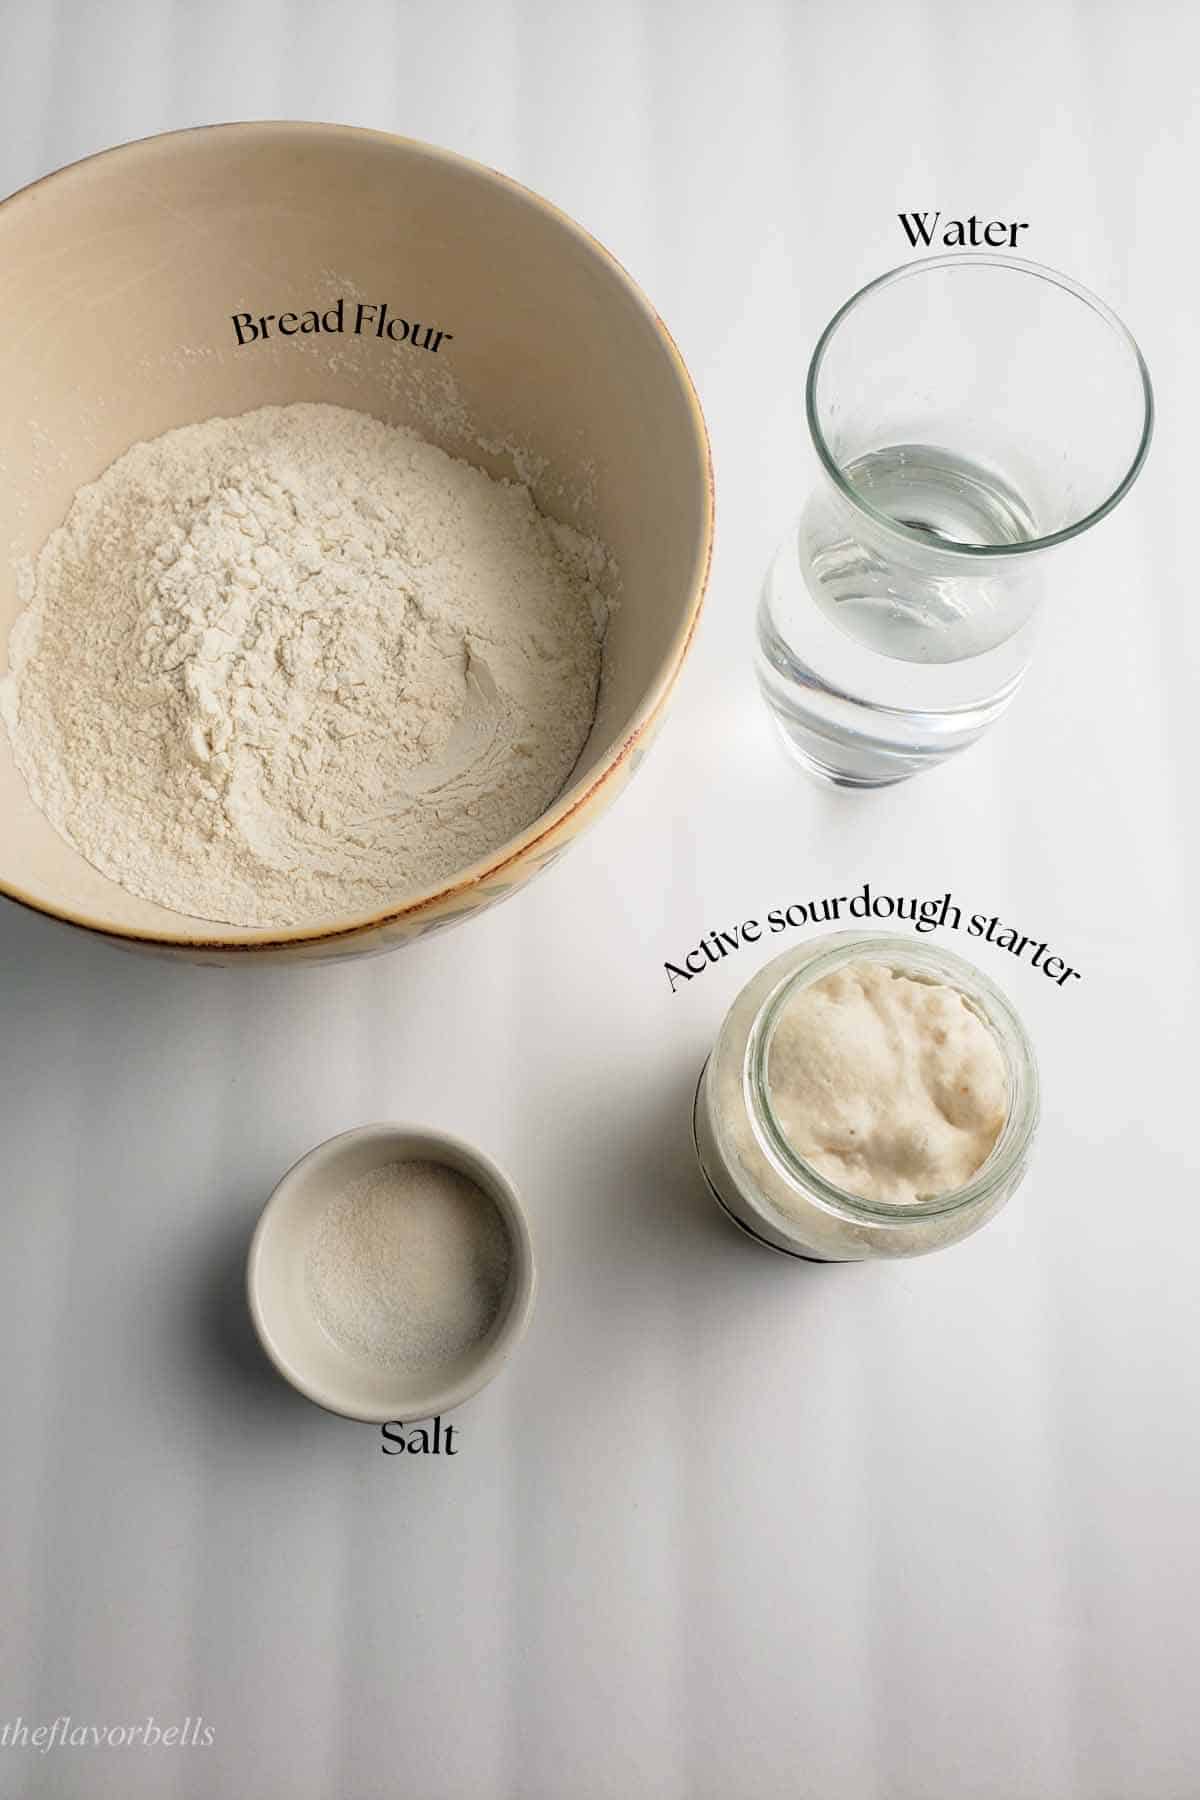
🍶 Ingredients required for the sourdough baguette recipe
Ripe sourdough starter
To make a delicious sourdough baguette with an open crust you need a ripe and mature sourdough starter. A ripe or active sourdough starter is one that has peaked in its activity. It should have reached its maximum volume, whatever it looks like for your starter. It could be double or triple the volume.
A mature sourdough starter is one that has been alive for more than 4-5 months. It ensures a stable and sturdy microbial population that can endure unfavorable environmental situations better.
If you are new to sourdough baking start by making a quick and minimum discard sourdough starter.
If I know that I will be making the sourdough baguette recipe tomorrow, I feed my starter in a 1:7:7 ratio, the night before. The next morning, you start by making the baguette dough.
Bread flour
To make a good Baguette you have to start with good bread flour. You cannot achieve the right texture with regular flour. So, avoid using all-purpose flour and choose high-protein bread flour. Now, since we are using the sourdough starter as the leavening agent, avoid bleached bread flour. It is best to choose organic or unbleached bread flour with a higher gluten percentage. I use King Arthur’s Sir Lancelot bread flour for this sourdough baguette recipe.
Water
Use bottled water if your tap water smells chlorinated. Chlorine is known to check the yeast growth in the dough. So, it is better to avoid chemically treated water.
Salt
You can use regular table salt or fine sea salt.
🍞 Step-by-step instructions to make sourdough baguettes
Step 1 Make the dough
Into a large bowl, add measured bread flour and water. Use the back of a ladle to combine the flour and water, until it kind of comes together. Then, use your hands to mix and combine flour and water uniformly so that no dry patch of flour is left. Now clean the sides of the bowl and cover the bowl with a plastic wrap or kitchen towel.
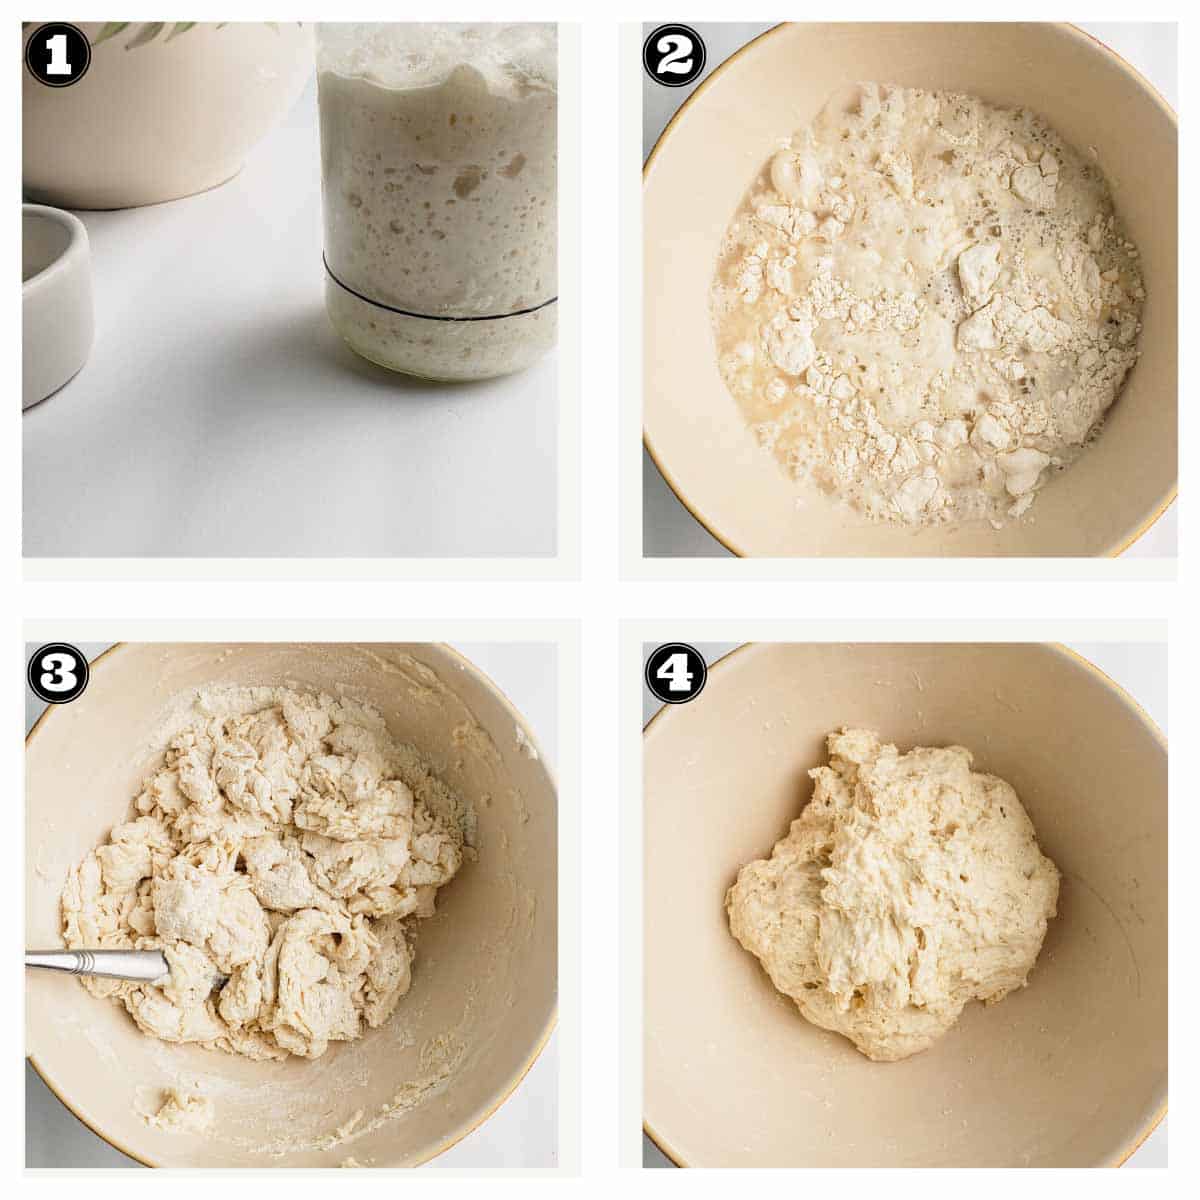
Now, let the dough rest for 1 hour. This resting phase is called autolyse. It helps in building the texture of the dough as it initiates gluten development.
Step 2 Add sourdough starter and salt to the dough
After autolyse, add the ripe sourdough starter to the dough. You can do it by simply dropping the sourdough starter on the dough. Then wet your hands and begin poking the starter into the dough. You can also use the Pincer method to incorporate sourdough started into the dough.

Then stretch and fold and combine to form a round dough ball. Flip and cover the bowl.
Let it rest for 20 minutes. Do not add starter and salt altogether, as salt limits the sourdough activity. Hence, we give a gap of 20-25 minutes between the sourdough starter and salt addition.
After 20 minutes spread the salt accompanied by 10 g of retained water. The process of adding water in the later stage of dough formation is called Bassinage. Bassinage helps the dough to hold more water, which eventually contributes to open crumbs in the bread.
To incorporate salt in the dough, use the same method as used for incorporating the sourdough starter.
Keep incorporating until you stop feeling the grains of salt in your hands. When done, stretch and fold the dough to form a round dough ball.
Cover and let the rest for 30 minutes.
Step 3 Building dough strength
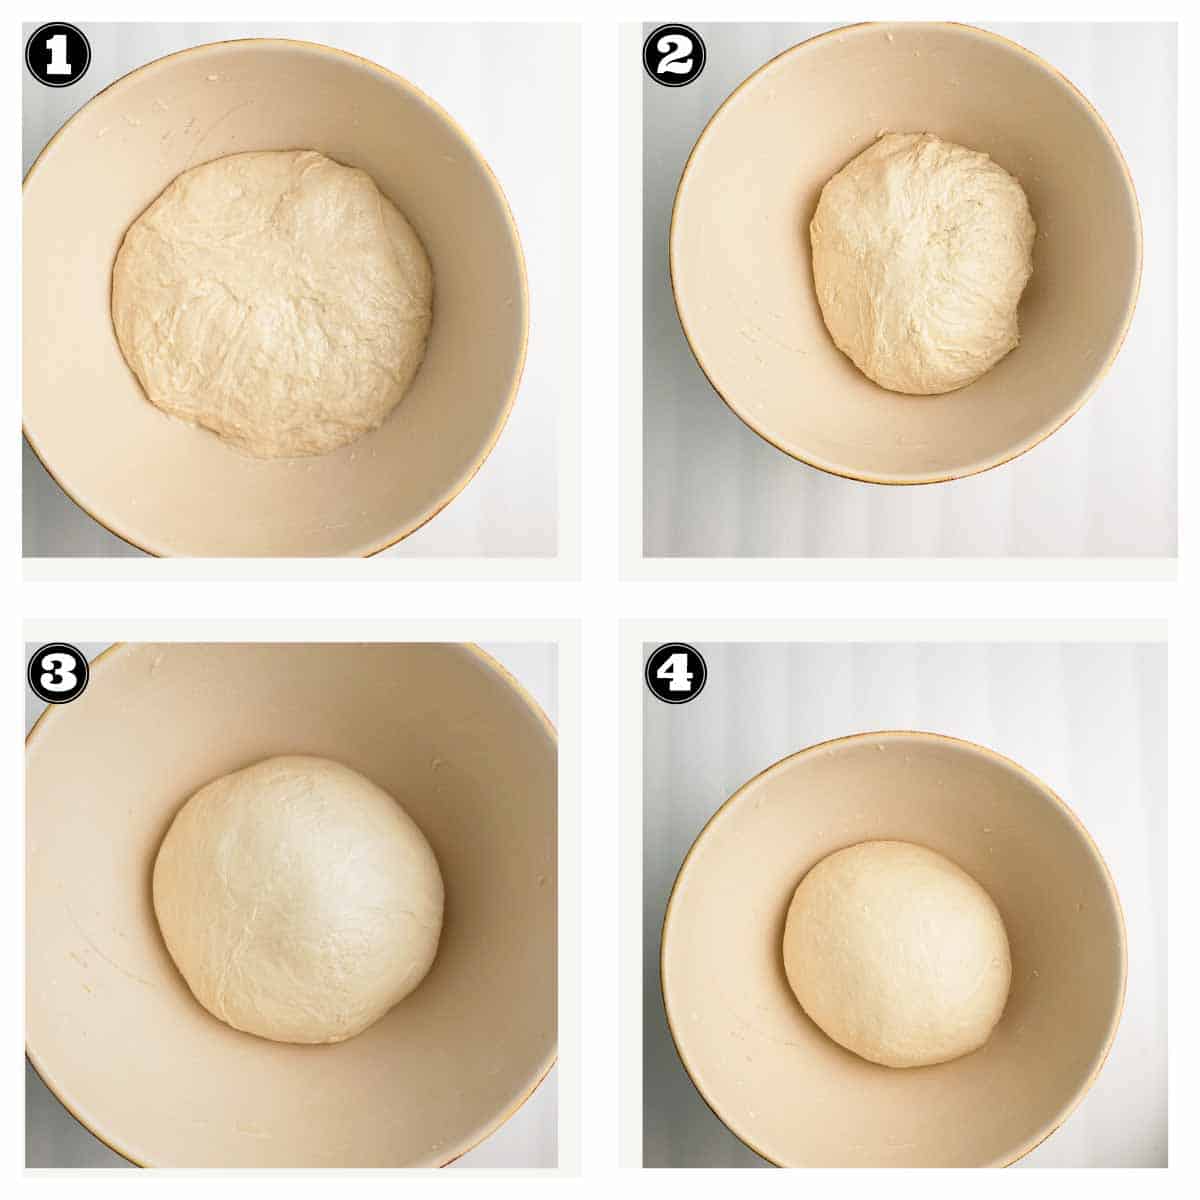
Since we are not doing any active kneading, we will have to conduct a few rounds of stretching and folding to build strength in the dough. These rounds should be spread 30 minutes apart. A total of 4 rounds are required to build enough strength or say gluten development in the dough.
You can also do coil folds instead of stretching and folding if that is what you feel comfortable with.
Start with the first round of stretching and folding. Stretch the baguette dough outwards by putting your hand under the dough and then fold it under the dough on the opposite side. Repeat the process on all sides and eventually flip the dough.
Conduct three such rounds at 30 minutes intervals. By the end of 4th round, the dough would have attained maximum strength and will not fall flat but hold its round dome-like shape.
If you think that you are still not there, conduct another round of stretching and folding.
Step 4 Cold retard
Now cover the baguette dough with a cling wrap and place it in the refrigerator. Cold fermentation improves the texture, flavor, and nutritional value of the dough. Anything between 8-24 hours should work. But since this is the same-day recipe, I like to stick to an 8-hour cold retard.
You can also keep it overnight. But for that, you will have to work out a timeline of your own. Use the below-illustrated timeline as a guide.
Step 5 Shaping
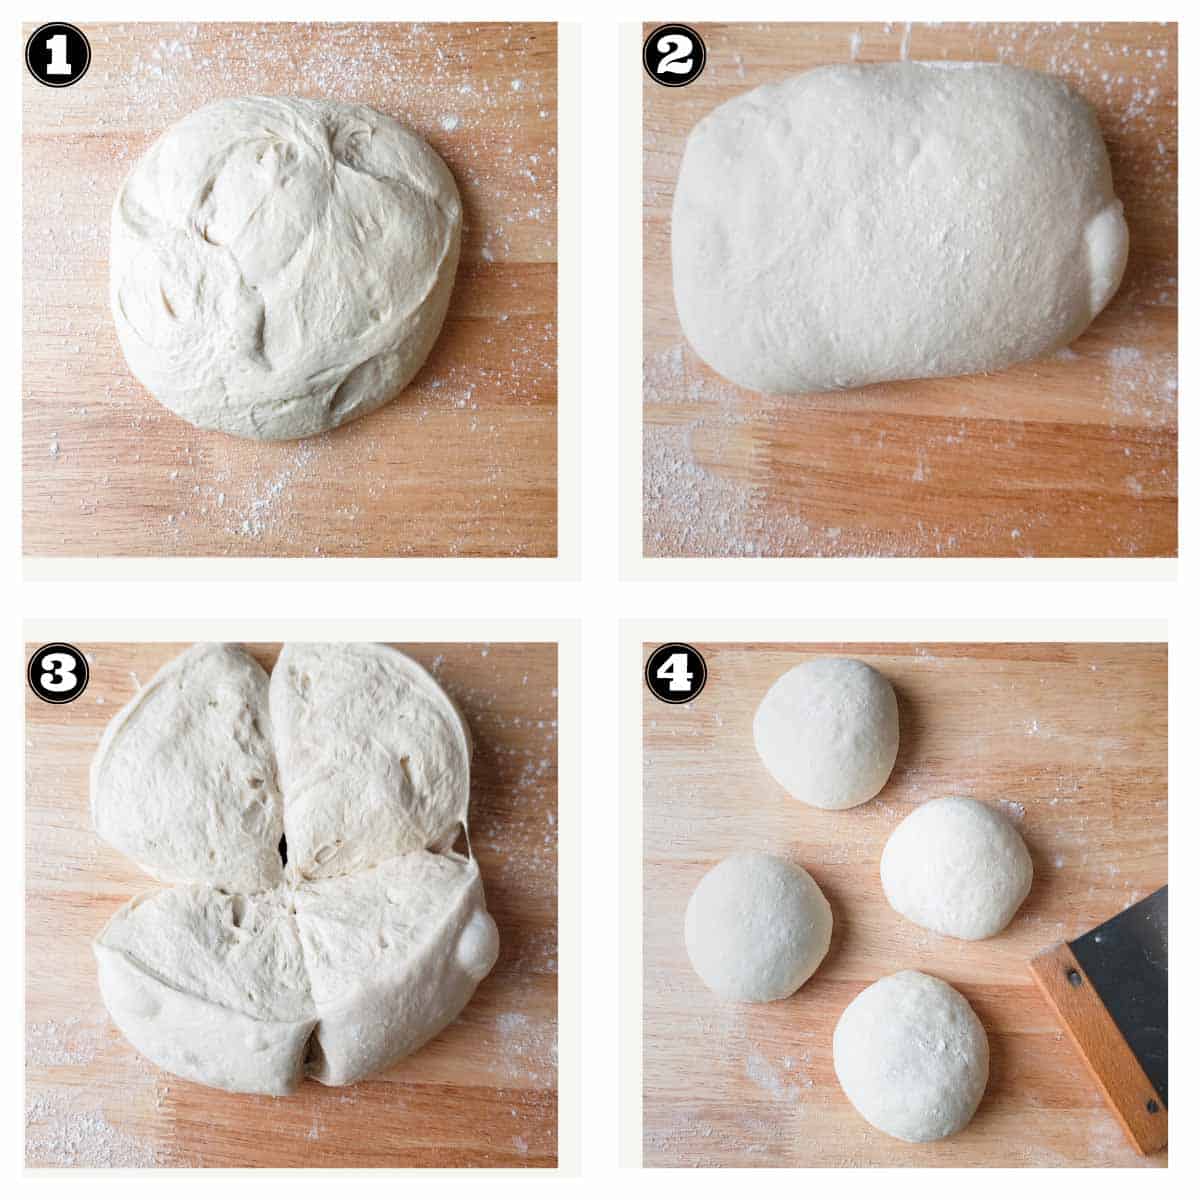
Now dust the top of the dough with some flour and transfer it onto a flour-dusted work surface. Now gather it and form a round. Then divide the dough into 4 equal parts. This sourdough baguette recipe will yield 4 medium-sized baguettes.
Take one piece of dough and gather all the sides and form it into a round. Flip and dust with flour. Similarly, make a round with the remaining pieces of dough. Cover them and let them rest for 20 minutes.
After they have rested, take one round and flatten using your fingers. Grab the top portion and press at the center. Similarly, bring and seal the lower potion on it. Now flip the dough bring the top portion towards the base and use the heel of your hands to press and seal it in place. (Refer to the images).
Dust with flour and keep aside. Repeat with the remaining rounds.
Now take one oval piece of dough on a floured work surface and place it in front of you with the seam facing down. Cup your both hands and place them at the center of the dough. With a gentle motion stretch, the dough outwards with your cupped hands without putting too much pressure on the dough. Repeat till the baguette reaches the desired size.
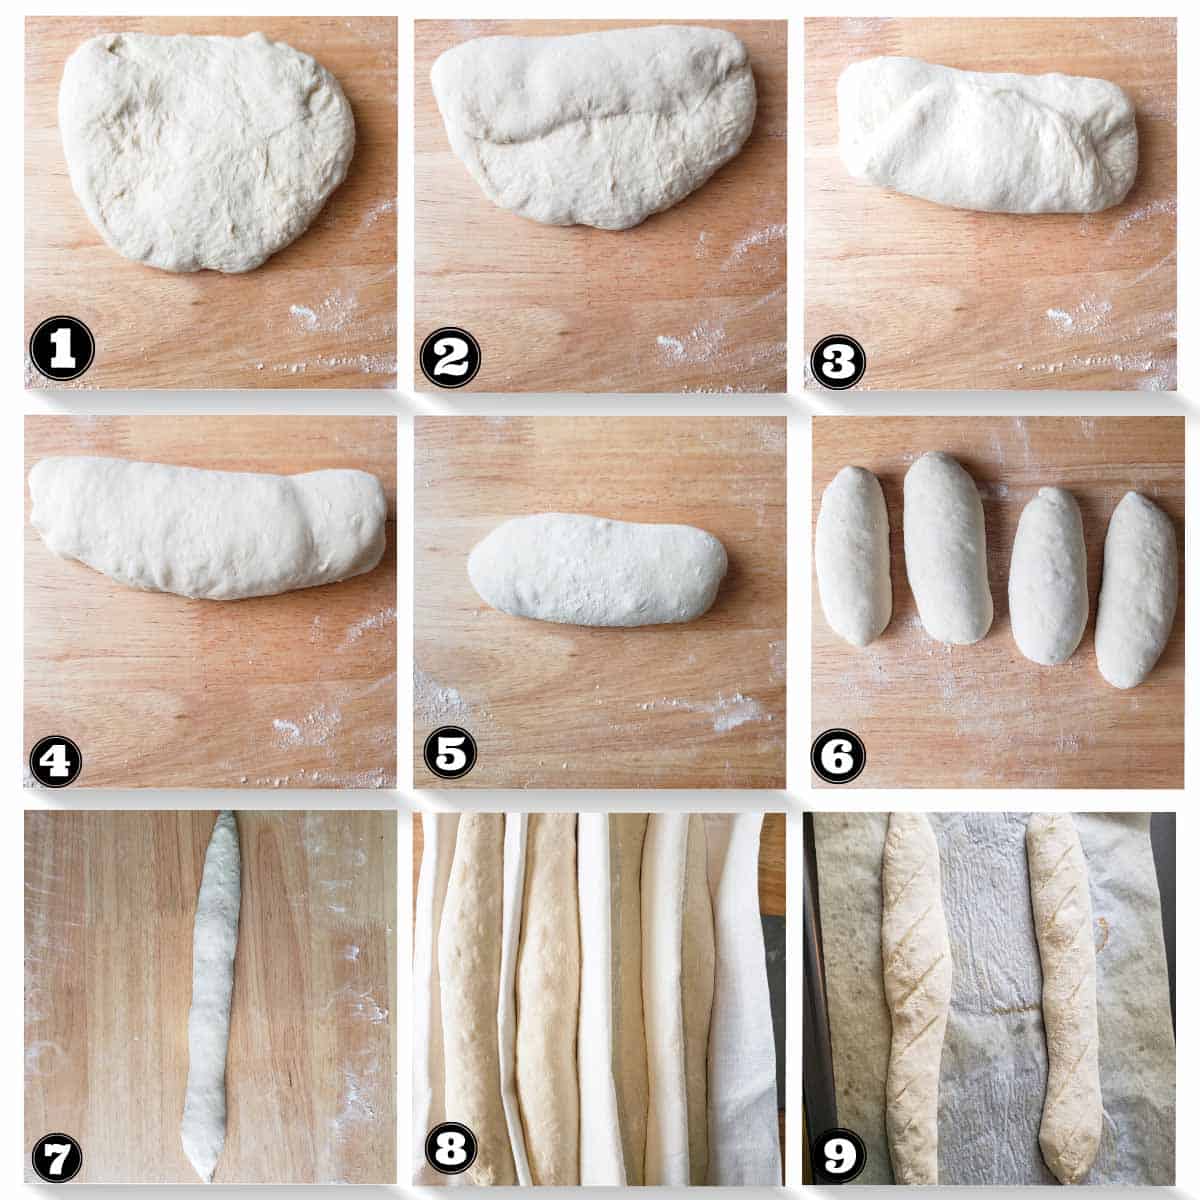
Take a couche and dust nicely with flour.
Couche is thick linen that helps bread dough keep its shape while it proofs and rises.
Make a fold in the couche and place the baguette in it and dust with some flour. Similarly, shape the remaining baguettes and place them in the folds of the couche.
You can also use a baguette pan for proofing and baking in this sourdough baguette recipe.
Step 6 Proofing

After placing all the baguettes in the couche, cover them with a kitchen towel while they proof and rise a bit. The proofing. Time may vary depending on the ambient kitchen temperature. It could be anywhere between 45 minutes and 90 minutes. You can do a poke test to check if the baguettes have proofed right.
Step 7 Scoring and baking
Towards the end of the proofing time, preheat the oven to 500 oF, with a baking tray or baking sheet lined with parchment paper inside. The best is to use a pizza stone. But if you do not have a pizza stone, you can simply use a thick and large enough baking tray.
When the oven is ready flip the baguettes onto a baker’s peel or anything similar. Pull out the hot baking tray from the oven and place the baguette on it. Carefully transfer the remaining baguettes using the peel onto the baking tray. Use a sharp lame or razor blade to score slashes on the baguette and spray them with water.
Now place the tray back in the oven and bake the baguettes at 500 oF for 10 minutes with a tray of water placed in the oven. Then remove the water tray and reduce the temperature to 450 oF and bake them for 10 more minutes.

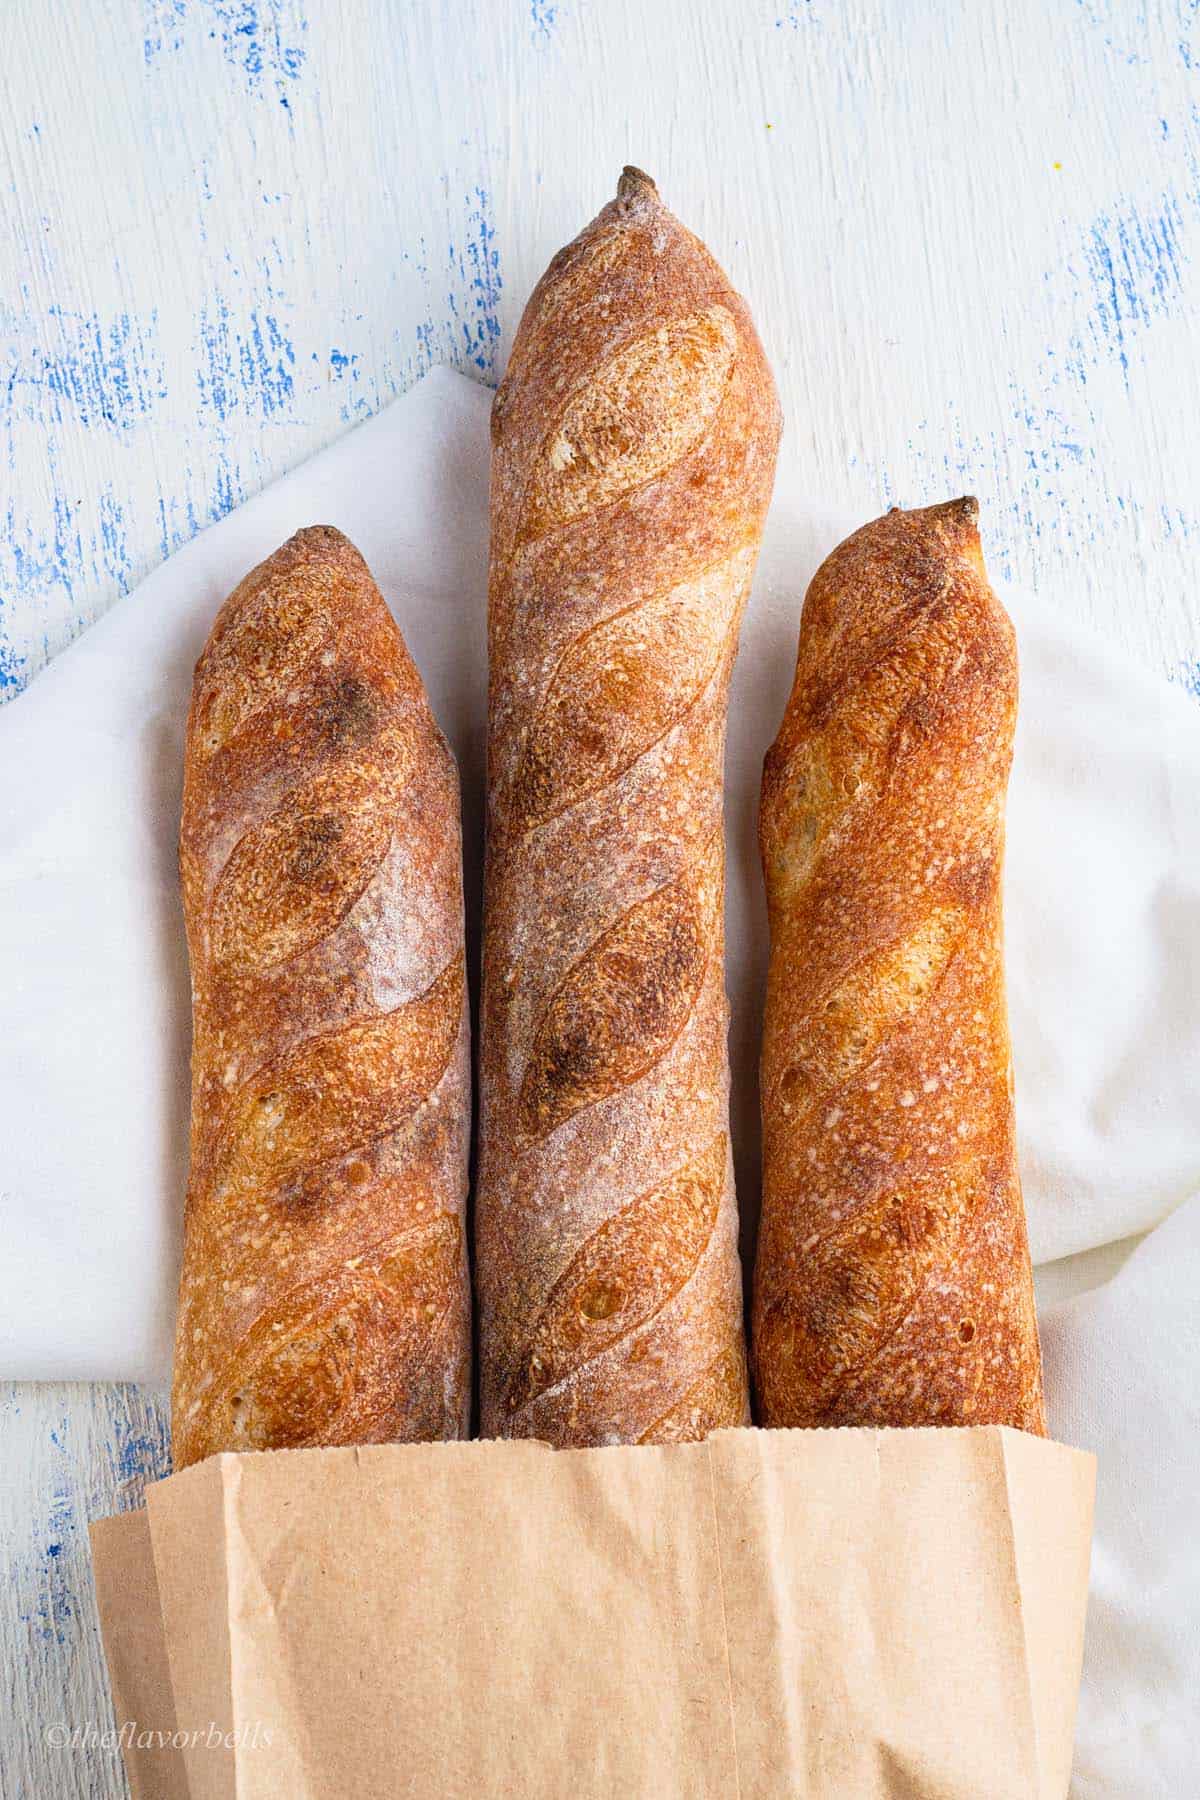
When the crust turns golden brown, remove them from the oven and carefully transfer them to a cooling wire rack.
There you have it, no yeast sourdough baguette with a crunchy crust.
Let them cool for 15-20 minutes before slicing with a sharp knife and serving.
⏰ Baking Timeline for the sourdough Baguette Recipe
Below is the illustration of the baking schedule for the same-day sourdough baguette recipe. You can increase the cold fermentation by up to 24 hours to get the best results.

🫙Storage Instructions
The sourdough baguettes have a longer shelf life than the commercial yeast baguettes because they are more acidic. Hence, food-spoiling bacteria and molds do not develop that easily.
Also, it has a thicker crust that prevents sourdough baguettes from getting dry.
Freshly baked baguettes can last 4-6 days at room temperature without any chemical preservatives if stored properly.
It is best stored wrapped in a cotton cloth or a cotton bread bag. Place it in a cool corner of your kitchen or inside a bread box.
It is not advisable to refrigerate the sourdough bread. Though you could freeze it if you baked it in bulk and want to store them for longer. Place the entire baguette or slices in a freezer-safe bag, with air removed. Now warp it with a double layer of foil, mark the date and place it in the freezer.
💭Pro Tips
Keep note of the following to execute this sourdough baguette recipe to perfection.
- Weigh your flour and water to get the best results.
- Use high-gluten bread flour for the best results.
- Mix the dough nicely with your hands to ensure there is no dry flour left. Go again and again with your hands to ensure that the flour is uniformly hydrated.
- For enhanced flavor elongate the fermentation duration.
- While shaping keep the seam facing down. Also, keep the seam down while you transfer the baguette to the couche and eventually to the baking tray.
- Baguette handling can be tricky but having the right set of tools makes your task easy.
❓Frequently Asked Questions
French baguettes are made with commercial yeast whereas sourdough baguette is made with the wild yeast culture. The French baguettes are made with commercial yeast polish which imparts a sourdough-like character. They might look very similar in texture and color, but the flavor varies remarkably. The sourdough baguettes have a slightly acidic sourdough-like taste to them whereas the French baguettes are just deeply yeasty in flavor (though a great flavor on its own). The acidity in sourdough baguettes gives them a better flavor profile along with a longer shelf life.
You can serve them as such with some herbed butter or plain olive oil. They make great sandwich bread. Also, they can be sliced and topped with numerous toppings to make crostini. You can serve them with soups and stews as a side.
Sourdough fermentation reduces the amount of gluten in the bread and makes it easy to digest for everyone, including people with celiac disease. The lower phytate levels make it easily digestible and nutritious. So, the ease of digestion and low glycemic index of the sourdough baguettes makes them a healthier choice than their counterparts.
The key is to bake it at a very high temperature to get the initial oven spring and then let the crust brown for an equal amount of time at a slightly lower temperature. Use the temp. as high as 500 0F to bake your sourdough baguettes on preheated surfaces like a baking stone or a thick baking tray for best results.

🍛 More sourdough recipes
A few Bread recipes with sourdough starter and other ways to use sourdough starter are linked below:
- The best garlic sourdough bread recipe
- Jalapeño Cheddar sourdough: A spicy cheese sourdough bread!
- Sourdough Rolls | No-yeast quick dinner rolls using sourdough starter
- The best Sourdough doughnuts recipe with Cinnamon sugar
- Sourdough chocolate bread recipe: Easy and delicious !
- How to make sourdough hot dog buns from scratch?
- How to make the basic sourdough batard?
- Sourdough Ciabatta
Hope you will like this sourdough baguettes recipe. Share your results and opinions in the comment section below. Also, subscribe to never miss a recipe.
Till then
Bake it Delicious!
📝 Recipe card: Sourdough Baguette recipe
Sourdough Baguette Recipe
Equipment
- Couche
- Baker’s peel
- Lame
- Baking stone/ baking tray
Ingredients
- 80 g Sourdough starter
- 400 g Strong Bread flour
- 320 g Water (310 +10g)
- 12 g Salt
Instructions
Step 1 Make the dough
- Into a large bowl, add measured bread flour and water.
- Use the back of a ladle to combine the flour and water, until it kind of comes together.
- Then, use your hands to mix and combine flour and water uniformly so that no dry patch of flour is left.
- Now clean the sides of the bowl and cover the bowl with a cling wrap or kitchen towel.
- Now, let the dough rest for 1 hour. This resting phase is called autolyse. It helps in building the texture of the dough as it initiates gluten development.
Step 2 Add sourdough starter and salt to the dough
- After autolyse, add the ripe sourdough starter to the dough. Simply drop the sourdough starter on the dough.
- Then wet your hands and begin poking the starter into the dough. You can also use the Pincer method to incorporate sourdough started into the dough.
- Then stretch and fold and combine to form a round dough ball. Flip the dough and cover the bowl.
- Let it rest for 20 minutes.
- Then spread the salt accompanied by 10 g of retained water on the dough. The process of adding water in the later stage of dough formation is called Bassinage. It helps the dough to hold more water, which eventually contributes to open crumbs in the bread.
- To incorporate salt in the dough, use the same method as used for incorporating the sourdough starter.
- Keep incorporating until you stop feeling the grains of salt in your hands. When done, stretch and fold the dough to form a round dough ball.
- Cover and let the rest for 30 minutes.
Step 3 Building dough strength
- Start with the first round of stretching and folding. Put your hand under the dough and stretch it outwards and then fold it under the dough on the opposite side.
- Repeat the process on all sides and eventually flip the dough.
- Conduct three such rounds at 30 minutes intervals. By the end of 4th round, the dough would have attained maximum strength and will not fall flat but hold its round dome-like shape.
- If you think that you are still not there, conduct another round of stretching and folding.
Step 4 Cold retard/ Cold fermentation
- Now cover the dough with plastic wrap and place it in the refrigerator. Cold fermentation improves the texture, flavor, and nutritional value of the dough. Anything between 8-24 hours should work. But since this is the same-day recipe, I like to stick to an 8-hour cold retard.
Step 5 Shaping the baguettes
- Now dust the top of the dough with some flour and transfer it onto a flour-dusted work surface. Now gather it and form a round.
- Then divide the dough into 4 equal parts.
- Take one piece of dough and gather all the sides and form it into a round. Flip and dust with flour.
- Similarly, make a round with the remaining pieces of dough. Cover them and let them rest for 20 minutes.
- After they have rested, take one round and flatten using your fingers. Grab the top portion and press at the center. Similarly, bring and seal the lower potion on it. Now flip the dough bring the top portion towards the base and use the heel of your hands to press and seal it in place. (Refer to the images).
- Dust with flour and keep aside.
- Repeat with the remaining rounds.
- Now take one oblong piece of dough on a floured work surface and place it in front of you with the seam facing down. Cup your both hands and place them at the center of the dough. With a gentle motion stretch, the dough outwards with your cupped hands without putting too much pressure on the dough.
- Repeat till the baguette reaches the desired size.
- Take a couche and dust nicely with flour. Couche is thick linen that helps bread dough keep its shape while it proofs and rises.
- Make a fold in the couche and place the baguette in it and dust with some flour.
- Similarly, shape the remaining baguettes and place them in the folds of the couche. If you have a baguette pan, you can proof the baguettes in it.
Step 6 Proofing the sourdough baguettes
- After placing all the baguettes in the couche, cover them with a kitchen towel while they proof and rise a bit. The proofing time may vary depending on the ambient kitchen temperature. It could be anywhere between 45 minutes and 90 minutes. You can do a poke test to check if the baguettes have proofed right.
Step 7 Scoring and baking
- Towards the end of the proofing time, preheat the oven to 500 oF, with a parchment-lined baking tray or baking sheet inside. The best is to use a pizza stone. But if you do not have a pizza stone, you can simply use a thick and large enough baking tray.
- When the oven is ready flip the baguettes onto a baker’s peel or anything similar. Pull out the hot baking tray from the oven and place the baguette on it.
- Carefully transfer the remaining baguettes using the peel onto the baking tray.
- Use a sharp lame or razor blade to score slashes on the baguette and spray them with water.
- Now place the tray back in the oven and bake the baguettes at 500 oF for 10 minutes with a tray of water placed in the oven.
- Then remove the water tray and reduce the temperature to 450 oF and bake them for 10 more minutes.
- When the crust turns golden brown, remove them from the oven and carefully transfer them to a cooling rack.
- Let them cool for 15-20 minutes before slicing with a sharp knife and serving.
Notes
- Weigh your flour and water to get the best results.
- Use high-gluten bread flour for obtaining open crumbs.
- Mix the dough nicely with your hands to ensure there is no dry flour left. Go again and again with your hands to ensure that the flour is uniformly hydrated.
- Do not add starter and salt altogether, as salt limits the sourdough activity. Hence, we give a gap of 20-25 minutes between the sourdough starter and salt addition.
- For enhanced flavor elongate the fermentation duration.
- By the end of 4th round, the dough would have attained maximum strength and will not fall flat but hold its round dome-like shape. If you think that you are still not there, conduct another round of stretching and folding.
- Longer the cold retard, the better the flavor. Anything between 8-24 hours should work. So for better flavor, you can prolong the cold fermentation. You can also keep it overnight.
- While shaping keep the seam facing down. Also, keep the seam down while you transfer the baguette to the couche and eventually to the baking tray.
- Baguette handling can be tricky but having the right set of the tool makes your task easy.
📋Nutrition Facts


Samantha
I twisted my baguettes while transferring them on to the baking stone. They didn't look as photogenic as yours, but tasted great! Thanks, for the recipe!