In this post, we are going to understand what is an autolyse? And how this resting time or a pause can improve your bread-making? Autolyse ( pronounce it as auto-lease ) is a period of rest following the initial mixture of a portion of (or all) water and flour. The time may vary from recipe to recipe, but all we need to ensure is that the flour and water are combined well and no dry patches of flour are left in the combined dough. There is a whole set of the biochemical phenomenon that will happen behind the scene, but in simple terms, autolysis helps in dough development without kneading.
A brief history.
The term Autolyse was coined by a French professor of baking, who suggested the procedure as an efficient means of reducing kneading time and thus improving bread's flavor and color. Raymond Calvel, a renowned French Professor of baking who discovered "autolyse", used the term in his book the taste of bread. Long kneading times subject bread dough to atmospheric oxygen, which bleaches the naturally occurring carotenoids in bread flour, robbing the flour of its natural creamy color and flavor. It also makes the dough easier to shape and improves structure. More on this in the benefits section.
What is this confusion around Autolyse, Autolysis, and autolyze?

You might come across the terms Autolyse, Autolyze, and dough autolysis around the web when reading through some sourdough bread or yeast bread recipe. Well, there is no need to get confused. I can say with one sentence that they all refer to the same phenomenon. Keep reading to find out more...
Autolyse is the British variant or more accurately the French Cognate of Autolyze. Raymond Calvel, who discovered "autolyse", used the term in his book the taste of bread. Thus, it is the term most commonly used and accepted (though autolyze is also acceptable).
Autolysis more commonly known as self-digestion refers to the destruction of a cell through the action of its own enzymes. It simply means that the enzymes in the flour will act upon it and start to digest the flour. On hydrating, the enzymes in the flour get activated and start working on the flour cells. Now it is important to note here, that autolyse and autolysis refer to the same phenomenon. It is just that Autolysis(phenomenon) is the noun and autolyze (action) is a verb.
Autolyse means combining flour and water so that they can undergo autolysis.
Now we are clear about the various terms and what they mean, let us get to the important part. We want to understand what happens during the resting time and how is it helpful?
The science behind Autolyse: What happens during this rest period?
- Firstly Hydration of the dough.
When water is added to the flour, the hydration of dough takes place. Water starts combining with the starch granules, bran, and proteins in the flour.
- Secondly, Protein bonds formation or gluten development.

Wheat flour contains a mixture of Glutenin and gliadin proteins. On hydration, they immediately bind together to form gluten. Gluten is a combination of more than one type of protein joined with each other in a more complex manner. Gluten development makes the dough less sticky and more workable.
On kneading, we can further strengthen the gluten to become longer and stronger. Gluten helps to give the body to the bread and creates a network of web-like structures to trap the air, which eventually makes the bread lighter and fluffier.
That’s why autolyse is important as it allows natural gluten structure formation.
- Thirdly, enzymatic activity.
Flour enzymes, especially protease and amylase start working in the dough combined with water. Protease makes the dough softer and extensible by breaking the protein bonds.
Now, you might ask on one side the protein bonds are formed to develop gluten, and to make the dough stronger. On the other side, there is the protease enzyme breaking the protein bonds!
Yes, all these processes are happening at the same time during the resting stage( autolyse). But there is a difference in their pace. Gluten development is much faster and instant. Whereas protease takes some time to start acting and also its activity is very limited. Protease activity is higher at lower pH. So, after adding the starter or yeast, the protease activity kicks in. During the rest, we only observe a minimal protease activity that is just sufficient to give some extensibility to the autolysed dough.
The second enzyme that is at work during this stage is amylase. Amylase breaks down the starch molecules into sugars. This step adds a good amount of sugar molecules to the dough. In the next step when yeast or preferment is added to the dough, the yeast will have readily available sugar to consume. As a result, the lag phase of yeast fermentation is reduced and yeast comes into log or exponential phase much quickly. In simple terms, the bulk fermentation time is reduced.
Concludingly, at the end of autolysing, we will have a stronger dough, less stick, extensible, and a dough that is ready for the next step of bread making, fermentation.

Why use an autolyse? What are its benefits?
Reduces kneading efforts and time.
Autolyse is very helpful when working with high-protein flours. This simple resting stage reduces the overall kneading efforts. Working on recipes with very strong flours like durum or semolina, which absorbs too much water, kneading can be pretty tiring. It comes in handy when working with such flours. In general, longer resting time leads to shorter kneading time. It is great how rest can reduce the working efforts!
Bran softening.
Bran or fiber in the flour combined with water starts to get softer and workable. Autolyse allows it the much-needed time to absorb the water and become soft.
Better gluten structure.
The final dough has a better and more stable gluten structure. While kneading, gluten formation, strengthening, and also gluten tearing and breaking happen at the pace of kneading or working or on the dough. Whereas during autolyze the gluten development happens at its own pace and there is no breaking or tearing of the gluten strands. Hence, this resting makes a great contribution to the overall dough structure and the final bread crumb.
Breaking down of starch into simpler sugars
Starch is a complex carbohydrate containing multiple sugar molecules combined altogether. Amylase in the flour gets activated on hydration and starts working on the starch molecules in the flour. It breaks down the starch into simpler sugars so that the yeast has readily available food. Yeast consumes these sugars and releases carbon dioxide and alcohol, which gives flavor and texture to the bread.
More extensible and softer:
The enzymatic breakdown is simultaneously making the dough softer by breaking the protein strands. The resultant dough is more extensible and less elastic, which makes sit easy to shape and work with.
Better flavor and color:
It is more or less connected to the first benefit. Since the autolysis reduces the overall kneading time, the percentage of dough oxidation is reduced. The natural carotenoids that give the specific color and flavor to the dough are not oxidized and result in a better flavor and color of the bread.
Reduces need for dough conditioners
Reduced or sometimes eliminates the need for dough conditioners. We are various dough conditioners to improve the structure of the dough and make it soft and workable. Autolyse can somewhat make up for them.
Better oven spring:
Yes, a better oven spring and open crumb structure due to a stronger gluten structure in the dough. A well-developed dough will get a better oven spring than underworked dough.
Autolyse plays a very crucial role in developing the dough structure that will lead to a perfect bread with better structure and flavor.
What are the drawbacks of Autolyse?
Makes the baking more complex
If you are making some recipe that is already complex and involves multiple steps, autolysis can make the overall process more tedious. It will alter the baking schedule and complete timeline.
Autolyse makes the incorporation of the ingredients difficult
Overall, it makes the incorporation of the further ingredients much difficult. Incorporating polish, starter, salt, etc can become slightly tedious. It is easy to combine everything all in the beginning and knead the dough at once. But when you let the dough autolyse, the dough had already come together. Incorporating the rest of the ingredients into it takes a little muscle. If you are working with a dough mixer, you will have to let the dough stay in it for the entire duration. It occupies the mixer all the time and you can not use it for any other purpose. It requires adjusting the baking schedules accordingly if running a home bakery or a professional bakery.
Sometimes ingredient incorporation becomes tricky when you need to incorporate more liquid or water( bassinage) with the other ingredients, especially using a stand mixer. The dough tends to just slip over and not incorporate the liquid, without manual intervention.
- Different types of flour need different resting durations. No schedule fits all flours. It takes experience to gauge how much autolyse will give the best results with a specific type and combination of flours. Prolonged autolyse can lead to enhanced enzymatic activity and the resultant dough can become excessively extensible and gummy.
- Highly extensible flours ( spelt flours) become very difficult to manage when autolyzed. It is believed that freshly milled flour can become overly sticky on resting.
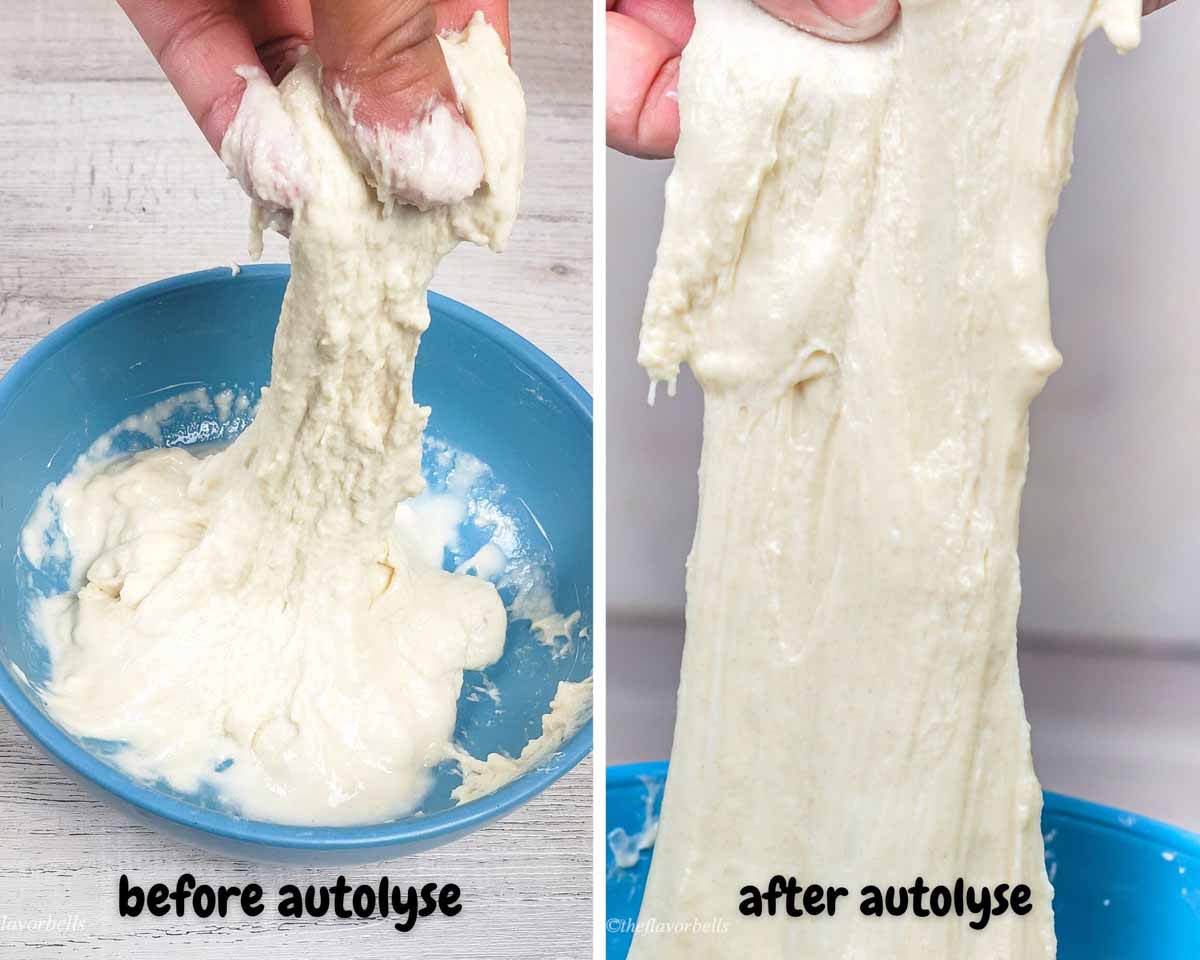
Experimenting to demonstrate the effect of autolyse
I did a simple experiment by taking two samples of 100 g of bread flour and using 70 g water(70 percent hydration) to make the dough. The dough in the blue bowl was given 1 hour of rest whereas the flour in the white bowl was not given any rest. Everything else remained the same. I did a very simple sourdough ciabatta-like shaping to avoid any tension building so that the clear effect of resting could be observed.

Observations or results:
The autolyzed dough was holding its shape better while stretching and folding, it was easy to work with, it fermented better and got a better oven spring on baking.
How long should you autolyse?
The duration of rest will depend on the type of flour. A dough's rest time is determined by how much protein and fiber it contains. Temperature also plays a crucial role in autolyse. Most prolonged autolyse require low temperatures to keep the enzymatic activities in control.
| Type of flour | Autolyse Duration |
| All-purpose Flour | 30 minutes- 1 hour |
| Whole wheat flour | 45 minutes -4 hours |
| Bread flour | 30 minutes- 2 hours |
| Rye flour | Avoid |
| Semolina flour | 1-5 hours |
In my experience 1 hour of resting works best in most cases.
Understanding true autolyse and modified autolyse method
In true autolyse only flour and water are combined and given a resting time to do their thing. It is most common in sourdough baking. You can literally not bake a good loaf of sourdough without autolyze. Whereas in modified autolyze, there are more components than these two. It could be salt, yeast, or yeast mixture like poolish or preferment.
There are two types of modified autolyse.
Saltolyse:
The process of pre-mixing the flour, salt, and water and letting it rest for a defined period is called saltolyse. Salt helps in tightening the gluten structure and reduces enzymatic activities. In some recipes where we want prolonged fermentation periods, the amylase activity during the rest needs to be reduced. In such specific cases, the addition of salt can prove helpful.
Fermentolyse:
This type of autolyse has a fermentation process involved. SO, in fermentolyse, yeast is added to the flour and water mixture. I can only think of two reasons for doing so. First, when we are working with liquid preferment like a poolish. Since there is so much water in the preferment, adding it later will alter the overall hydration percentage of the dough. So, it is a good idea to add it in the beginning for autolyse stage. In such a situation use the cold preferment or colder water to mix the dough, so that the overall dough Temperature(DT) remains low and yeast activity remains almost negligible. This will allow the rest time to do its thing without being affected by the fermentation process.
Second, when we have to use active dry yeast for fermentation in our recipe. Doing true autolyse with that can be difficult. It needs to be activated in warm water or milk with sugar before adding to the dough and we can not add such liquid yeast mixture to the dough after the rest. So, the best is to add Active dry yeast as such to the flour and mix water. It will take longer to activate. Long enough that autolyse will be almost over by the time yeast will activate and start fermentation.

Some Frequently asked questions
The dough that rests for too long can become very weak. We now know that during autolyse gluten development takes place. But there is enzymatic activity happening inside the dough. The protease enzyme breaks down the protein chains (breaks the gluten).
In a standard resting of an hour or so, protein activity just kicks in towards the end and is very limited. But in prolonged autolyse, the protease activity becomes more profound which makes the dough sticky and weak. So whenever looking for a prolonged rest try to go for cold-autolyse, where the low-temperature limits enzymatic activity. But going beyond the suggested timeframe will certainly deteriorate the dough structure.
Yes, you can autolyse in the fridge. But in standard resting, you should not go for cold rest. I mean, when you have to autolyse the dough for 30 minutes to 1 hour, why would you put it in the fridge?
But yes, when you are planning to go for a prolonged rest like 3- 4 hours. It is a good idea to put the dough to rest in the fridge. The cold temperature keeps the yeast activity in check, which if not controlled can potentially deteriorate the dough structure and make the dough weak and sticky.
Yes, you can autolyse with salt in some specific cases. The process of pre-mixing the flour, salt, and water and letting it rest for a defined period is called saltolyse. In addition to tightening the gluten structure, salt reduces enzymatic activity. When we want to extend fermentation periods, we need to reduce the amylase activity at the time of autolysis. In such specific cases, the addition of salt during rest stage can prove very helpful.
The process of autolyse with sourdough starter is called fermentolyse. In this scenario, you can add a sourdough starter with flour and water before letting it rest (1 hour in most cases). In this case, fermentation will also take place with autolyse. This could be counterproductive.
But if you are baking in very cold weather, where it takes longer for the yeast activity to kick in, you can surely go for this kind of resting.
Why not? You can very well autolyse the pizza dough. Most pizza bakers swear by the benefits of rest on the overall taste, flavor, and texture of pizza.
When you make sourdough pizza, resting is the quintessential step. I like to rest my pizza dough for at least 45 minutes before kneading. But you can also rest the yeast pizza dough. The best is to let the dough restfor 30 minutes before mixing in the rest of the ingredients.
Yes, temperature plays a crucial role in autolyse. The final resting temperature should be between 72-78 oF for achieving the optimum outcome. If the final dough temperature is very low, the enzymatic activity is slower and you might not get the desired results. Similarly, if you add very hot water for mixing the dough, or place it in a very hot environment, the enzymes get denatured or say destroyed.
So, yes temperature plays a crucial role in autolyse and the overall baking process.
Further readings
- How to make yeast water with fruits?
- Why is your sourdough bread too dense? Ways for making bread less dense.
- Making a quick sourdough starter with minimum discard: A Comprehensive guide
- Everything you need to know about making dehydrated sourdough starter and easily reviving it
Hope you found this post helpful!
Happy baking!
How to autolyse? Unleasing the power of the pause
Equipment
- A stand mixer (optional)
Materials
- Bread flour-400g 100 percent
- Water-280g 70 percent
Instructions
- Into a large bowl, add flour or a combination of the flours. Then add the measured quantity of water.
- Using the back of a wooden ladle, combine all the flour and water. Combine well to ensure that no dry flour patch is left.
- If using a stand mixer, knead at low speed for 2-3 minutes to incorporate flour and water. Then cover the dough and let it rest for 45 minutes.
Notes
- Make sure to cover the dough properly to prevent it from drying. Always use a cling wrap to cover the dough if the RH (relative humidity in your kitchen is low)
- If you are using the stand mixer, combine the flour and water at low rpm for 2-3 minutes only. No more than that.
- Adjust the water temperature to achieve the optimum autolyse temperature. The final dough temperature for autolyse should be between 72-78 F for getting the optimum results.


Leave a Reply