Alright, so wheat pita bread is a healthier choice than the regular all-purpose flour Pitas. And, this Whole wheat pita recipe is as easy as it can get.
Pita bread is basically a middle eastern flatbread. But now it has become part of the mainstream European and North American food.
Be it all-purpose flour or whole wheat flour pita bread, both are equally delicious. It is just that the ones made with whole wheat has a higher fiber and is much easier on your stomach and calorie charts.
A little background on my love at first bite with this Mediterranean flatbread!
I never had Pita bread back home in India. Long ago, after we had just moved to the States, we went to dine at this Mediterranean restaurant close to our place. They served freshly baked in the house bread.
Pita bread was one of the flatbreads served with baba ghanoush. I cannot explain how much I loved it! After that, it stayed on my grocery list for a while until I started to make it on my own. Pita is a family staple now. I often use it as a naan substitute.
They are so easy to make. And not to forget, the homemade ones taste a hundred times better than the store-bought ones.

What will you learn in this post about Wheat Pita Bread?
In this blog post, I will share with you :
- How to make whole-grain pita bread using a sourdough starter?
- Procedure to make wheat pita bread with instant yeast?
- How to cook pita bread on the stovetop?
- A simple way to make Pitas in Oven.
- Key to get the perfect pita pockets every time.
- In case, you are looking for a sourdough discard recipe for pita bread, I got you covered. I will give my little way to use my sourdough discard to make pitas.
Want more reasons to try this whole wheat pita recipe?
- It is totally Vegan.
- Uses staple pantry ingredients.
- It is low-calorie pita bread.
- Highly versatile bread.
- Act as a base for numerous recipes.
- Make a big batch and enjoy the week-long.
- Pita pockets are traditionally filled with falafel, kebabs, gyros, or can be simply used to scoop hummus or Baba Ghanoush.
- It is a highly versatile bread and can be used as sandwich bread for literally anything.
- It can be used as a pizza base.
- Whenever I run out of Naan I use pita with my Kadhai paneer!
- And, the store-bought ones are nowhere close to the homemade ones.
I have been making them for quite a while now. Everybody, including the little one, loves it.
So, let’s get into this easy to make, easy to digest, easy to carry pita bread.
Key for the perfect pita pockets

It is an easy bread, but just like any other recipe, you have to break the code. And the secret code for perfect pita is baking it at the right temperature and for the right time.
It should be made at high temperatures in an oven or over a very-hot skillet on stovetops.
Pita is baked at a very high-temperature >=465 0F so that the water in the dough gets evaporated very quickly and the bread puffs up, creating a pocket inside called pita pockets. So, in case your pitas do not puff up, try raising the temperature of your oven. There is a usual error of +10 to 15 o F in our home ovens.
I have detailed both the cooking ways for achieving perfect pockets every single time, in the baking section.
Amazing ways in which you can use these whole wheat pitas are:
- Fill with Falafel and Kebobs
- Bake and make Pita Chips
- Scoop Hummus or Baba Ghanoush
- Enjoy with any curry recipe
- Use as a Pre-cooked Pizza Base
- Use as a sandwich base for literally anything!
What is pita bread made of?
Usually pita bread is made of all-purpose flour, but they can be easily made with whole wheat flour. Whole wheat pita has less calories. They are not just healthy and easy to digest due to high fiber content , but also easier to make.
In addition to flour, you just need some salt, oil and a fermenting agent. Be it the commercial yeast or sourdough.
How to make this whole-grain pita bread using a sourdough starter or Instant Yeast?
The process for making pitas with yeast and sourdough is more or less the same. The difference is just in terms of time.
While working with sourdough, you have a longer timeline, whereas, with instant commercial yeast, you might be good to bake in fewer hours.
Instant yeast might take 2-3 hours for the bulk rise, whereas the natural fermentation may take 3-6 hours depending on the ambient temperature. Patience is the key with sourdough.
Also, pita bread just like any other bread made with sourdough is much more flavorful due to the longer fermentation periods.
If you are making the pita bread with instant yeast read the blue text.
For those making the sourdough pita bread, read the red text.
Instructions in black are common for both the methods.
Step 1 : For making perfect wheat Pitas
Yeast Activation
I like to mix sugar in warm water and then add the active dry yeast. I always activate yeast separately. This way, I am sure that my yeast is alive and flourishing.
Take care that the water should not be very-hot else, the yeast will die.
We add sugar as the yeast will feed on sugar and multiply in warm water as these are ideal conditions for yeast to grow and flourish. After 5 minutes or so, the solution should become frothy and foamy.
Now that we know that the yeast is active and vigorous we are ready to knead the dough.
Feeding the starter.
Those, who are opting to make it with a sourdough starter, start by feeding the starter. If you already have a ripe starter, measure it and move to the second step.
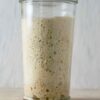
Making wheat pitas with sourdough discard
Pita bread is an excellent recipe to use sourdough discard. Just use more amount of discard as compared to the ripe or well-fed starter. For a recipe of this size about 90 g of sourdough discard, is sufficient. I have made excellent sourdough pitas with 90g of discard for about 2 cups of flour.
The only issue that you might experience is that it will take a little longer for the bulk rise when compared with a ripe starter dough.
Step 2: Kneading the dough
I combine all the dry ingredients; whole wheat flour, salt, and oil. Mix them all together. You can use little all-purpose flour if you want. But in that case, the total volume of water needed will vary from that given in the recipe.
Then, I add the activated yeast solution or ripe starter to the dry mixture and add water. Start to mix with a wooden spatula until the dough comes together and forms a big ball. At this point, I cover the dough and let it rest for 15 minutes. It helps in the dough hydration and makes it easy to work with.
Now comes the time to lose some elbow grease. I knead it for good 7-8 minutes till it becomes smooth and supple. Using some flour in between is a welcome step if the dough gets sticky. Soft and smooth dough with a supple surface is the key to soft pitas. Smoother the dough, softer will be the pita bread.
You can employ your stand mixture for the job. Using the dough hook attachment knead at low- speed settings for 5-6 minutes or until you get a smooth dough.
Lightly greasing the bowl before placing the dough prevents the dough from sticking to the bowl while proofing.
Step 3: Bulk Rise the dough
We want to place the dough in a warm and moist place to rest for at least two hours or until it doubles in size. The sourdough will take much longer.
You can also cold rise it by placing the dough in a refrigerator overnight. Pitas made from the cold risen dough are so much better in flavor and texture. I prefer to let the dough rise overnight.
Then, I remove the dough from the bowl and place it onto a floured work surface. I like to shape it into a big round before dividing it into 8 equal pieces.
Step 4: Shaping and rolling the pitas


I shape each piece into a small round ball by pulling dough from the sides and sealing it under using the side of my hand. Next, I cover the balls with a kitchen towel and let them rest for about half an hour.
I am looking for another rise in the dough. They should become a little fuller in size.
Now, it's time to start rolling the pitas. I start by Sprinkling a small amount of flour on the work surface. I gently pat the dough ball flat with my fingers.
Few people are expert enough to roll it with their fingers only, but I switch to a rolling pin here. I roll them round to about ¼ inch of thickness.
If you prefer fatter pitas, just roll them thicker. I like to dust some flour on the bread round, as it looks good when they come out of the oven. While I repeat the process with the rest of the dough balls, I protect my rounds from drying out, by covering them with a kitchen towel.
Step 5: Proofing the wheat pitas
Let them proof covered with a kitchen towel. The wheat pitas made with instant yeast will take 45-50 minutes to proof whereas the sourdough ones may take about 2 hours.


Step 6: Baking the pita bread
Oven baking
Before heating the oven, place the baking stone/ cast iron skillet/ baking tray inside the oven. I bake my pita bread at 465 0F.
Once the oven is preheated, I carefully and quickly place the rolled wheat pita bread on the hot baking surface.
We need to be quick here. Do not keep the oven door open for long, else the oven temperature will fall. And the pita bread might not puff up.
When trying hard to do everything right from the beginning, we certainly cannot afford to fail at the last moment.
Also, It is crucial to keep an eye on these beauties as they bake very fast. When they are puffed up on one side, I immediately flip them over and bake for another 3 minutes.
It takes me 5-6 minutes to bake my pita bread. Your time may vary depending on the thickness of your pitas.
Making the wheat pita breads on stove top


For stovetop cooking, I place my cast iron skillet on high flame. Once the skillet is really hot, I reduce the flame to medium.
A trick that I use is to dust some flour on the skillet. If the flour turns brown, you know that the skillet is ready for the pitas.
I place one rolled pita round on the skillet. Now, here is the key. Flip the pita as soon as you see it rising even slightest. This is crucial, as pitas should not have those bubble spots like naans. So, as we flip to the other side, before the formation of any apparent bubble, the other side of bread will come in complete contact with the skillet surface and cook evenly, without any bubble spots and puff up completely.
If you think that the wheat pita bread is getting brown spots, turn down the heat and flip the pita to other side.
Cook the bread evenly on both sides. I flip again if it needs more baking on the other side.
If it didn't puff all the way, don’t worry. Just give it another try, by taking it on to the direct flame. With the help of Steel-tongs flip it on direct flame. Remember, we are not looking to burn or char it.
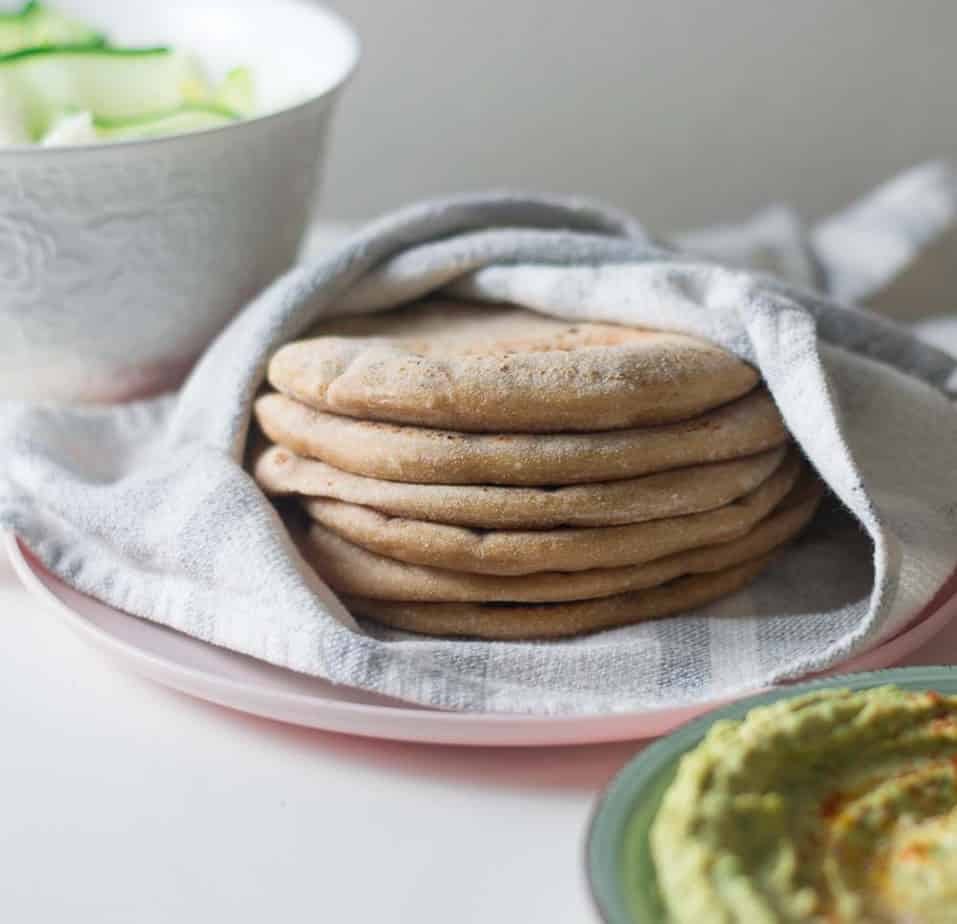
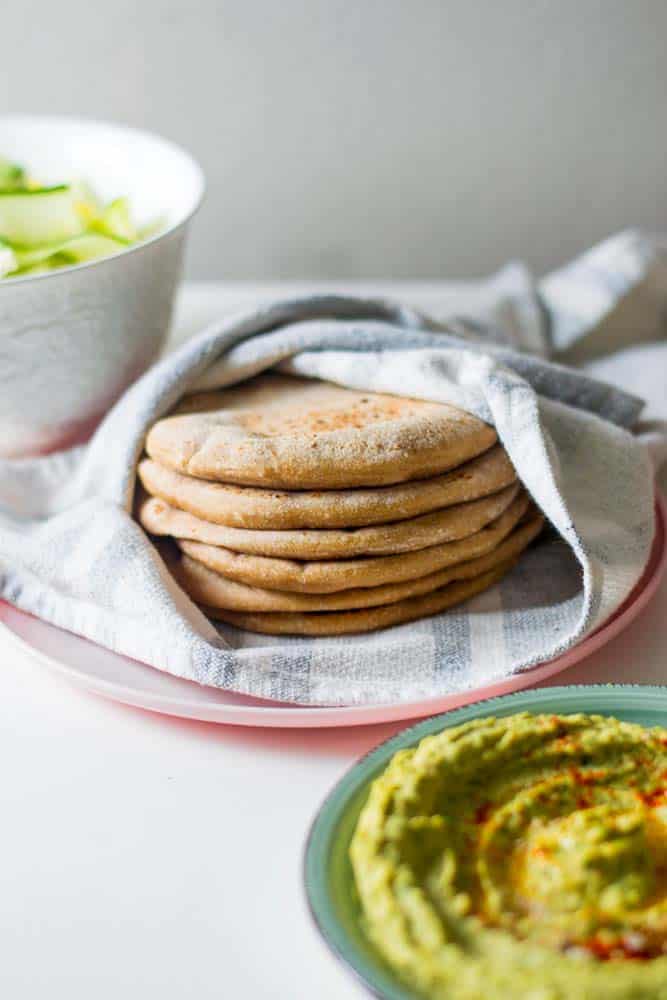
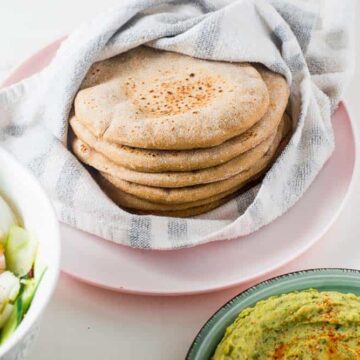
Step 6: How to best store Pita bread?
Pitas are best when eaten fresh after cooking. If you are aiming for the softest pita bread, make sure to immediately cover them with a kitchen towel.
You can make them all at once and store in an airtight bag for several days and can be eaten as they are or warmed in a toaster oven. Another way is to wrap multiple pitas in foil and heat in the oven until warm.

Alternately store the dough in the refrigerator and bake fresh bread as and when needed.
Baked wheat pita bread can also be frozen with wax paper between the layers and packed in a freezer-safe bag for up to three months.
Some pro tips for perfect Wheat pitas
Tips for perfect wheat pita bread:
- Yeast activation: We definitely don’t want to mess up this step. We need to give it ample food ( Sugar) to feed on, and a favorable environment to reproduce ( warmth through warm water and moisture?? Water guys!!)
Don’t kill your yeasts with super-hot water. If you have a thermometer, 90 – 100 0 F is the optimum temperature for fermentation.
- Also, later in the process, we want to keep our yeast happy and growing. So, throughout the bread making, we will take care that our yeast stays happy and multiply well, by giving it a warm and moist environment to rise.
- While baking, don’t keep the oven door open for too long while placing or flipping your pita bread. Also, take care not to burn yourself as we are working at really high temperatures here.
- Take care not to overbake the pitas, this will make the pitas hard. Flip them immediately as you see them puffing.
- Remove from oven and cover immediately with a kitchen towel while other pitas bake. This will keep them soft.


If you make these beauties, do tag me on Instagram. I love to see your creations.
Click to find more sourdough based recipes.
A complete guide for wheat pita bread: sourdough/ Yeast
Ingredients
- 280 g Whole wheat flour (>2 cups)
- 180 g Water
- ¼ oz Dry yeast / 80 g ripe starter
- 1 teaspoon Sugar (only if using yeast fermentation)
- 1 teaspoon Salt
- 1 ½ tablespoon Olive oil
Instructions
Making the dough:
- Add water, yeast, and sugar to a large bowl, stir to combine. Let it sit uncovered for 5- 10 minutes or till the yeast solution becomes frothy. If making with sourdough, measure the starter, add water, and set aside.
- In a big bowl add whole wheat flour, olive oil, and salt.. Mix well and add the yeast mixture or the water- sourdough starter mixture. Stir with a wooden spoon until it comes together as a big lump of dough. Cover and let it rest for 15 minutes.
- Sprinkle a little flour on the countertop. Turn dough onto a floured work surface, knead for 7-8 minutes. Knead till the dough becomes smooth. Add little flour if needed, but try not to use too much.
- Grease a bowl with olive oil and transfer the dough to that bowl. Cover with a wet kitchen towel or plastic wrap.
Bulk rise and shaping and proofing the wheat pita bread
- Allow it to bulk rise until the dough has doubled. They yeast fermented dough (2-3 hours)will bulk rise way faster than the sourdough(3-6 hours).
- Divide dough into six pieces, make each into a ball. Cover and allow it to sit for 30 minutes.
- Working with one dough ball at a time (leave the others covered), use your fingers to start to shape the ball into a disc, being careful not to press all the air out. Finish by using a rolling pin to roll disc into ¼ inch thick rounds.
- Continue the process until all balls are rolled round. Keep the rolled ones covered with a kitchen towel.
- Now let the instant yeast pitas proof for 45-50 minutes. And for the sourdough ones, it may take double the time.
Baking the wheat pitas
If baking them in oven:
- Place a baking tray or a pizza stone on the bottom rack of the oven and preheat the oven to 465 0F.
- Place the rolled pitas on the hot baking stone and bake for about 2-3 minutes until the bread puffs up.
- Then flip it and bake for another minute or so. Take care not to overbake the pitas, this will make the pitas hard. Flip them immediately as you see them puffing.
- Remove from oven and cover immediately with a kitchen towel while other pitas bake.
If making them on a stove top:
- Choose a heavy bottom skillet. Cast iron would work best. Heat the skillet at high flame.
- When you know that the skillet is hot enough, reduce the flame to medium. A trick that I use is to dust some flour on the skillet. If the flour turns brown, you know that the skillet is ready for the pitas.
- Place a rolled pita on the skillet. Flip the bread as soon you observe a first signs of puffing up. Flip immediately as the bread starts to rise.
- Now let the bread cook on the other side until it fully puffs up. Flip and cook the first side again if needed.
- Remove from the heat and cover immediately with a kitchen towel and repeat with the rest of the pita breads.
- Serve hot and as your heart desires!
Notes
- Yeast activation: We definitely don’t want to mess up this step. We need to give it ample food ( Sugar) to feed on, and a favorable environment to reproduce ( warmth and moisture through warm water).
- Don’t kill your yeasts with super-hot water. If you have a thermometer, 90 – 100 0 F is the optimum temperature for fermentation.
- Also, later in the process, we want to keep our yeast happy and growing. So, throughout the bread making, we will take care that our yeast stays happy and multiply well, by giving it a warm and moist environment to rise. In my opinion, an oven with lights on is the best place.
- When baking, don’t keep the oven door open for too long while placing or flipping your pita bread. Also, take care not to burn yourself as we are working at high temperatures here.
- Take care not to overbake the pitas, this will make the pitas hard. Flip them immediately as you see them puffing.
- Remove from oven and cover immediately with a kitchen towel while other pitas bake. This will keep them soft.
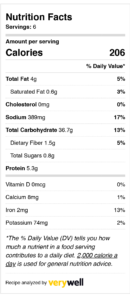
Nutrition facts


Samadrita
I tried this pita bread. Came out great. My pita bread would always turn hard. Now I know why?Thanks for the recipe n details.
Meenakshi
You are most welcome dear. I would love to see your bake. Do share the image by tagging me on the Gram if possible.