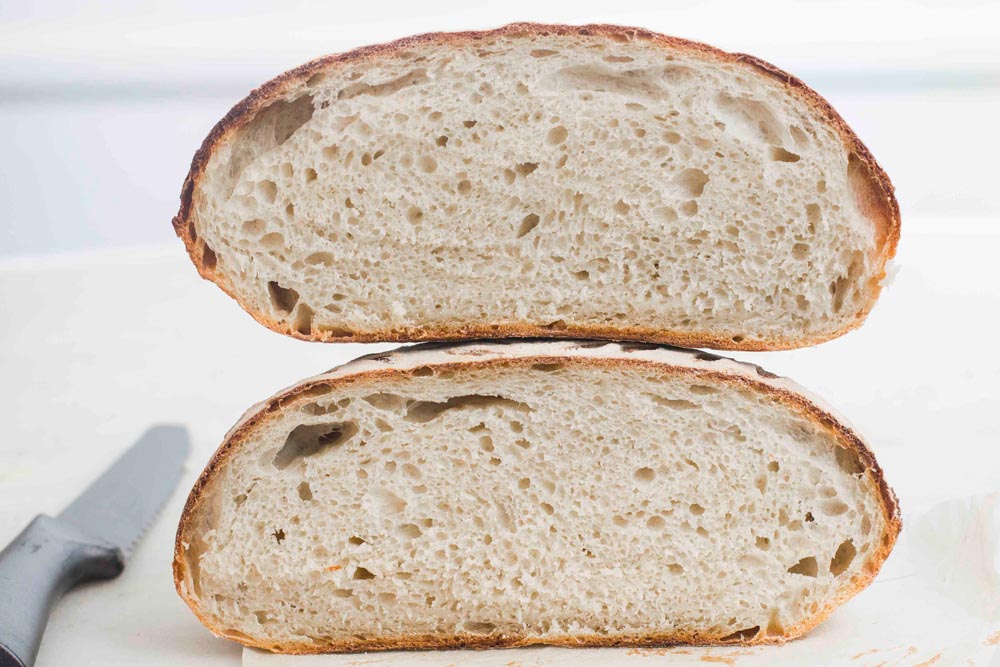
This all-purpose flour sourdough bread is no-knead, uniform crumb, and has a perfectly crispy crust with a flavorful chewy interior. Today let me share the recipe for every day sourdough boule with decorative pattern scoring with you.
What do you do when your heart desires a home-made tangy slice of sourdough bread? You enter your kitchen and bake it.
Neah!!! Not with this one. You need to build it. Baking sourdough bread is a time-intensive process. But for a bread fanatic like me, this labor is a pleasure.

I have used some vital wheat gluten in this recipe. Generally, whole wheat flour bread requires vital wheat gluten. However, adding little to the all-purpose flour yields the dough structure every close to that of bread flour.
Activating the starter for the all-purpose flour sourdough bread
For all the home bakers who refrigerate their sourdough starter, initiate by feeding the starter. Before we begin with the bread making we need to ensure that our starter is active and ripe.

How do you know that the starter is ready for this beautiful all-purpose sourdough bread?
How should the ripe sourdough starter look?
- It should be bubbly
- It should have a lot of even gaps( air bubbles) when seen from outside
- The top should be dome-shaped (convex)
- The top should not be sinking inwards.
- It should pass the drop test
Wondering what is a Drop Test?
In a small bowl take cold water. To which add a drop of ripe starter. If the starter floats, it is ready to be used.
Autolyse the dough for the all-purpose Flour Sourdough bread
Autolyse is a process of combining the dough and water just to a point when no dry flour is left. And letting the dough rest for half an hour to an hour .
It is a biological reaction, more commonly known as self-digestion, which refers to the destruction of cell components through the action of its own enzymes.
Autolyse is a French cognate for autolysis coined by the French baking professor Raymond Calvel who recommended the procedure as a means of reducing kneading time, thereby improving the flavor and color of bread.
What actually happens during autolyse?
- Hydration of flour (hence reduces the kneading time) and activation of enzymes.
- Enzyme protease is released, which breaks down the proteins in the flour. We all know that Gluten is the main protein in the flour. In simple language, it means that the gluten is developed as a result of this enzymatic activity. In a physical sense, it makes the dough stretchy and elastic.
- Amylase is another enzyme that breaks down the starch in the flour to form simple sugars. These sugars will act as food for the wild yeasts that will be added through the medium of starter in the next step.
Let’s look at the benefits of autolyze
- Quicker Hydration of flour
- Facilitates in gluten structure development
- Release sugars for the feeding of yeast
- Reduces the overall kneading time.
- Improves the flavor of the bread
- Improves the color of the bread (sugars released during autolyze caramelizes on baking and imparts beautiful color to our loaves)
Incorporating salt and starter into the Dough
To incorporate the starter, I like to spread it over the dough and poke it into the dough. I use my fingers to continuously poke the dough and push the starter into the dough. Similarly, I spread saltwater over the dough and again incorporate it using my fingertips.
Then, I pull up some dough from one side and tuck it under the opposite side. I repeat this stretch and fold several times going around the dough till the starter is well incorporated.
(At this stage if you feel that there is a need to knead the dough. Give it a shot. It is easier to do that in a bowl. Just make sure you wet your fingrs first.)
Stretching and Folding the all-purpose flour sourdough bread
This step is crucial for gluten development.
- It helps to strengthen the gluten structure.
- Incorporates air into the dough.
- It eventually helps to achieve the much-desired bounce in the dough.
Stretching and folding multiple times makes up for the conventional kneading.
In one session I like to do 6 Stretch and Folds. Gluten strands do not align instantly. They take time. Giving a rest between the stretching sessions helps the stretched gluten to align. So, the rest period of 35 minutes or so is very crucial

Before first Stretch and Fold After fourth Stretch and Fold


Ideally, four sessions of stretching and folding should work. Before concluding to stretch the dough make sure the dough is ready.
A few ways to ensure that the dough is ready:
- Before starting the final stretching and folding, the dough should have retained its shape. It means it should not have fallen flat in the bowl. It should have retained a convex top from the previous stretching and folding.
- Also, before doing the final stretch, perform a windowpane test.
Using both hands hold the dough between your first two fingers and respective thumbs. Stretch them in opposite directions till it forms a thin translucent dough window pane. If the dough does not tear while doing so, it is ready. And if it tears apart easily, consider performing another round of stretch and fold.
What is a Windowpane test?
Using both hands hold the dough between your first two fingers and respective thumbs. Stretch them in opposite directions till it forms a thin translucent dough window pane. If the dough does not tear while doing so, it is ready. Your dough passes the Windowpane test.
Bulk rising
Bulk rising could take anywhere between 2-6 hours depending upon the temperature and humidity status of the ambient environment.
- The dough should look doubled in size or close. Sometimes, on a hot summer day, the dough can be ready in less than 2 hours. So, always keep an eye on the dough.
- Keep checking the dough by making a gentle poke into it. If the dough bounces back slowly leaving behind a slight indentation, it is ready to be shaped.
Shaping the sourdough bread
Before giving the final shape to the dough, I like to do a pre-shaping. It prepares the dough for the final shaping. Also, resting the dough after pre-shaping further strengthens the top of the dough.
Interested in other sourdough recipes?

This Sourdough Hokkaido Milk Bread made with Tangzhong is a super soft and fluffy milk bread recipe. Tangzhong method ensures that it stays soft and moist for days. Soft, light, fluffy, and springy Japanese bread will surely delight you.
There are numerous techniques for shaping the dough. I like to simply gather the sides and fold over one another. I have explained it in the instructions.
Also, a little tension building is crucial to create a uniformly round shape. Rotating and dragging the dough towards yourself strengthens the outer surface of the dough. This is crucial so that the dough retains its shape and structure even after final proofing.
Final proofing
In this particular recipe, I keep the dough in the fridge for final proofing. Slow or low-temperature proofing helps to develop a great flavor. Refrigerating slows down the yeast activity and bacterial activity dominates the scene. More lactic acids are produced that imparts the sourness to the dough. The dough gets more depth of flavor during the cold rise.
Also, for doing decorative scoring on the dough, it is always a good idea to start with the cold risen dough.
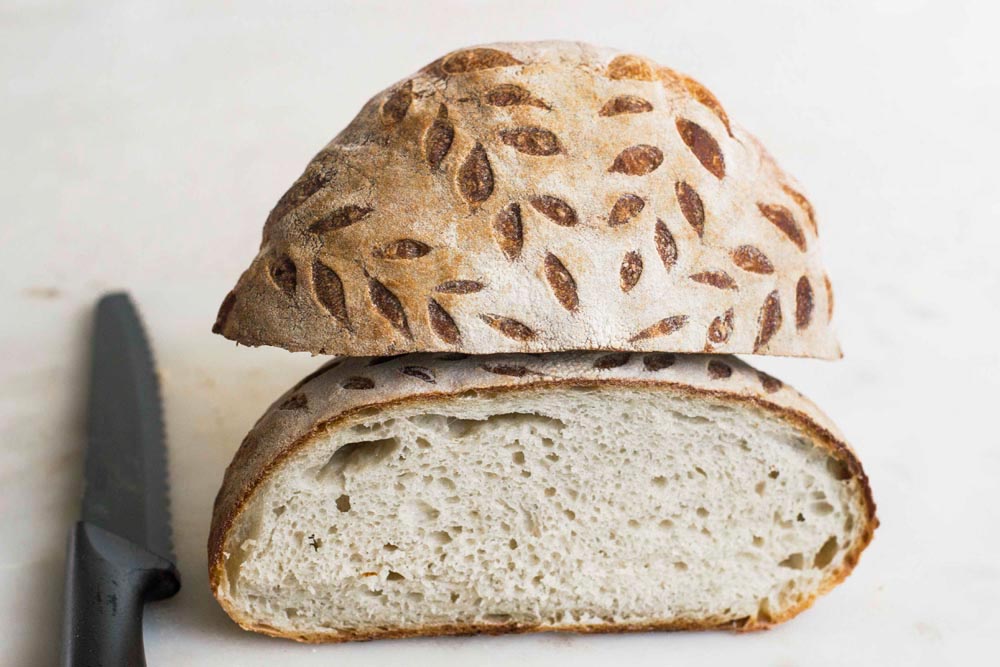
Sourdough Bread Scoring pattern
Scoring patterns on cold risen sourdough:
- The cold risen dough is easy to work with.
- It holds its shape well and does not fall flat easily while scoring.
Even if the dough is proofed at room temperature consider refrigerating it for at least an hour before scoring.
Decorative scoring designs can take 1-2 minutes and the last thing you want is to see is your dough falling flat in the process.
Bread flour holds the shape better because of its high gluten content. So, it is easier to do decorative scoring on them. But with proper handling, all-purpose flour sourdough bread can also be scored equally beautiful.
Scoring the Decorative pattern
For a design like this one, I use a thread to guide me. I make impressions with the help of a thread by gently pressing it against the dough. It will divide the dough into 8 equal parts. Taking these 8 lines as a guide, I score 6-7 sets of slashes to create a wheat stalk. Take note to make one slash at the top, right at the beginning of the line itself. This design will have 8 wheat stalks.

Baking the all-purpose flour sourdough boule
Bake on your choice of tool. I generally bake in my Dutch oven. Though the pattern contrasts come out looking better when baked on open surfaces like baking stone or baking steel. When baking the bread on open surfaces, I always place a tray with ice cubes on the bottom rack to induce steam into the oven.
If you guys are interested, I can do a separate post on scoring a boule. Do let me know in the comments below.
Slicing and storage
Always let the bread cool before slicing. At least for half an hour. If you do not wait you might regret this haste. Remember that cooling the bread is the final step of baking the bread. If you slice the hot bread right out of the oven, the crumbs are possibly wet and soft. We definitely don’t want that.
The best way to store this all-purpose sourdough bread is at room temperature. Wrap well in a kitchen towel, to prevent drying out. The lactic acid fermentation improves the shelf life of sourdough bread. So, it can be comfortably kept at room temperature for 4-5 days without the fear of mold and bacterial spoilage. Consider freezing if looking to store for a longer period.

This Indian Flatbread: Naan made with sourdough discard is chewy, yet soft and flavorful without any yogurt! It is a foolproof stovetop naan recipe. It is very forgiving. There is no way you can mess it up.
Few of our most loved sourdough recipes:
- How to make Sourdough Hokkaido Milk Bread
- How to make sourdough hot dog buns from scratch?
- No-knead wild yeast bread: It’s a Yeast water bread recipe
- A complete guide for wheat pita bread: sourdough/ Yeast
Give this beautifully scored sourdough bread a try and do share your experience.
Happy baking!
Recipe card for all-purpose flour sourdough bread

How to make all-purpose flour sourdough bread with pretty scoring pattern
Ingredients
- 412 grams All-purpose flour
- 38 grams Vital wheat gluten
- 75 grams Ripe Starter
- 10 grams Salt
- 340 grams Water
Instructions
- Start by activating the starter: Feed the starter and make sure that it is ripe and bubbling before starting with the bread.
- Autolyse:° Add vital wheat gluten to the all-purpose flour and mix well. Now add the measured quantity of water. Retain about 1 ounce of water. °Using the back of a wooden ladle just combine the flour and water till no dry flour is left. °Clean the flour stuck to the sides of the bowl by a wet hand and cover the bowl with a cling wrap or a kitchen towel. Let it rest for an hour.
- Add the starter and salt: °Spread the starter over the dough. °Now using the tip of your fingers push the starter into the dough. Keep poking the dough with the fingers of both hands for about half a minute. °Then add salt to the retained water and spread over the dough. Repeat the poking process for another minute with slightly wet fingers.
- Stretching and Folding: °Now start from a side away from you, stretch the dough from on side, lifting it upwards and bring it towards yourself and fold it under the opposite side of the dough. Slightly turn the bowl about 45 degrees and again reach under the dough with wet fingers stretch upwards and fold under the opposite side. Keep repeating until you are satisfied that the starter has been well incorporated. °Ideally, a full circle of 5-6 stretches and folds should suffice. It should take about a minute or so. Now let the dough rest for about 35 minutes.°After 35 minutes repeat the stretching and folding. Let rest for another 35 minutes. °Repeat this 3 more times till you can stretch the dough without breaking. °Before the final stretch and fold, the dough should have retained a mild dome structure. °Do the windowpane test and if the dough passes the test stop folding and stretching. ( ideally, 4 sessions should suffice. In case it does not, give another stretch and fold)
- Bulk rise: °Cover the dough and leave it for bulk rising in a warm and humid corner of your kitchen. °It should become fuller and increase in volume ( about twice the initial volume). °It could take 2-6 hours depending on the ambient temperature. °Do the poke test. If the dough bounces back slowly on poking leaving behind an indentation. It is ready to be shaped.
- Shaping: °Take out the bulk risen dough on to a flour-dusted work surface. Stretch the dough in opposite directions using both hands making two wings. °Then bring these stretched ends towards the center and tuck them in the center one over other. Pick the bottom edge to roll towards the center and keep rolling all the way to the top till the dough has eventually flipped over with the seam facing down.° Let it bench rest in this position for 15 minutes before final shaping.°For final shaping flip over the rested dough so that the seam side faces up. Now gather the sides and bring them towards the center. Tuck the left side to the middle and the right side on the left side. Grab the bottom and tuck over the right side in the middle. Now similarly grab the top edge and tuck over the bottom flap in the middle of the boule. Now use a bench scraper to lift the dough and flip over.°Hold the dough using the fingers of both hands away from your body and gently drag it towards you, building the tension on the outer surface. Rotate the dough and repeat till a firm and evenly round boule is formed.
- Final proofing: °Dust the top of the dough with flour. Place a bench scraper under and flip the shaped dough into a flour-dusted proofing basket. °Cover with a kitchen towel and let it proof overnight in the refrigerator (8-10 hours).°Make a gentle poke into the dough, if it bounces back slowly leaving an indent, it is ready to go into the oven.
- Scoring the pattern on sourdough bread and Baking: °Preheat the oven to 500 0F with the Dutch oven inside.°Flip the dough on to a parchment paper. °Give a gentle spray of water and dust evenly with flour. Use your hands to gently spread it evenly on the dough. °Using a thread makes 4 crisscross lines across the dough. °Then, score holding a scoring blade/ lame at 45 degrees angel to create 8 even wheat stalks.°Pull out the Dutch oven and transfer the dough by lifting it with the parchment paper into it. Carefully put it back in the oven.°Bake for 20 minutes and then remove the lid of the Dutch oven and reduce the temperature to 450 0 F. Bake for another 20 minutes.
- Slicing and storage: °Remove from the oven and let the bread cool for 45 minutes before slicing.°Using a bread knife, slice the bread into half or quarters depending on your choice.°Store the leftover bread at room temperature by wrapping it in kitchen towels. It will keep fresh for 4-5 days. °For prolonged storage transfer to a freezer-safe bag and put it in the freezer.
Notes
- Drop test: Use it to check if the starter is ripe. Into a small bowl take cold water. Now, add a drop of the starter. If the drop of starter floats, it's ready.
- Windowpane Test: Use it to determine whether the dough is ready to be shaped. It confirms the optimum gluten development. Using both hands hold the dough between your first two fingers and respective thumbs. Stretch them in opposite directions till it forms a thin translucent dough window pane. If the dough does not tear while doing so, it is ready. And if it tears apart easily, consider performing another round of stretch and fold.
- Poke test: Use it to determine if the dough has proofed enough.If the dough bounces back slowly on poking leaving behind an indentation. It is ready.
Nutrition Facts

Nutrition Info


Jane J
It’s beautiful! I thought sourdough needed a deep slash that forms an ear for expansion. This is so much prettier!
Samaira Mathews
Dear Meenakshi. your design is cute, but I was just wondering if you have some simpler designs that would be less intricate. And a beginner like me can pull them off.
Meenakshi
I am planning to include various simpler designs in a separate post on scoring. Thanks for the suggestion Samaira.
Neeti Pal
Such a pretty design Meenakshi! Thanks a lot for walking through the entire process.
Meenakshi
You are so welcome, dear.
Linda Contrera
It is such a craftly scored bread. So pretty.
Meenakshi
Thanks a lot Linda. so glad you liked it dear.
Natasha
Found exactly what I was looking for, start to finish complete recipe with scoring tips. It would have been even better if there were some images of the scoring process.
Meenakshi
I am glad Natasha that you found it useful. as far as images are concerned, I am working on that. Thanks for the suggestion.