Crusty, golden, and delightfully chewy, homemade sourdough bread bowl takes your favorite soups and dips to the next level. Whether you’re serving a rich, creamy chowder or a hearty stew, these naturally leavened bread bowls add rustic charm and incredible flavor to every bite. Made with an active sourdough starter, this recipe yields a perfectly crisp exterior and a soft, airy interior—ideal for soaking up delicious broths.
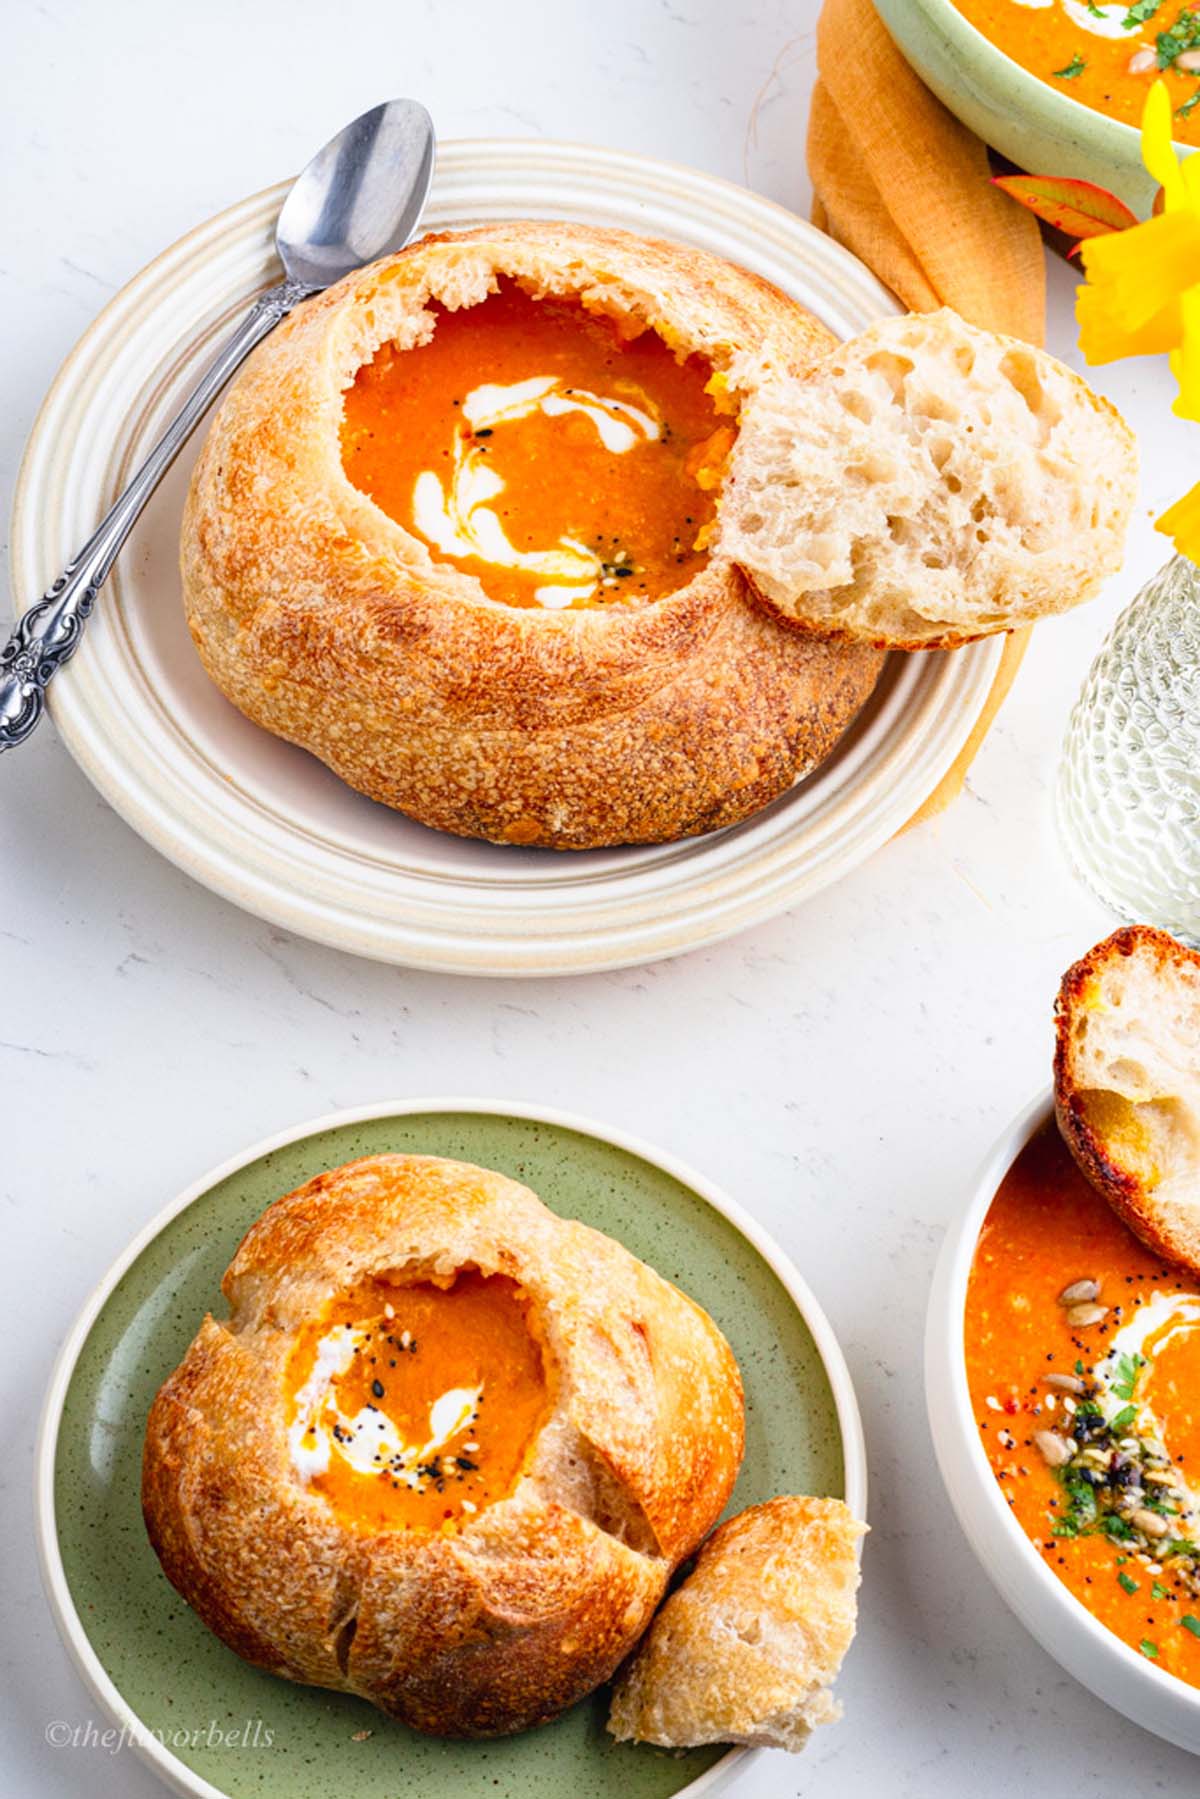
In this guide, you'll learn step-by-step how to make sourdough bread bowls from scratch, along with pro tips to get that panera sourdough bread bowl like artisan-style crust at home. Get ready to impress your family with bakery-quality homemade bread bowls that are as beautiful as they are delicious!
Jump to:
🧂 Ingredient Notes & Substitutions
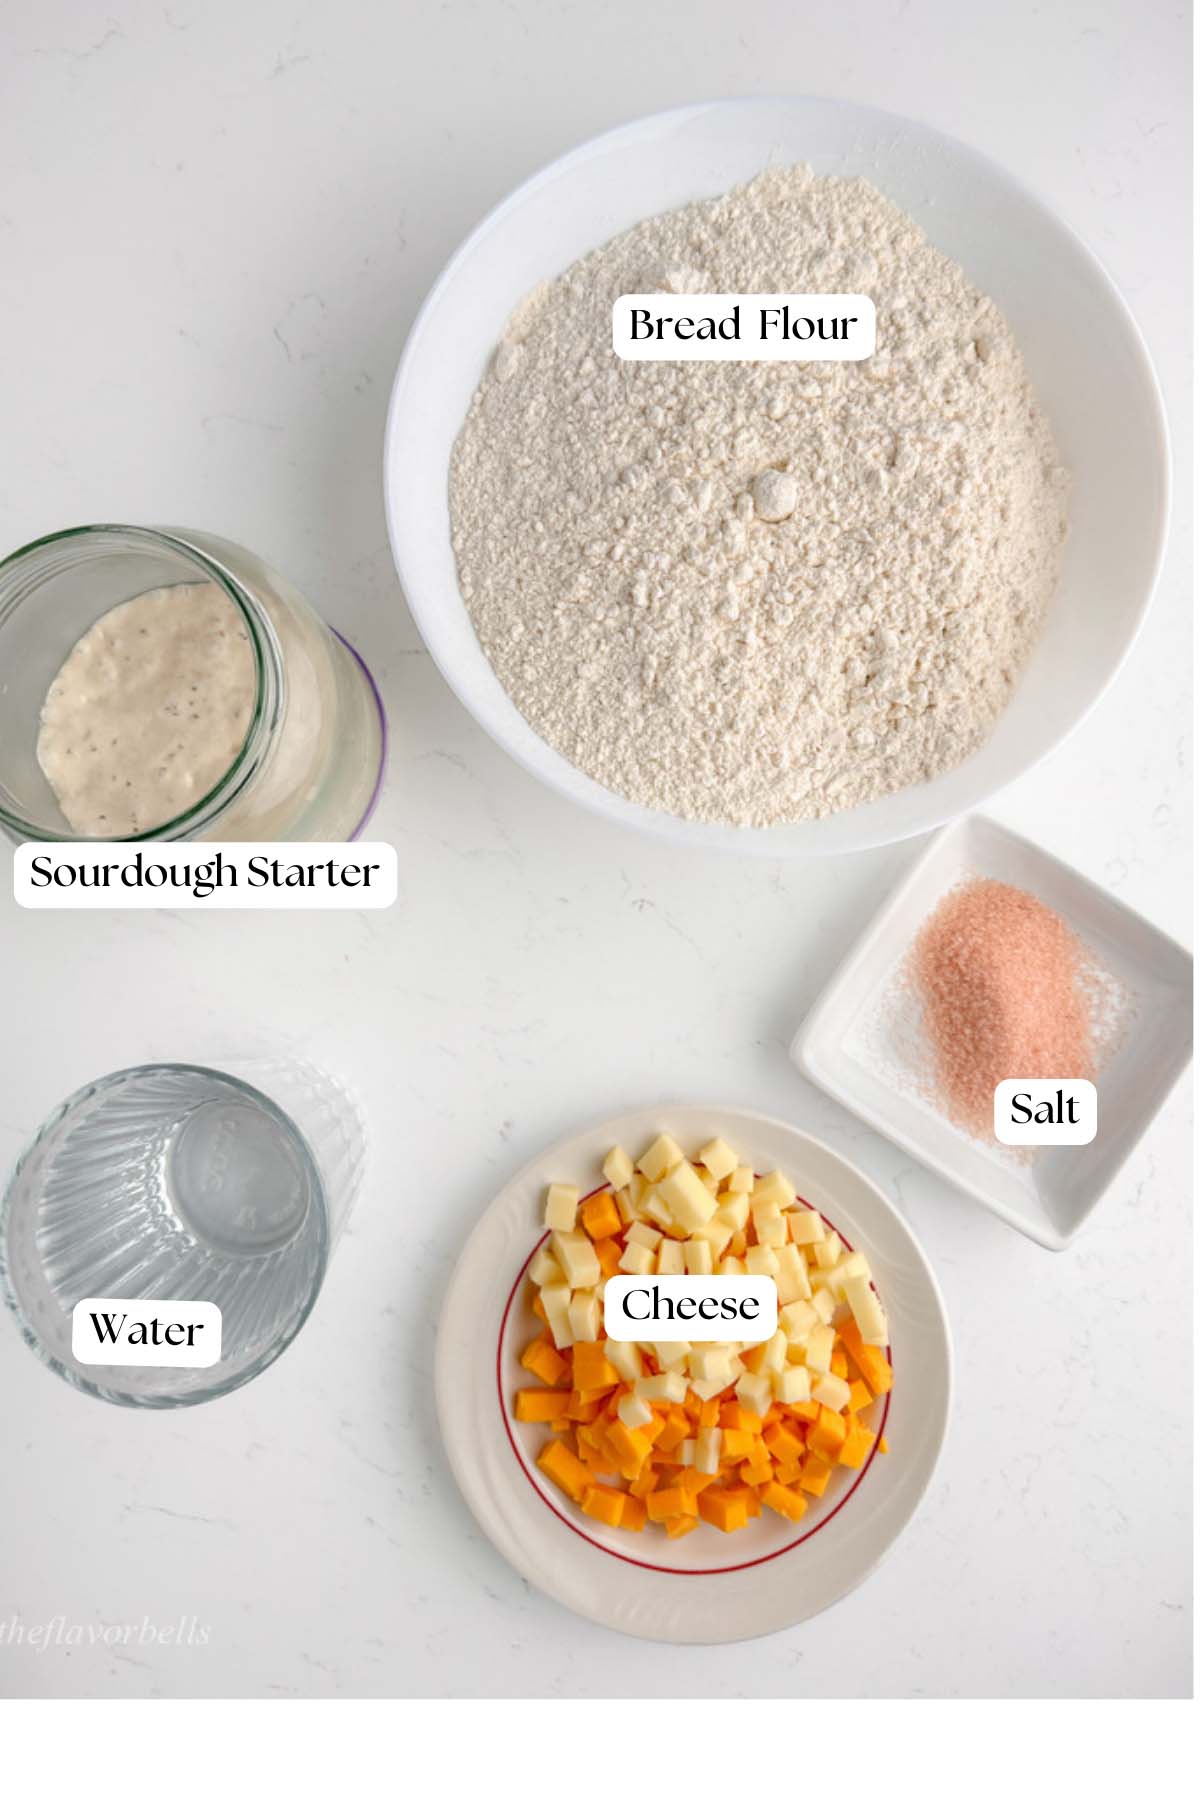
Flour Options:
This sourdough bread bowl recipe uses bread flour for its high protein content, which helps create a sturdy structure perfect for bread bowls. If you don’t have bread flour, you can substitute it with all purpose flour, but the bread may be slightly less chewy. For a heartier texture, you can replace up to 20% of the flour with whole wheat flour—just add a little extra water to compensate for its higher absorption rate.
Water Adjustments:
Hydration levels can vary depending on the flour brand and climate. The recipe uses 74 percent hydration. If your dough feels too dry, add small amounts of water (a teaspoon at a time) until you reach a soft, pliable consistency. If it's too sticky, let it rest longer during autolyse to allow the flour to fully absorb the water before adding more flour.
Sourdough Starter:
A well-fed, active sourdough starter is crucial for achieving the right rise and flavor. If your starter is sluggish, consider giving it a few extra feedings before baking. If you don’t have a starter yet, you can make one from scratch (though it takes about a week), or you can use a store-bought starter culture. For a quicker option, substitute with ¼ teaspoon of instant yeast and adjust the fermentation time accordingly, though you’ll miss out on the signature tangy flavor.
Salt Matters:
Fine sea salt, Himalayan Pink salt, or kosher salt works best in this recipe. Avoid iodized table salt, as it can sometimes affect fermentation. If using coarse salt, dissolve it in a small amount of water before mixing it into the dough for even distribution.
🥣 Equipment needed
- Kitchen Scale: Precision is key in sourdough baking. A kitchen scale ensures accurate measurements of ingredients, especially flour and water, for consistent results.
- Mixing Bowls: You’ll need a set of sturdy mixing bowls for combining your ingredients, coil folding, and allowing the dough to rest during bulk fermentation.
- Proofing Baskets (Bannetons): These are essential for shaping and supporting your dough during its final rise. They also create a beautiful spiral pattern on the crust.
- Baking steel or pizza stone: You can simply use a baking sheet if you do not have any of these.
- Dough Scraper: This handy tool helps you handle sticky dough, divide it, and shape it without losing its structure.
- Lame or Sharp Knife: Scoring the dough before baking is crucial for controlling how the bread expands in the oven. A lame (a double-sided blade) or a very sharp knife works best.
- Parchment Paper: This makes transferring your dough into the hot Dutch oven easier and prevents sticking.
- Stand Mixer (Optional): While sourdough can be mixed and kneaded by hand, a stand mixer with a dough hook attachment can save time and effort, especially when working with larger batches or sticky dough.
🔪 How to make sourdough bread bowl?
Step 1: Mix and Develop the Dough
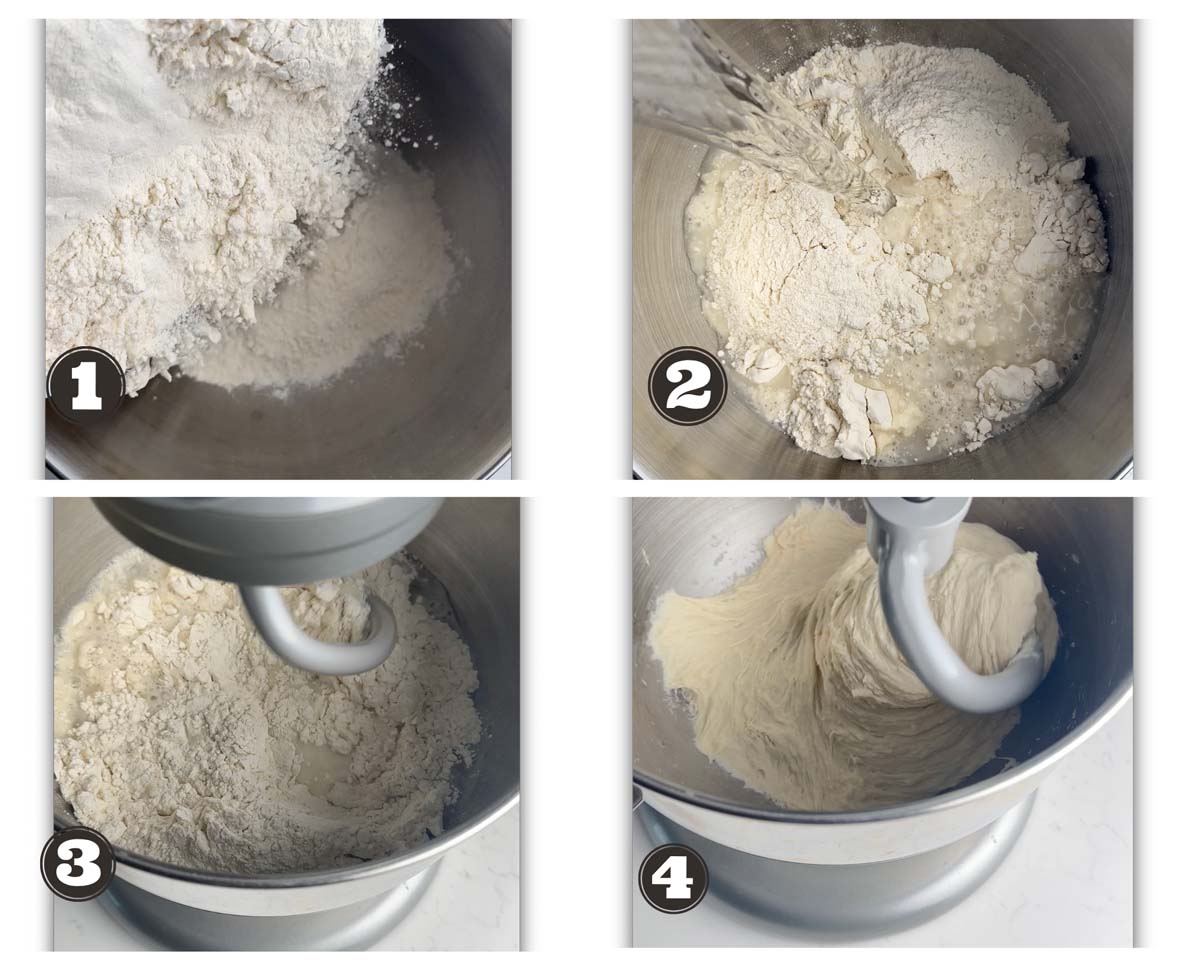
In the bowl of a stand mixer fitted with a dough hook, combine the bread flour and most of the water (reserving a small amount for later). Mix on low speed until a rough, shaggy dough forms, then increase the speed slightly and knead for about 5-7 minutes, until the dough starts developing some elasticity. Cover the bowl with a damp towel and let it autolyse for 40 minutes—this crucial rest period allows the flour to absorb the water and kickstarts gluten development.
If you are not using a stand mixer simply combine flour and water in a large mixing bowl and combine them using your hands. Pay some extra effort to combine the dough and work a little bit with it to initiate gluten development.
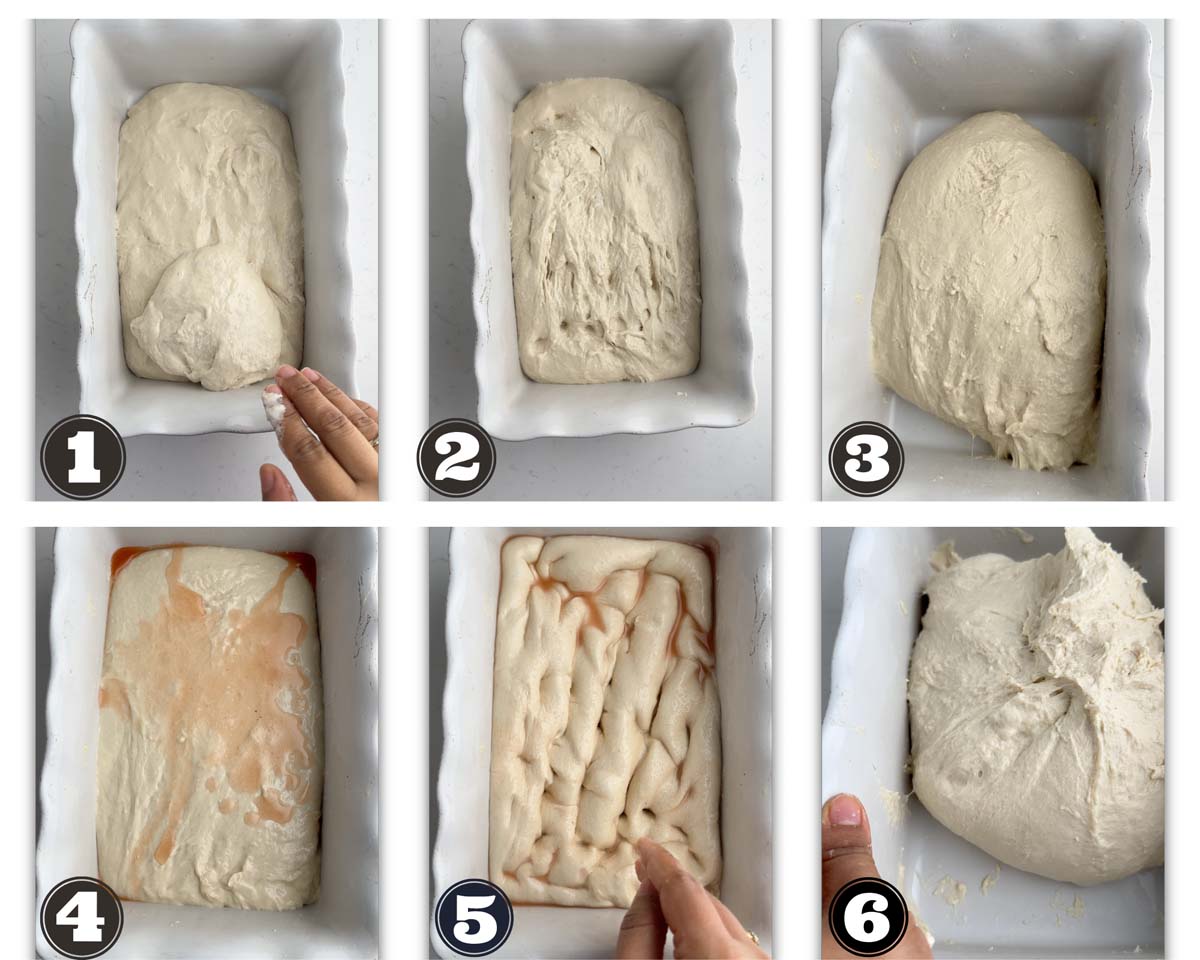
After autolyse, add the sourdough starter and incorporate it using the pincer method—gently pinch and fold the dough multiple times to distribute the starter evenly. Next, mix the remaining water with the salt (this is called bassinage) and slowly incorporate it into the dough. This step ensures the dough remains well-hydrated while keeping its strength. Once fully combined, move on to bulk fermentation.
Step 2: Bulk Fermentation with Coil Folds or Stretch and Folds
Transfer the dough to a lightly greased or floured bowl and let it bulk ferment at room temperature for 4 to 6 hours. During this period, perform four rounds of coil folds or stretch and folds, spaced about 30 minutes apart. To do a stretch and fold, grab one side of the dough, stretch it upwards, and fold it over itself. Rotate the bowl and repeat on all sides.
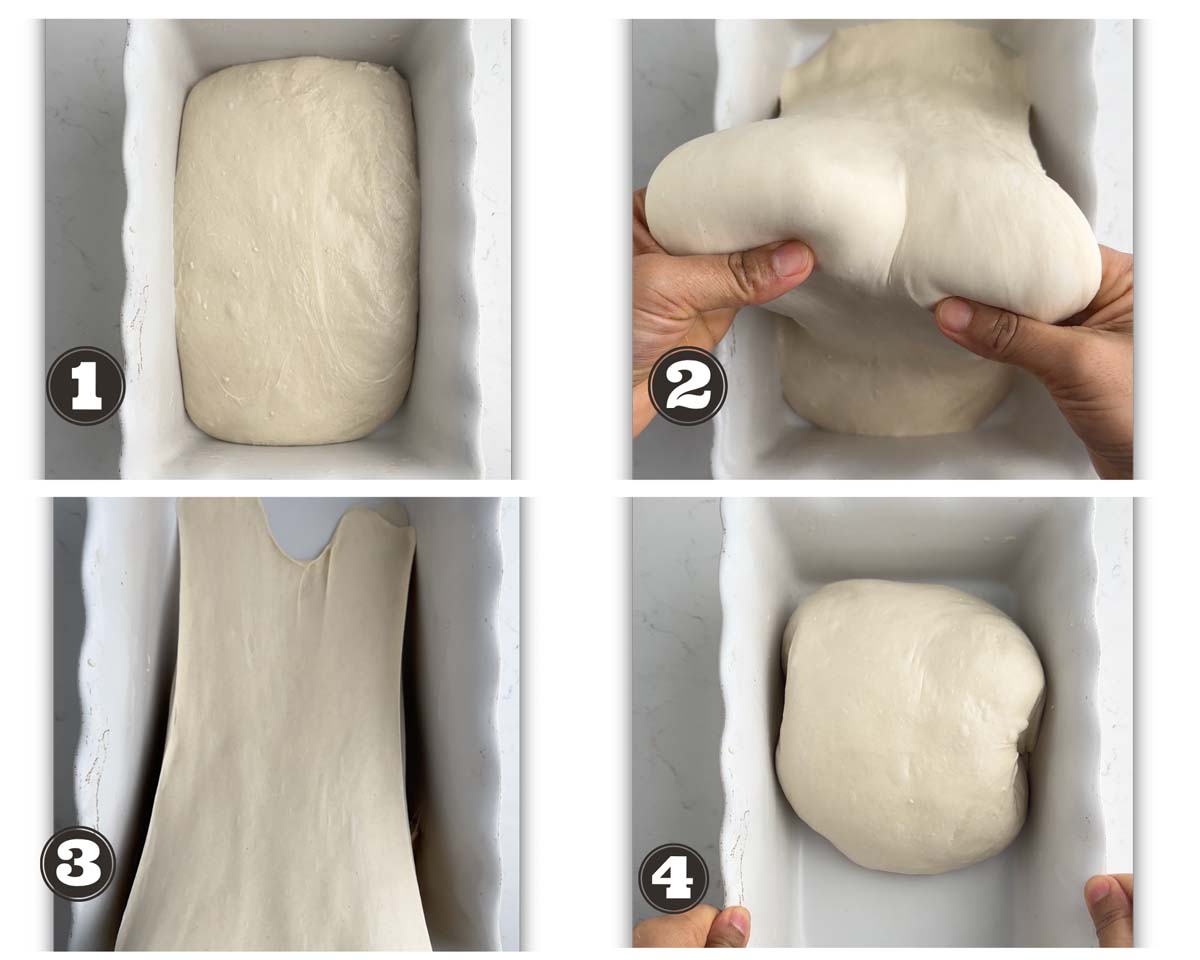
For a coil fold, gently lift the dough from the center with both hands, allowing the edges to tuck under as it folds onto itself. These techniques build gluten strength while maintaining dough elasticity. By the end of bulk fermentation, the dough should be puffy and slightly domed, though not necessarily doubled in size.
Step 3: Divide dough and shape Bread Bowls
Once bulk fermentation is complete, lightly flour a clean surface and turn the dough out onto it. Depending on the size of bread bowls you want, you can divide the dough into four small sourdough bread bowls or two larger ones. For reference, I made two small bread bowls and one large bowl, so feel free to adjust based on your needs. You can make 5 mini sourdough bread bowls using this recipe. For a bigger crowd, simply double the recipe.
To shape, gently gather the edges of each portion toward the center, then flip it over and use your hands to create surface tension by rolling it into a smooth ball. Let them rest uncovered for 20 minutes to allow the gluten to relax before final shaping.
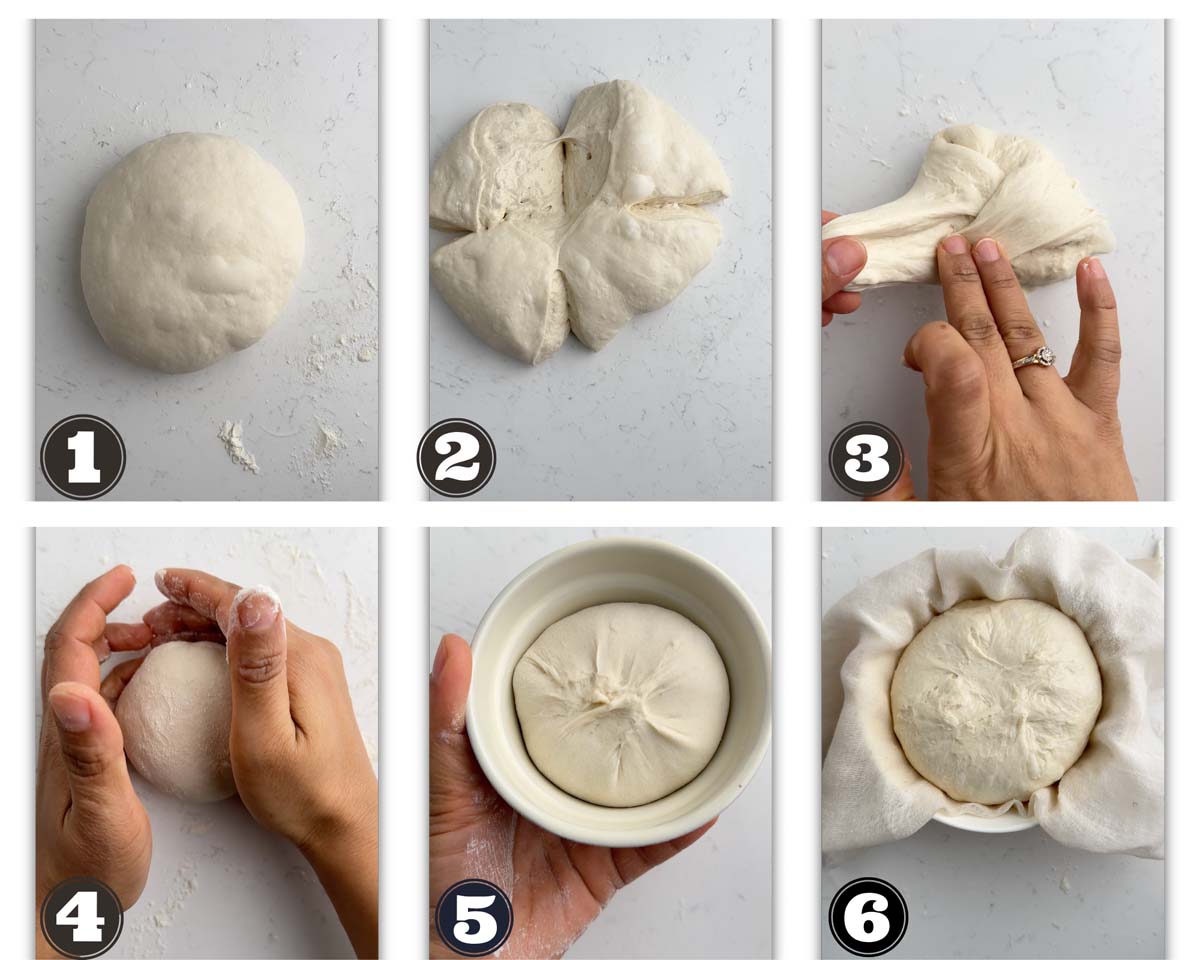
After the dough has rested, reshape each ball by gently pulling the edges under to create a smooth, taut surface. Then, place each shaped dough ball seam-side up into a small, floured bowl to help maintain its shape during proofing. Cover them with a towel to prevent drying.
Step 4: Proofing
At this stage, you have two proofing options:
- Cold Retard (Overnight Proofing): For enhanced flavor and better structure, you can refrigerate the dough overnight. This slows fermentation and allows the sourdough flavors to develop more deeply. When ready to bake, let the dough come back to room temperature for about 30-60 minutes before baking.
- Room Temperature Proofing: If you're short on time, you can let the dough proof at room temperature for 1 to 2 hours, or until it looks slightly puffy and airy.
This flexible proofing method allows you to work with your schedule while still achieving delicious results!
Step 5: Bake the Bread Bowls
Preheat your oven to 475°F (250°C) at least 45 minutes before baking to ensure it's fully heated. If using a baking stone, baking steel, or parchment paper lined baking sheet, place it inside the oven to preheat—this helps create a crisp, well-baked crust.
For steam, prepare a pan filled with lava rocks on the lower rack of the oven while preheating. When you place the bread in the oven, carefully pour hot water over the lava rocks—this generates steam, which helps achieve a crispy, golden crust.
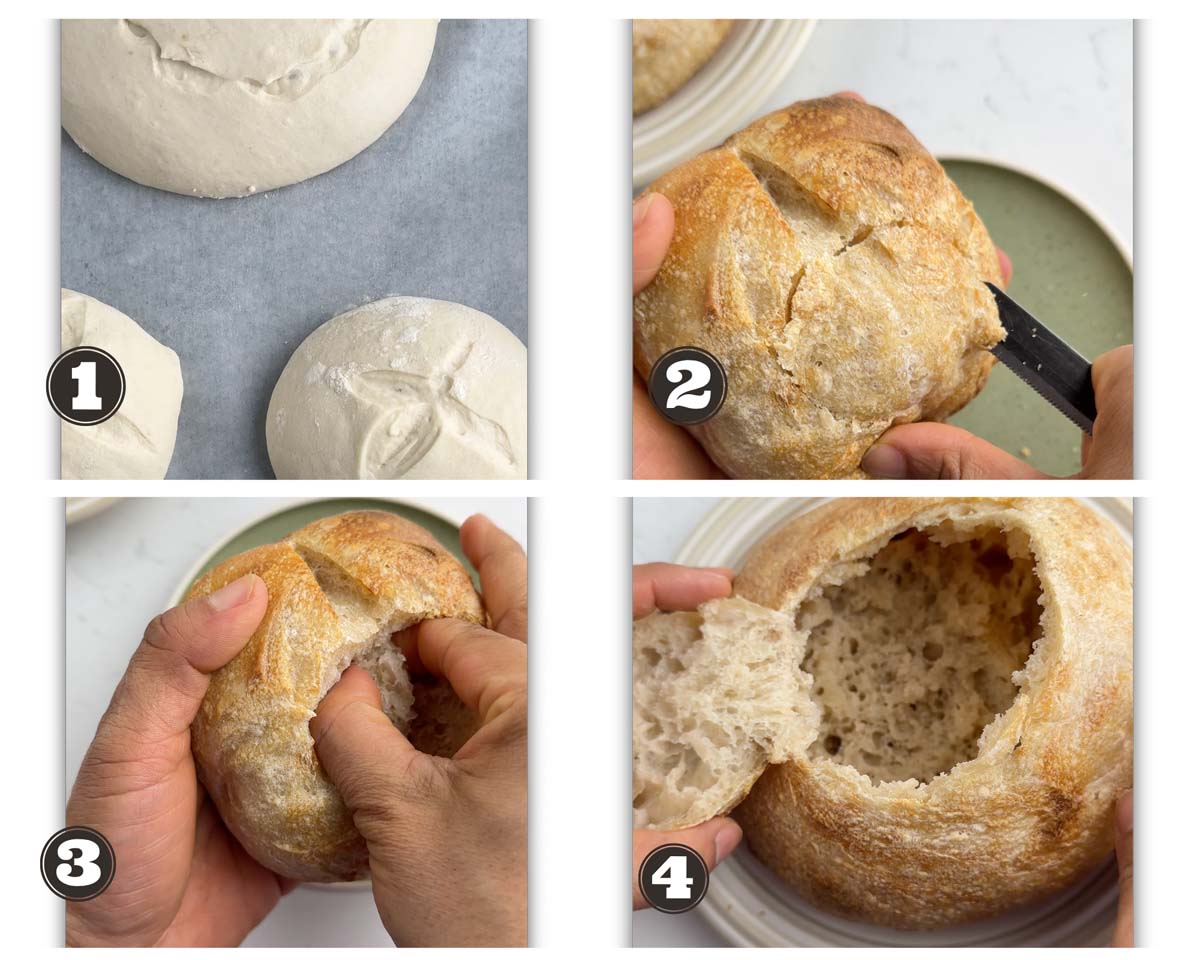
Just before baking, take your proofed dough, gently invert it onto parchment paper, and score the tops with a sharp blade to allow for controlled expansion. Transfer them onto the preheated baking surface and bake for 20-25 minutes for larger bread and 15-17 minutes for the smaller ones. Bake until the bread bowls are deep golden brown and sound hollow when tapped on the bottom.
Step 6: Cool and prepare sourdough bread bowls for soup
Once baked, transfer the bread bowls to a wire rack and let them cool completely before cutting. This step is crucial, as cutting too soon can result in a gummy interior.
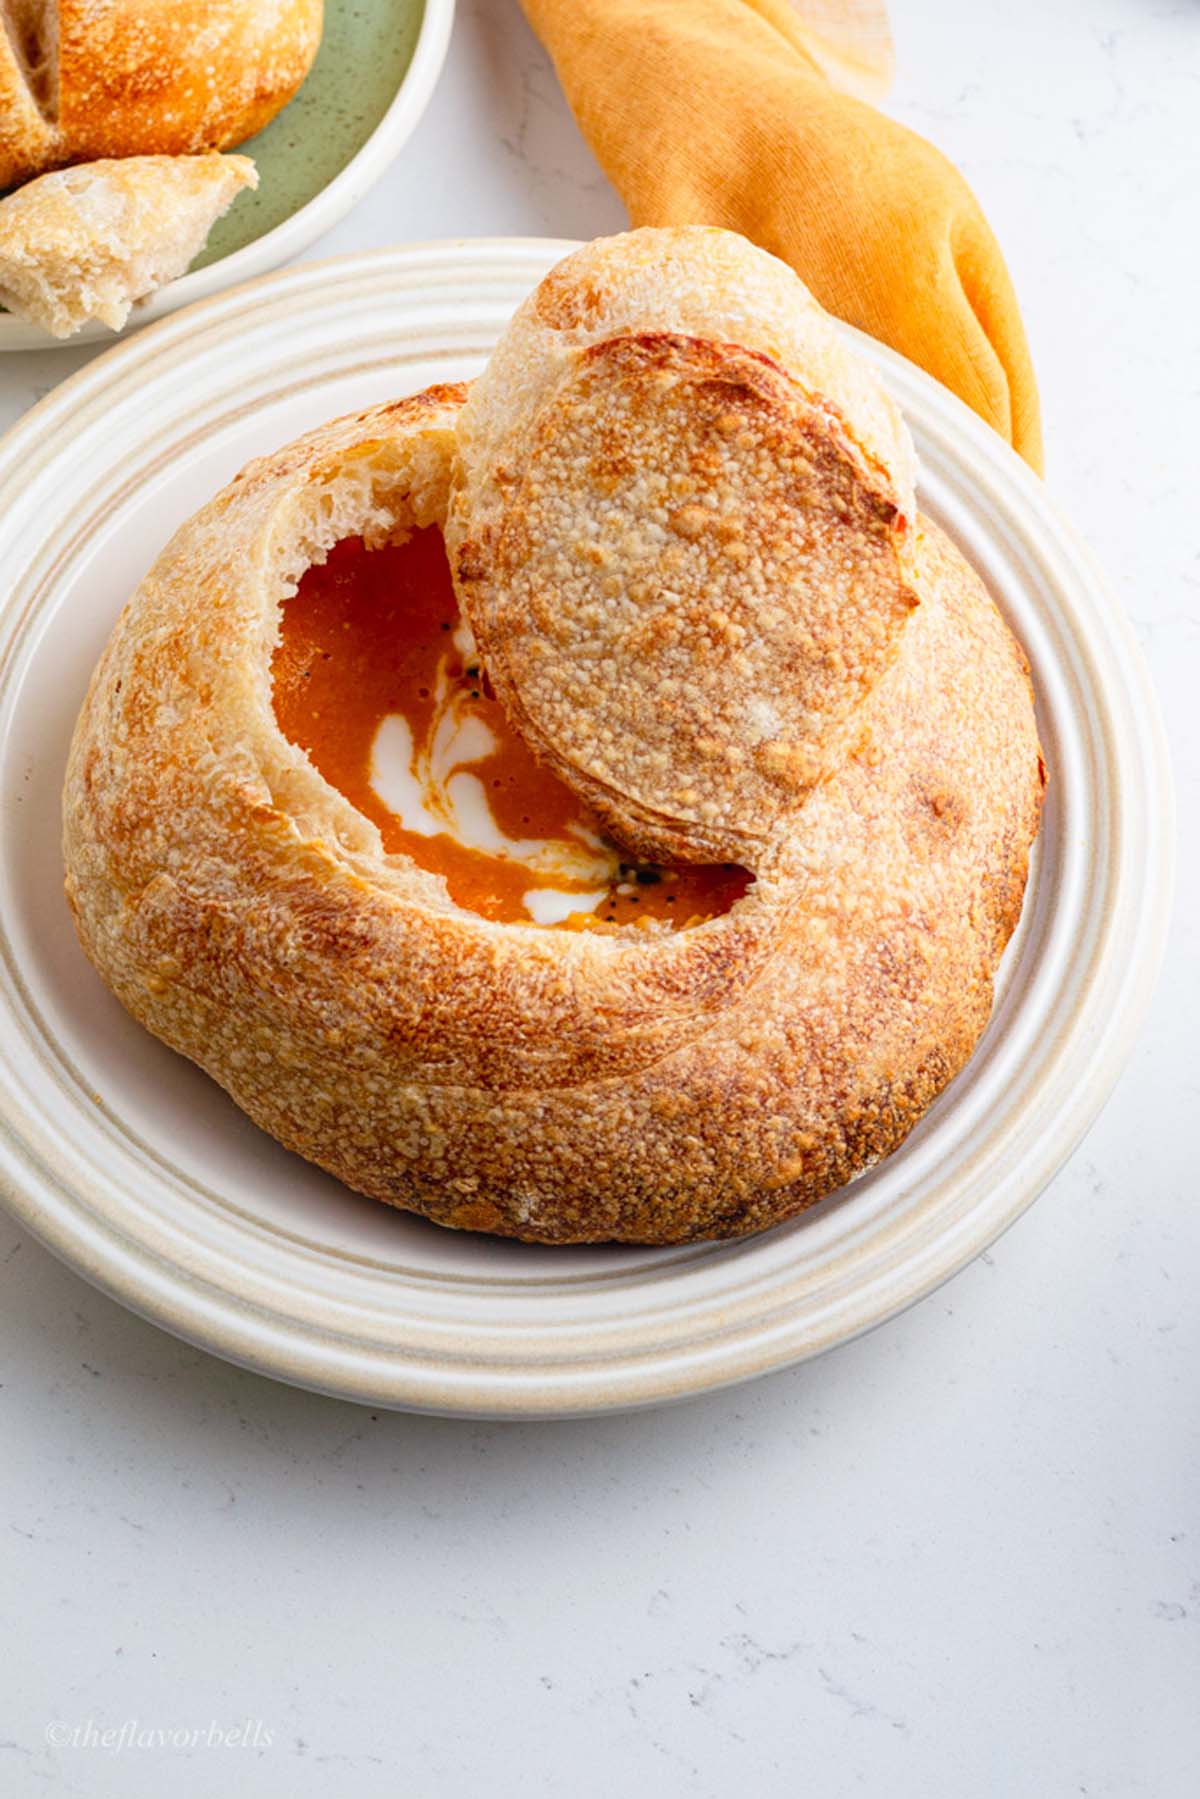
To turn your bread into a bowl, use a thin and small serrated knife to carefully cut a circular opening on the top of each loaf. Gently remove the cut-out lid, then use your hands or a spoon to scoop out some of the soft breadcrumbs from inside, creating space for your soup or filling. Be careful not to remove too much, leaving a bit of bread inside helps maintain structure and prevents leakage.
Now your homemade sourdough bread bowls for soup are ready to be filled with your favorite soup, chowder, or dip! Enjoy!
⏰ Baking Schedule
| Day & Time | Step to Do |
| Day 1, 9:00 a.m. | Mix bread flour and water in a stand mixer. Knead for 5-7 minutes until elastic. Cover and let autolyse for 40 minutes. |
| Day 1, 9:40 a.m. | Add sourdough starter and incorporate using the pincer method. Let the dough rest for 20 minutes. |
| Day 1, 10:00 a.m. | Mix salt with the remaining water (bassinage) and incorporate it into the dough. Let the dough rest for 30 minutes. |
| Day 1, 10:30 a.m. | Perform the first round of coil folds or stretch and folds. |
| Day 1, 11:00 a.m. | Perform the second round of coil folds or stretch and folds. |
| Day 1, 11:30 a.m. | Perform the third round of coil folds or stretch and folds. |
| Day 1, 12:00 p.m. | Perform the fourth round of coil folds or stretch and folds. |
| Day 1, 12:30 p.m. | Let the dough rest and continue bulk fermentation until 2:30-3:30 p.m. |
| Day 1, 2:30 p.m. | Divide the dough into portions and shape into balls. Let rest for 20 minutes. |
| Day 1, 2:50 p.m. | Reshape the dough balls and place them seam-side up in floured bowls for proofing. |
| Day 1, 3:00 p.m. | Choose proofing method: - Cold Retard: Refrigerate overnight. - Room Temperature Proofing: Proof for 1-2 hours until puffy. |
| Day 1, 5:00 p.m. | (If room temperature proofing) Preheat the oven to 475°F (250°C) with a baking stone or steel. Prepare a steam pan with lava rocks. |
| Day 1, 5:30 p.m. | (If room temperature proofing) Score the dough, bake for 15-25 minutes, and cool. |
| Day 2, 9:00 a.m. | (If cold retard) Remove dough from the fridge and let it come to room temperature for 30-60 minutes. |
| Day 2, 10:00 a.m. | Preheat the oven to 475°F (250°C) with a baking stone or steel. Prepare a steam pan with lava rocks. |
| Day 2, 10:45 a.m. | Score the dough, bake for 15-25 minutes, and cool completely before turning it into a sourdough bread bowl. |
💭 Pro Tips
- Avoid over-flouring your work surface when shaping the dough. Too much flour can dry it out and affect the texture.
- Use wet hands or a dough scraper to handle sticky dough without adding excess flour.
- Bulk fermentation is crucial. Let the dough rise until it’s puffy and slightly jiggly, but not overproofed.
- Do not skip autolysis. Autolyse (resting the flour and water before adding the starter and salt) improves gluten development and dough elasticity.
- Ensure your oven is fully preheated and at the correct temperature (usually 450-475°F or 230-250°C) for a proper rise and crust formation.
- After removing the crumbs from the sourdough bread bowl, bake it in oven or air fryer to keep the crumbs crispy and prevent the bread bowl from getting soggy after adding soup.
🍽Serving suggestions or sourdough bread bowl filling ideas
Soups:
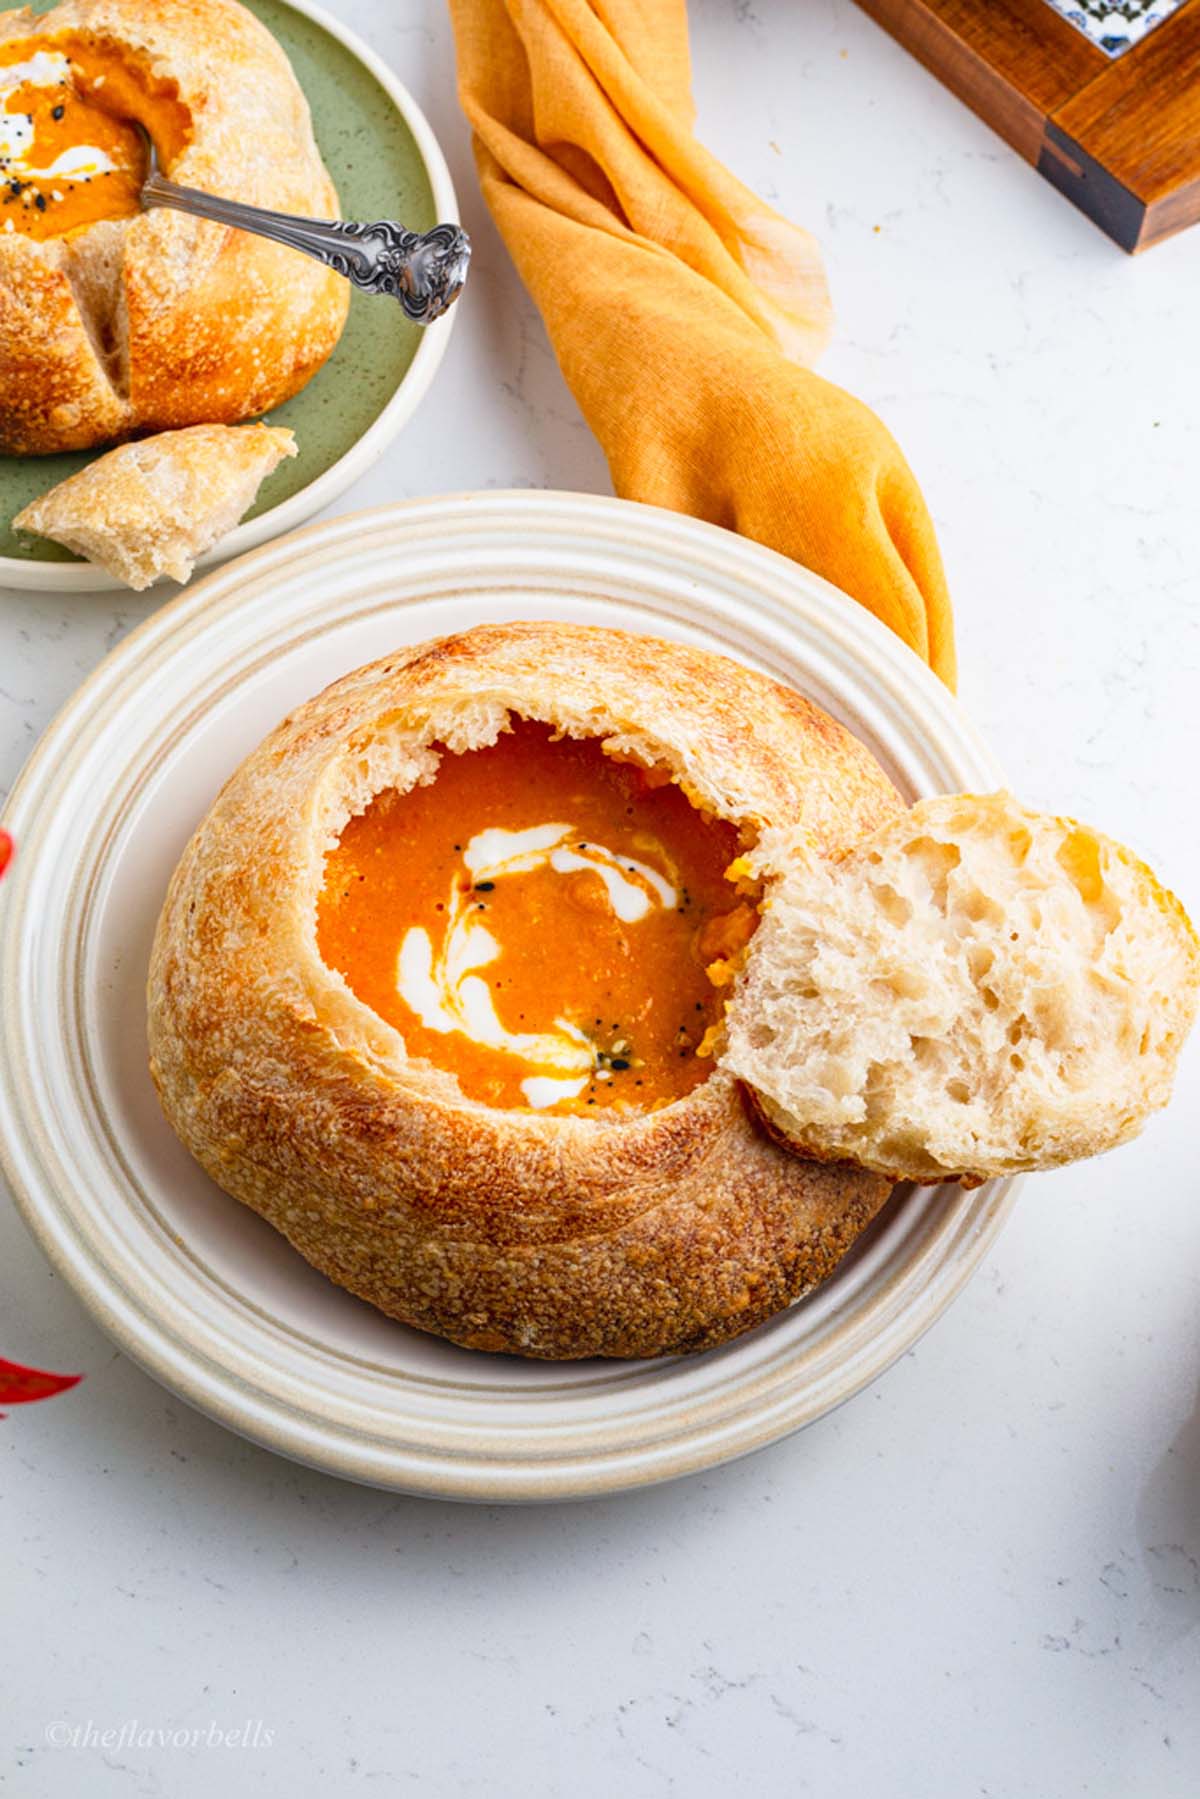
Classic Clam Chowder’s creamy, briny flavors pair perfectly with tangy sourdough, while Tomato Basil Soup offers a comforting combination that highlights the bread’s crusty exterior and soft interior; Broccoli Cheddar Soup’s rich, cheesy texture complements the hearty sourdough, Butternut Squash Soup’s sweet and savory profile makes it a fall favorite, and French Onion Soup or carrot lentil soup served in the bread bowl adds an extra layer of flavor and texture.
Dips and Spreads:
Spinach and Artichoke Dip is a creamy, cheesy option perfect for scooping with bread bowl pieces, Garlic cilantro sauce on warm bread creates a simple yet indulgent treat, Hummus or Baba Ganoush adds a Mediterranean twist, and Cheese Fondue turns the bread bowl into a vessel for dipping bread chunks into melted cheese.
Salads:
Serve Caesar Salad inside the bread bowl for a hearty meal, or opt for a light and protein-packed Chickpea Salad that pairs well with sourdough.
Breakfast Ideas:
Fill the bread bowl with scrambled eggs, bacon, and cheese for a savory breakfast, or use it as a base for a yogurt and granola parfait for a sweet start to the day.
🫙 Storage Tips
- Storing Leftovers:
- Room Temperature: If you plan to consume the bread bowl within 1-2 days, store it in a paper bag or wrapped in a clean kitchen towel at room temperature. This helps maintain the crust’s texture.
- Refrigeration: For longer storage (up to 5 days), place the bread bowl in an airtight container or plastic bag and refrigerate. Note that refrigeration can dry out the bread, so reheat it before serving.
- Freezing: To freeze, wrap the bread bowl tightly in plastic wrap and then in aluminum foil. It can be stored in the freezer for up to 3 months. Thaw at room temperature and reheat before serving.
- Reheating:
- Oven: Preheat your oven to 350°F (175°C). Wrap the bread bowl in aluminum foil and warm it for 10-15 minutes. For a crispier crust, unwrap it for the last 5 minutes.
- Microwave is not ideal for maintaining texture, though you can microwave the bread bowl for 10-15 seconds if you’re in a hurry.
- Reviving Stale Bread:
- Sprinkle the bread bowl with water and bake it at 350°F (175°C) for 5-10 minutes to restore its freshness.
❓Frequently Asked Questions
To prevent your bread bowl from getting soggy, follow these tips:
1. Choose the Right Bread
Opt for a thick-crusted, sturdy bread, such as sourdough or a rustic artisan loaf. These breads have a strong structure and can hold liquid better than soft bread like sandwich loaves or brioche.
2. Toast the Inside of the Bowl
Before adding your soup, toast the inside of the bread bowl to create a barrier against moisture:
* Preheat your oven to 375°F (190°C).
* Hollow out the bread, leaving a thick wall (about 1-inch thick).
* Brush the inside with olive oil, butter, or egg wash for added protection.
* Toast in the oven for 5–7 minutes until slightly crisp.
3. Use a Protective Layer
Create a moisture barrier by coating the inside with:
* Melted butter – Adds flavor and repels liquid.
* Cheese – Melted cheese like mozzarella or cheddar forms a waterproof layer.
* Egg wash – A thin layer of beaten egg, baked for a few minutes, helps seal the bread.
4. Control the Soup Thickness
A thicker soup or stew reduces the chances of sogginess. Avoid very thin, watery broths, or thicken them with cornstarch or flour before serving.
5. Add the Soup at the Right Time
Just before serving, pour the soup into the bread bowl. The longer the soup sits, the more moisture it absorbs. Serve immediately for the best results.
🔗Suggested Sourdough Bread recipes
If you love sourdough bread, you are bound to find the below recipes useful.
- Sourdough chocolate chip bread
- Sourdough soft pretzels
- Sourdough discard rolls
- Dark rye sourdough bread
- Blueberry sourdough bread
- Pumpkin Sourdough
- Sourdough Croissants
- Sourdough Ciabatta
- Chocolate sourdough Bread
- Sourdough Sandwich bread
- Cheesy sourdough breadsticks
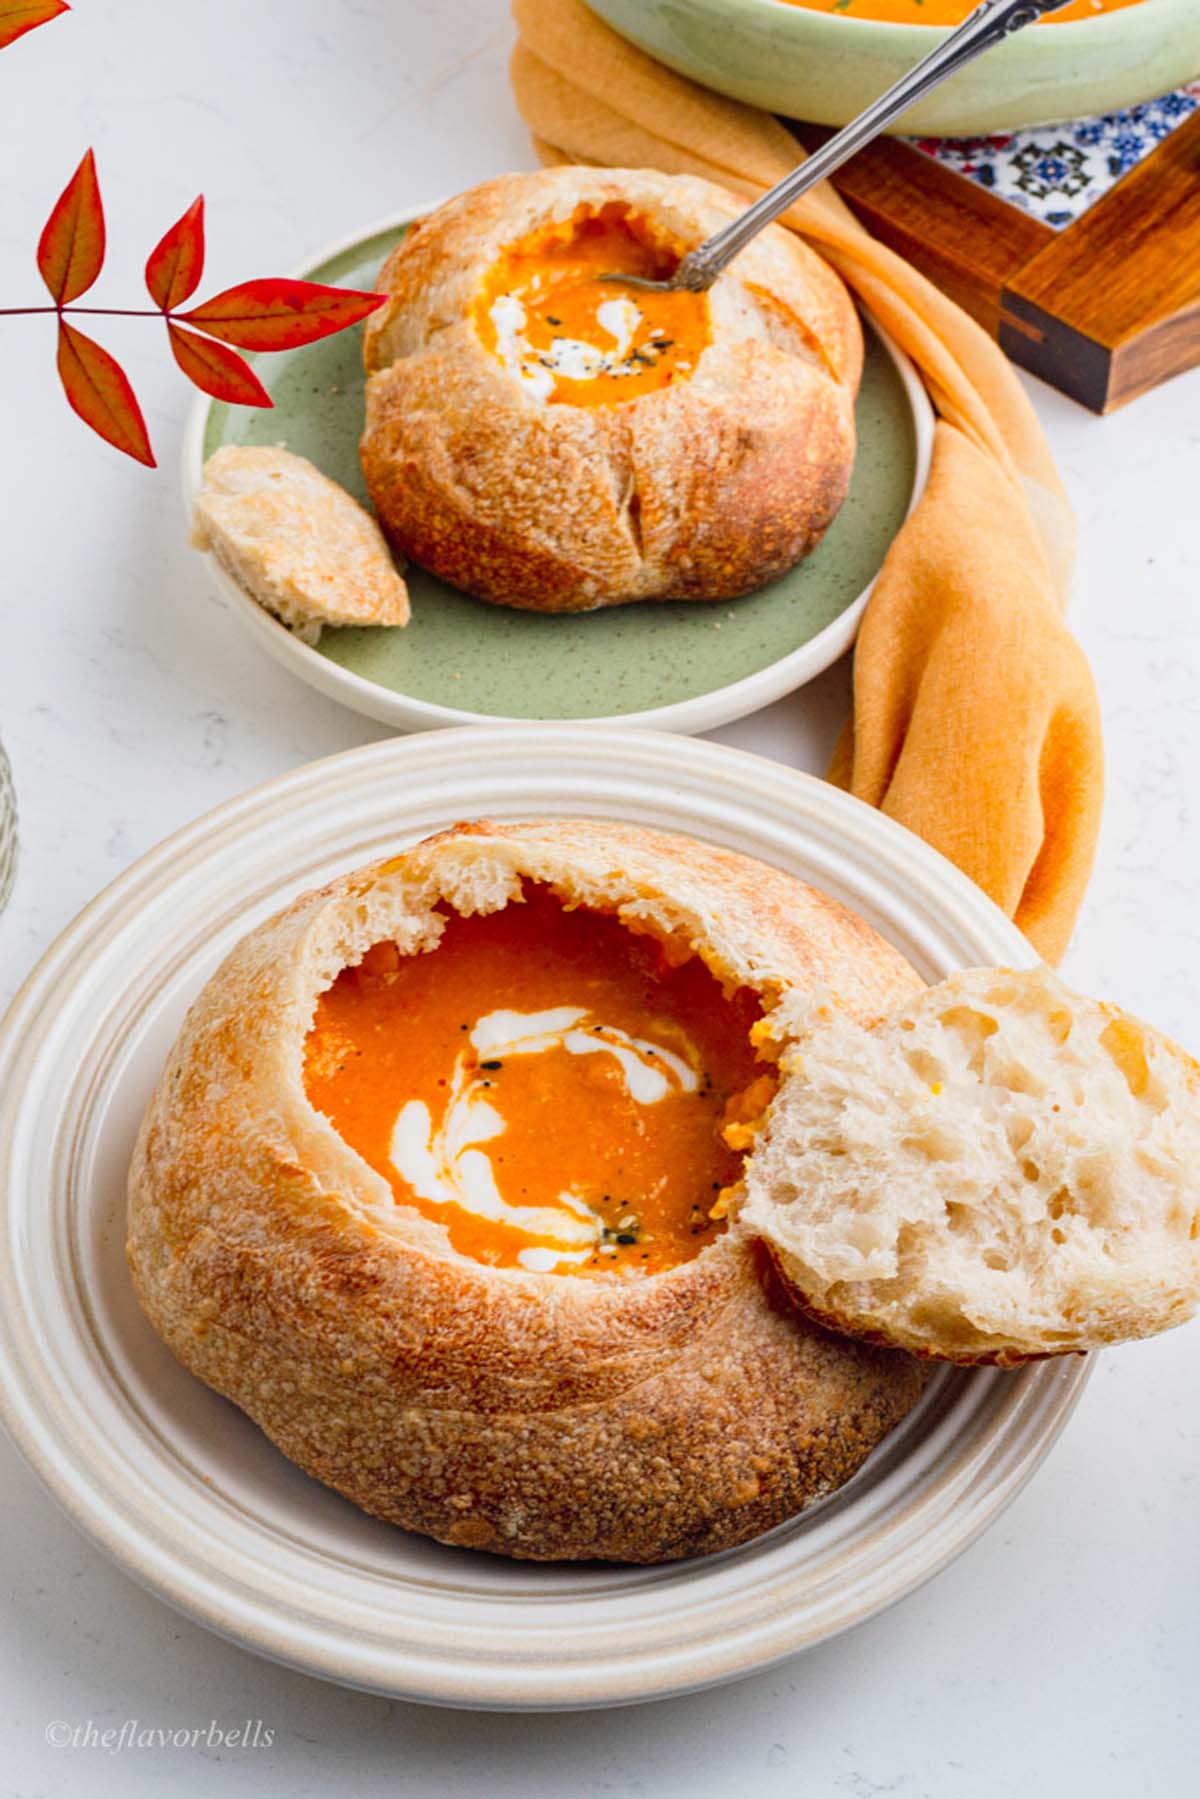
There’s something magical about tearing into a freshly baked sourdough bread bowl, letting the warm steam escape as you dip into a rich, flavorful soup. I started making these for weekend dinners, and now, they’ve become a tradition in our home—one that always brings smiles to the table!
Now, it’s time for you to Grab your starter, roll up your sleeves, and get baking! Don’t forget to share your creations with us—tag us on social media or leave a comment below. We’d love to see how your bread bowls turn out and hear about your favorite fillings.
Happy baking! 🥖✨
Sourdough Bread Bowl
Ingredients
- 350 g Bread flour about 2 ¾ cups
- 260 g water divided (250+10)g ( 1 cup +1 tbsp)
- 70 g sourdough starter about ¼ cup
- 7 g Salt 1 ½ tsp
Instructions
Step 1: Mix and Develop the Dough
- Combine bread flour and most of the water (reserving a small amount) in a stand mixer fitted with a dough hook.
- Mix on low speed until a rough, shaggy dough forms, then increase speed slightly and knead for 5-7 minutes until the dough develops elasticity.
- Cover the bowl with a damp towel and let the dough autolyse for 40 minutes to allow flour absorption and gluten development.
- After autolyse, add the sourdough starter and incorporate it using the pincer method (pinch and fold the dough to distribute the starter evenly). Cover and let the dough rest for 20 minutes.
- Mix the remaining water with salt (bassinage) and slowly incorporate it into the dough to maintain hydration and strength.
- Cover and rest for 30 minutes before performing coil folds.
Step 2: Bulk Fermentation with Coil Folds or Stretch and Folds
- Perform four rounds of coil folds or stretch and folds, spaced 30 minutes apart:
- o Stretch and Fold: Grab one side of the dough, stretch it upwards, and fold it over itself. Rotate the bowl and repeat on all sides.
- o Coil Fold: Gently lift the dough from the center, allowing the edges to tuck under as it folds onto itself.
- By the end of bulk fermentation, the dough should be puffy and slightly domed.
Step 3: Divide and Shape the Sourdough Bread Bowls
- Lightly flour a clean surface and turn the dough out onto it.
- Divide the dough into portions based on the desired size of the bread bowls (e.g., two large or four small).
- Shape each portion by gently gathering the edges toward the center, flipping it over, and rolling it into a smooth ball to create surface tension.
- Let the shaped dough rest uncovered for 20 minutes to relax the gluten.
- Reshape each dough ball by gently pulling the edges under to create a smooth, taut surface.
- Place each shaped dough seam-side up into a small, floured bowl to maintain its shape during proofing.
Step 4:Proofing
- Cover with a towel and choose a proofing method:o Cold Retard (Overnight Proofing): Refrigerate the dough overnight for enhanced flavor and structure. Before baking, let it come to room temperature for 30-60 minutes.o Room Temperature Proofing: Proof at room temperature for 1-2 hours until the dough looks slightly puffy and airy.
Step 5: Bake the Bread Bowls
- Preheat the oven to 475°F (250°C) at least 45 minutes before baking. If using a baking stone, baking steel, or inverted baking sheet, place it in the oven to preheat.
- For steam, place a pan filled with lava rocks on the lower rack of the oven while preheating. Pour hot water over the rocks when placing the bread in the oven.
- Gently invert the proofed dough onto parchment paper and score the tops with a sharp blade for controlled expansion.
- Transfer the dough to the preheated baking surface and bake:o 20-25 minutes for larger bread bowls.o 15-17 minutes for smaller bread bowls.
- Bake until the bread bowls are deep golden brown and sound hollow when tapped on the bottom.
Step 6: Cool and Serve
- Transfer the baked bread bowls to a wire rack and let them cool completely before cutting.
- To create the bowl, use a small serrated knife to cut a circular opening on the top of each loaf.
- Remove the cut-out lid and scoop out some of the soft bread crumbs from inside, leaving enough bread to maintain structure.
- Briefly bake or air-fry the bowl to keep it crispy and prevent sogginess on filling with soup or stews.
- Fill the bread bowls with your favorite soup, chowder, or dip and enjoy!
Notes
- Avoid Over-Flouring: Use minimal flour on your work surface when shaping the dough. Excess flour can dry out the dough and negatively impact its texture.
- Handle Sticky Dough Carefully: Use wet hands or a dough scraper to handle sticky dough instead of adding more flour.
- Monitor Bulk Fermentation: Allow the dough to rise until it becomes puffy and slightly jiggly, but avoid overproofing.
- Do Not Skip Autolyse: Resting the flour and water mixture before adding the starter and salt (autolyse) is essential for improving gluten development and dough elasticity.
- Preheat Your Oven Properly: Ensure your oven is fully preheated to the correct temperature (450-475°F or 230-250°C) for optimal rise and crust formation.
- Crisp the Bread Bowl: After removing the crumbs from the bread, briefly bake or air-fry the bowl to keep it crispy and prevent sogginess when filled with soup.
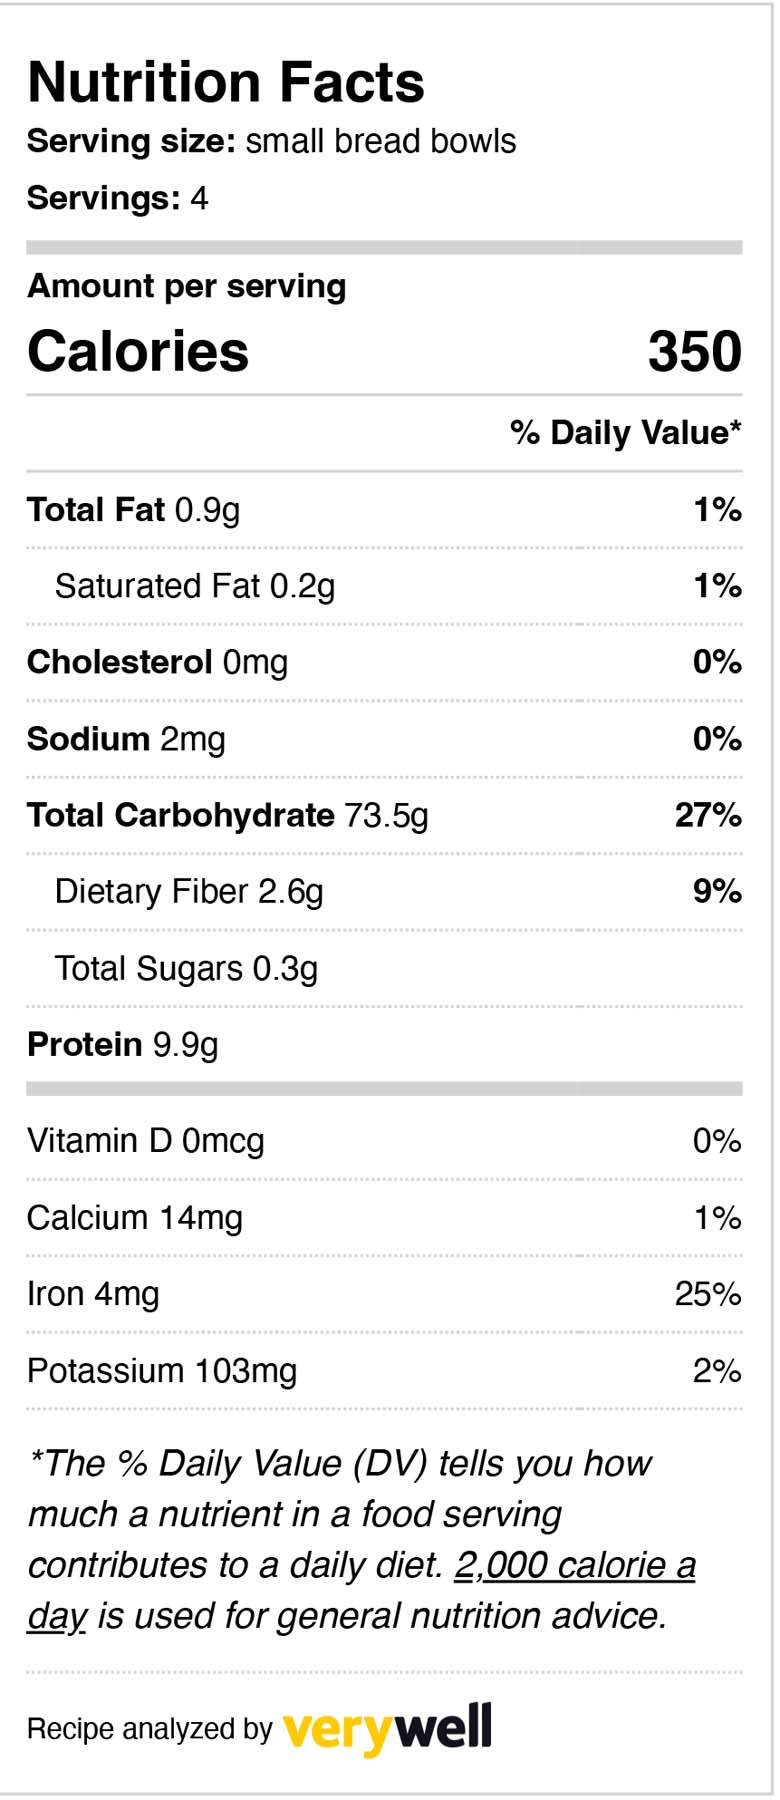
📝 Nutrition Facts




Sunita
Sourdough Bread Bowls are such a fun and delicious way to serve soups or stews.