These braided challah buns are super tender, soft, and delicious with a luscious golden-brown crust. Follow this easy vegan challah rolls recipe to make rolls or water challah bread at home.

If you liked vegan hamburger buns, tiger buns, coffee rolls, sourdough rolls, and ladi pav, this recipe will also please you.
Jump to:
🍞 Why will you love this challah bun recipe?
- This recipe is super easy and detailed with all actionable for making perfect challah buns.
- All the ingredients are your pantry staples.
- If you have an egg allergy, this recipe is for you.
- This is a vegan challah recipe, that is very approachable.
- These challah rolls are super tender and moist with a shiny golden-brown crust.
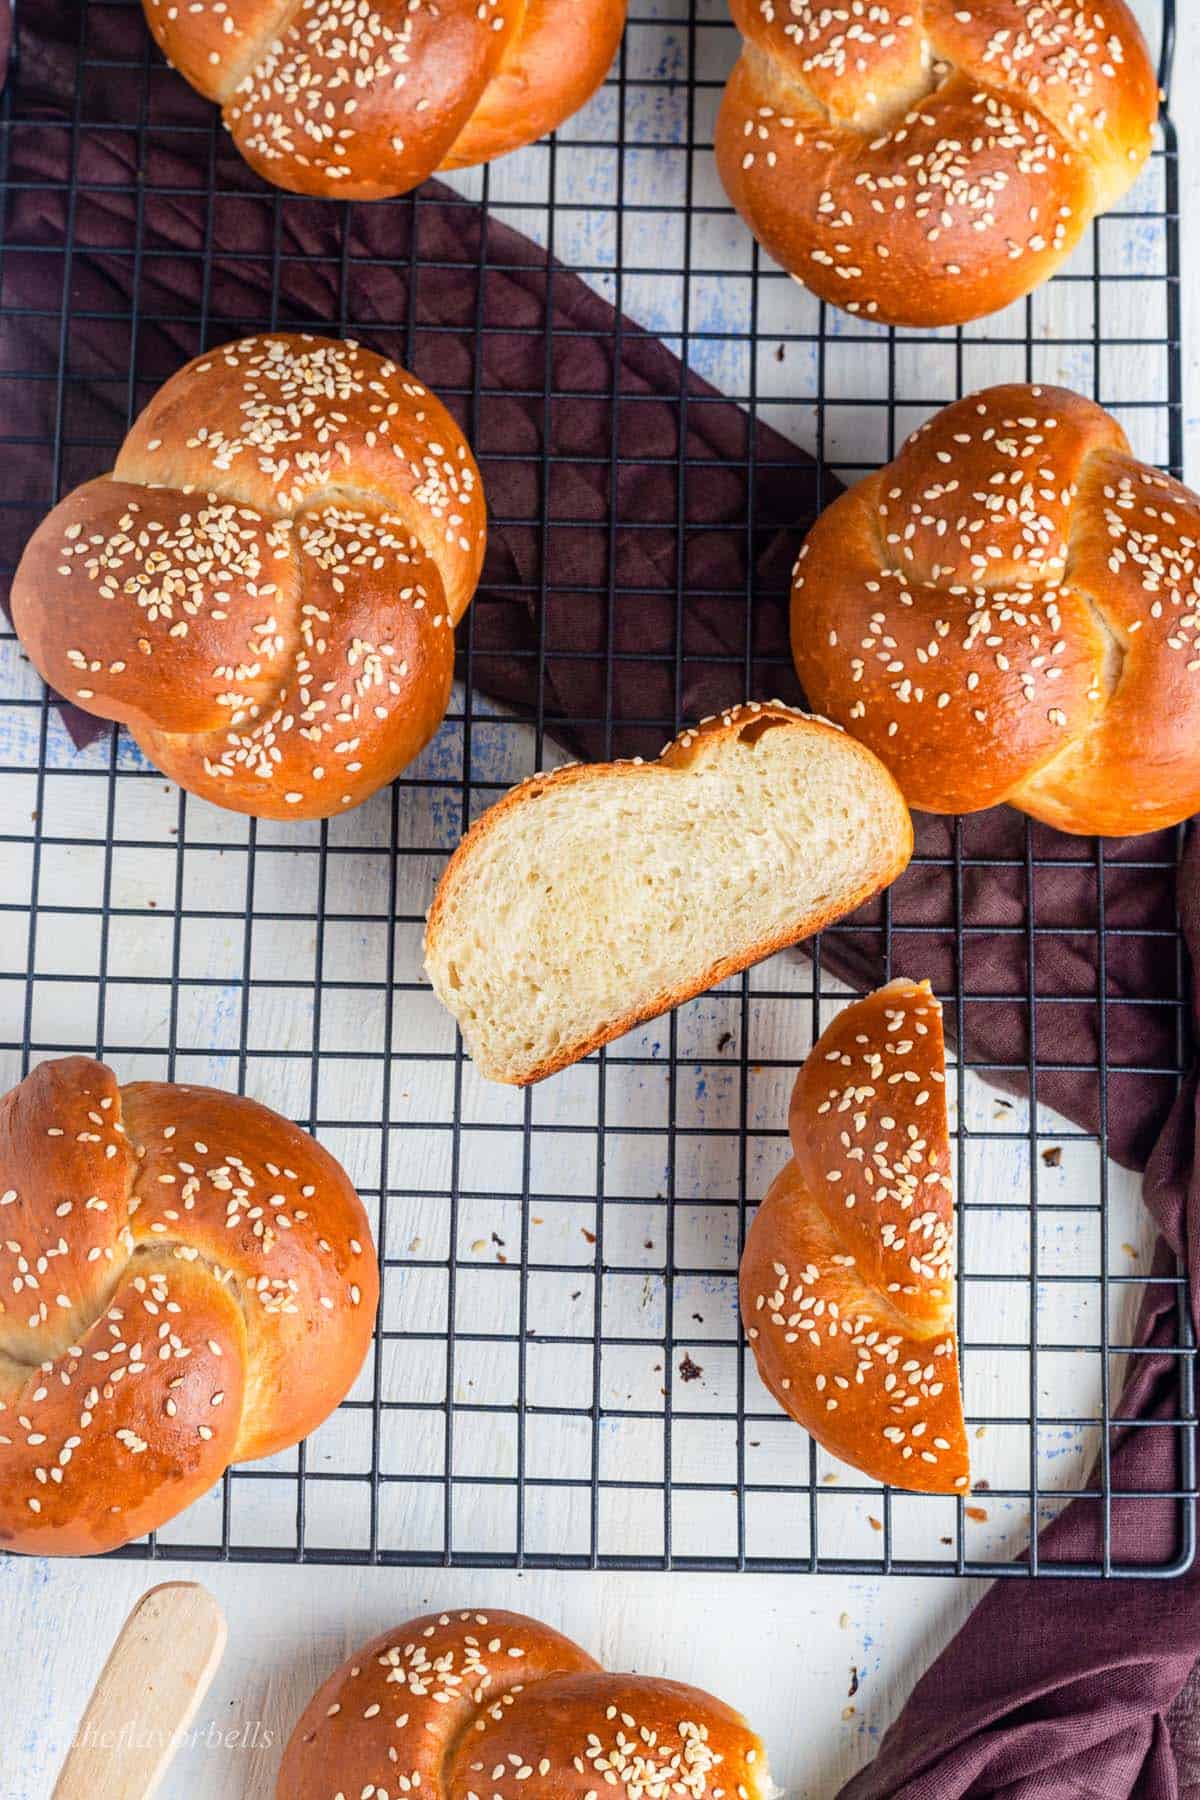
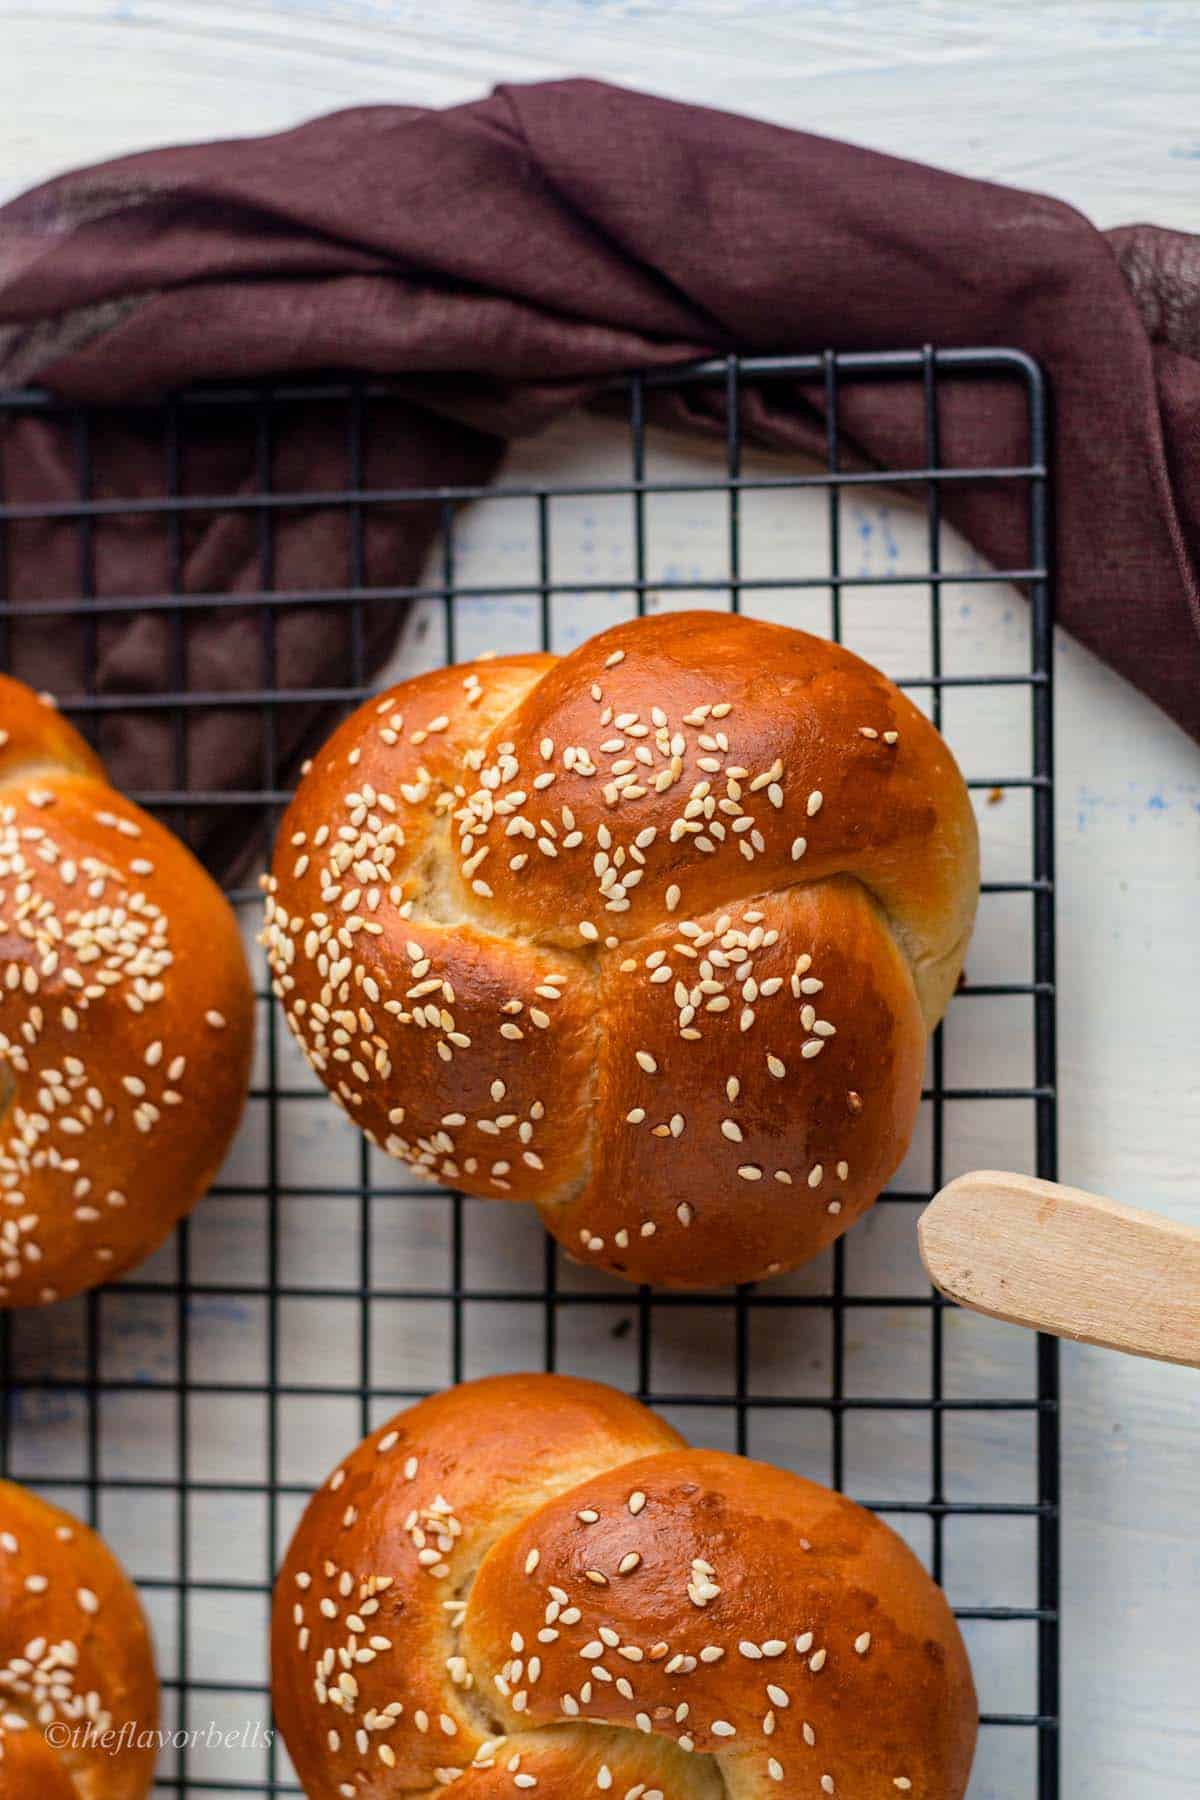
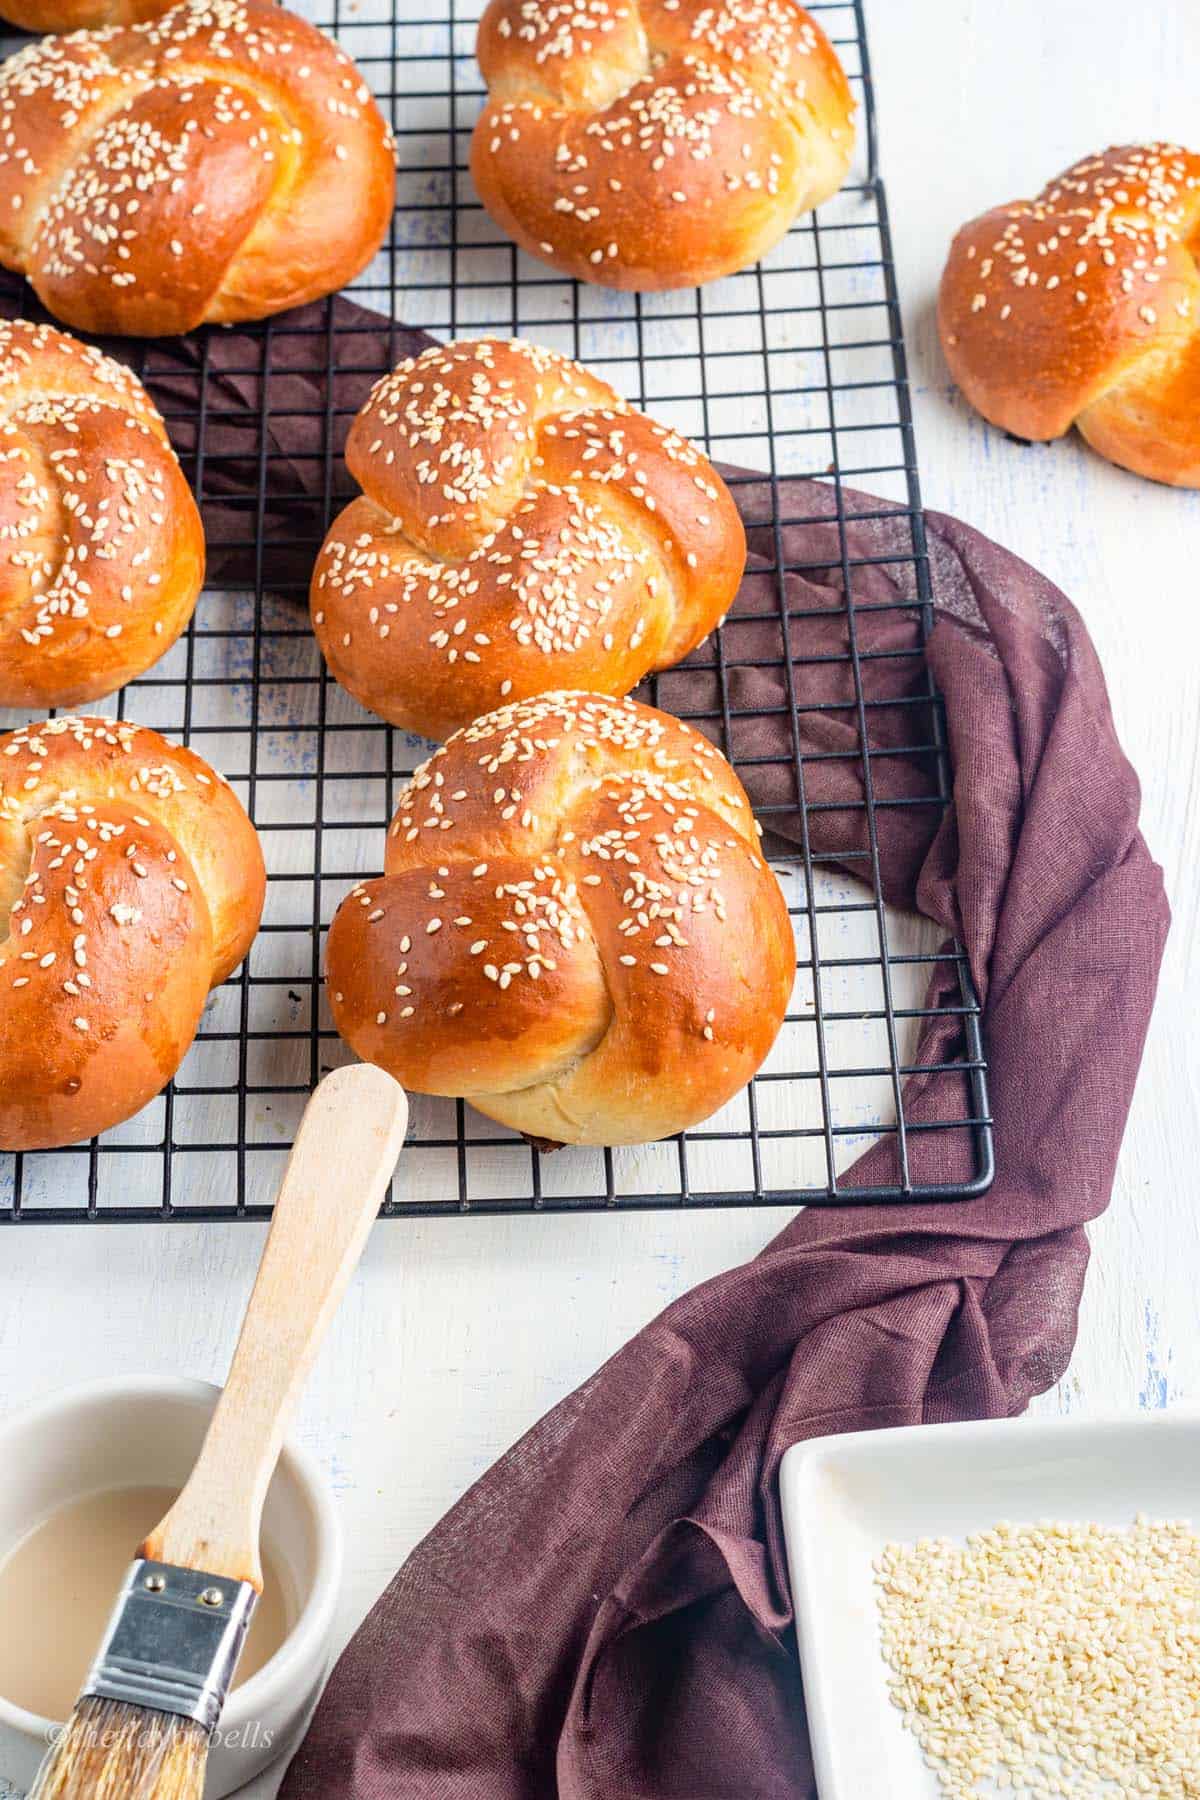
- These challah buns are topped with white sesame seeds to add a layer of crunch to the buns.
- You can use this recipe for making challah bread recipe.
🍶 Ingredients required to make Challah Buns
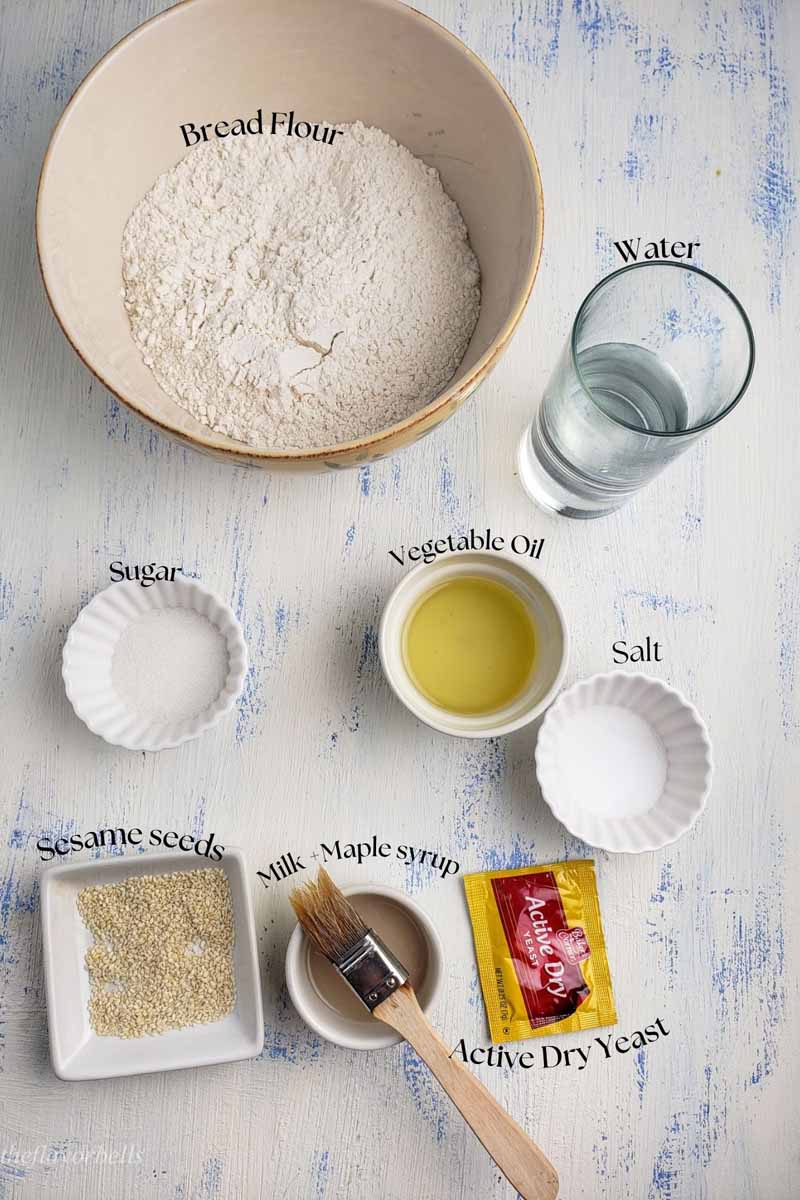
Bread flour
You will need bread flour for making the challah buns. You can use all-purpose flour but for best results, use bread flour only. If you are going to use high-gluten bread flour, increase the amount of water in the dough by 30-35 grams.
Vegetable oil
The tenderizer used in this recipe is vegetable oil. You can use whichever oil you like but try to choose a neutral-flavored oil only.
Instant dry yeast
You can use instant dry yeast or active dry yeast. I have used instant dry yeast which needs to be bloomed first in warm water and a sugar mixture.
Sugar
Vegan Sugar is added to the bread dough to provide instant food for the yeast for multiplication. You can replace it with cane sugar or honey.
Salt
Salt is for flavor. You can use fine sea salt or table salt.
White sesame seeds
I have used white sesame seeds for topping the challah buns. You can use anything like poppy seeds, etc. as per your choice.

🔪 How to make challah buns?
Step 1 Kneading the dough
Before starting to knead the dough, we must bloom the active dry yeast. So, take warm water (100-110o F) and add sugar to it. You can also use honey instead of sugar.
Mix well and then add in a packet of active dry yeast, which is about 7 grams. Mix it and then put it in a warm place to bloom.

In 5-7 minutes, the yeast mixture will become foamy and bubbly. Refer to the images. Now we are ready to knead the dough.
If you are using instant dry yeast, there is no need to bloom it. You can simply add it to the flour along with other dry ingredients.
Grab a large bowl and start by combining all the dry ingredients. Which in this case is just bread flour and salt. Use a whisk to uniformly distribute salt in the flour. Now add the vegetable oil, followed by the yeast water.
I like to use the back of a ladle to combine all the ingredients into a dough mass. When you reach a point where the ladle cannot help to combine the dough any further, you scrape it and set it aside.
Now flip the bowl on a work surface. Use a bench scraper to scrape the flour stuck to the sides of the bowl.
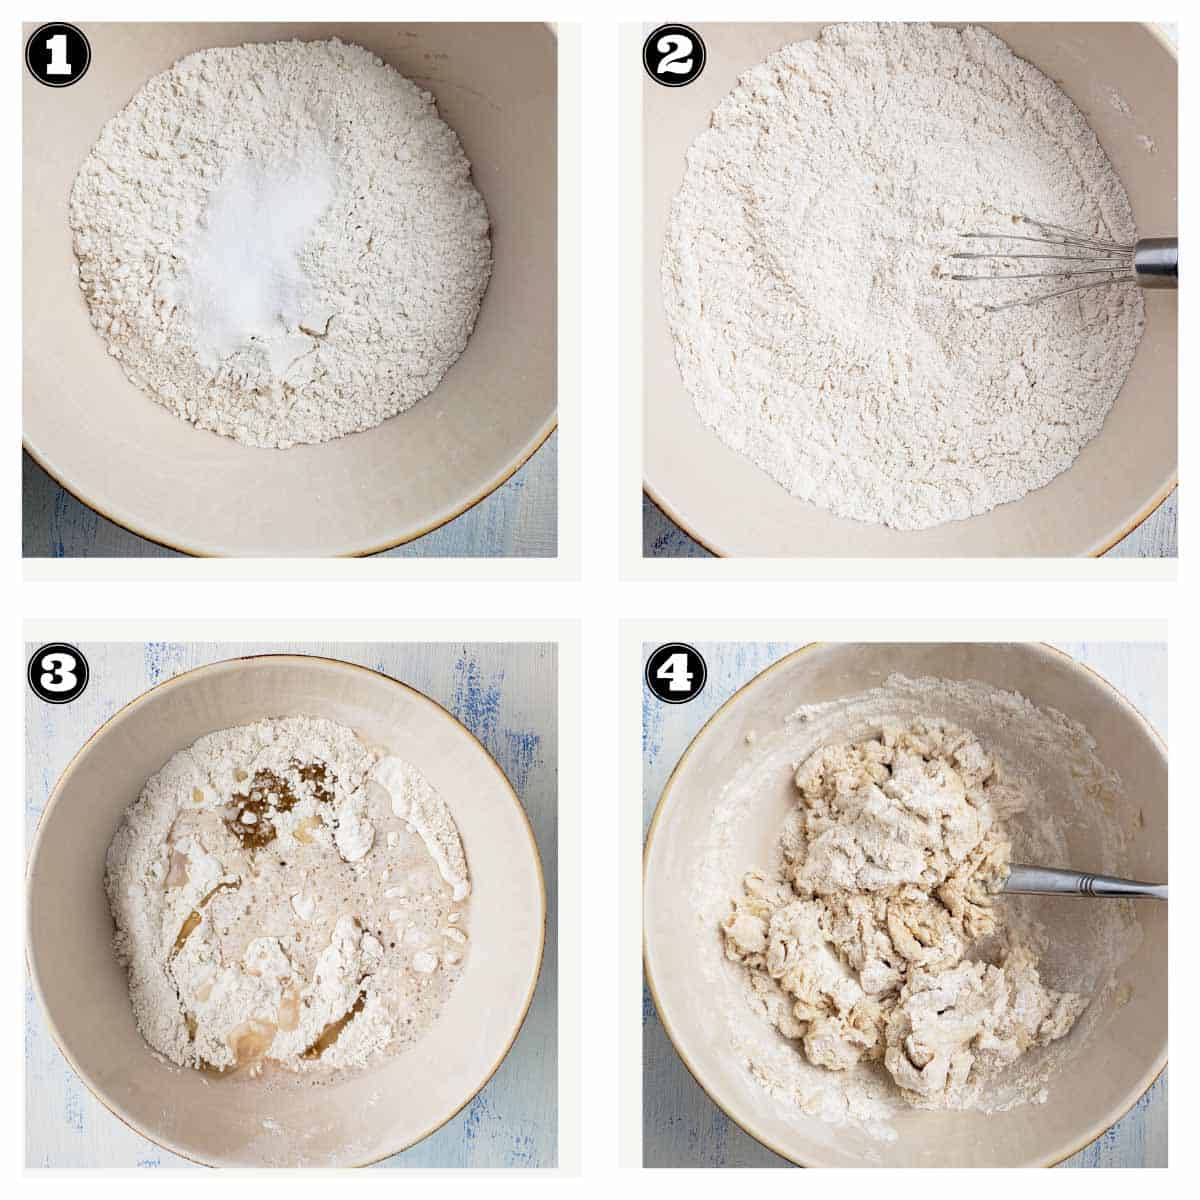
Now let us start kneading the dough with our hands. First, combine all the dry patches of flour into one dough mass. Then grab the dough with your fingers and pull it up. Then slap it on the counter ( work surface) while folding it over.
By doing this you will be working on the gluten and also aerating the dough. Keep repeating till the dough starts to come together and becomes less sticky.
The total kneading time should be around 8-10 minutes. I know it is tiring, so you can take a break in between. Just cover the dough with the inverted large bowl. Then come back and start kneading, until the dough becomes smooth and supple. You know that the dough is ready when it no longer sticks to your fingers and has a smooth finish.

What to do if the dough becomes dry and difficult to work with?
The challah dough should not be dry and hard, instead, it should be soft and easily pliable. The dry dough is possible if you have added more than the required amount of flour to the recipe. So please weigh the flour for the best results. Also do not add extra flour while kneading the dough. You could dust the work surface with some flour, but do not add too much flour.
Another reason for dry dough could be the presence of high gluten in your dough. If you are using high-gluten flour, it will become super dry in this recipe as it is a low-hydration recipe. In that case, consider adding about 30 grams of extra water to the recipe.
Kneading the challah bread dough in a stand mixer
To knead the challah rolls dough in a stand mixer combine dry ingredients with the yeast mixer in the bowl of a stand mixer. Now place it on the stand mixer fitted with a dough hook attachment.
Knead at slow speed for 8-10 minutes (speed 2 on KitchenAid stand mixer) when the dough starts to cling to the dough hook and start leaving the bowl sides, increase the speed to high (6 on KitchenAid) and knead for 2 more minutes.
By the end, the dough should have left the sides fully and become smooth and supple. Now your dough is ready!
Step 2 Bulk fermenting the dough
Transfer the dough to a greased bowl. Cover the bowl with plastic wrap or cling wrap. To bulk ferment the dough it is important you place it in a warm corner of your kitchen. This is crucial in cold weather. You can put it in an oven with the lights turned on.

Now, wait until the dough doubles up in volume. If it is warm in your kitchen it might take as less as 90 minutes. But in winter dough takes longer to ferment. It took me 2 and a half hours.
So, keep checking on your dough and ferment until it doubles in volume, whether it is in 1 ½ hours or 2 ½ hours. It may even take longer, so be patient.
Step 3 Shaping the challah buns
Transfer the dough onto a flour-dusted work surface. Gather the dough sides and form it into a large round. Use a bench scraper to divide the dough into 8 equal parts. You could just use them as such or weigh each part.
I divided the dough into eight 89 grams pieces. Then take one piece and gather all the edges to form a round. Flip and rotate under the hand to form a small round. Repeat with the remaining pieces of the dough. Keep them covered to prevent the surface from drying.

When you are done making rounds, grab a round dough ball and flatten it. Then grab the top and fold to the center. Then fold further down to finally seal the edges (refer to the image). You will form an elongated dough strip.
Keep repeating with the remaining balls while keeping others covered.
When all done, take the first elongated dough piece, and roll it into a thin strip. To do so, cup it under your hands and stretch outwards. The movement is very similar to that of shaping the baguettes.
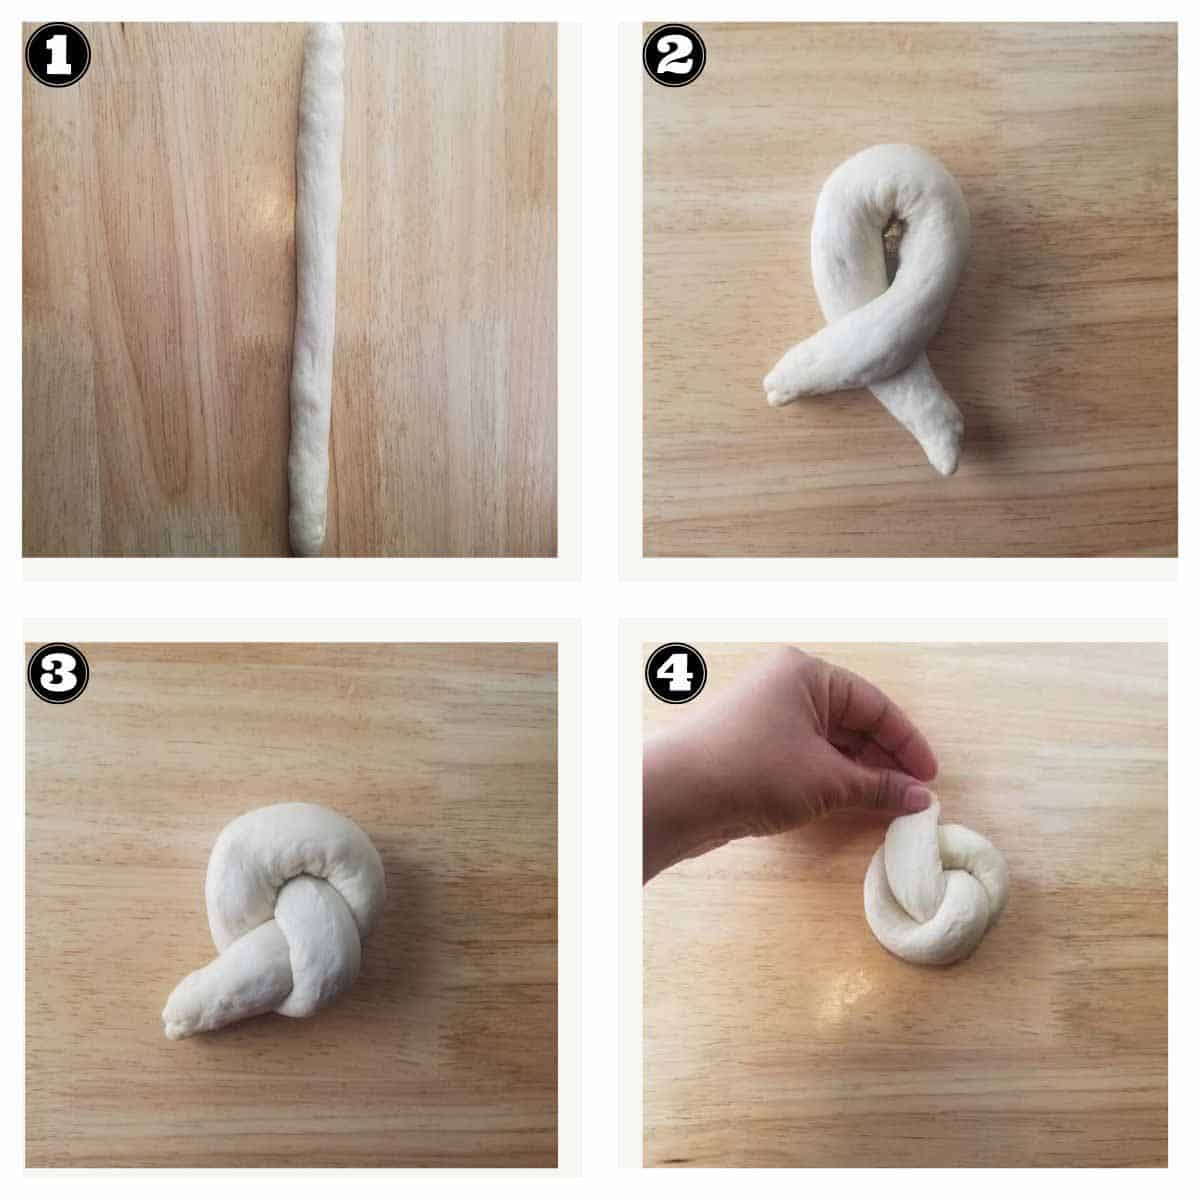
Keep stretching until the strip becomes a 28 cm long dough strand. Then twist the strip from the center to form a loop. Keep the edges of the strips facing toward you. Then grab the right end of the loop and put it into the center of the loop. Then grab the remaining end and fold it upwards. Now flip the bun and seal both the dough strip edges nicely by pinching them together. Finally, flip the shaped challah bun and place it on a parchment-lined baking sheet with the sealed edges facing down.
Repeat the process with the remaining dough strips and form 8 twisted challah rolls.
How else to braid the challah rolls?
Other than this there are more ways to braid one-strand challah rolls. Let us discuss a few braided challah.
- The first one is the snail twist in which roll the dough strip in a circular motion like the shell of a snail.
- The second could be the twisted buns. They are made first by making a simple loop through the knot and then joining the ends.
Step 4 Proofing the knotted challah buns
Now cover the challah buns placed on the parchment lined baking sheet with a kitchen towel. Place it in a warm corner of the kitchen and let them puff up until they appear doubled up in volume.

Step 5 Milk wash and top the buns
Now is the time to mix one tablespoon of plant-based milk with a tablespoon of honey or maple syrup. Now take a pastry brush to give every challah roll a milk wash.
If you are using eggs, just crack an egg and break the yolk to make a uniform egg mixture for egg wash.
Egg wash is an important part of challah as it gives it a dark brown luscious crust. But since it is a vegan recipe and we make all recipes egg free here, we are going to use the vegan egg wash.
After giving them the milk wash sprinkle them with white sesame seeds.
Step 6 Baking the challah buns
Preheat the oven to 380 oF and bake the challah buns for 25-26 minutes or until they turn deep golden brown.

When done, remove the baking sheet from the oven and place the challah bread rolls on a wire cooling rack.
Let them cool for 10-15 minutes before serving.
You can serve these Jewish bread rolls with the usual jam, jelly, or nut spreads or as challah hamburger buns or challah burger buns. I usually serve them alongside soups and stews as mini challah dinner rolls.
🫙How to store and freeze challah buns
Before storing the water challah rolls, ensure that they are fully cooled down. You can put them in a paper bag or linen bag and close it. They will keep well on your kitchen counter for 2-3 days. If you have a bread box, you can store them in it for 2-3 days.
You can freeze the left-over challah buns by placing them in a zip-locked bag and squeezing out any excess air. Then seal the bag and cover it with foil. I like to put a date and description on the foil, so I do not lose track. They will freeze well for months.
❓Frequently Asked Questions
If your challah buns from opening up make sure that you pinch both the dough stands nicely. The dough has a good amount of oil and hence the dough is not much sticky. Hence take time to nicely tug together the dough ends.
Challah is usually rich bread with super tender crumbs, just next to the brioche. It is always made in some sort of braided pattern. It could 5 strands, three strands, or a six strands braid. Also, challah has a super glossy and golden brown crust.
No, challah and brioche are not the same. Though they are both rich bread with a soft and tender crumb. They are both made with eggs. But challah never has butter, but vegetable oil. Brioche on the other hand is incomplete without butter. Butter not only makes the brioche crumbs tender and moist but also gives them an amazing buttery flavor to it.
As the name suggests egg challah has eggs and water challah does not have eggs. But the exact composition of the water challah is very subjective. Some people add it to water challah, whereas others debate that water challah should be a lean bread made with just flour and water, without using any form of fat.
If your challah buns are dense, there is a possibility that they were not fully proofed. Due to cold temperatures yeast might take longer to multiply, hence the rolls will require more time to proof.
And if you used instant yeast, there arises another possibility of expired or inviable yeast, which did not provide enough leavening to your challah rolls. That is why always use instant dry yeast, as on blooming it is confirmed that the yeast is live and fully active.

💭Pro Tips to make perfect challah buns
- The water for blooming yeast should be warm to a level that you can easily dip your finger into it without burning your finger. If you have an instant-read thermometer, the temperature should be between 100-110 oF.
- If you are using instant dry yeast, there is no need to bloom it. You can simply add it to the flour along with other dry ingredients.
- Kneading the dough with your hands is tiring, so you can take a break in between. Just cover the dough with an inverted large bowl. Then come back and start kneading, until the dough becomes smooth and supple. You know that the dough is ready when it no longer sticks to your fingers and has a smooth finish.
- Kneading the dough in a stand mixer: To knead the challah rolls dough in a stand mixer combine dry ingredients with the yeast mixer in the bowl of a stand mixer. Now place it on the stand mixer fitted with a dough hook attachment. Knead at slow speed for 8-10 minutes (speed 2 on KitchenAid stand mixer) when the dough starts to cling to the dough hook and start leaving the bowl sides, increase the speed to high (6 on KitchenAid) and knead for 2 more minutes. By the end, the dough should have left the sides fully and become smooth and supple. Now your challah bread dough is ready!
- Let the dough bulk ferment until it becomes double in volume. It may take 1 ½ to 2 ½ hours or much longer. Do not get affected by the timeline. The actual time required by the dough to double up will depend on the ambient room temperature in the kitchen and the quality of the yeast.
- You can replace maple syrup with honey or any other syrup like brown sugar syrup.
🥖More bread recipes and rolls
- Semolina Bread with Sesame Seeds
- Turkish Bread
- Dairy free bread: The best whole wheat vegan milk bread
- How to bake perfect bread in Instant pot
- Tiger rolls: A foolproof Dutch crunch bread recipe
- Hamburger buns
- Matcha Bread (Eggless Matcha Swirl Bread)
- Coffee Buns ( Eggless Mexican Bun Recipe)
- Sourdough Rolls | No-yeast quick dinner rolls using sourdough starter
🍞More sourdough bread recipes
A few Bread recipes with sourdough starter are linked below:
- Rustic sourdough bread with a perfect crust and open crumb
- The best garlic sourdough bread recipe
- Jalapeño Cheddar sourdough: A spicy cheese sourdough bread
- Sourdough chocolate bread recipe: Easy and delicious !
- How to make sourdough hot dog buns from scratch?
- How to make the basic sourdough batard?
- Ciabatta bread
Hope you enjoyed this recipe for challah buns. Share your results and opinions in the comment section below. Also, subscribe to never miss a recipe.
Till then
Bake it Delicious!
📝 Recipe Card

Challah Buns
Ingredients
- 400 g bread flour 3 ¼ cups
- 220 g warm water slightly less than 1 cup
- 70 g Vegetable oil ⅓ cup
- 10 g vegan sugar or cane sugar 2 tsp
- 11 g salt 2 teaspoon salt
- 7 g active dry yeast 1pkt
- 3 tablespoon White sesame seeds
- 1 tablespoon soy milk+1 tablespoon maple syrup (Milk wash)
Instructions
Step 1 Kneading the dough
- To bloom the yeast, take warm water (100-110o F) and add sugar to it. Mix well and then add a packet of active dry yeast. Mix it and then put it in a warm place to bloom. In 5-7 minutes, the yeast mixture will become foamy and bubbly.
- Grab a large bowl and start by combining all the dry ingredients. Which in this case is just bread flour and salt. Use a whisk to uniformly distribute salt in the flour.
- Now add the vegetable oil, followed by the yeast water.
- Use the back of a ladle to combine all the ingredients into a dough mass. When you reach a point where the ladle cannot help to combine the dough any further, you scrape it and set it aside.
- Now flip the bowl on a work surface. Use a bench scraper to scrape the flour stuck to the sides of the bowl.
- Now start kneading the dough with your hands. First, combine all the dry patches of flour into one dough mass. Then grab the dough with your fingers and pull it up. Then slap it on the counter (work surface) while folding it over. By doing this you will be working on the gluten and aerating the dough.
- Keep repeating till the dough starts to come together and becomes less sticky. The total kneading time should be around 8-10 minutes. Knead until the dough becomes smooth and supple. You know that the dough is ready when it no longer sticks to your fingers and has a smooth finish.
Step 2 Bulk fermenting the dough
- Transfer the dough to a greased bowl.
- Cover the bowl with a plastic wrap or a cling wrap.
- To bulk ferment the dough it is important you place it in a warm corner of your kitchen. This is crucial in cold weather. You can put it in an oven with the lights turned on.
- Now, wait until the dough doubles up in volume. If it is warm in your kitchen it might take as less as 90 minutes. But in winter, dough takes longer to ferment. It took me 2 and a half hours.
- So, keep checking on your dough and ferment until it doubles in volume, whether it is in 1 ½ hours or 2 ½ hours. It may even take longer, so be patient.
Step 3 Shaping the challah buns
- Transfer the dough onto a flour-dusted work surface.
- Gather the dough sides and form it into a large round.
- Use a bench scraper to divide the dough into 8 equal parts. You could just use them as such or weigh each part.
- Divide the dough into eight 89 grams pieces.
- Then take one piece and gather all the edges to form a round. Flip and rotate under the hand to form a small round.
- Repeat with the remaining pieces of the dough. Keep them covered to prevent the surface from drying.
- When you are done making rounds, grab a round dough ball and flatten it.
- Then grab the top and fold to the center. Then fold further down to finally seal the edges (refer to the image). You will form an elongated dough strip.
- Keep repeating with the remaining balls while keeping others covered.
- When all done, take the first elongated dough piece, and roll it into a thin strip. To do so, cup it under your hands and stretch outwards. The movement is very similar to that of shaping the baguettes.
- Keep stretching until the strip becomes a 28 cm long dough strand.
- Then twist the strip from the center to form a loop. Keep the edges of the strips facing toward you. Then grab the right end of the loop and put it into the center of the loop. Now grab the remaining end and fold it upwards.
- Finally flip the bun and seal both the dough strip edges nicely by pinching them together. Finally, flip the shaped challah bun and place it on a parchment-lined baking sheet with the sealed edges facing down.
- Repeat the process with the remaining dough strips and form 8 twisted challah rolls.
Step 4 Proofing the knotted challah buns
- Now cover the challah buns placed on the parchment lined baking sheet with a kitchen towel. Place it in a warm corner of the kitchen and let them puff up until they appear doubled up in volume.
Step 5 Milk wash and top the buns
- Now is the time to mix one tablespoon of plant-based milk with a tablespoon of honey or maple syrup. Now take a pastry brush to give every challah roll a milk wash.
- After giving them the milk wash sprinkle them with white sesame seeds.
Step 6 Baking the challah rolls
- Preheat the oven to 380 oF.
- Then bake the challah buns for 25-26 minutes or until they turn deep golden brown.
- When done, remove the baking sheet from the oven and place the challah bread rolls on a wire cooling rack.
- Let them cool for 10-15 minutes before serving.
Notes
- The water for blooming yeast should be warm to a level that you can easily dip your finger into it without burning your finger. If you have an instant-read thermometer, the temperature should be between 100-110 oF.
- If you are using instant dry yeast, there is no need to bloom it. You can simply add it to the flour along with other dry ingredients.
- Kneading the dough with your hands is tiring, so you can take a break in between. Just cover the dough with an inverted large bowl. Then come back and start kneading, until the dough becomes smooth and supple. You know that the dough is ready when it no longer sticks to your fingers and has a smooth finish.
- Kneading the dough in a stand mixer: To knead the challah rolls dough in a stand mixer combine dry ingredients with the yeast mixer in the bowl of a stand mixer. Now place it on the stand mixer fitted with a dough hook attachment. Knead at slow speed for 8-10 minutes (speed 2 on KitchenAid stand mixer) when the dough starts to cling to the dough hook and start leaving the bowl sides, increase the speed to high (6 on KitchenAid) and knead for 2 more minutes. By the end, the dough should have left the sides fully and become smooth and supple. Now your dough is ready!
- Let the dough bulk ferment until it becomes double in volume. It may take 1 ½ to 2 ½ hours or much longer. Do not get affected by the timeline. The actual time required by the dough to double up will depend on the ambient room temperature in the kitchen and the quality of the yeast.
- You can replace maple syrup with honey or any other syrup like brown sugar syrup.
📋 Nutrition Facts


Leave a Reply