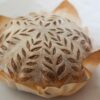
This ladi pav recipe yields the fluffiest, super-soft, lightest, and most cottony Mumbai style pav ever! These pav buns have an innate subtle hint of sweetness and a pinch of saltiness that from the butter that is brushed on the top. Unlike the dinner rolls that we get in Supermarkets, which are much sweeter to the core.
So, if you are interested in making the Indian pav, follow along.
Table of contents
I am such a bread person! The gratification that I derive out of bread making is just inexpressible. A good loaf of bread makes my day and a bad baby out of the oven upsets me. Let me know your views about bread-making in the comments down below.
Getting back to this dinner roll recipe, I cannot rave enough about how much I love this recipe, as it comes out perfect every time I make it. So, let us jump right into it.
What is ladi pav?
Alright, so some people call it pav, pao, ladi pav, pav bun, pav bread….they are all the same. In India, pav is just like dinner rolls, but more neutral-flavored. Since they are paired with savory recipes, they can't be sweet like their western counterparts, the dinner rolls.
Ladi means a continuous array and pav means bread, so Ladi pav means a connected array of bread. Very much like the dinner rolls.
Also, in most cases, ladi pav are made without eggs. And yes, this recipe is eggless!
They are ideal for literally any occasion. In India, we call them Pav or Ladi Pav, generally enjoyed with vegetable stew (Bhaaji) or vada (Vada Pav).

Ingredient for making ladi pav:
Let us talk a little about, what you would need to make this Mumbai style ladi pav recipe. Just some substitutions and ingredient notes.
All-purpose flour:
Bread flour makes the best ladi pav. But I wanted to keep the recipe approachable, as bread flour is not easily available in India and many other places, so I choose to stick with all-purpose flour. Don't worry, even all-purpose flour makes perfect pav buns.
Butter:
Use good quality butter, the ones with higher fat percentages for best results.
I have used unsalted butter in the ladi pav recipe, but if you are using the salted butter, make sure to omit the salt from the recipe
Yeast:
I have used active dry yeast in the recipe. So, it needs to activate by adding in the warm liquid and sugar mixture.
But in case you are using instant yeast, just add the dry ingredients and mix.
Dry milk powder:
I always add dry milk powder to my pavs, buns, and rolls, as it helps to keep them soft for longer.
This is an optional ingredient, but adding dry milk powder does help with the texture and softness in the ladi pav recipe.
Milk:
I like to use whole milk. Whole milk gives a richer texture and enhances the flavor of the bread. You can also go with 2% milk.
I have made it with 2% fat milk, with good results.
I suggest avoiding skim milk as we are not using any eggs here (like always), so all the richness and texture have to come from milk.

Step by step instructions
Step 1 Activating the active dry yeast
Heat one cup of milk. Now, add butter to the milk so that it melts. Stir in the sugar. Now, we want to activate the active dry yeast.
Check the temperature of your milk mixture. It should be between 1050F-1100F. It is the ideal temperature for proofing dry yeast.
If you do not have a thermometer, just ensure that the water is hot enough that you can dip your finger comfortably without burning it.
Once we add yeast to the milk mixture, we stir it and let it rest for 5-10 minutes or until it becomes bubbly, frothy, and rises.
A quick note here, people often confuse the ideal yeast proofing temperature with the ideal temperature for yeast rising. Yeast rises optimum between 85-950 F, but for activating active dry yeast we need a slightly higher temperature.
Step 2 combining all the dry ingredients
Start the ladi pav recipe by combining all the dry ingredients in a large bowl or the bowl of the stand mixer.
Make sure to mix them with 2-3 swirls of a whisk, to ensure that salt is mixed evenly in the flour.
We want to add the entire yeast mixture, all at once to the flour mixture. Now, using the rear end of a wooden spoon or anything with similar strength, combine the flour until it starts to come together.
Step 3 Kneading

Then, it is time to put your stand mixer to use. Start at 1 speed for 2 minutes and then, bump up the speed to 2 for 5 minutes. We have to keep kneading this for additional 7-8 minutes at a medium speed until the dough comes together smoothly and separates itself from the bowl.
You might need to add 1-2 teaspoon of flour towards the end if you think that the dough is still sticking at the bottom.
The exact amount of flour will vary with the type of flour and ambient environmental conditions of your kitchen.
Scrape the dough from the base and add 1 teaspoon of flour. Knead for an additional 2 minutes and it will leave the sides of the bowl.
The texture of the dough is the key to this laid pav recipe. It should be soft, supple, smooth, and highly pliable. It normally takes me 11-15 minutes.
You know that the pav dough is ready when it does not stick to your finger.
When you think that your dough is ready, just stop the mixer and touch the dough, if it's done, it will not stick to your finger.
For making these super-soft dinner rolls we need to ensure that the dough is soft, supple, and not at all sticky.
Hand kneading
For those who are doing it with their hands, just keep going, don't add too much flour. Do not add more than 1 tablespoon of four in all. I suggest kneading in a circular motion initially for 2-3 minutes. Once it absorbs the moisture, start to push or stretch the dough forward with the heels of your hands. Bring it back and push forward again. Keep scraping and add flour only to dust the surface.
After a good 15 minutes of kneading, it will start to come together, and become springy. But you are not there yet!
Knead for an additional 2-3 minutes or so, until your dough becomes smooth, soft, and shiny. Poke the dough, and if it springs back into shape, then, it's done.
And reward yourself with your favorite treat. You deserve it.
A bread machine or a stand mixer does make our life much easier, but the gratification that a hand-kneaded dough gives is much bigger.
Step 4 Bulk Rise( First Rise)
Now, oil a large bowl and place the dough into the bowl. Brush some oil on the dough surface to lock the moisture and prevent it from drying. Cover the bowl with a cling wrap or a kitchen towel and place it in a warm and moist place.
My ideal place is in the oven, right under the oven light, which is switched on, with a pan of hot water placed next to it. Let us give our yeast what it wants! And it wants a warm and moist place.
In the next 45 min to 1 and a half hour, the dough will double in size. I want to make a quick note here, that never goes by the time limit in case of yeast activity. It might take longer or less time depending on the temperature situation in your place. So, the good idea is to keep checking your dough after adequate intervals.

How to proof the bread in an Instant pot
To bulk rise and proof bread in the Instant pot, yogurt mode is ideal.
I like to grease the pot of the instant pot with cooking oil and directly place the dough in it. Let the dough proof in the ferment option( if you have it) in yogurt mode. And select the custom temperature settings. 85-95 0F is ideal for yeast activity.
By the way, I have a perfect recipe to make bread in an Instant pot. You might wanna check that out.
If you do not have yogurt mode, select the sauté mode set at low temperature and place the dough in a greased bowl, and put the bowl in the instant pot. Let it preheat for 3-4 minutes and then, turn off the Instant Pot. Close the lid and let the dough bulk rise or proof in the warm Instant Pot.
You can also use sous vide-mode, and select the custom temperature of somewhere between 85-95 0F
Or go the conventional route. Just place the dough in the oven with lights turned on for quicker bulk rise or proofing.
Shape 5 Shaping and proofing the Dinner Rolls/ pav
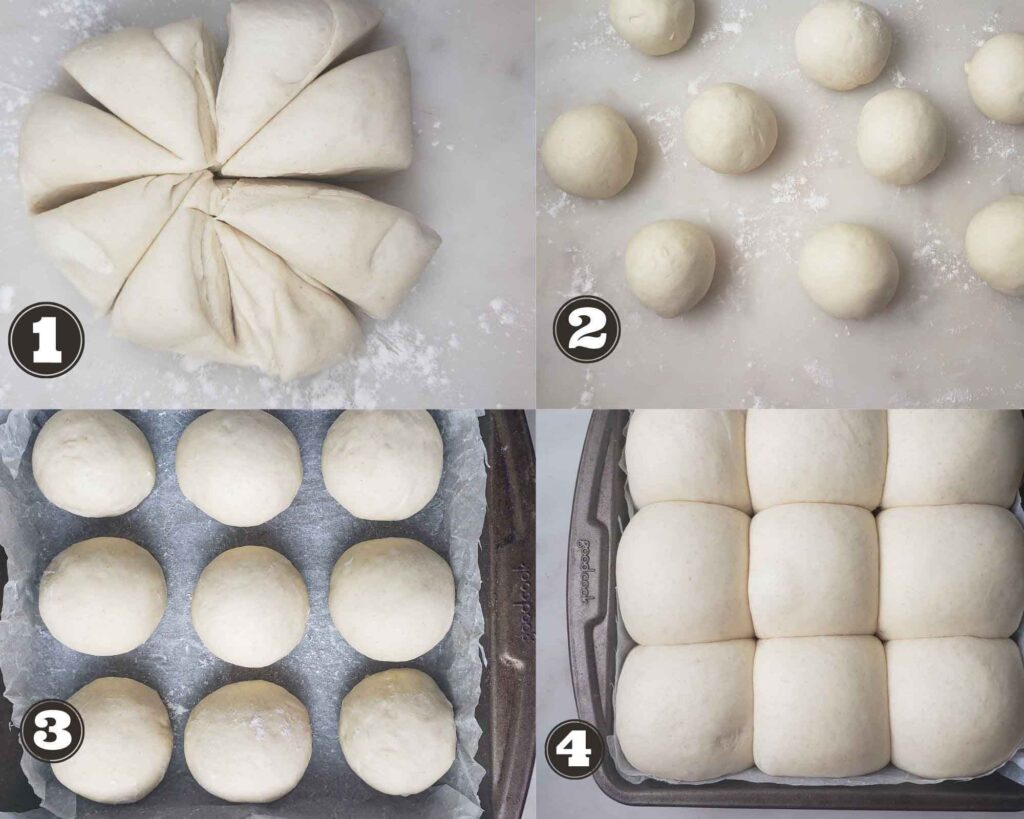
Punch the dough gently to deflate and remove from the bowl on to floured work surface and divide it into 9 equal-sized balls.
It's better to use a scale so that all the dough balls are equal in size. Or simply eyeball them.
Make sure to make smooth balls, and lock all the seams underneath and pinch them.
I place them in an 8" square baking pan lined with parchment paper. You can use a round pan or whatever suits you.
Place them at least 1inch apart, so that they have ample space to rise without interfering with each other and finally join into each other and become one loaf altogether. For that, they need to rest and rise in a damp and warm place. Use the same setting as we used for the first rise.
These need to rise well above the rim to ensure the super-soft dinner rolls.
Step 6 Baking
Once the ladi pav rises much above the pan, they are ready to bake. I spray them with water, ensuring not to deflate them before popping them into the oven. Temperature 385 0F works best for this recipe. Every oven is different, so adjust accordingly. They would take 15-16 minutes.
Once out, brush them with softened salted butter for that sheen and gloss. Butter also helps to soften the crust and enhances the flavor profile of the buns.

Let them cool in the pan for 10 minutes and then cool completely over a cooling rack. But I am sure nobody will wait that long, so just follow your heart.
Frequently Asked Questions regarding Ladi Pav recipe
Well, this is a super interesting question. I did a little digging up and found answers across the web. Pav is a Portuguese word for bread. Portuguese are the ones who brought the leavened bread baking to India.
In fact, before the Akbar reign, Indians were not even accustomed to refined flour. Whole wheat flour was the major consumed flour and the same is true even now.
So pav is a bread that is made in a form of a Ladi ( continuous array), hence it is called Ladi pav.
Or like my daughter like to call it, the pav bhaji bread!
So, these Indian pav buns are not inherently vegan. They can be easily made vegan, by substituting the butter with vegan butter and using high-fat vegan milk.
Coconut milk will be an excellent substitute but, I will probably avoid it as it has a very strong flavor. So choose neutral-flavored milk like soy milk, or hemp milk to make a vegan ladi pav recipe.
Well, it will depend on the recipe. Some people use eggs in their ladi pav recipes.
But most bakeries make it without eggs as a large portion of Indian population is vegetarian and do not eat egg.
So if you are allergic, it would be a good idea to ask if the pav served contains eggs.
So, ladi pav is Ladi pav. Some restaurants say ladi paw on their menus. But if you are looking for the closest English counterpart, that would be the Dinner rolls. So yeah, you can safely say that ladi pav is called dinner rolls in English.

Storage Instructions and other helpful tips for making perfect ladi pav
Storage tips are as follows:
- Ensure to cool the ladi pav completely: Place them on a cooling rack and leave them at room temperature for 1 or 2 hours to allow the baking process to cease completely. When rolls are cool to the touch, start your storage process.
- Wrap properly to seal freshness. It is important to wrap your pav or buns inside a foil or a plastic storage bag. If you use foil, make sure it completely encases the bread. In case using a plastic storage bag, push all excess air from inside before you seal the lip area.
- Where to store? If you intend on eating the rolls or buns within 2-3 days, store them in a cool and dry place at room temperature. Many believe that placing bread inside a refrigerator will help it to stay fresh for longer. This actually has the opposite effect and the rolls or buns will dry at a faster rate.
- So, I like to freeze my bread if I am not planning to consume them in a few days. Safely dual-covered and sealed in a freezer-safe bag. Ladi pav buns freeze well for months. For thawing the pav, simply place it wrapped on a baking rack so it will warm to room temperature at an even rate and reabsorb the moisture inside the wrap. Then, unwarp, and reheat in the oven and enjoy!
Some helpful tips that will ensure that you do not mess this ladi pav recipe
- Use active dry yeast only. Because it needs to be activated and in the very initial stage we can confirm whether the yeast is alive and vigorous or not. It milk yeast mixture should become bubbly and foamy.
On the contrary in the case of instant yeast, you directly add it to the flour. There is no sure way of telling if the yeast is active or dead.
- Do not stick to any timelines when making this ladi pav recipe. The key is to observe your dough. The precise time for bulk rise and proofing always varies.
- If you think that the dough is still wet and not firming up or coming together, add a little flour. Do not too much flour at once. A tablespoon at once, knead, and give it some time to absorb water.
- Give your best to knead the dough. The dough is the key to any bread. It should be smooth and supple. Sometimes resting a dough helps. So, if you are kneading with your hands, and it still feels wet, cover and let it autolyze for 15 minutes. Then resume kneading. It will come together easily.

If you found this ladi pav recipe useful, do not forget to share it with your friends. We would highly appreciate a comment and a rating! It helps me create more resources like this.
Happy baking!
Ladi Pav Recipe Card

Ladi paav recipe
Ingredients
- 2 cups All-purpose flour
- 3 tablespoon Butter
- 2 teaspoon Yeast
- 1 teaspoon Sugar
- ½ teaspoon Salt
- 2 tablespoon Dry milk powder
- ¾ cup Milk
Instructions
- Start by warming milk and adding butter to it. Let the butter melt completely and add sugar to the solution. Then add yeast, mix, and let activate for about 5 minutes, or until it becomes frothy and bubbly.
- Combine flour, milk powder, and salt in the bowl of a stand mixer.
- Add the yeast mixture to the dry ingredients and place the bowl on the stand mixer with a dough hook attached.
- Start at low speed until it all comes together and then, increase the speed.
- After 10 minutes, the dough will become stretchy and start to come together and leave the bowl sides and only remain stuck to the bottom. At this point stop the mixer and scrape the dough from the bottom and add a spoon or two of flour, (no more) and keep kneading for an additional 5-7 minutes until it separates itself completely from the bottom of the bowl.
- Stop the mixer when you see your dough has become soft and smooth and does not stick to your hands i.e. you should be able to hold the dough in your hands without its sticking to your hands.
- Place the dough in a greased bowl. Apply some oil over the dough and cover the bowl with a cling wrap.
- Let it rest in a warm and moist place (refer to the instructions given in the post) until it doubles in size. It could take 1- 2 hours depending on the ambient temperuature. (Look for the volume not the time line)
- Remove the dough from the bowl onto a floured work surface and divide it into 9 equal balls (preferably use a scale).
- Shape each ball into a smooth round ball by locking all the seams underneath and pinching them with your fingertips, in a way that you achieve a smooth-surfaced round ball.
- Transfer them to 8 inches’ square cake pan or whatever available with you. But make sure to place them at least 1 inch apart. Cover them with a greased cling wrap loosely and let them rest until they double in size and puff up well above the sides of the pan. It can take 45 minutes to 1.5 hours.
- Preheat the oven to 385 0F.
- Remove the cling wrap very carefully without deflating the rolls. (that is why we need to grease them in the first place so that they don’t stick to the dough). Before placing them into the oven, make sure to mist or spray them with warm water without deflating them.
- Bake for 15-16 minutes or until their tops become golden brown. Once out of the oven, immediately brush them with softened or melted salted butter or margarine.
- Let them come to the room temperature and serve, or store at room temperature or refrigerate (refer to storage instructions).
Notes
Storage instructions:
- Ensure to cool the bread completely: Place the bread on a cooling rack and leave it at room temperature for 1 or 2 hours to allow the baking process to cease completely. When rolls are cool to the touch, start your storage process.
- Wrap properly to seal freshness
It is important to wrap your rolls or buns inside a foil or a plastic storage bag. If you use foil, make sure it completely encases the bread. In case using a plastic storage bag, push all excess air from inside before you seal the lip area. - Where to store
If you intend on eating the rolls or buns within 2-3 days, store them in a cool and dry place at room temperature. Many believe that placing bread inside a refrigerator will help it to stay fresh for longer. This actually has the opposite effect and the rolls or buns will dry at a faster rate. So, I like to freeze my bread if I am not planning to consume them in a few days. Safely dual covered and sealed in a freezer-safe bag. They freeze well for months. For thawing the bread, simply place it wrapped on a baking rack so they will warm to room temperature at an even rate and reabsorb the moisture inside the wrap. Reheat in the oven and enjoy!
Other helpful tips:
- Use active dry yeast only. Because it needs to be activated and in the very initial stage we can confirm whether the yeast is alive and vigorous or not. It milk yeast mixture should become bubbly and foamy.
On the contrary in the case of instant yeast, you directly add it to the flour. There is no sure way of telling if the yeast is active or dead.
- Do not stick to any timelines. The key is to observe your dough. The precise time for bulk rise and proofing always varies.
- If you think that the dough is still wet and not firming up or coming together, add a little flour. Do not too much flour at once. A tablespoon at once, knead, and give it some time to absorb water.
- Give your best to knead the dough. The dough is the key to any bread. It should be smooth and supple. Sometimes resting a dough helps. So, if you are kneading with your hands, and it still feels wet, cover and let it autolyze for 15 minutes. Then resume kneading. It will come together easily.
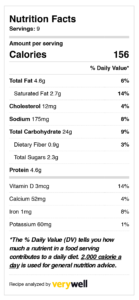
Nutrition facts


Neena Parashar
Best pav ever! this recipe really worked for me. My pavs never came out this soft and fluffy. Looking forward to trying more of your bread recipes.
Meenakshi Singh
Hi , ur recipe is so detailed...easy to understand...want to know...Can i replace all purpose flour with whole wheat flour...want to make it more healthy...if yes den what should be quantity nd time...plz explain...thnx
Meenakshi
Hey Meenakshi, glad you found it helpful. Yes, you can replace all-purpose flour with whole wheat flour, but the pav will not be as fluffy and pillowy. I suggest you substitute 30 percent all-purpose with whole wheat. It will add some fiber to the pav. But if you still want to go 100 percent whole wheat, you will have to add about 1/4 cup of vital wheat gluten. Increase the liquid percentage (2-3 tablespoons of water or milk should be enough for this recipe), as whole wheat has more bran and germ so it absorbs more water. Follow the rest of the recipe as such. I hope it helps.
Seema
Meenakshi, the ladi pav recipe is so detailed, I loved reading through it. We hardly come across one written to such perfection.
Meenakshi
Thanks, Seema, so glad you found it helpful.
Claudia
I made these today and had to come back and tell you they are so soft and delicious we cant believe these are eggless amazing! I think the dry milk powder makes the difference!
Meenakshi
Yes, dry milk does add an element of softness. So glad you liked it.
Sandhya Ramakrishnan
Such a lovely recipe and those ladi pav makes me want to grab one right off the screen. Love the detailed instructions for beginners and makes it so much easier to follow.
Mahy
Fantastic buns - exactly how I like them when I cook at home. Can't wait to try your recipe!
Beth
These were a big hit yesterday at our bbq. Everyone loved them and I made so many extras, and they were so yummy!
Sue
I love how fluffy and delicious these buns are! The hint of sweetness really sets them apart!
Meenakshi
Glad you liked them, Sue.
Beth
These rolls are amazing and yummy! We made these last night to go with our dinner and they turned out so delicious! I’m definitely making these again soon!
Meenakshi
So glad you enjoyed it, Beth.
Kay
Perfectly soft and fluffy rolls, kids love them fresh from the oven still slightly warm!
Meenakshi
So glad you guys enjoyed them, they taste best when still warm.
Melanie
I was so happy I came across your recipe, as soon as I saw it I had to make it. I haven't had these in years and I love them so much - your recipe came out perfect. My family ate them all straight out of the oven, lol
Meenakshi
So glad you liked them Melanie.
Claudia
That sheen is outstanding on those rolls and making my mouth water for them cant wait to dive into them!