
Ladi paav recipe
This ladi pav recipe yields the fluffiest,super-soft, lightest, and most cottony Mumbai style pav ever! These pav buns have an innate subtle hint of sweetness and a pinch of saltiness that from the butter that is brushed on the top.
Ingredients
- 2 cups All-purpose flour
- 3 tablespoon Butter
- 2 teaspoon Yeast
- 1 teaspoon Sugar
- ½ teaspoon Salt
- 2 tablespoon Dry milk powder
- ¾ cup Milk
Instructions
- Start by warming milk and adding butter to it. Let the butter melt completely and add sugar to the solution. Then add yeast, mix, and let activate for about 5 minutes, or until it becomes frothy and bubbly.
- Combine flour, milk powder, and salt in the bowl of a stand mixer.
- Add the yeast mixture to the dry ingredients and place the bowl on the stand mixer with a dough hook attached.
- Start at low speed until it all comes together and then, increase the speed.
- After 10 minutes, the dough will become stretchy and start to come together and leave the bowl sides and only remain stuck to the bottom. At this point stop the mixer and scrape the dough from the bottom and add a spoon or two of flour, (no more) and keep kneading for an additional 5-7 minutes until it separates itself completely from the bottom of the bowl.
- Stop the mixer when you see your dough has become soft and smooth and does not stick to your hands i.e. you should be able to hold the dough in your hands without its sticking to your hands.
- Place the dough in a greased bowl. Apply some oil over the dough and cover the bowl with a cling wrap.
- Let it rest in a warm and moist place (refer to the instructions given in the post) until it doubles in size. It could take 1- 2 hours depending on the ambient temperuature. (Look for the volume not the time line)
- Remove the dough from the bowl onto a floured work surface and divide it into 9 equal balls (preferably use a scale).
- Shape each ball into a smooth round ball by locking all the seams underneath and pinching them with your fingertips, in a way that you achieve a smooth-surfaced round ball.
- Transfer them to 8 inches’ square cake pan or whatever available with you. But make sure to place them at least 1 inch apart. Cover them with a greased cling wrap loosely and let them rest until they double in size and puff up well above the sides of the pan. It can take 45 minutes to 1.5 hours.
- Preheat the oven to 385 0F.
- Remove the cling wrap very carefully without deflating the rolls. (that is why we need to grease them in the first place so that they don’t stick to the dough). Before placing them into the oven, make sure to mist or spray them with warm water without deflating them.
- Bake for 15-16 minutes or until their tops become golden brown. Once out of the oven, immediately brush them with softened or melted salted butter or margarine.
- Let them come to the room temperature and serve, or store at room temperature or refrigerate (refer to storage instructions).
Notes
Storage instructions:
- Ensure to cool the bread completely: Place the bread on a cooling rack and leave it at room temperature for 1 or 2 hours to allow the baking process to cease completely. When rolls are cool to the touch, start your storage process.
- Wrap properly to seal freshness
It is important to wrap your rolls or buns inside a foil or a plastic storage bag. If you use foil, make sure it completely encases the bread. In case using a plastic storage bag, push all excess air from inside before you seal the lip area. - Where to store
If you intend on eating the rolls or buns within 2-3 days, store them in a cool and dry place at room temperature. Many believe that placing bread inside a refrigerator will help it to stay fresh for longer. This actually has the opposite effect and the rolls or buns will dry at a faster rate. So, I like to freeze my bread if I am not planning to consume them in a few days. Safely dual covered and sealed in a freezer-safe bag. They freeze well for months. For thawing the bread, simply place it wrapped on a baking rack so they will warm to room temperature at an even rate and reabsorb the moisture inside the wrap. Reheat in the oven and enjoy!
Other helpful tips:
- Use active dry yeast only. Because it needs to be activated and in the very initial stage we can confirm whether the yeast is alive and vigorous or not. It milk yeast mixture should become bubbly and foamy.
On the contrary in the case of instant yeast, you directly add it to the flour. There is no sure way of telling if the yeast is active or dead.
- Do not stick to any timelines. The key is to observe your dough. The precise time for bulk rise and proofing always varies.
- If you think that the dough is still wet and not firming up or coming together, add a little flour. Do not too much flour at once. A tablespoon at once, knead, and give it some time to absorb water.
- Give your best to knead the dough. The dough is the key to any bread. It should be smooth and supple. Sometimes resting a dough helps. So, if you are kneading with your hands, and it still feels wet, cover and let it autolyze for 15 minutes. Then resume kneading. It will come together easily.
Nutrition facts
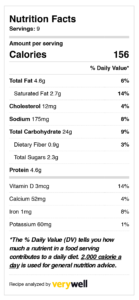
Nutrition
Calories: 156kcal
Tried this recipe?Let us know how it was!