After multiple experiments, trials, and errors, I finally have a recipe for making bread in Instant Pot. This instant pot bread recipe is as perfect as it can get. You just cannot make better bread in IP.
I have tried to make almost all possible variations of bread in an Instant pot. I made lean and rich bread. Then I tried different fermented bread; active dry yeast-risen and sourdough-risen bread. Further, I tested the best bread proofing mode in Instant pot, be it Yogurt mode or Proofing option in Bake mode. I went ahead and tried all possible ways to make bread in Instant Pot( Pressure cook or bake). And lastly, I tested the best way to crust the instant pot bread.
So, it is not going to be a straight recipe post. It is more of an experimental post. I will try my best to answer all the questions related to Instant Pot bread. Primarily, since there is no one-size-fits-all method to approach bread making in an Instant Pot. All models are different. IP makers are constantly improving their technology and launching better models with more features. So, the older models might not even have advanced features like Yogurt Mode and Bake.
Anyways, we will go deep into all these further down the post, but let us first create a roadmap of what we will discuss in this Instant Pot bread blog post today.
What to expect from this blog post
In addition to the step by step recipe guide, tips and explanations, you will find answers to following questions:
- My experiments with making bread in an Instant pot.
- Which types of bread can or should I make in Instant Pot
- How do I proof the bread in my instant pot?
- Which is the best way to proof the bread in an Instant Pot?
- How do you proof the bread in IP without the yogurt button?
- which is the best mode to make bread in IP?
- Can you use the Instant pot for baking?
- Why should you make this bread in IP??
- What do I need to make bread in an instant pot?
- How to Make Instant Pot Bread? Step by step guide.
- Can I Freeze Instant Pot Bread?
My experiments with making bread in an Instant pot.
I have made steamed buns in IP multiple times, but I was never interested in making bread in the instant pot. I mean the real baked bread. It happened after I upgraded my IP model from Classic Duo to Duo Evo Plus.
Duo Evo plus comes with BAKE mode. I baked a decent mini cake in that. Because of this, I wondered if it could bake rich bread that normally requires 350-375 0F.
It kind of got me interested, and I started experimenting.
Test 1: Rich bread vs lean bread.
Rich loaves of bread have tenderizing agents such as butter, oil, or milk that give them a soft and tender texture. Most of our sandwich bread is rich bread.
Bread made with only flour, salt, and water is called lean bread. There are chewy interiors and crispy exteriors. They usually require 400-500 0 F to bake.
| Type of bread | Approx.Baking Temp. | Crust | Interior |
| Lean bread | 400-500 0 F | Crispy | Chewy and open crumb |
| Rich bread | 350-3750 F | Chewy | Rich, tender, and closed crumb |
So I made a rich and lean bread in Instant pot. Although I was skeptical about the lean-bread, I was pleasantly surprised. On the contrary, I found that the rich bread tends to bake slightly denser in the instant pot.
Results:
| Type of bread | Texture | Flavor |
| Lean bread | Light and fluffy- chewy | Nutty |
| Rich bread | Dense | Rich |
So, the lean bread surprised me with the texture, but the rich bread saddened me with the dense texture. All the bread I have seen on the internet is quite similar to that. Denser and doughy!
So, I decided that I do not want to go the rich bread route with my instant pot bread.

Which types of bread can or should I make in Instant Pot (IP)?
Based on test 1, I concluded that: Though, you can make rich or lean either type of bread with satisfactory results in an instant pot. But the rich bread tends to stay a bit denser. So I recommend going for lean bread.
Or anywhere in between. Like not a super-rich bread, but adding just about 2 tablespoon of butter. And no other tenderizer. Hmmm, that sounds like another project!
Test 2. Naturally fermented vs yeast-fermented bread in Instant pot
When the lean loaf was decided, the next question was the fermentation method. Please note that both the loaves of bread in Test 1 were baked with active dry yeast.
So, I wanted to see if, sourdough can make any difference? So this time, I made lean bread with sourdough fermentation and active dry yeast.
As expected, the sourdough bread had a better crumb and texture than the yeast one. But the difference was no biggie. So I think, mode of fermentation does not make much difference.
But the key in fermenting bread for baking in an instant pot is to over-proof the bread, which we will discuss in detail in proofing.
Test 3: Bulk rising and proofing the bread in an Instant pot
Which is the best way to proof the bread in an Instant Pot?
- There are two ways for proofing the bread in an Instant pot.
Number 1: The yogurt mode: I regularly proof my sourdough in the instant pot. I like to use a custom setting in yogurt mode. In my opinion, it is the best way to proof the bread in the instant pot as it gives you the flexibility to choose the precise temperature. Also, you can just drop the dough into the greased instant pot.
Number 2: Duo Evo plus have a proofing option in the Bake Mode. I use this method, especially when I am making any quick yeast-risen bread. It proofs the dough in about 40-50 minutes!
Also, when you use the proofing option in Bake mode, do not place the dough directly in the pot of instant pot. There is no way to tell what temperature settings they use but, one thing is sure that the pot gets hot towards the end. I had a batch of dough wasted because of that.
So, place the dough in another bowl and place the bowl in the instant pot.(More on that in the proofing section.)
Alright, the point is that the yogurt mode is best for proofing the dough for the instant pot bread or any other bread recipe.

How do I proof the bread in my instant pot?
To bulk rise and proof bread in the Instant pot, yogurt mode is ideal.
I like to grease the pot of the instant pot with cooking oil and directly place the dough in it. Let the dough proof in the ferment option( if you have it) in yogurt mode. And select the custom temperature settings. 85-95 0F is ideal for yeast activity.
I always keep the bulk rise temperature for sourdough on the higher side, at 97 degrees. Why? 97 0F. It works best for my kitchen condition during this time of the year.
Since the dough is usually colder in winters because of the cold water and ambient environment, I set my thermostat around 95 oF. I keep it at 85 0F during summers.
In most cases ( IP), the yeast-risen dough will double in less than an hour, while sourdough may take 1-2 hours, depending on how strong the culture is!
How do you proof bread in IP without yogurt button?
To the best of my knowledge, the instant pot models that do not have a yogurt option, do not even have the Bake mode. So, it also eliminates the proofing option.
I can share a trick that I have used in the past. I select the sauté mode setting at low temperature and place the dough in a greased bowl, and put the bowl in the instant pot. Let it preheat for 3-4 minutes and then, turn off the Instant Pot. Close the lid and let the dough bulk rise or proof in the warm Instant Pot.
You can also use sous vide-mode, and select the custom temperature of somewhere between 85-95 0F
Or go the conventional route. Just place the dough in the oven with lights turned on for quicker bulk rise or proofing.
Other Instant pot recipes:
Test 4: Which is the best mode to bake bread in an Instant pot?: Bake or pressure cook?
It will be the most crucial test and affect the outcome greatly. And unfortunately, there is no straight answer as to which is better?
Bake Mode:
Without a doubt, the bread made in BAKE mode had a better crust and overall was a better bread. I am a crust person, and I liked the crust of this bread.
But many of you who do not have the BAKE function, might not even have the option to try it. But if you have bake mode, use that.
Pressure cook Mode:
Making the pressure-cooked bread in an Instant Pot is a challenge in itself. But let me keep that aside and talk about the bread. The pressure-cooked bread had a more crusty exterior. I think it has something to do with the moisture inside the pan. I did not use the container that has an airtight lid. The foil allowed some moisture( in form of steam) to enter into the bowl, which causes a more gelatinized surface, which eventually became super crispy when browned in an oven.
Overall, it was a moist and delicious bread.

Why bake-mode makes better bread than pressure cook mode in an Instant pot?
Because firstly, making the bread in bake mode is much easier and hassle-free than in pressure cook mode. To pressure cook bread in an Instant pot, you have to find the right size of tightly lidded steel utensil that does not narrow toward the top. It was a challenge for me. So I decided to go with a steel bowl and sealed it with multiple layers of foil tightly.
Secondly, you cannot make a big loaf, as you have to close the bowl or utensil, whatever you choose to use. The bread ideally rises more than 2 times in volume. So unless you have a 10 quartz instant pot, you cannot make decent size bread. This stands true to baking bread in general in Instant pot, but pressure cooking further contains it.
Thirdly, I liked the crust on the baked bread much better than that on the pressure-cooked one.
An FAQ, related to Instant pot baking.
Can you use the Instant pot for baking?
Yes, pretty much. I have successfully baked mini cupcakes and mini banana bread in an Instant pot with satisfactory results. And yes, multiple loaves of bread. Though, not all were good. But some were nice.
Test 5: Crusting/Browning the bread

I crusted one bread with the air fryer lid and the other in the oven. I do not own the crisp and air fryer model. But a friend happened to have an air fryer lid compatible with Duo Evo Plus. So she was happy to lend it for my experiment.
I found that the bread crusted best in Broil mode, at 400 0 F for 12 minutes.
And this recipe is particularly the best bread you can bake in an instant pot.
But, the oven-baked bread was better than the air fryer one. It had an even browned crust than the air fryer one ( which only crusts the top and sides and not the bottom and lower sides)
Alright, so, why should anybody even bother to make bread in Instant pot?
I know that the instant pot is not the best equipment to make bread. Bread bakers even do not like the home ovens. We have to do multiple manipulations to get the bread right, even in the oven.
But instant pot as a kitchen tool has a few advantages of its own.
- Primarily, it is time-saving. It is quick. It makes the proofing fast. Also, IP ( Instant Pot) can preheat much faster than conventional ovens. If not fast, it is not even slower than conventional ovens in terms of baking time.
- Temperature settings are more precise and accurate.
- And not to forget, how versatile it is! It is by far the best cooking equipment I have. Even for bread making, it can do almost all the chores, from bulk rising, proofing, baking, and crusting.
- If you want to make a quick small bread. It is a good option, without having to preheat the entire oven.
- Even if you do not have the air fryer lid or Bake options, you can still make the bread in pressure cooker mode and let the crust brown in the oven.
- Without a doubt, it is the best tool to proof the bread, if you already do not have any specialized equipment. Even if you do not bake the bread in IP, you can always use it for the bulk rise and proofing.

The pressure-cooked bread gets high gelatinization on its surface. It means that the crust is much thicker than normal bread. It has a tendency to become hard on air frying. That is because of excess moisture while baking( Pressure cook in this case). Brushing the bread with melted butter as it comes out of the oven helps to make this instant pot bread recipe perfect.
What do I need to bake bread in Instant pot?
Baking Ingredients:
For making instant pot bread, you need only a few ingredients. Just some flour, fermenting agent, salt, and water.
The tests showed that naturally-fermented bread got a better spring and crumb than the ones made with commercial yeast. So, if you want a fluffy and open crumb in your bread, go for a sourdough starter. And yes, only if you have it. In case you are planning to make a sourdough starter, read my comprehensive guide for making a sourdough starter with minimum discard. Else, just go with the commercial yeast.
Kitchen Equipment:
- Instant Pot: The perfect Instant pot for making bread would be the Instant pot Duo Evo plus and duo crisp air fryer. They both have the bake mode. An air fryer model or just the air fryer lid is required for browning the bread crust.
But rarely does anybody have them both, so we are going to modify and choose whatever we have on hand. This instant pot bread recipe is all about flexibility. We are going to use whatever model we have and tweak it along the way. I have details in the recipe notes.
- A metal cake tin( 6 inches), or a metal container with a lid.
- A candy or meat thermometer.
How to make bread in Instant pot
1. Activating the dry yeast or feeding the sourdough starter:
- If you are going to ferment the instant pot bread with the active dry yeast, start by activating it. Dissolve sugar in warm water and pour in the dry yeast. Stir it and let it bloom in a warm place. It may take 5-10 minutes, depending on the ambient temperature of the kitchen.
If you are using the sourdough starter, make sure to feed the starter well ahead of time. A well-fed starter should be bubbly and have a dome shape at its top.
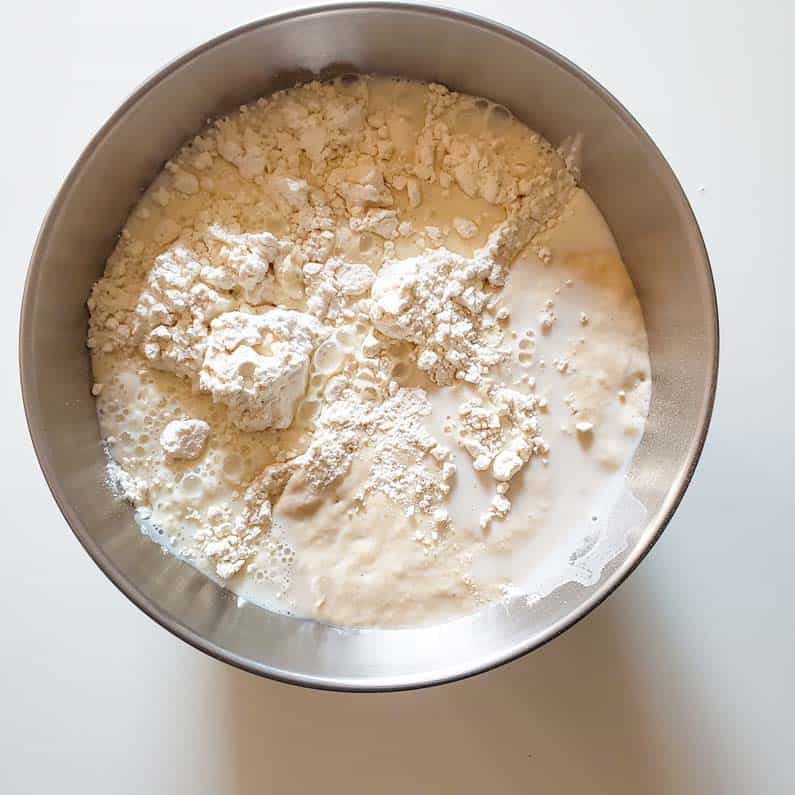
2. Combining all the dry and wet ingredients
Now combine all the dry and wet ingredients in a bowl and mix well. Keep mixing them until the dough comes together and no dry patch of dough is left. You can use the back of a wooden spatula to do that.
Now, cover the dough with a kitchen towel and let it rest at room temperature for about 20 minutes.
This process is called autolyze. It helps in gluten development.

3. Stretching and folding
It is a no-knead instant pot bread recipe. Though, we are not going to do any hand or stand machine kneading. Instead, we are going to do a couple of sets of stretch and folding. Start by making your hand mildly wet and lift the dough from one side and tuck under the opposite side. Then go around and repeat the process to do 4-5 folds. Then, cover the dough and let it rest for 15 minutes. After 15 minutes come back, and repeat the stretch and fold. Do this step 2 more times.
After 4 stretch and fold sessions, our dough is ready for the bulk rise.

4. Bulk Rise
Grease a steel pot of the IP and transfer the dough into it. Now place the pot inside and turn on the IP and select the yogurt mode. Select the custom temperature setting and set the temperature somewhere between 85-95 0F depending on how warm your kitchen is. Time will vary for sourdough and yeast.
Active dry yeast dough will double in 40 minutes to 1 hour whereas the sourdough will take double or more time.
So set the timer accordingly. You can always come back and check if it has already doubled.
5. Shaping the Instant Pot Bread
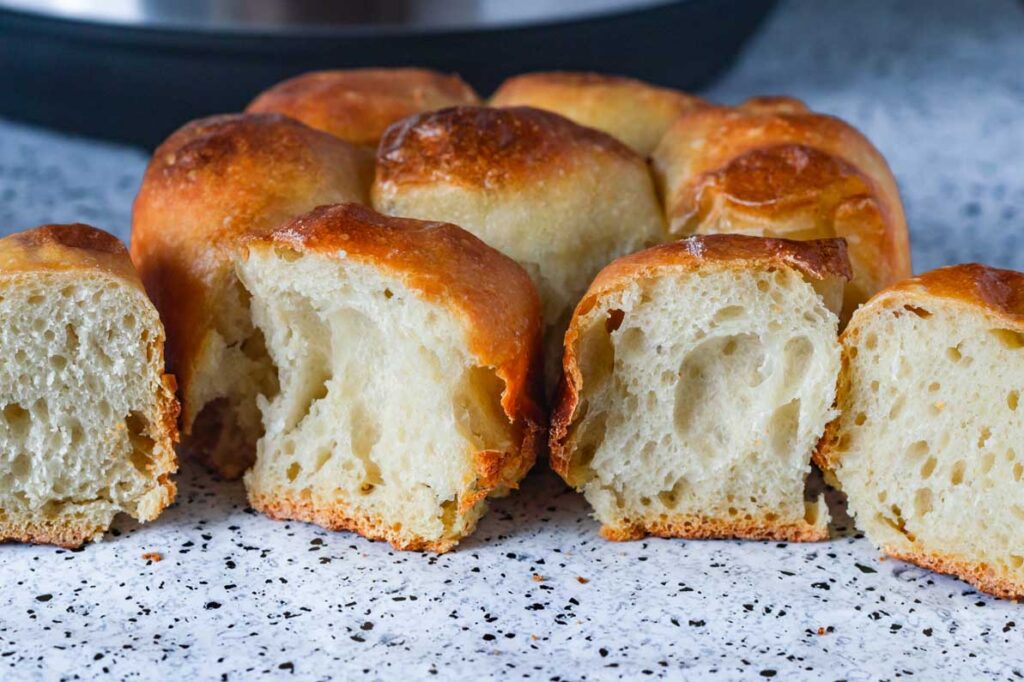
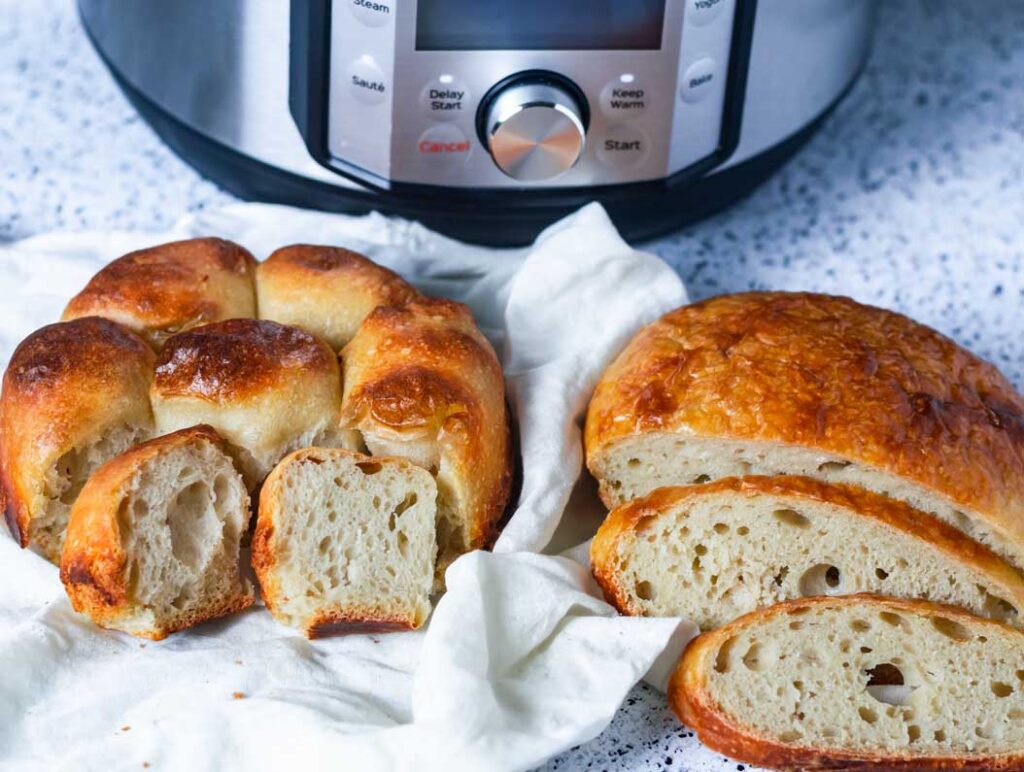
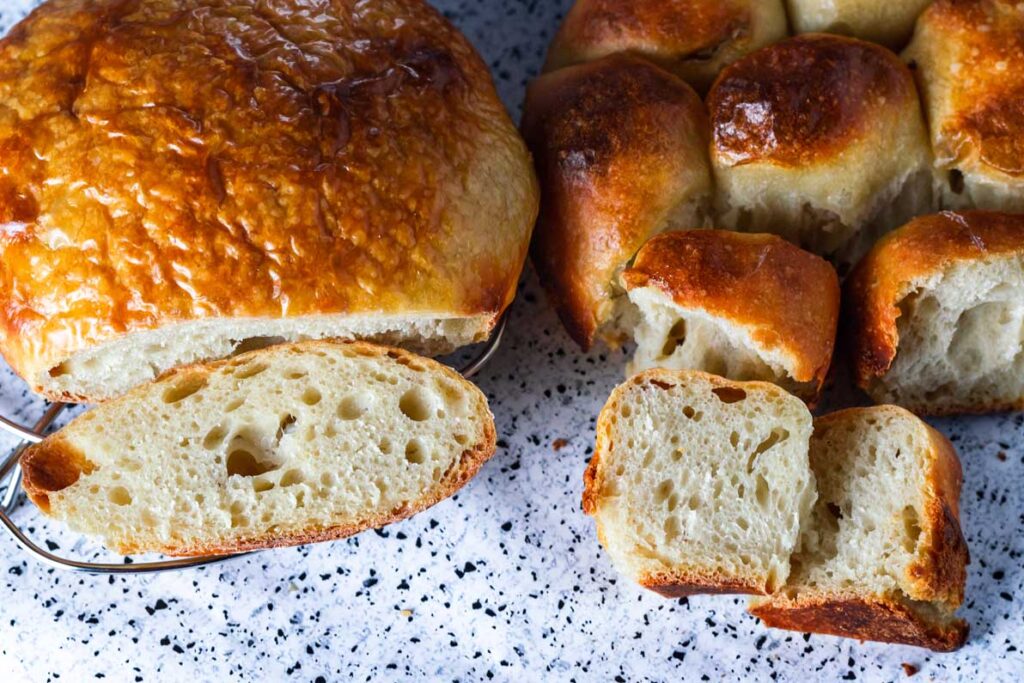
Now, this is very crucial. I made two types of bread in terms of shape; one as a boule and the other as separate rolls. Although both baked well, the rolls were better. Baking the whole boule takes longer and sometimes can remain undone from the center, and then, you have to put it back in the instant pot.
Though, that should not happen if you follow this instant pot bread recipe as such.
Still, I like to shape my instant bread as separate rolls. If you are a first-timer, I suggest you do the same.
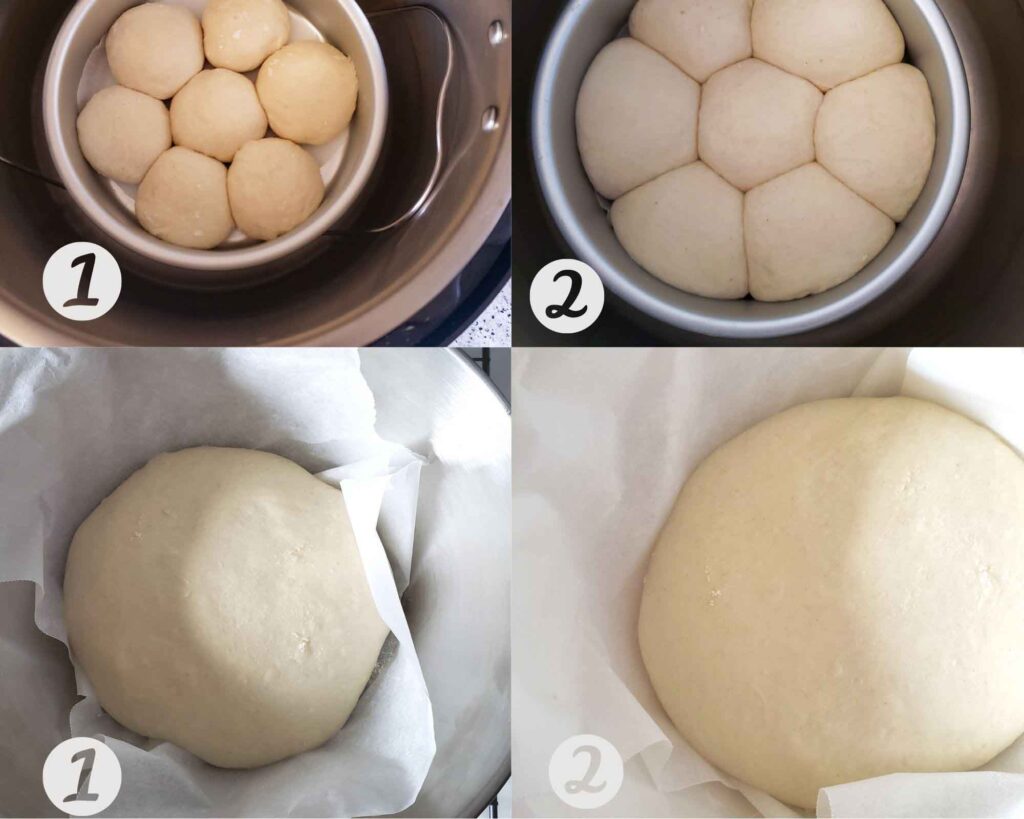
So, I divide the dough into seven equal parts. Then, I roll each ball into a roll by smoothing the surface and tucking the edges underneath.

6. Proofing
If you are shaping your bread like rolls, choose a round cake pan. Grease the cake tin and dust with all-purpose flour. Now transfer the shaped rolls into the cake pan.
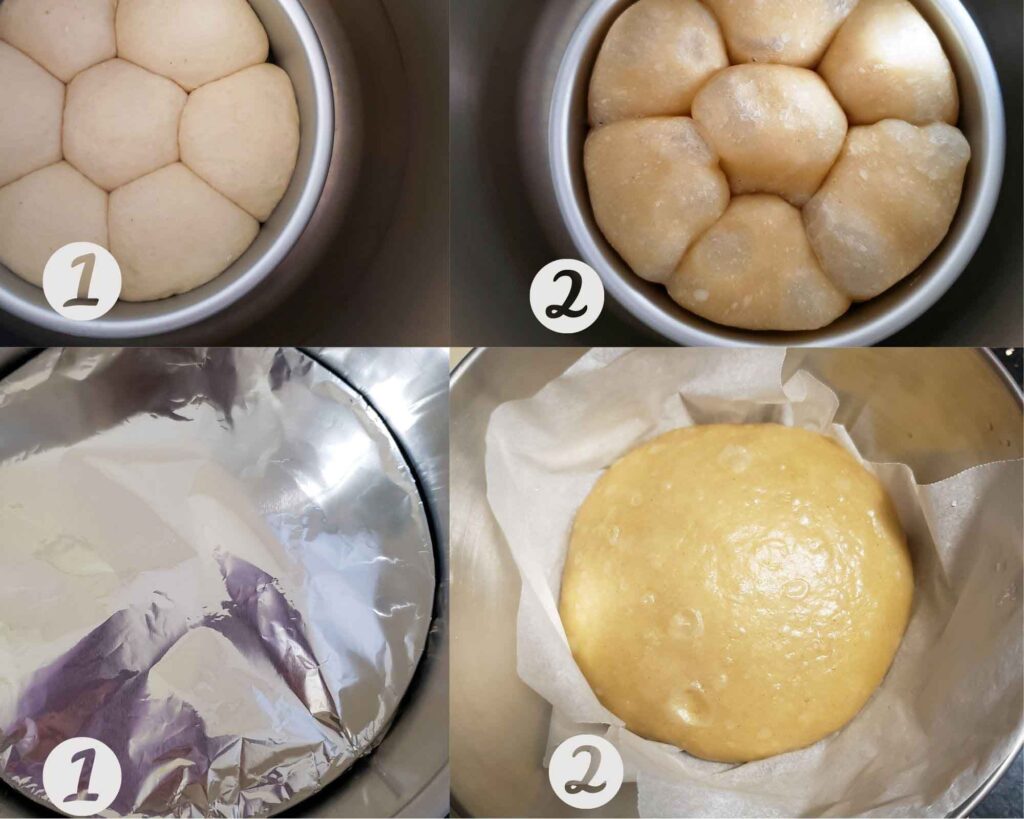
It will only work if you have a BAKE option in your IP. But if you plan to pressure cook the bread, find a metal container with a lid. Or just use a steel bowl that fits into your IP and has enough space in it for the bread to double. Then, put 2-3 rounds of foil on it to cover so that no steam or water can enter the bowl.
Then place the bowl in the pot of your IP and close the lid. Press the yogurt button and let it ferment for 1-2 hours.
Another crucial step is to let the dough over-proof. Ideally, we do not want the dough to over-proof, as this prevents it from having the much-needed oven spring. But in ideal condition, we put the bread in a pre-heated oven. The high temperature leads to quick evaporation in the dough and a sudden rise in yeast activity that causes the bread to rise or spring up.
But in the instant pot, the dough will pre-heat with the IP. So we do not get the ideal conditions for the oven spring. That is why it is important to have the dough slightly over-proofed.
7. Baking the bread
Bake mode: If you have bake mode in your IP, bake for 30 minutes. The temperature at the center of the loaf should be 185 0F +5 0F
If you do not have the bake mode, start the pressure cooker mode. Fill the pot with ¾th cup of water and pressure cook for 30 minutes.
8. Browning or crusting the Instant pot bread
Using the air fryer lid, crust the outer surface of the bread. Select the broil mode and set the temperature to 400 0 F. The bread crusted best in Broil mode, at 4000 F for 12 minutes. If your bread is larger, it may take longer.
Alternately bake the bread in the oven, at 4200 F for 12-15 minutes, until a golden-brown crust is formed.


Some of our favorite bread recipes:
How to store Instant pot bread
The bread made in an Instant pot, just like any other bread stays fresh at room temperature for 2-3 days. Wrap the bread in linen and then put it in a bread bag that closes tightly. The bread should not come in contact with direct air, as it causes the bread to become dry and harden.
Can I Freeze Instant Pot Bread?
Yes, sure. Just like any regular bread, you can freeze the Instant pot bread for prolonged storage. Let the bread cool and then, slice it. Put them in a freezer-safe bag and seal it. Wrap the bag in two layers of foil.
It freezes well for months.
Now that you know how to bake this quick and easy bread, give this a try, and do not forget to tag me on Instagram. If you found my Instant pot bread recipe useful, do share it with your friends.
Happy baking!
Recipe card for making bread in Instant pot
How to make perfect bread in an Instant pot
Equipment
- Instant Pot ( preferably Duo Evo Plus)
- Air Fryer Lid (or Instant Pot Duo Crisp & Air Fryer)
Ingredients
- 310 g All-purpose Flour (2 ½ cups)
- 1 teaspoon Active dry Yeast Or Sourdough starter- 70 g
- 1 teaspoon Sugar (if using active dry yeast for leavening)
- 1 teaspoon Salt
- 1 teaspoon Butter (optional) (melted for brushing the baked loaf/rolls)
- 1 cup Water (240 g)
Instructions
Preparing the leavening agent:
- Activate the active dry yeast by mixing in warm water (100-110 0F) with 1 teaspoon of sugar. Set aside. It should become foamy and frothy in 5-10 minutes.
- Feed the sourdough starter 3-5 hours in advance. Make sure that the starter is ripe by the time you start to knead the dough.
Preparing the dough
- Combine all the wet and dry ingredients in a big bowl. Using the back of a wooden spatula, combine them until the dough comes together. Use hands towards the end if needed. Make sure that there are no patches of dry flour in the dough. Cover with cling wrap or a kitchen towel and let the dough rest for 20 minutes.
Stretching and folding
- Now, wet a hand to stretch the dough. Take your hand under the dough and stretch it upwards, now tuck it under the dough on the opposite side. Repeat 4-5 times. Then, cover and let the dough rest for 15 minutes. Come back after 15 minutes and repeat the same process. You should do it 4 times at the interval of 15 minutes, to get smooth dough.
Bulk rising the dough
- Grease the instant pot interior, place the dough inside and close the lid. Proof till the dough doubles in size.
- Method 1: Yogurt mode- Ferment- Custom temperature- 95 0F.
- Select the custom temperature setting on Yogurt mode and set the temperature somewhere between 85-95 0F for 1-2 hours, depending on how warm your kitchen is. Active dry yeast dough will double up much faster than the sourdough. My yeast dough doubled in 50 minutes, and the sourdough one took about 2 hours.
- Method 2: Bake mode-Proofing option- Select time for 2 hours for sourdough and 1 hour for yeast bread. Also, do not place the dough directly in the pot. Instead, put it in a bowl and place the bowl in the IP.
- Method 3: Sous Vide Mode - Custom temperature – 90 0F. Do not put the dough directly in the pot.
- Method 4: Cold rise overnight in the fridge for best flavor.
- Method 5: Kitchen counter or oven with the light turned ON.
Shaping
- Shape the dough either into rolls or a single boule. For making rolls divide the dough into 7 equal parts and make them into smooth rolls. Place the rolls in a suitable container, depending on how you plan to bake them. (Read the suitable baking container in notes)
Proofing
- Let the dough overproof, much more than you would ideally do in the case of oven-baked bread. Choose the method that best suits you from the bulk rise section.( Also, read the proofing section of the post for more clarity)
Bake the bread
- Method 1: Select BAKE mode – custom- High temperature-30 minutes.
- Method 2: Pour ¾th cup of water in the pot and place the closed container with the shaped bread directly in it. ( Make sure there is no scope of water getting into the container.) Select Pressure cook at High temp. for 30 minutes. When done, let the pressure release naturally. Use a meat or candy thermometer to check if the bread is fully baked. The center of the bread should measure 180-195 0F.
Browning or crusting the Instant pot bread
- Replace the lid with the air fryer lid. (do not forget to empty and dry the pot if you pressure cook the bread) Select the broil mode and set the temperature to 400 0F for 12 minutes. ( If you make a boule, it may take longer.)
- Alternately bake the bread in the oven, at 420 0F for 12-15 minutes, until a golden-brown crust is formed. Take out of the oven, and brush with melted butter.
Cooling and slicing
- Transfer the bread onto the cooling rack and let the bread cool for 30 minutes before slicing.
Notes
Recipe Notes
- Smaller bread bakes better and faster. That is why I recommend making rolls. If making a boule, choose to make smaller boules.
- It's a lean bread and crust will nothing but crispy. Steam gelatinizes the sugars in the flour and forms a crust on the surface. On broiling in an air fryer or oven, the crust becomes nice and crisp. If you do not like such crust, brush the crust with melted butter as soon as it comes out. Alternately you can also add 2 tablespoon of melted butter to the recipe if do not like a crispy crust.
- While proofing the shaped dough, try to over-proof the dough. Unlike the conventional oven, the instant pot does not give a natural spring to the bread. IP is pre-heating with the bread inside it. So, our best bet is to over-proof the dough to achieve a light and fluffy bread with an open crumb.
- A suitable baking container will depend on how you plan to shape the bread and on the mode of baking you use. If you are using, pressure cooker mode, you need a deep pan, bowl, or box, preferably with a tight lid. It should be deep enough to give ample space for the bread to rise without any hindrance while baking. If your baking container does not have a lid, cover it tightly with foil, to ensure that no steam or water can get inside the container.
- If you are using the bake mode, you can use any baking pan, that will fit in your instant pot.
- Oven-crusted bread is somewhat better than air fryer-crusted bread. Simply because, air fryer only crisps the bread from the top surface, whereas the overall surface is browned in the oven. But you can choose either of the two ways.
Nutrition facts


Shirley
Wow What an informative page! I spend a lot of time 'living' in my camperized van wandering about. Space is at a premium so when I have a suitable power connection, my go to is my InstantPot Mini. I have been experimenting with bread baking in it with some success, but you just saved me a whole lot of trial and error to achieve better results!
I'm new to your site, but you now have a new follower. Thank you so much ❤️
Susan
So... I was largely skeptical, but looking at your images, I somehow got enticed to make bread in an instant pot. I used your yeast recipe instructions. I made small dinner rolls, and I can't believe they came out so great! I ended up crusting them in an oven ( I do not own an air fryer top). But I really want to thank you for this wonderful write-up and explanation. At the tender age of 76 I learned a new thing today.
Alyssa Hixenbaugh
I need to get an instant pot so I can try this recipe!
Meenakshi
It is such a helpful kitchen tool..can't imagine my life without it.
Cindy Mom the Lunch Lady
Man those instant pots can do just about anything! Your bread looks so delicious 🙂
Cooking with Carbs
What an amazing and thorough post. I love all your different experiments trying to come up with the perfect bread instant pot recipe. I love my instant pot, I love carbs and I love making bread, but I've never tried making bread in it before. I'm going to pin this recipe too so I can come back to it. Thank you!
Meenakshi
So glad you liked it dear.
Sandra
I got to try this...Bread in IP? Thanks for the recipe.
Jade
Wow.. I had no clue that Intapot can even make bread! gotcha try this.
Meenakshi
Do give this one a try. Thanks for the comment.