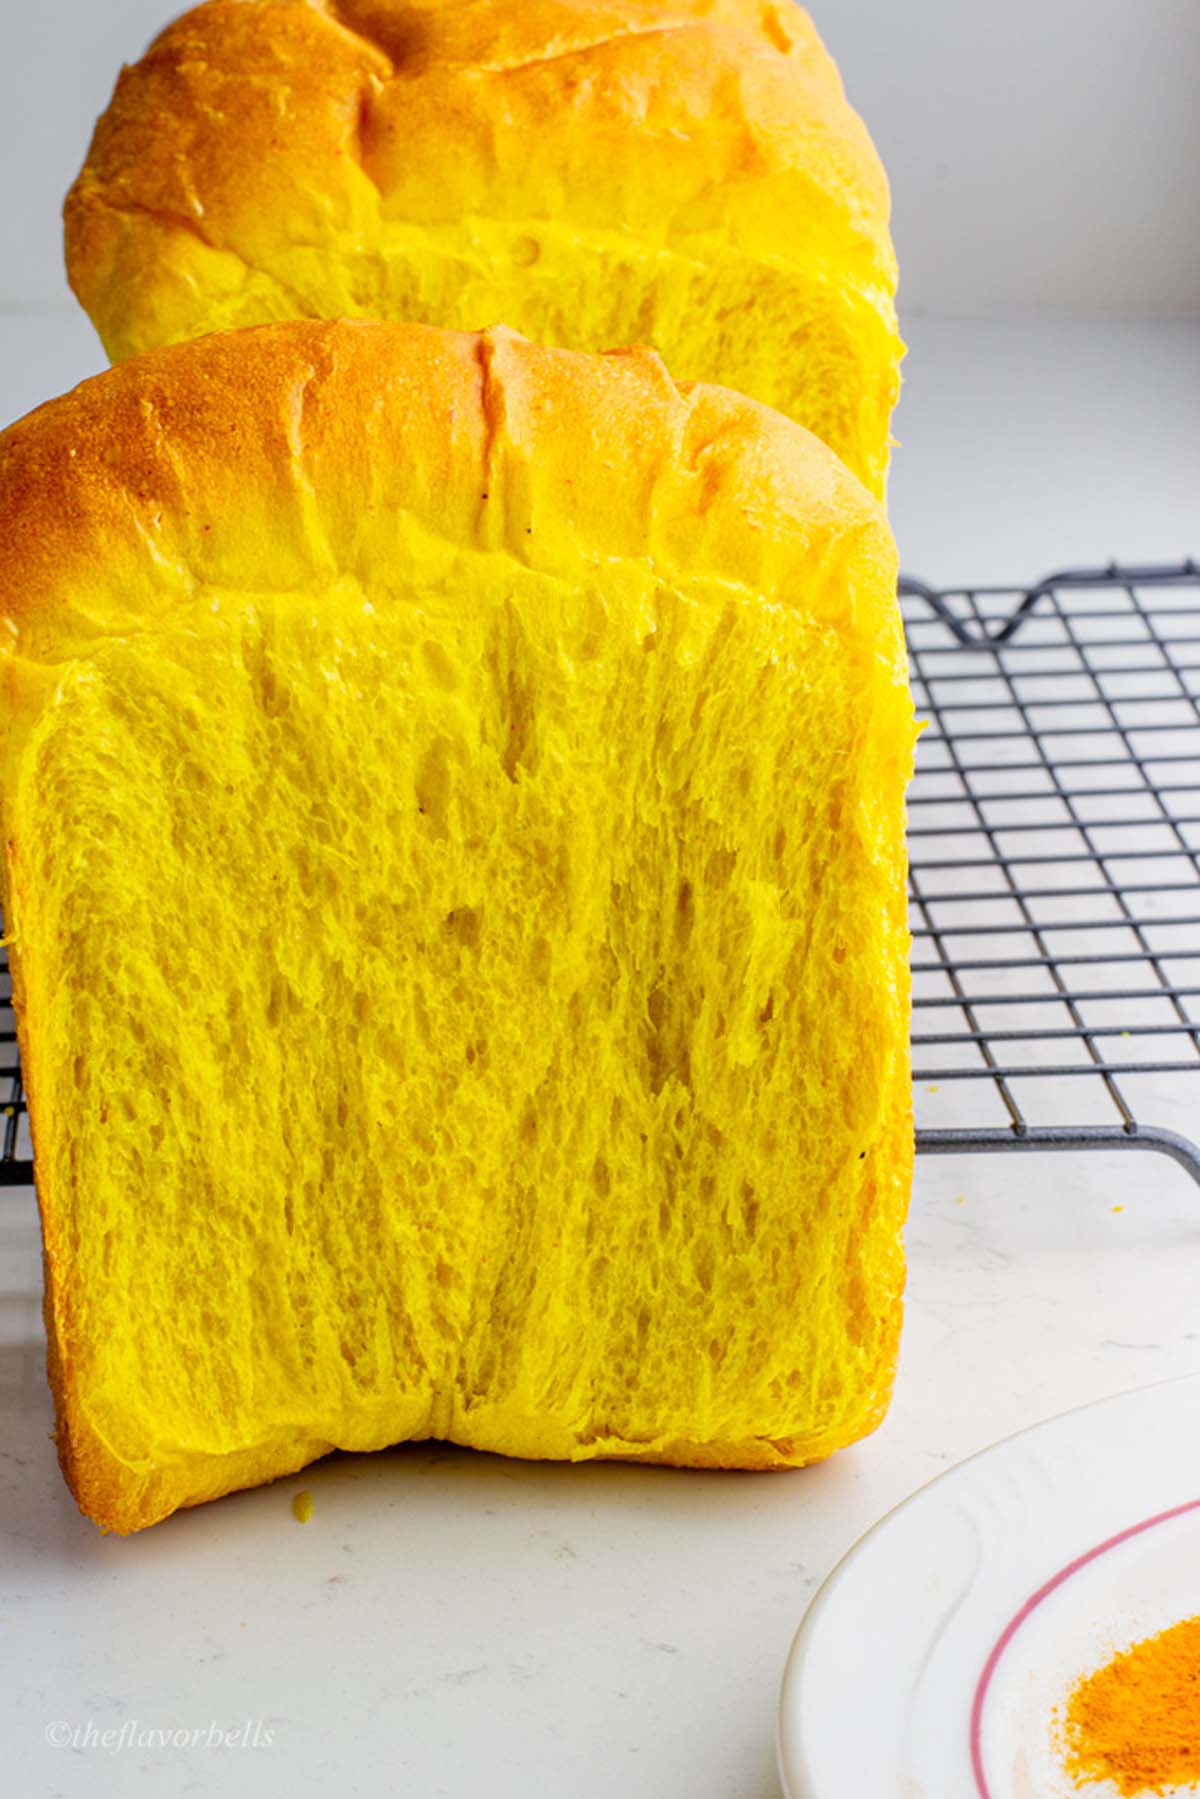
These golden-hued slices of homemade turmeric bread will brighten your breakfast table with their earthy aroma and promises of both flavor and wellness. This breakfast sandwich loaf recipe is a great way to incorporate more healing ingredients into your daily meals or to simply impress guests with a vibrantly colored artisanal bread that's surprisingly easy to make.
Turmeric flatbread is very common in my Indian household, but this turmeric sandwich bread recipe is inspired by Palestinian-style turmeric bread (minus the sesame seeds). Follow along and enrich your home baking arsenal.
Jump to:
👩🏽🍳 Why to Try This Recipe?
- Golden Goodness in Under 3 Hours – From mixing to baking, this turmeric bread delivers spectacular results without consuming your entire day, perfect for busy home bakers who still want fresh homemade bread.
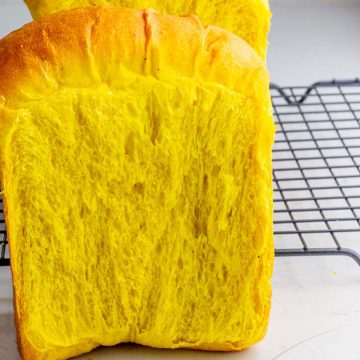
- Naturally Vibrant Color – Skip artificial food coloring! The turmeric creates a stunning golden-yellow hue that makes your sandwiches and toast visually appealing without any additives.
- Egg-Free Versatility – This recipe is already egg-free and can easily be adapted to fully vegan turmeric bread by simply swapping dairy milk for plant-based alternatives.
- Turmeric bread Benefits – Incorporate the well-documented health benefits of turmeric into your daily bread consumption with this delicious functional food.
- Beginner-Friendly Success – The straightforward process and forgiving dough make this an ideal recipe for novice bread bakers looking to expand their skills.
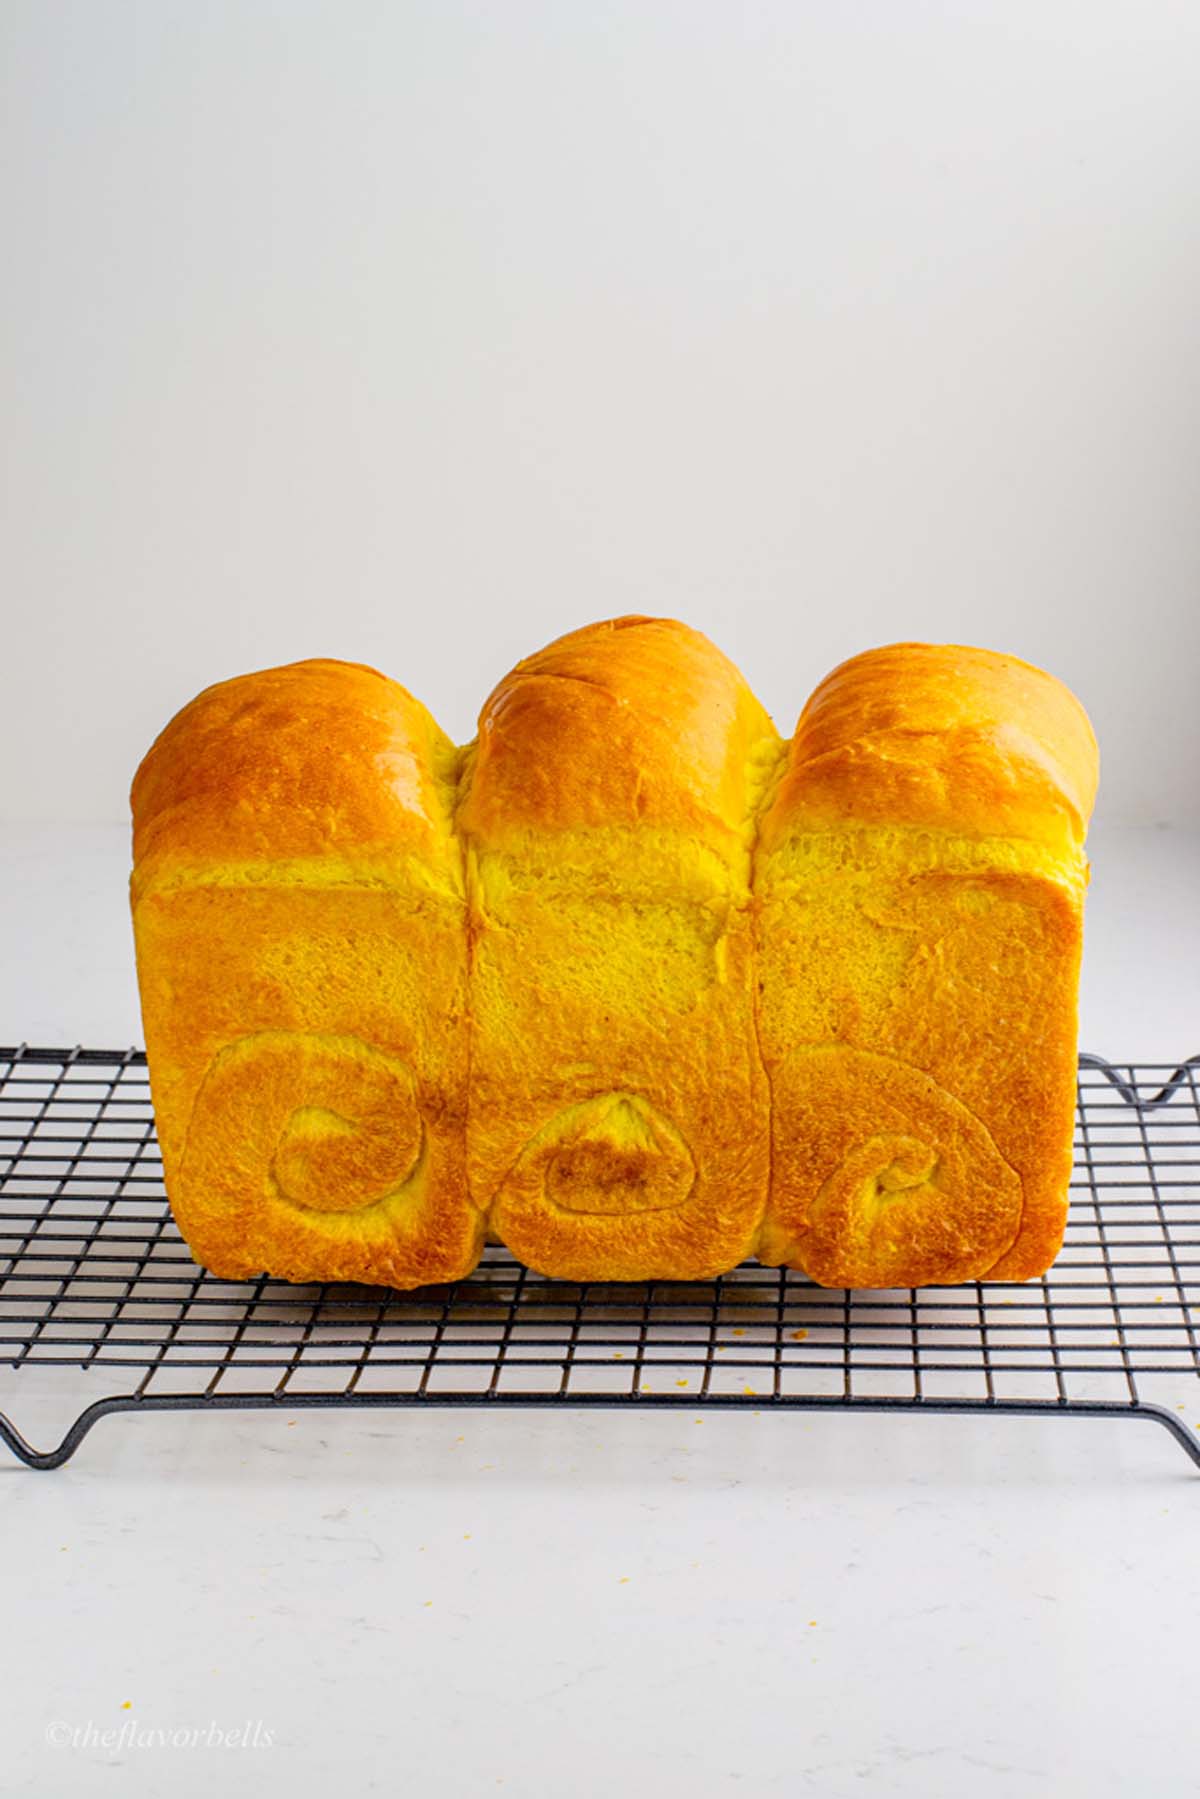
- Perfect Sandwich Structure – The three-part rolling technique creates the ideal crumb for clean, even slices that hold up beautifully to fillings without falling apart.
- Customizable Flavor Base – While delicious as-is, this turmeric bread recipe provides an excellent canvas for adding complementary spices like black pepper, cardamom, or garlic.
- Instagram-Worthy Results – The striking yellow color and professional-looking pullman loaf shape make this bread as photogenic as it is delicious.
- Freezer-Friendly – Make a double batch and freeze slices for quick access to homemade turmeric bread whenever you need an immune-boosting meal.
🧂 Ingredient Notes & Substitutions
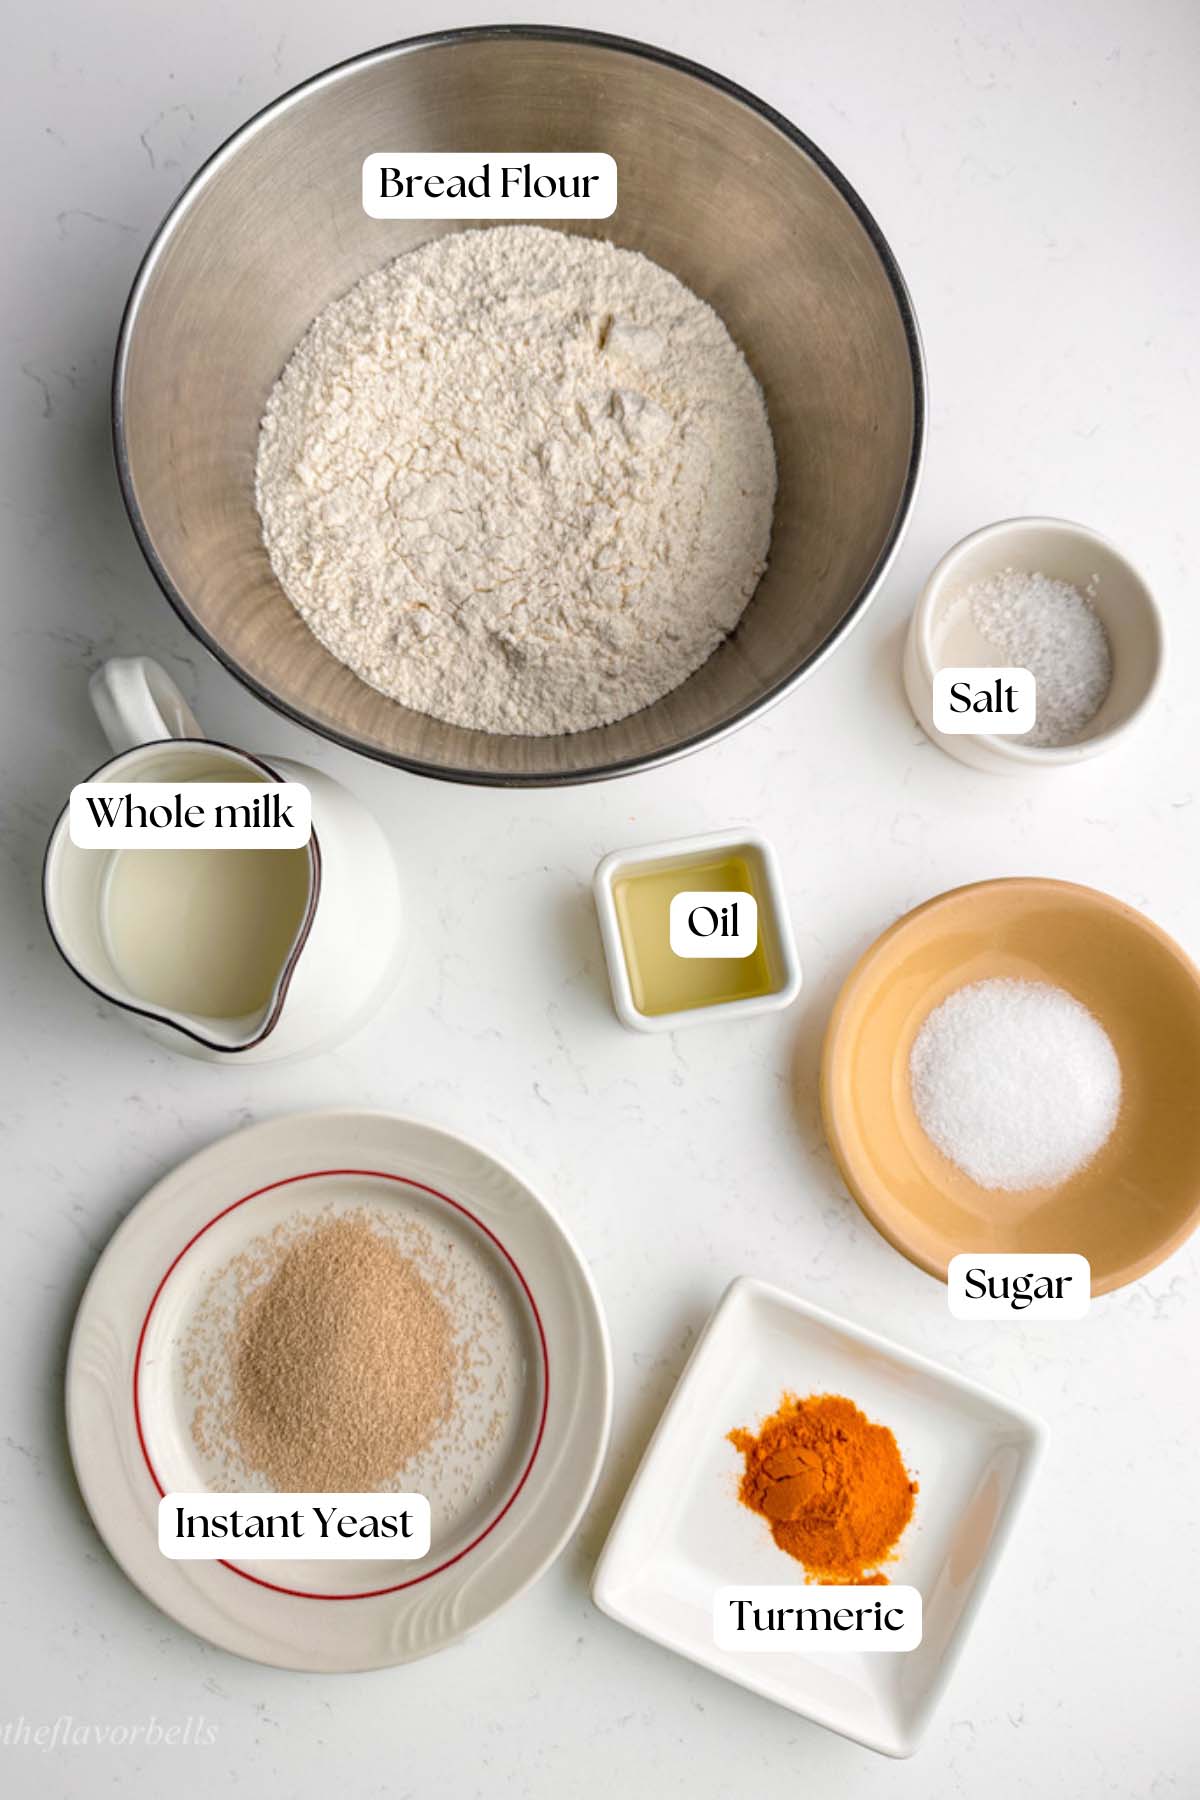
- Flour Flexibility: While bread flour creates the perfect chewy texture for this golden turmeric loaf, all-purpose flour works in a pinch. For those seeking whole grain goodness, substitute up to 25% whole wheat flour for a nuttier flavor profile that complements turmeric's earthiness.
- Milk Alternatives: Don't let dairy restrictions stop you from enjoying homemade turmeric bread! Unsweetened almond, oat, or coconut milk all make excellent non-dairy substitutions with subtle flavor variations that enhance the bread's character. For a tangier twist, buttermilk or plant-based yogurt thinned with water creates spectacular results.
- Turmeric Sources: The star ingredient deserves special attention! Fresh turmeric root (finely grated) delivers the most vibrant color and pronounced health benefits, though high-quality organic ground turmeric powder is more accessible for most home bakers. That’s why I have used Turmeric powder in this recipe. Look for brands with higher curcumin content for maximum anti-inflammatory properties and that signature golden yellow color that makes turmeric bread so Instagram-worthy.
- Yeast Options: While instant yeast streamlines the bread-making process, active dry yeast works perfectly when proofed first in warm liquid. For those interested in artisanal sourdough turmeric bread, replace the commercial yeast with 100g of active sourdough starter and extend rise times accordingly.
- Oil Selection: The neutral oil called for allows turmeric's flavor to shine, but don't hesitate to experiment with cold-pressed olive oil or coconut oil for different flavor profiles. A tablespoon of ghee adds a traditional Indian touch that perfectly complements the warming spices.
- Flavor Enhancers: While not in the base recipe, consider adding a pinch of black pepper to increase turmeric's bioavailability, or incorporate warming spices like cardamom, cinnamon, garlic powder, or cumin that compliments the earthy flavor of turmeric. You can also sprinkle some white or black sesame seeds at the top for a nutty crunch or just add them to the dough for a Palestinian turmeric bread-style loaf.
🔪Step by Step Instructions
Step 1: Combining All Ingredients for the Dough
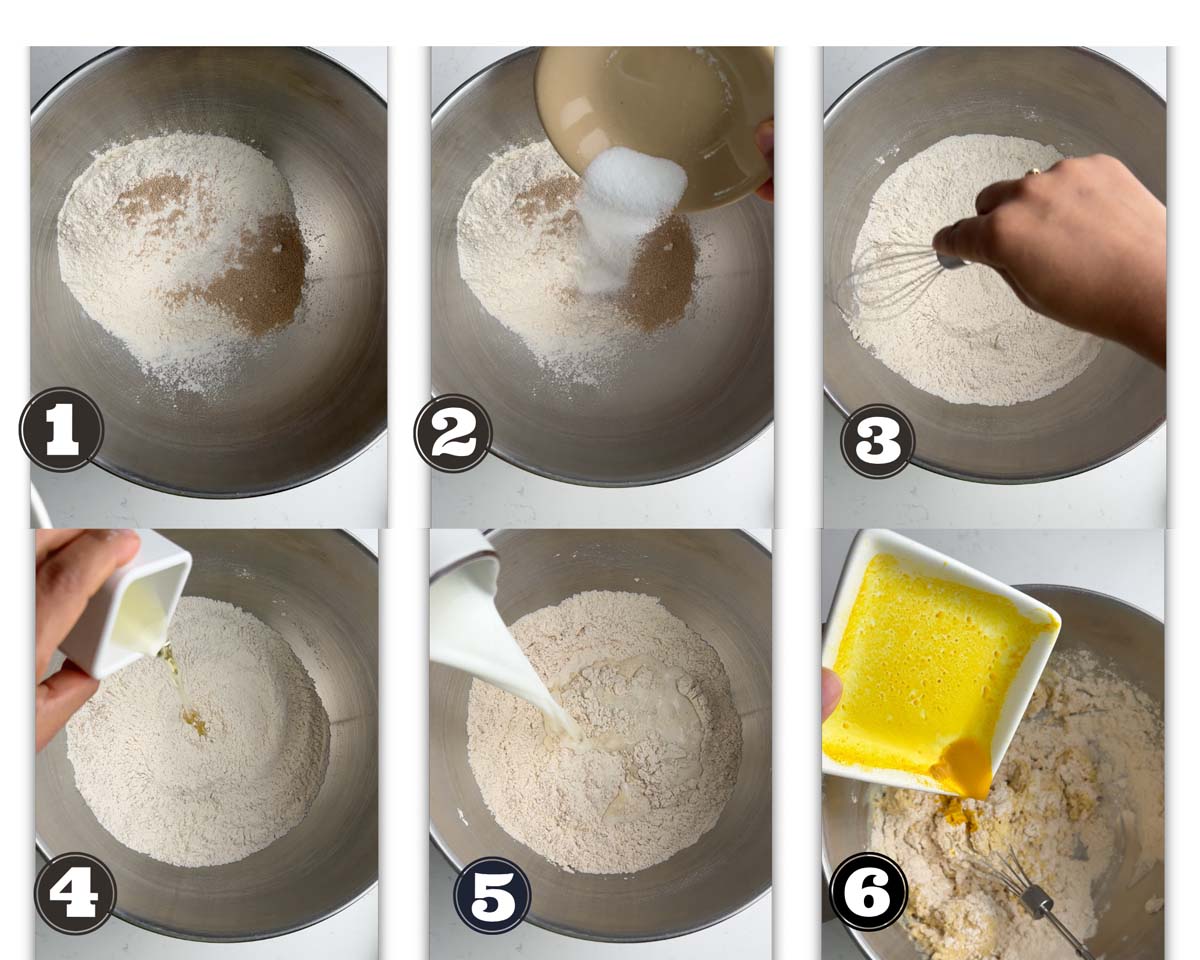
Start by gathering all your ingredients at room temperature, which helps the yeast activate properly. In a large mixing bowl or the bowl of the stand mixing, whisk together the bread flour, salt, sugar, and instant yeast until well the ingredients are evenly distributed.
Now warm the milk (make sure it's just warm, not hot, to keep your yeast happy). Take 2-3 tablespoon of milk and add turmeric to it. Warm liquid helps the better pigment extraction from turmeric powder. Now, create a well in the center of your dry ingredients, then pour in the warm milk, add the oil, followed by the turmeric milk solution.
Warm milk enhances turmeric pigment extraction by increasing solubility and dispersion of curcumin, turmeric’s active compound. Heat loosens turmeric’s cellular structure, allowing curcumin to dissolve more efficiently in the milk's fat. This results in better absorption, color release, and bioavailability of curcumin.
Using a dough whisk or wooden spoon or spatula, gently stir from the center outward, gradually incorporating more of the dry ingredients until a shaggy dough forms. Don't worry if it looks a bit rough at this stage – the kneading will bring it all together into a smooth, golden masterpiece.
Step 2 Kneading Turmeric Bread Dough
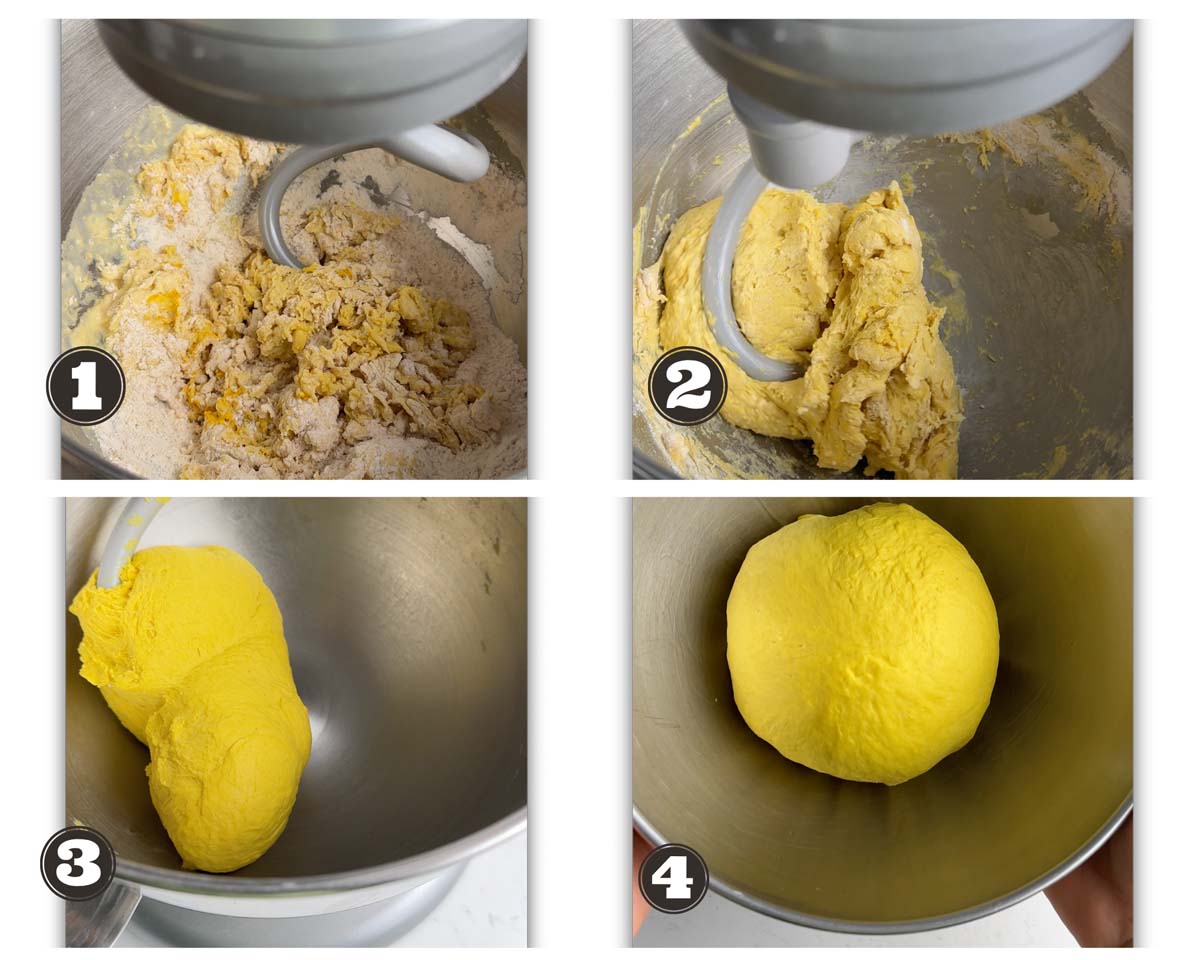
For hand kneading: Turn your gorgeous golden dough onto a lightly floured surface and prepare for a mini workout! Using the heels of your hands, push the dough away from you, then fold it back toward yourself like you're closing a book. Give it a quarter turn and repeat. Continue this rhythmic push-fold-turn motion for about 12-15 minutes until your dough transforms from sticky to smooth and elastic. The perfect turmeric dough will pass the windowpane test – when a small piece can be stretched thin enough to see light through without tearing. Your arms might feel the burn, but remember: great bread comes from love and muscle!
For stand mixer kneading: Attach the dough hook to your mixer and transfer the initial shaggy mixture to the bowl. Begin on low speed (setting 1-2 for KitchenAid) for about 2 minutes to incorporate everything without sending flour flying across your kitchen. Once the ingredients are combined, increase to medium speed (setting 4-5) and knead for 8-10 minutes.
Watch as the turmeric works its magic, transforming your dough into a smooth, elastic ball that pulls away cleanly from the sides of the bowl. The dough should feel slightly tacky but not sticky when touched with a clean finger. This method is perfect for busy bakers who want to multitask while creating their anti-inflammatory turmeric sandwich bread.
Step 3: Bulk Fermentation
Once your turmeric dough is properly kneaded, it's time to let those yeast microorganisms work their magic! Gently shape the dough into a ball and place it in a large lightly oiled bowl. Flip the dough once to ensure the entire surface has a thin coating of oil, which prevents it from drying out during fermentation.
Cover your bowl with plastic wrap or a damp cloth, creating a cozy environment for your dough to rise. Now, place your covered dough in a warm, draft-free spot for about 60-90 minutes, or until it has doubled in size.
The ideal temperature is around 75-80°F (24-27°C). This first rise is critical for developing those beautiful air pockets and that tender crumb structure that makes homemade turmeric bread so irresistible. If your kitchen is chilly, try placing the dough near (not on) a warm oven or use the proofing setting if your oven has one. I often use the ferment option on my Instant Pot to ferment bread in instant pot.
Step 4: Shaping
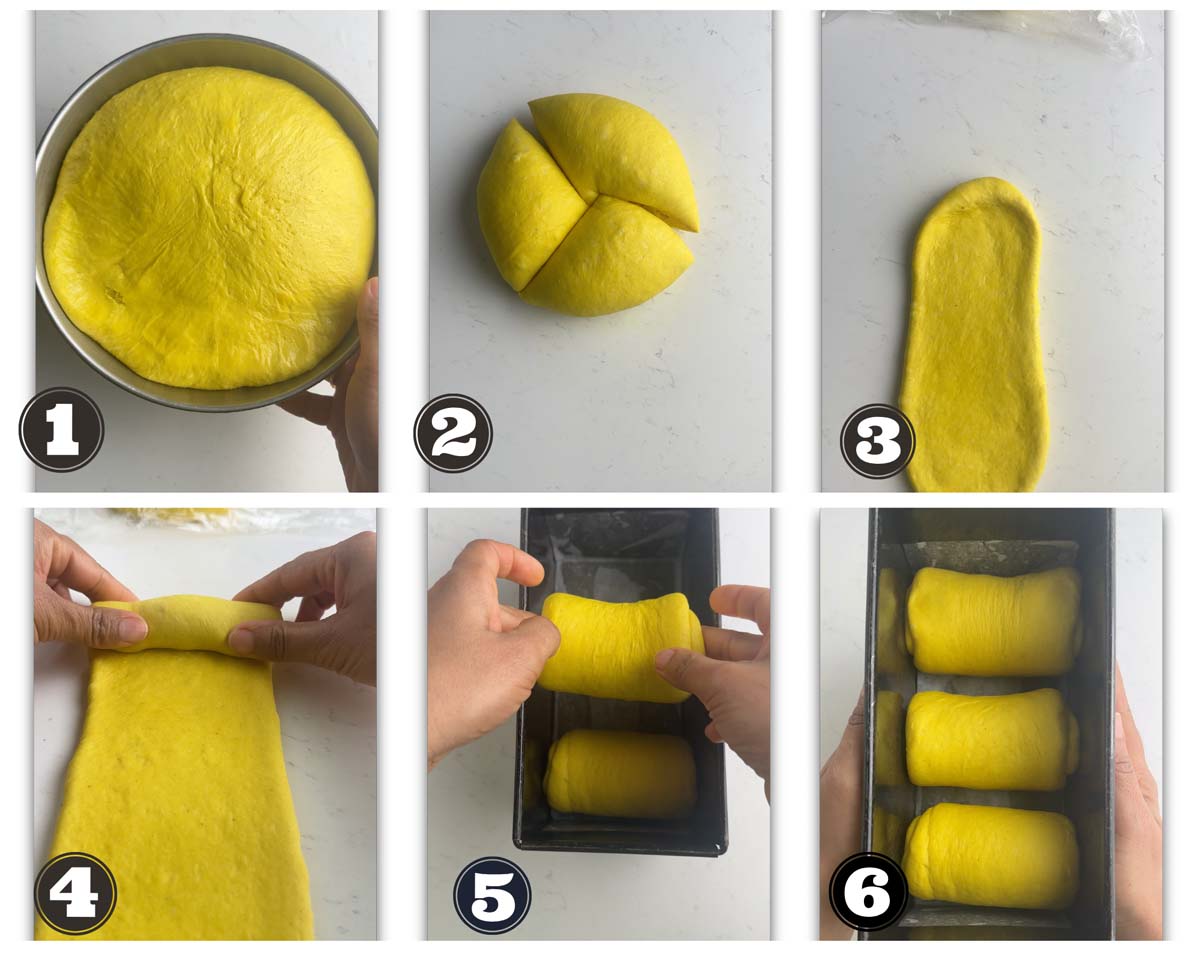
Once your dough has doubled in size, it's time for the fun part! Gently punch down the dough to release excess gas bubbles and transfer it to a lightly floured surface. Using a kitchen scale for precision, divide your golden dough into three equal portions ( 214g each).
Take each portion and flatten it into a rectangle with your hands, aiming for a width that matches your 8×4.5-inch pullman loaf pan. Starting from the short end, tightly roll each rectangle like you're making a jelly roll, pinching the seams to seal. This rolling technique creates that classic sandwich bread structure perfect for even slices.
Arrange all three rolled portions side by side in your lightly greased pullman loaf pan, with the seam sides facing down. This three-part method creates a beautiful pull-apart effect and ensures even baking of your turmeric bread.
Step 5: Proofing
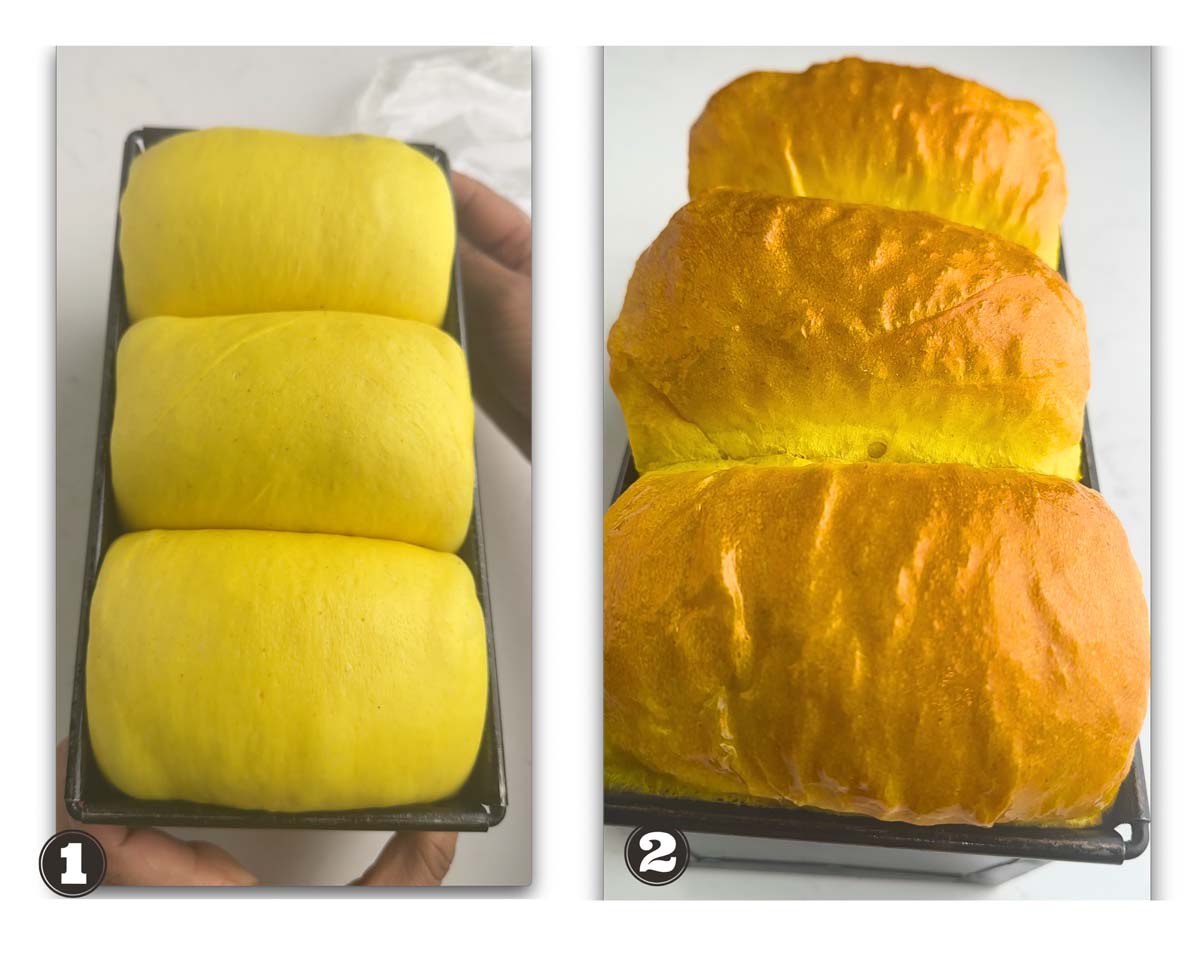
Cover your filled loaf pan with a clean kitchen towel or plastic wrap and let the shaped dough proof for 45-60 minutes until it's nearly reached the top of the pan. This second rise, or final proof, is crucial for achieving that perfect sandwich loaf texture.
During this time, your dough should look noticeably puffier and feel light and airy when gently poked. About halfway through proofing, preheat your oven to 380°F (193°C) so it's properly hot when your golden turmeric bread is ready for baking.
The ideal proofing environment is slightly warmer than room temperature, around 80-85°F (27-29°C), with moderate humidity. If your kitchen is cool, try creating a proofing box by placing a cup of hot water in your microwave alongside the dough (not turned on) or use your oven's proofing setting if available.
Step 6: Baking
When your turmeric dough has proofed beautifully, it's time to transform it into golden, aromatic bread! If you'd like a shiny finish, you can gently brush the top with milk or beaten egg just before baking.
Place the loaf pan on the middle rack of your preheated 380°F (193°C) oven and bake for 22-25 minutes. You'll know your anti-inflammatory turmeric bread is ready when it develops a gorgeous golden-amber crust and sounds hollow when tapped on the bottom.
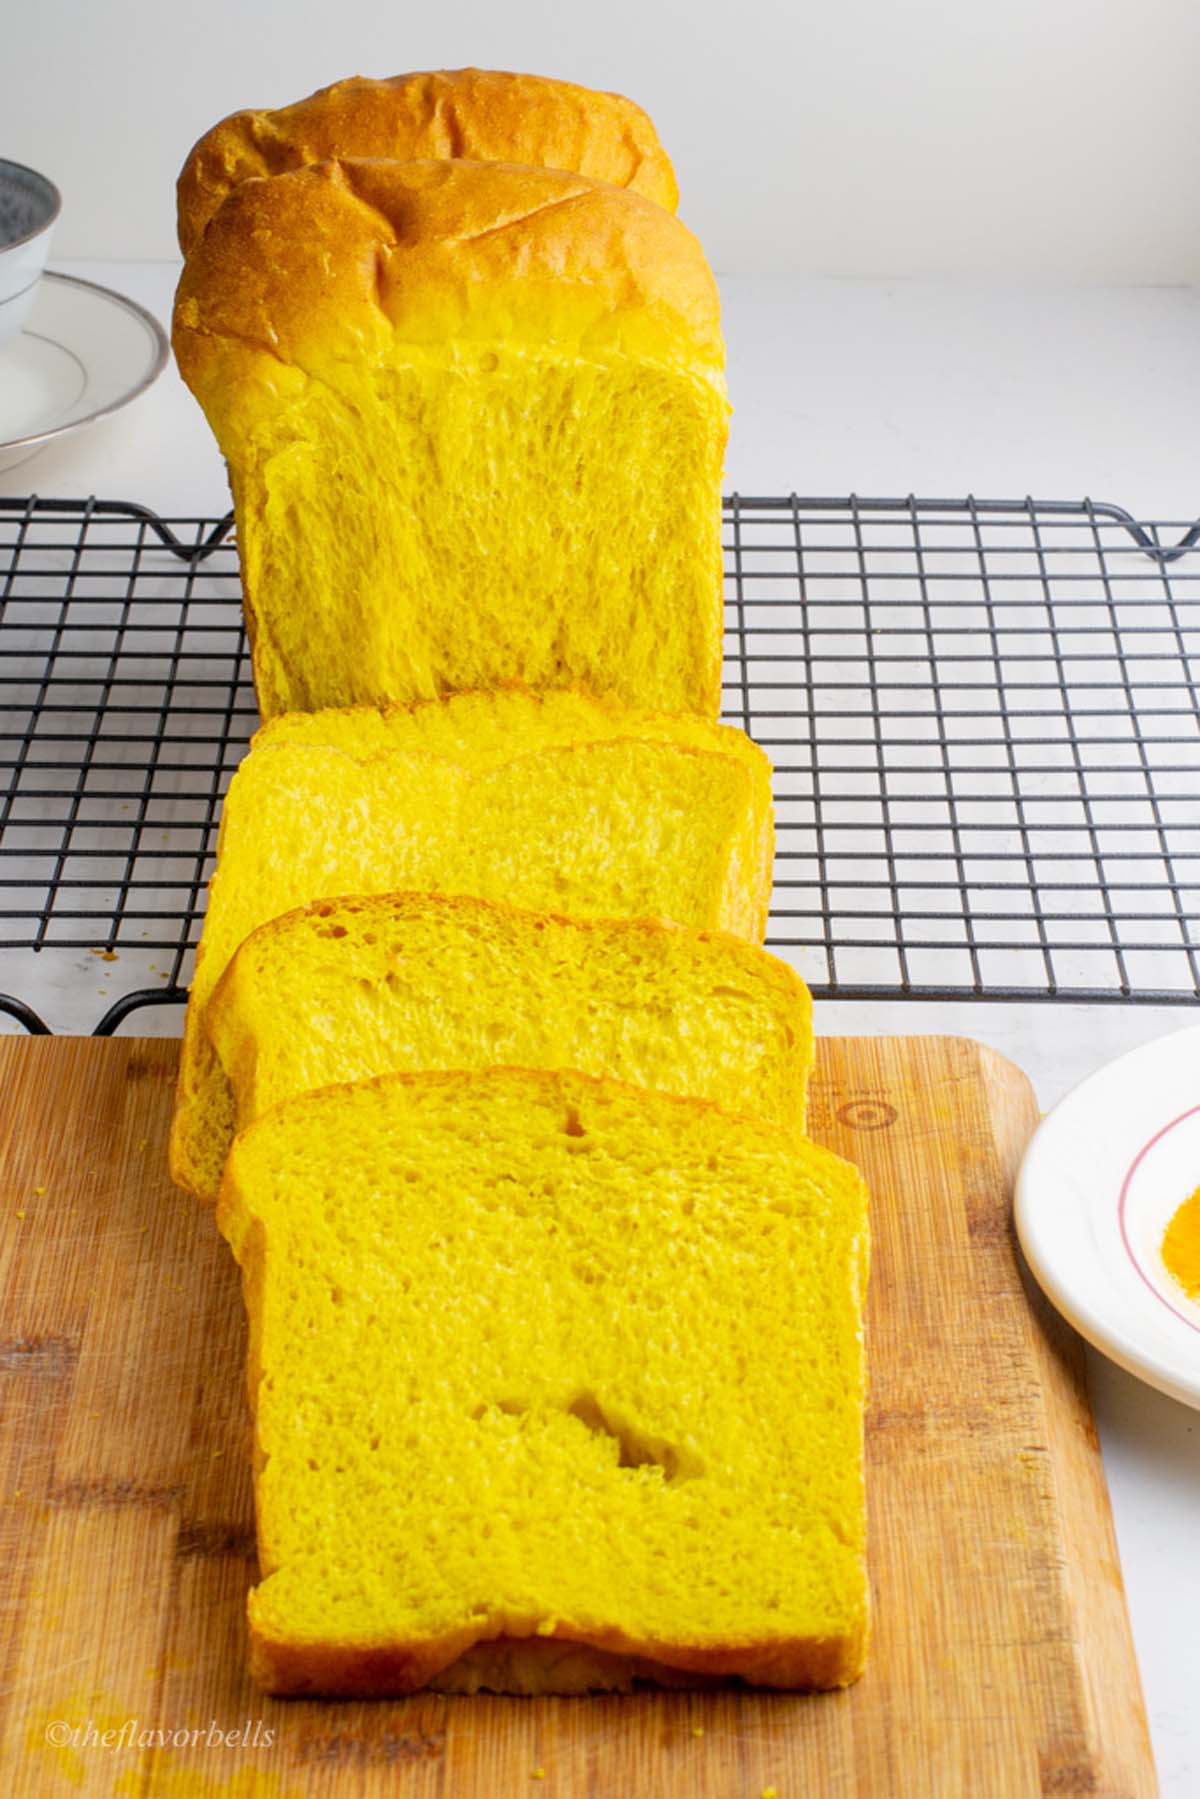
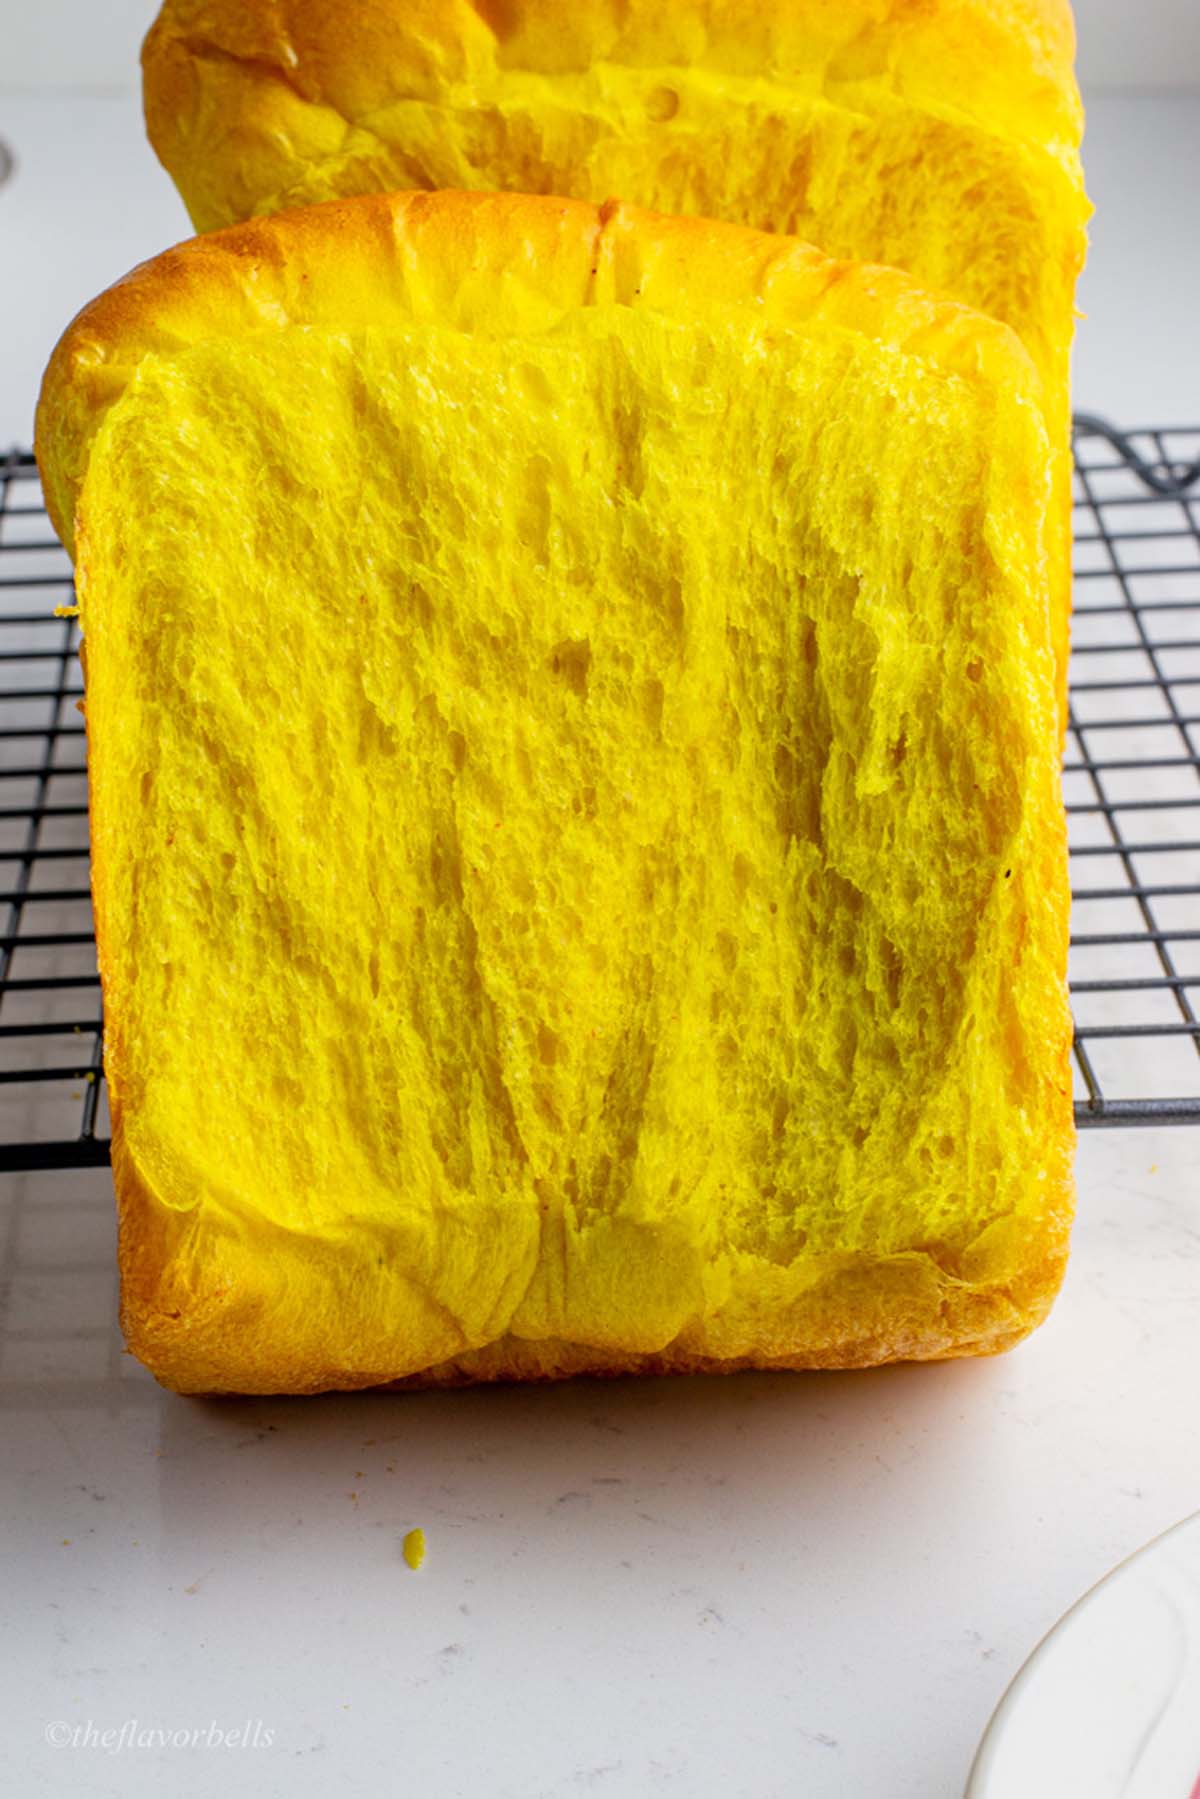
For the most accurate results, use an instant-read thermometer – the internal temperature should reach 190-200°F (88-93°C) when the bread is perfectly baked. Once done, allow your loaf to rest in the pan for 5-10 minutes before transferring to a wire rack to cool completely.
Resist the temptation to slice while hot (though the aroma will make this challenging!), as the structure continues to set during cooling, ensuring perfect sandwich slices.
📝Recipe Notes & Troubleshooting
- Perfect Turmeric Selection: Choose quality ground turmeric. For maximum anti-inflammatory benefits, add a pinch of black pepper to your dough—it enhances curcumin absorption by up to 2000%!
- Preventing Bitter Notes: While rare with proper measurement, using too much turmeric can create bitterness. If you're new to baking with turmeric, start with the recommended amount before experimenting with stronger flavors in future loaves.
- Flour Hydration Tip: Turmeric bread dough might need slight flour adjustments based on your kitchen's humidity. The perfect dough should be tacky but not sticky—add flour one tablespoon at a time if too wet, or a sprinkle of milk if too dry.
- Proper Proofing Temperature: If your kitchen runs cold, your easy turmeric sandwich bread might rise slowly. Create a DIY proofing box by placing the covered dough in your oven with just the light on, or next to a bowl of hot water in a microwave (not turned on).
- Fixing Dense Bread: If your turmeric bread turns out denser than expected, the most common culprits are insufficient kneading or cutting the rise time short. Give the dough the full suggested time to develop those gorgeous air pockets for light, fluffy results.
- Preventing Dry Crust: If you struggle with dry crusts, place a small oven-safe dish with water on the bottom rack while baking your vegan turmeric bread. This creates steam that helps develop a tender crust with that perfect golden color.
- Rescue Slightly Overbaked Bread: If your crust turned out darker than desired, lightly brush the hot loaf with melted butter or olive oil immediately after baking to soften the crust and add moisture back into your turmeric pull-apart bread.
- Make-Ahead Option: Prepare this dough the night before and refrigerate after kneading for a slow, flavor-building fermentation. Allow the cold dough to come to room temperature before shaping the next morning for a time-saving breakfast sandwich loaf with deeper flavor notes.
🫙How do I store turmeric bread to keep it fresh for longer?
Proper storage is essential for maintaining the freshness, texture, and flavor of your homemade turmeric bread.
For short-term storage (2-3 days), allow your loaf to cool completely before wrapping it in a clean cotton towel or storing in a bread box. This method allows slight air circulation while protecting the bread from drying out too quickly. Avoid storing fresh turmeric bread in the refrigerator, as this actually accelerates staling despite popular belief.
For longer preservation, turmeric sandwich bread freezes exceptionally well for up to 3 months. Slice your completely cooled loaf before freezing—this allows you to thaw only what you need. Place pieces of parchment paper between each slice to prevent sticking, then store in an airtight freezer bag with excess air pressed out. When ready to enjoy, you can toast frozen slices directly from the freezer for a quick breakfast, or thaw slices at room temperature for about 30 minutes for sandwiches.
For maximum flavor preservation, consider freezing half your turmeric bread immediately after it's cooled completely, while enjoying the other half fresh. This strategy ensures you'll always have that freshly-baked quality without waste. If your bread does begin to stale, don't toss it—slightly stale turmeric bread makes excellent French toast, bread pudding, or croutons that showcase its distinctive golden color and subtle flavor.
❓Frequently Asked Questions About Turmeric Bread
Turmeric bread offers significant anti-inflammatory benefits thanks to curcumin, the active compound in turmeric that has been extensively studied for its powerful anti-inflammatory properties. When consumed regularly, this golden sandwich loaf can help supplement your diet with compounds that may reduce chronic inflammation—a key factor in many health conditions.
For maximum benefit, the inclusion of black pepper in your turmeric bread recipe is crucial, as it contains piperine which enhances curcumin absorption by up to 2000%.
Beyond inflammation reduction, turmeric bread provides additional health advantages including antioxidant properties that help fight free radicals, potential digestive benefits that may soothe gut issues, and immune system support.
The brilliant yellow color isn't just visually appealing—it's a sign of those beneficial curcuminoids working for your health. However, while incorporating turmeric bread into your diet can be part of a wellness routine, it's important to note that it works best as one component of an overall anti-inflammatory diet rather than a standalone remedy.
Absolutely! Turmeric bread adapts beautifully to bread machine preparation, making it even more accessible for busy home bakers seeking anti-inflammatory recipe options. To convert this recipe for a bread machine, simply add all ingredients to your machine's pan in the order recommended by your specific manufacturer—typically liquids first, followed by dry ingredients, with yeast added last (kept separate from salt).
Select the basic white bread cycle with medium crust setting for best results.
The key adjustment when using a bread machine for turmeric bread is to check the dough during the initial kneading phase. If it appears too dry, add additional milk one tablespoon at a time; if too wet, sprinkle in bread flour gradually.
The vibrant yellow turmeric can sometimes make it challenging to visually assess dough consistency, so feel the dough with slightly dampened fingers—it should feel tacky but not sticky.
For the best of both worlds, consider using your bread machine's dough cycle only, which handles the mixing, kneading, and first rise. Then remove the dough, shape it into your pullman loaf pan as described in the original recipe, allow for the second rise, and bake in your conventional oven.
This hybrid turmeric bread machine recipe gives you the convenience of machine kneading while still achieving that perfect sandwich loaf shape with the distinctive three-part division that creates an ideal pull-apart texture. The bread machine's consistent kneading also helps distribute the turmeric evenly for that picture-perfect golden color throughout your finished loaf.
🔗 More Bread recipes
- Danish Cardamom Buns
- Beet Root bread
- Coconut Buns
- Spanish Bread
- Banh Mi
- Brioche cinnamon rolls
- 3-ingredient bagels
- Millet buns
Treat yourself to this golden turmeric sandwich bread that brings together anti-inflammatory benefits and artisanal bread-making in one delicious, vibrant package. Find more bread recipes here.
Don't forget to tag me in your homemade turmeric bread photos and let me know in the comments how this sunny addition brightened your family's breakfast table!
Turmeric bread
Ingredients
- 375 g Bread flour (≈ 3 cups)
- 240 g Whole milk (≈ 1 cup)
- 15 g Oil
- 8 g Sugar
- 8 g Salt
- 5 g Turmeric (1 ½ tsp)
- 2 teaspoon Instant yeast
Instructions
Step 1: Combining All Ingredients for the Dough
- Ensure all ingredients are at room temperature to help yeast activate properly.
- In a mixing bowl, whisk together:Bread flour, salt, sugar, and instant yeast.
- Warm the milk gently (not hot).
- Mix 2–3 tablespoon of warm milk with turmeric powder for enhanced curcumin extraction (turmeric’s active compound).
- Make a well in the dry ingredients. Pour in: Warm milk, oil and turmeric milk solution.
- Mix using a dough whisk, wooden spoon, or spatula until a shaggy dough forms.
Step 2: Kneading Turmeric Bread Dough
- Hand Kneading:Transfer dough to lightly floured surface.Knead using the push-fold-turn method for 12–15 minutes.Dough should become smooth, elastic, and pass the windowpane test.
- Stand Mixer: Use dough hook attachment. Mix on low speed for 2 mins, then medium (speed 4–5) for 8–10 mins. Dough should pull away from the bowl and feel tacky but not sticky.
Step 3: Bulk Fermentation
- Shape kneaded dough into a ball and place in a lightly oiled bowl.
- Flip dough to coat fully and cover with plastic wrap or a damp cloth.
- Let it rise in a warm, draft-free spot for 60–90 minutes or until doubled. Ideal temperature: 75–80°F (24–27°C).
Step 4: Shaping
- Punch down dough gently to release gas.
- Transfer to floured surface and divide into 3 equal parts (~214g each).
- Flatten each portion into a rectangle.
- Roll tightly from the short side like a jelly roll, pinching seams to seal.
- Place seam-side down in greased 8×4.5-inch Pullman loaf pan side-by-side.
Step 5: Proofing
- Cover pan with a towel or plastic wrap.
- Let proof for 45–60 minutes until nearly reaching the top of the pan.
- Dough should appear puffy and airy.
- Preheat oven to 380°F (193°C) midway through proofing.
- Ideal proofing temperature: 80–85°F (27–29°C).
- Tip: Use a microwave with a hot cup of water as a proofing box.
Step 6: Baking
- Optional: Brush top with milk or egg wash for a shiny finish.
- Bake at 380°F (193°C) for 22–25 minutes.
- Look for golden-amber crust and a hollow sound when tapped.
- Internal temperature should be 190–200°F (88–93°C).
- Let rest in pan for 5–10 minutes, then transfer to wire rack.
- Cool completely before slicing for best texture.
Notes
- Perfect Turmeric Choice: Use high-quality ground turmeric. Add a pinch of black pepper to boost curcumin absorption by up to 2000%.
- Start Small: Too much turmeric can turn bitter. Stick to the recommended amount if you're new to it.
- Hydration Check: The dough should be tacky, not sticky. Adjust with 1 tablespoon flour if too wet or a splash of milk if too dry.
- Ideal Proofing Temp:
Cold kitchen? Proof in an oven with just the light on, or a microwave with hot water (microwave off). - Avoid Dense Bread: Knead thoroughly and don’t rush rising time—both are key to light, fluffy bread.
- Prevent Dry Crust: Place a small dish of water in the oven to create steam and promote a soft, golden crust.
- Fix Overbaked Crust: Brush a hot, overbaked loaf with melted butter or olive oil to soften and rehydrate the crust.
- Make-Ahead Dough: Refrigerate the dough after kneading for overnight fermentation. Bring to room temp before shaping.
📋 Nutrition Facts


Ryan
This Turmeric Bread recipe is such a vibrant and healthy twist on traditional bread!