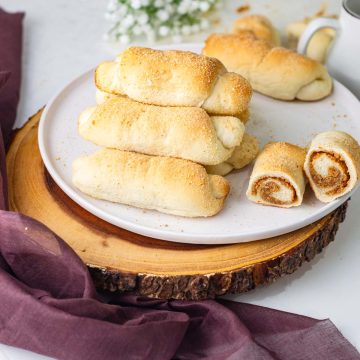
Craving a soft, fluffy, and buttery-sweet treat? Spanish bread, a popular Filipino bakery favorite, is just what you need! These delicious Spanish sweet breads, also called Señorita bread, are filled with a rich, sugary filling and coated in breadcrumbs for the perfect balance of texture and flavor. Whether you’re a fan of classic Filipino bread or simply love a good pastry, this homemade version will satisfy your cravings!

Here I am sharing an easy-to-follow recipe to recreate this delicious treat in your own kitchen. So grab your apron and get ready to bake up some mouthwatering bread!
Jump to:
🧂Spanish Bread Ingredients
This Spanish Bread recipe, Pan de Horno uses simple, readily available ingredients that you likely already have in your pantry. Check the exact list in the recipe card!

Substitutes & Replacements
- Replace Instant Yeast with Active Dry Yeast. If you don’t have instant yeast, you can use active dry yeast instead. However, active dry yeast needs to be bloomed first. Simply dissolve it in warm milk or water (about 110°F/43°C) with a pinch of sugar and let it sit for 5-10 minutes until foamy before adding it to the dough.
- Replace Bread Flour with All-Purpose Flour. You can swap bread flour with all-purpose flour, but since all-purpose flour absorbs less liquid, reduce the amount of water or milk in the dough by about 10% to maintain the right consistency.
- Replace Brown Sugar with White Sugar or any vegan sugar. Traditional Señorita Bread filling uses brown sugar for a deeper caramel-like flavor. If you only have white sugar, you can use 1/ 4 cup of white sugar instead of ¼ cup brown sugar. But consider adding a teaspoon of molasses or honey to mimic the taste.
- Replace whole milk with plant-based milk to make vegan Spanish Bread.
- Replace butter with margarine. While butter is preferred for its rich flavor, margarine works as a substitute if needed. Just keep in mind that butter gives a more authentic taste to Spanish sweet breads. You can also use vegan butter to make the vegan señorita bread.

🔪Step-by-step instructions for making Spanish bread
Now, let us learn how to make Spanish bread at home.
Step 1 Combining the Ingredients
In a large mixing bowl, add the bread flour, sugar, salt, and instant yeast. Use a spoon or whisk to mix everything thoroughly, ensuring the ingredients are evenly distributed. If you're using active dry yeast instead of instant yeast, you'll need to activate it first—dissolve it in warm water with a bit of sugar and let it sit for about 5–10 minutes until it becomes frothy.
Once your dry ingredients are combined, pour in the water and start mixing using the back of a ladle or a dough whisk. Stir everything together until the flour absorbs all the water, and a rough, shaggy dough starts to form. At this stage, the dough might look uneven and sticky, but that's completely normal. It just needs a bit of kneading to come together into a smooth, cohesive ball.

Step 2 Kneading the dough
Kneading with Hands: To knead the dough for Filipino Spanish Bread by hand, start by lightly flouring a clean surface and transferring the mixed dough onto it. Begin kneading by pushing the dough away with the heel of your palm, folding it back over itself, and rotating slightly before repeating the motion. Once the dough starts to come together, gradually add the softened butter, a little at a time, kneading continuously to incorporate it fully.
The dough will become sticky initially but continue kneading, pressing, and folding until the butter is fully absorbed. This process may take a few minutes, but the dough will eventually become smoother and more elastic. If it sticks excessively, lightly flour your hands but avoid adding too much flour, as this can result in dry bread. Knead for about 12-15 minutes until the dough becomes soft, slightly tacky, and passes the windowpane test—meaning it can be stretched thin without tearing.
Kneading In a Stand Mixer: If using a stand mixer, attach the dough hook and place the mixed dough into the bowl. Start on low speed to combine the ingredients, then gradually increase to medium speed. Once the dough starts coming together, add the softened butter in small portions, allowing each addition to fully incorporate before adding more.
The dough may briefly separate, but continue kneading, and it will come back together into a smooth, elastic consistency. This process should take about 8-10 minutes, with the dough eventually pulling away from the sides of the bowl while remaining soft and slightly sticky. Perform the windowpane test by stretching a small piece between your fingers—if it forms a thin, translucent sheet, the gluten has developed properly.
Once kneaded, shape the dough into a ball and place it in a greased bowl, covering it to rise until doubled in size before shaping the Senorita Bread rolls.

Step 3: Letting the Dough Bulk Ferment
After kneading, place the dough in a lightly greased bowl, ensuring there’s enough room for it to expand as it rises. Cover the bowl with a clean kitchen towel, or a plastic wrap, or a lid to prevent the dough from drying out. Bulk fermentation is a crucial step that allows the dough to develop flavor, structure, and strength.
The ideal fermentation time depends on the temperature of your kitchen. In a warm environment (75–80°F or 24–27°C), the dough typically takes about 1 to 1.5 hours to double in size. If your kitchen is cooler, around 65–70°F (18–21°C), it may take up to 2 hours or more.
To create the best conditions for fermentation, place the dough in a warm, draft-free spot. The oven (turned off) with the light on is a great option, as it provides gentle warmth. If the air is too dry, placing a cup of hot water inside the oven with the dough can help maintain moisture. Alternatively, you can place the bowl near a warm appliance, such as on top of the refrigerator.
Step 4 Making the Filling

While the dough is undergoing bulk fermentation, you can prepare the rich and buttery filling for our Señorita Bread. Start by melting the butter in a saucepan over low heat. Once melted, add the flour and cook it for about 2 minutes, stirring continuously to prevent lumps and ensure even cooking.
Next, mix in the breadcrumbs, brown sugar, salt, and milk, stirring everything together until well combined. Increase the heat to medium and continue cooking for another 2–3 minutes, or until the mixture thickens and comes together into a cohesive filling.
Once the filling reaches the right consistency, transfer it to a bowl, cover it, and set it aside to cool completely. It’s important to let the filling cool before using it to fill our Sweet Bread , as a warm filling can make shaping difficult and may affect the dough’s texture. This sweet, buttery filling is what gives Filipino Spanish Bread its signature taste, adding a deliciously caramelized and slightly crunchy texture to every bite.
Step 5 Shaping the Spanish Bread

Once the dough has risen and doubled in size, gently punch it down to release excess air. Transfer it to a lightly floured surface. The dough weighs approximately 570g after bulk fermentation. First, divide it into 10 equal portions, each weighing around 57g. You can use a kitchen scale for accuracy or simply eyeball it.
Roll each portion into a smooth ball and place them on a lightly floured surface. Cover them and let them rest for 15 minutes to relax the gluten, making shaping easier.
After resting, take one dough ball and roll it out using a rolling pin into a an oval shape, about 5–6 inches long and ¼ inch thick. Now use your hands to stretch opposite side and make it wider, such that the dough becomes slightly triangular in shape, with one side wider than the other.
Spread the filling evenly over the dough, ensuring it doesn’t reach the edges to prevent leakage. Starting from the wider side, gently roll the dough into a log, sealing the edges as you go. Roll each shaped bread in breadcrumbs to coat, then place them seam-side down on a parchment-lined baking sheet. Repeat with the remaining dough, spacing them slightly apart to allow room for the final rise before baking.
Step 6 Bake the Spanish bread

Preheat your oven to 375°F (190°C) and allow it to fully reach the set temperature before baking. Bake them for about 15 minutes, or until they turn a beautiful light golden brown on the surface. Keep an eye on them during the last few minutes to prevent over-browning.
Once baked, remove them from the oven and let them cool slightly before serving. These Filipino sweet rolls taste best when enjoyed warm, with their soft, fluffy texture and deliciously sweet filling!

FAQs
What makes Filipino Spanish Bread different from other Spanish sweet breads?
Numerous Spanish bread recipes have some sort of sweet filling. Unlike traditional Spanish sweet bread recipes, which often include ingredients like cinnamon, nuts, or dried fruits, Filipino Spanish Bread is known for its soft, fluffy texture and sweet breadcrumb filling.
Why is my Spanish Bread dense instead of soft and fluffy?
This could be due to insufficient kneading, not letting the dough rise properly, or adding too much flour during kneading. Make sure to knead well and allow proper proofing.
How do I prevent my Spanish Bread filling from leaking out during baking?
Avoid spreading the filling too close to the edges and ensure the dough is tightly rolled and sealed properly before baking. Also, do not add too much butter, or else the filling will leak out of the rolls. The amounts mentioned in the recipe are perfect.

Storage and Reheating Spanish Bread
There’s nothing quite like freshly baked Spanish Bread—soft, fluffy, and filled with that irresistible buttery-sweet filling. But if you have leftovers (or you’re making a big batch to enjoy later), proper storage and reheating will ensure they stay just as delicious as the day you made them. Here’s how to keep your Filipino bread fresh and enjoy it anytime!
- At Room Temperature (Best for 1-2 Days):
If you plan to eat your Señorita Bread within a couple of days, store them in an airtight container or wrap them individually in plastic wrap. This keeps them soft and prevents - In the Refrigerator (Up to 1 Week):
For longer storage, place the bread in an airtight container or a resealable bag and refrigerate. This helps extend freshness but may slightly firm up the bread due to the cold temperature. Don’t worry—proper reheating will bring back the soft texture! - In the Freezer (Up to 2 Months):
Want to stock up on Spanish sweet breads? Freezing is a great option! Wrap each bread individually in plastic wrap, then place them in a freezer-safe bag or airtight container. Label with the date so you remember when you made them.

How to Reheat Spanish Bread
- Microwave Method (Quick & Easy): Place a piece of Spanish Bread on a microwave-safe plate. Cover it with a damp paper towel to prevent it from drying out. Microwave for 15-20 seconds (or longer if frozen) until soft and warm.
- Oven Method (Best for Fresh-Out-of-the-Oven Texture): Preheat your oven to 300°F (150°C). Wrap the bread in foil to prevent it from drying out. Heat for 8-10 minutes if refrigerated or 12-15 minutes if frozen.
- Air Fryer Method : Preheat the air fryer to 300°F (150°C). Give the Spanish bread a gentle spray of water or milk and place the bread inside and heat for 3-5 minutes until warm.
Recipe Notes:
- Make sure your instant yeast is fresh and not expired. Because unlike active dry yeast, there is no additional step of blooming to confirm that.
- Don’t spread the filling too close to the edges—leave about ½ inch border to prevent it from oozing out.
- If the Bread Turns Out Too Dense, this could be due to too much flour or not enough kneading. The dough should be soft and elastic. Also, allow enough time for the dough to rise properly before baking for a light, fluffy texture.
- Swap bread flour with all-purpose flour, but since all-purpose flour absorbs less liquid, reduce the amount of water or milk in the dough by about 10% to maintain the right consistency.
- Substitute butter and milk with vegan substitutes for making Vegan Spanish Bread.
More Bread Recipes
- Homemade Coconut Buns
- Potato Hamburger Buns
- Ube Cinnamon Rolls
- Challah Buns | Vegan Challah Rolls
- Chocolate buns
- Coffee Buns ( Eggless Mexican Bun Recipe)
- Tiger rolls: A foolproof Dutch crunch bread recipe

Spanish Bread is called Señorita bread in Spanish. It is best enjoyed warm with a cup of coffee, tea, or hot chocolate for a comforting snack or breakfast treat. Gather around, share with friends and family, and savor the deliciousness. Enjoy every bite!
If you like the Spanish bread recipe, share it with your friends and family.
Till then,
Bake it Delicious!
Spanish Bread
Ingredients
Dough ingredients
- 300 g Bread flour 2 cups
- 42 g Sugar 3 Tbsp
- 3 g Salt ½ tsp
- 42 g Butter 3 Tbsp
- 200 g Water about ¾ cup
Filling Ingredients
- 42 g Butter 3 tbsp
- 62 g Bread crumbs Plain
- 10 g Flour 1tbsp
- 45 g Brown sugar ¼ cup
- 2 tablespoon Whole milk
- A pinch of salt
- ½ cup Plain bread crumbs for coating
Instructions
Combine the ingredients:
- In a large bowl, combine bread flour, sugar, salt, and instant yeast.
- If using active dry yeast, dissolve it in warm water with a little sugar and let it sit until frothy.
- Add water and mix until a shaggy dough forms.
Knead the Dough:
- By Hand: Knead on a floured surface, adding softened butter gradually until incorporated. Knead for 12-15 minutes until smooth and elastic.
- Using a Stand Mixer: Knead with a dough hook, adding butter gradually. Mix for 8-10 minutes until the dough pulls away from the bowl.
- Perform the windowpane test and shape the dough into a ball.
First Rise (Bulk Fermentation):
- Place dough in a greased bowl, cover, and let it rise in a warm place for 1-2 hours until doubled in size.
- Use the "poke test" to check readiness—if the indentation springs back slowly, it's ready.
Make the Filling:
- Melt butter in a saucepan, then add flour and cook fro 2 minutes at low heat. Then add breadcrumbs, brown sugar, salt, and milk.
- Stir and cook until thickened, then let it cool completely.
Shape the Bread:
- Punch down the risen dough and divide it into 10 equal pieces.
- Roll each into a smooth ball, rest for 15 minutes, then flatten into an oval shape. Then use your hands to stretch and make one side wide.
- Spread filling on each piece, leaving edges clear, then roll into a log.
- Coat with breadcrumbs and place seam-side down on a baking sheet.
Bake the Bread:
- Preheat oven to 375°F (190°C).
- Bake for 15 minutes or until golden brown.
- Let cool slightly and enjoy warm!
Notes
- For Detailed instructions refer to the blog post.
- Make sure your instant yeast is fresh and not expired. Because unlike active dry yeast there is no additional step of blooming to confirm that.
- Don’t spread the filling too close to the edges—leave about ½ inch border to prevent it from oozing out.
- If the Bread Turns Out Too Dense, this could be due to too much flour or not enough kneading. The dough should be soft and elastic. Also, allow enough time for the dough to rise properly before baking for a light, fluffy texture.
- Swap bread flour with all-purpose flour, but since all-purpose flour absorbs less liquid, reduce the amount of water or milk in the dough by about 10% to maintain the right consistency.
- Substitute butter and milk with vegan substitutes for making Vegan Spanish Bread.
Nutrition Facts


Leave a Reply