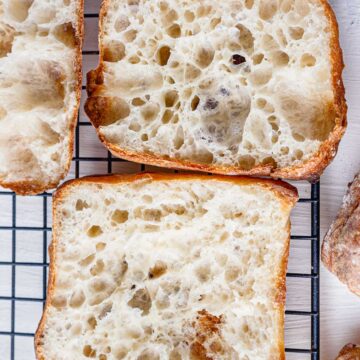
This easy sourdough ciabatta has a super crispy crust with a soft and chewy interior. The open crumbs and super light texture with a crusty exterior make this Italian bread highly desirable. The overnight sourdough ciabatta recipe has a unique texture and flavor.

Ciabatta is one of my favorite sourdough bread recipe to make owing to its ease of making and versatility of the ciabatta rolls. Had you tried the same-day sourdough bread recipe yet? That recipe is a keeper.
Jump to:
Why should you try making these sourdough ciabatta rolls recipe?
- Crispy golden crust
- Soft and tender open crumbs
- Perfect for sandwiches and burgers
- Cold fermentation enhances the flavor and texture
- Easier on your gut.
🍶 Ingredients required to make sourdough ciabatta rolls recipe

Ripe sourdough starter
To make a delicious sourdough ciabatta with an open crust you need a ripe and mature starter. A ripe or active sourdough starter has peaked in its activity. It should have reached its maximum volume, whatever it looks like for your starter. It could be double or triple the volume.
A mature sourdough starter has been alive for more than 4-5 months. It ensures a stable and sturdy microbial population that can endure unfavorable environmental situations better.
If I know that I will be baking the sourdough bread tomorrow, I feed my starter in a 1:7:7 ratio, the night before. But if I am going to knead the dough today, and my starter is hungry, I start by feeding it in a 1:1:1 ratio in the morning. It reaches its peak in 4-5 hours. And just when it is about to hit its peak, I start kneading the dough.
Bread flour
Ciabatta is a high-hydration bread. You cannot achieve the right texture with regular flour. So, avoid using all-purpose flour and choose high-protein bread flour. Now, since we are using the sourdough starter as the leavening agent, avoid bleached bread flour. It is best to choose organic or unbleached bread flour with a higher gluten percentage.
Water
Use bottled water if your tap water smells chlorinated. Chlorine is known to check the yeast growth in the dough. So it is better to avoid chemically treated water.
Salt
You can use regular table salt or fine sea salt.

🍞 Step-by-step sourdough ciabatta recipe
Step 1 Preparing the dough and Autolyse
To follow a bread recipe to perfection, it is crucial to measure each ingredient in weight and not in volume.
So, do use a weighing scale to measure the ingredients precisely.
In a large mixing bowl add the flour and then add the water. Retain about 10 g of water to add later with the salt.
Mix well to combine the flour and water properly so that no dry flour patches are left. You can use the back of a wooden ladle to do so. It is crucial to ensure that the dough is well-hydrated throughout. If needed, go in with your hands.
I like to use the Pincer method, which means just going in with your hands grabbing the dough in your hand, and just squeezing it. Then, leave it and grab some more. Your hand will act as a pincer in this method. This way we keep on moving and work with our dough for a good 1-2 minutes, till everything is well combined.
Now clean the sides of the bowl and cover it with a cling wrap and let it autolyze for 1 hour.
Autolyse initiates the gluten formation in the dough. Glutenin and gliadin combine to form Gluten. The most important ingredient to achieve a light and open crumb sourdough ciabatta.
It is important not to add salt or sourdough starter at this stage. Salt and yeast fermentation is known to stretch the gluten. The gluten formed at this stage is not strong enough. The sole purpose of autolyse stage is to obtain maximum gluten formation.
Make the dough in a stand mixer
You can easily make the sourdough ciabatta recipe in a stand mixer. Into the bowl of the stand mixer add flour and water. Mix at low speed for 1-2 minutes until the flour is fully hydrated. Now remove the dough hook attachment and cover the bowl with a kitchen towel.
After a rest of 1 hour, put the dough hook again and add weighed sourdough starter. Mix at low speed for 1 minute and then bum up the speed to 3 and knead for one -2 more minutes, until the starter is fully incorporated.
Give rest of 15 minutes and then add salt. Knead on low speed to fully incorporate the salt.
Remove the dough bowl from the stand mixer and scrape the sides. Now cover with the cling wrap.

Step 2 Adding starter and salt in stages:
After the sourdough ciabatta dough has got enough time to autolyze, we will add the sourdough starter. (Follow the baking schedule for more clarity.)
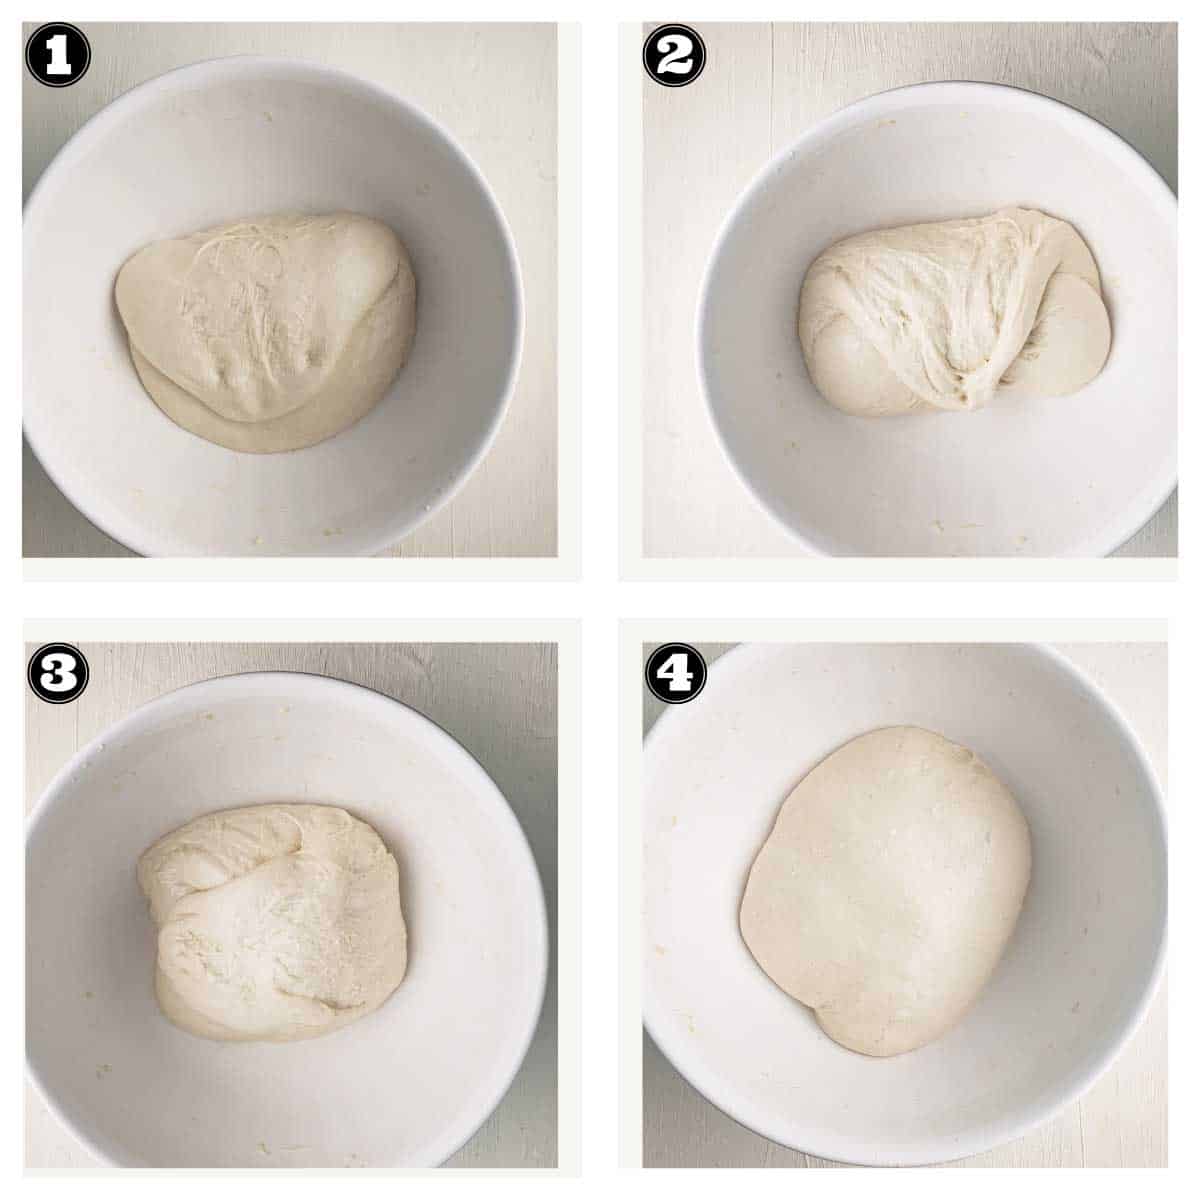
I like to spread the sourdough starter on the dough surface. Then, I go in with the tips of my fingers and poke the starter into the dough. I do it for good 30 seconds or so before I start to stretch and fold the dough, with the purpose to incorporate the sourdough starter.
Ensure that there is no unincorporated starter left in the dough. If required, flip the dough, and use the pincer method to combine.
Once you are satisfied, cover, it and let it rest for 30 minutes.
After 30 minutes, add the salt. Sprinkle the salt on the dough's surface. Now add the reserved water. Adding water at the later stages of gluten development is called bassinage.
Combine the water and salt into the dough using the same technique that we used for combining the sourdough starter.
When, you feel that the salt and water are well combined, clean the edges of the bowl and cover it. Let it rest for 45 minutes before you start to stretch and fold it further.
Step 3 Stretching and folding and cold fermentation
The dough has already been in the bulk rise stage, for 45 minutes when we start our first stretch and fold.
Wet your hands slightly and grab the dough by putting your hands under and stretching it outwards. Stretch it to a point till you could easily stretch it without feeling any resistance from the dough. Now fold it under the opposite side of the dough. Rotate the bowl, at 45 degrees, and repeat.
In one session of Stretching and folding you should be doing 4-6 stretching and folding. Reduce their number toward the later stretching as the dough will become stronger.
For the first two rounds do 6 stretch and fold, and 4 in the last two rounds. Give a resting time of 30 minutes between each stretching and folding session.
One thing to note here is that your dough might not be ready after the fourth session of stretch and folds. In such cases, give the rest of the 30 minutes and do another round.
Now cover the bowl with a cling wrap and place it in the refrigerator for 8-9 hours or overnight. You can extend this period up to 24 hours. Cold proofing elances the flavor of the bread.
Step 4 Shaping the sourdough ciabatta rolls
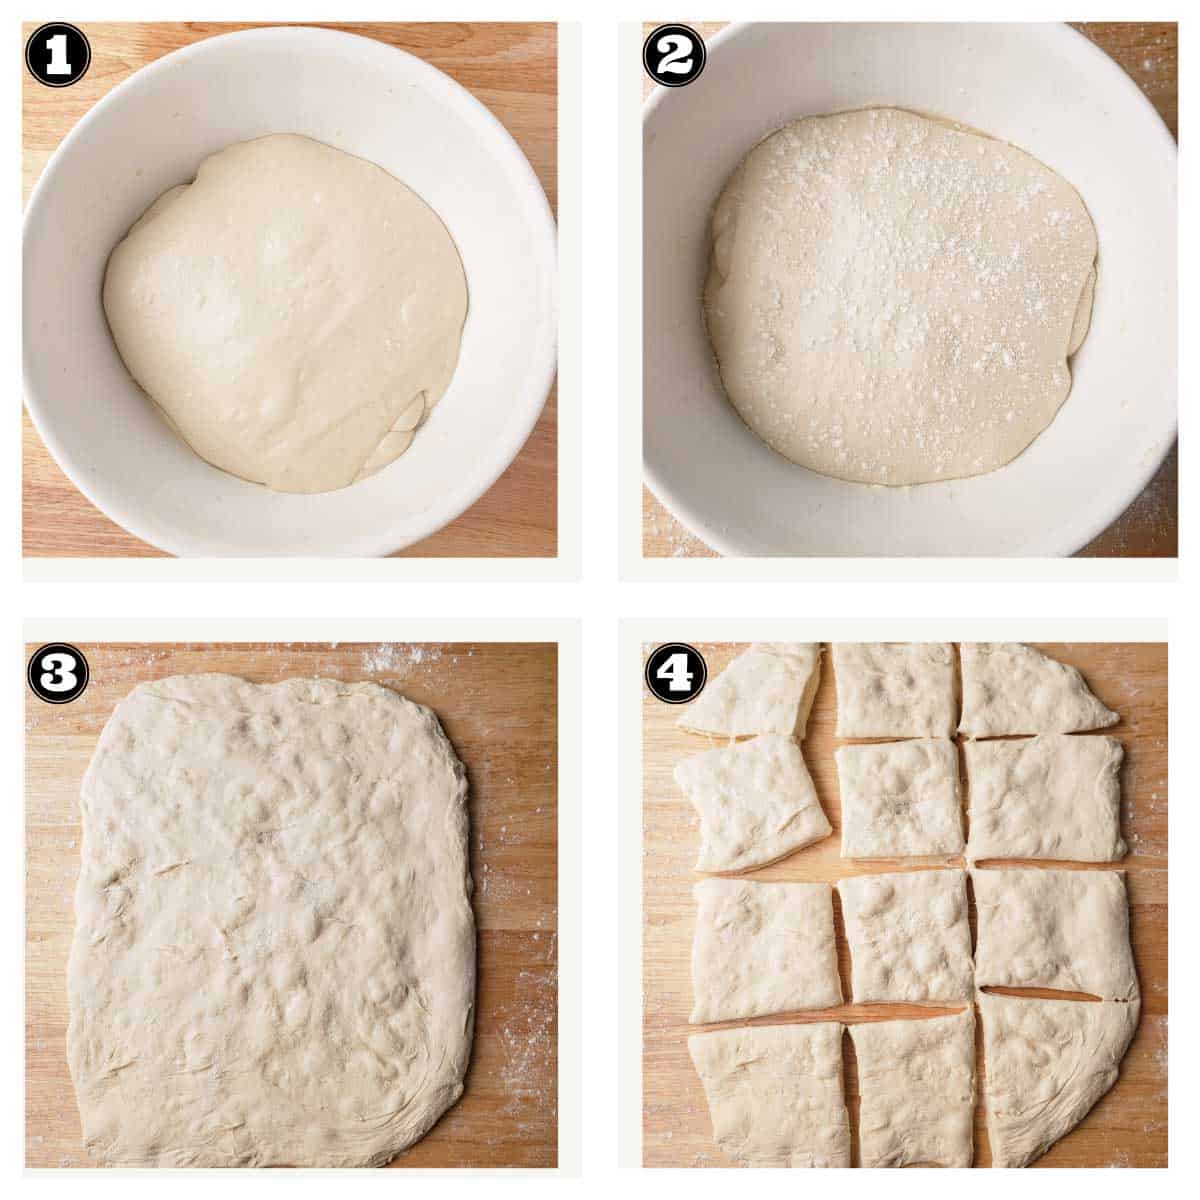
For shaping sourdough ciabattas, I invert the bowl on a floured work surface and let the dough fall onto the work surface. Using the flour-dusted fingers to stretch the dough to form a rectangular slab or sheet. Dust it with flour and allow the dough to relax for 5 minutes.
Once the dough has relaxed, stretch again to form a uniform thickness slab. Then dust with flour if required. Grab a bench scraper and cut it into individual ciabattas by dividing the dough into three equal parts vertically and then making horizontal cuts. Form 12 equal portions.
Then take each piece and dust it with flour. Using the tip of the fingers, poke each piece while stretching and shaping it into a rectangular ciabatta.
Step 5 Proofing the sourdough ciabatta recipe
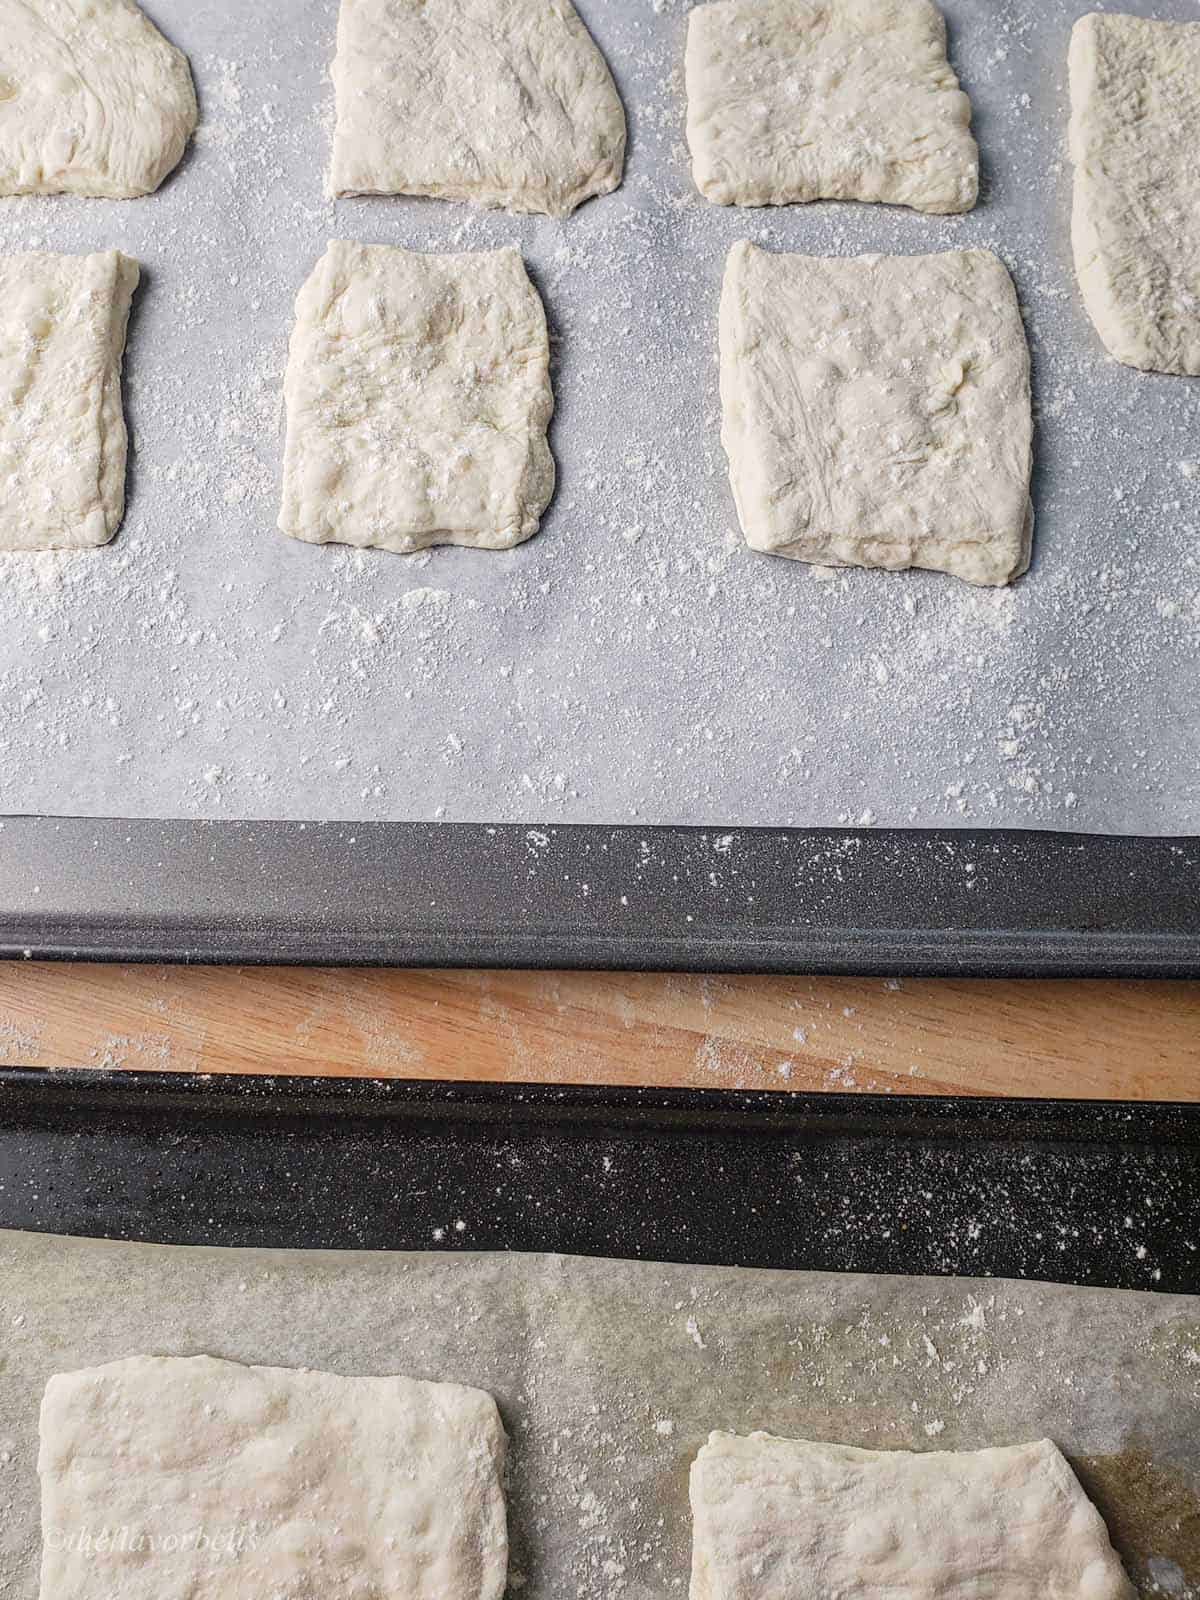
Take 2 large parchment lined baking sheets or sheet pans. Then dust them with flour and place the shaped ciabatta bread while leaving appropriate space in between. And cover them with a kitchen towel and let them proof until they appear slightly fuller.
Do not allow them to overproof if you want those open crumbs.
Step 6 Baking the sourdough ciabatta bread recipe
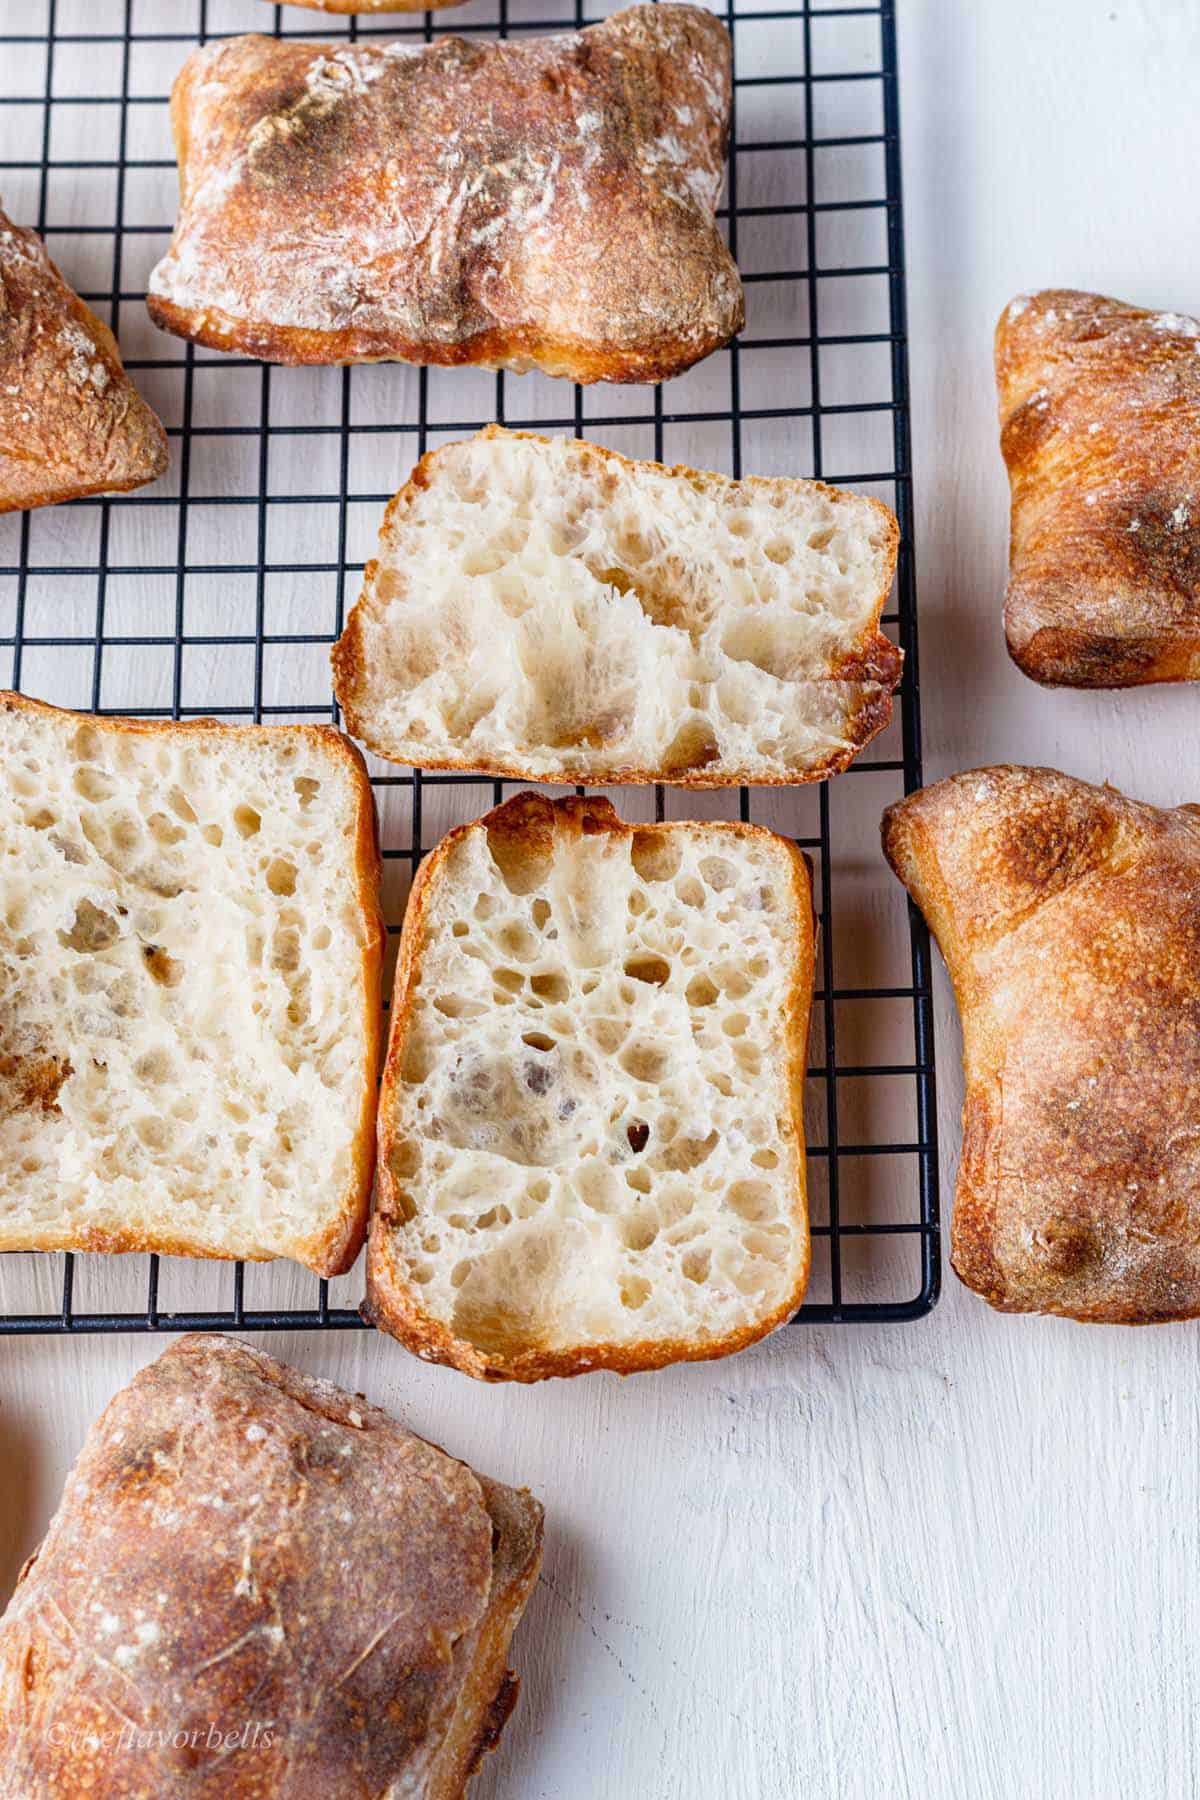
It is very important to bake the bread at the right temperature for the best results. Preheat oven to 480o F and bake the ciabatta for 16-18 minutes or until they become deep golden brown. Rotate the tray halfway through the baking time.

Let it cool for 20-25 minutes before slicing.
Use a sharp bread knife) to slice the bread and build your favorite sourdough ciabatta sandwich.
🫙Storage
The sourdough ciabatta has a longer shelf life than its yeast counterpart. Freshly baked sourdough ciabatta recipe can last 4-5 days at room temperature if stored properly.
It is best stored by wrapping it in a cotton cloth or a cotton bread bag. Place it in a cool corner of your kitchen or a bread box.
It is not advisable to refrigerate the ciabatta rolls or bread. Though you could freeze it if you baked it in bulk and want to store it for longer. Place them in a freezer-safe bag, with air removed. Now wrap it with a double layer of foil, mark the date and place it in the freezer.

❓Frequently Asked Questions
· The ciabatta bread can be served as such alongside soups and stews.
· These are most commonly used to build Italian sandwiches.
· It can also be used to make a panini sandwich.
· Add a patty and build a burger using the ciabatta bread.
· You can also enjoy such with some extra virgin olive oil or butter and drizzle with balsamic vinegar.
Well, that is not necessary. But in an ideal situation, we like our bread to have double fermentation. The first is the bulk fermentation and the second one is the proofing of the shaped bread dough. Bread recipes using instant yeast, do not require to rise twice. One rise is enough for them.
But sourdough bread is known for its flavor. And fermentation is the primary source of flavor in the bread. So, a sourdough ciabatta must ferment twice.
To make the sourdough ciabatta the same day without the cold retard (cold fermentation), start by feeding the sourdough starter the day before. And let the dough be proof at room temperature after the final stretch and fold. It would take somewhere between 3-5 hours depending on the ambient temperature. Following this method would allow you to bake the ciabatta on the same day.
This is an overnight sourdough ciabatta recipe. But you can make it same day. If you feed your sourdough starter in a 1:1:1 or 1:2:2 ratio, it will reach its peak in 3-5 hours. In such a situation you can use it to bake sourdough bread on the same day.
To make the ciabatta using the discard, increase the percentage of the starter to 30 percent. i.e. for this recipe use 120 g of room temperature discard. Also, make sure that the sourdough discard should not be older than a week. Do not use the discard that has been sitting in your fridge for longer than a week.
🍛 More sourdough recipes
A few Bread recipes with sourdough starter and other ways to use sourdough starter are linked below:
- The best garlic sourdough bread recipe
- Jalapeño Cheddar sourdough: A spicy cheese sourdough bread!
- Sourdough Rolls | No-yeast quick dinner rolls using sourdough starter
- The best Sourdough doughnuts recipe with Cinnamon sugar
- Sourdough chocolate bread recipe: Easy and delicious !
- How to make sourdough hot dog buns from scratch?
- How to make the basic sourdough batard?
I hope you will love this sourdough ciabatta rolls recipe. Share your results and opinions in the comment section below. Also, subscribe to never miss a recipe.
Till then
Bake it Delicious!
📝 Recipe card
Sourdough ciabatta rolls recipe
Ingredients
- 400 g Bread flour
- 320 g water
- 80 g Ripe sourdough starter
- 12 g salt
Instructions
Step 1 Preparing the dough and Autolyse
- In a large mixing bowl add the flour and then add the water. Retain about 10 g of water to add later with the salt.
- Mix well to combine the flour and water properly so that no dry flour patches are left. You can use the back of a wooden ladle to do so. It is crucial to ensure that the dough is well-hydrated throughout. If needed, go in with your hands.
- Now clean the sides of the bowl and cover it with a cling wrap and let it autolyse for 1 hour.
Step 2 Adding starter and salt in stages:
- After the dough has got enough time to autolyze, add the sourdough starter.
- Spread the sourdough starter on the dough surface and go in with the tips of my fingers and poke the starter into the dough. Do it for good 30 seconds or so. Then start to stretch and fold the dough, with the purpose to incorporate the sourdough starter.
- Ensure that there is no unincorporated starter left in the dough. If required, flip the dough, and use the pincer method to combine. ( refer to notes)
- Once you are satisfied, cover, it and let it rest for 30 minutes.
- After 30 minutes, add the salt. Sprinkle the salt on the dough's surface. Now add the reserved water. Adding water at the later stages of gluten development is called bassinage.
- Combine the water and salt into the dough using the pincer technique or simple stretching and folding.
- Clean the edges of the bowl and cover it. Let it rest for 45 minutes before you start to stretch and fold it further.
Step 3 Stretching-folding and cold fermentation
- The dough has already been in the bulk rise stage, for 45 minutes when we start our first stretch and fold.
- Wet your hands slightly and grab the dough by putting your hands under and stretching it outwards. Stretch it to a point till you could easily stretch it without feeling any resistance from the dough. Now fold it under the opposite side of the dough. Rotate the bowl, at 45 degrees, and repeat. In one session of Stretching and folding you should be doing 4-6 stretching and folding. Reduce their number toward the later stretching as the dough will become stronger.
- For the first two rounds do 6 stretch and fold, and 4 in the last two rounds. Give a resting time of 30 minutes between each stretching and folding session.
- Now cover the bowl with a cling wrap and place it in the refrigerator for 8-9 hours or overnight. You can extend this period up to 24 hours. Cold proofing enhances the flavor of the ciabatta rolls.
Step 4 Shaping the sourdough ciabatta bread
- For shaping sourdough ciabattas, invert the bowl on a flour-dusted workstation and let the dough fall onto the surface. Using the flour-dusted fingers stretch the dough to form a rectangular slab or sheet. Dust it with flour and allow the dough to relax for 5 minutes.
- Once the dough has relaxed, stretch it again into a uniform-thickness slab. Then dust with flour if required and cut it into individual ciabattas by dividing the dough into three equal parts vertically and then making horizontal cuts. Form 12 equal portions. (refer to the process images)
- Then take each piece and dust it with flour. Using the tip of the fingers, poke each piece while stretching and shaping it into a rectangular ciabatta.
Step 5 Proofing the sourdough ciabatta
- Line 2 large baking sheets with parchment paper. Then dust them with flour and place the shaped ciabatta bread while leaving appropriate space in between. And cover them with a kitchen towel. Let them proof until they appear slightly fuller. Do not allow them to overproof if you want open crumbs on the ciabatta.
Step 6 Baking the sourdough ciabatta bread
- Preheat the oven to 480o F and bake the ciabatta for 16-18 minutes.
- Let it cool for 20-25 minutes before slicing.
- Use a sharp bread knife to slice the bread and build your favorite sourdough ciabatta sandwich.
Notes
- The pincer method means just going in with your hands grabbing the dough in your hand, and just squeezing it. Then, leave it and grab some more. Your hand will act as a pincer in this method. Keep on moving and work with the dough for a good 1-2 minutes, till everything is well combined.
- It is important not to add salt or a starter in the initial stage while mixing flour and water. Salt and yeast fermentation is known to stretch the gluten. The gluten formed at this stage is not strong enough. The sole purpose of autolyse stage is to obtain maximum gluten formation.
- Make the dough in a stand mixer. Into the bowl of the stand mixer add flour and water. Mix at low speed for 1-2 minutes until the flour is fully hydrated. Now remove the dough hook attachment and cover the bowl with a kitchen towel. After a rest of 1 hour, put the dough hook again and add weighed sourdough starter. Mix at low speed for 1 minute and then bum up the speed to 3 and knead for one -2 more minutes, until the starter is fully incorporated. Give rest of 15 minutes and then add salt. Knead on low speed to fully incorporate the salt. Remove the dough bowl from the stand mixer and scrape the sides. Now cover with the cling wrap.
- If the dough is not ready after the fourth session of stretch and folds, give the rest 30 minutes and do another round.
📋 Nutrition Facts


Meenakshi
Gina Williamson
Thank you so much. This was my first attempt and I think they turned out really great! I love the open crumb chewy texture in a small sourdough package!