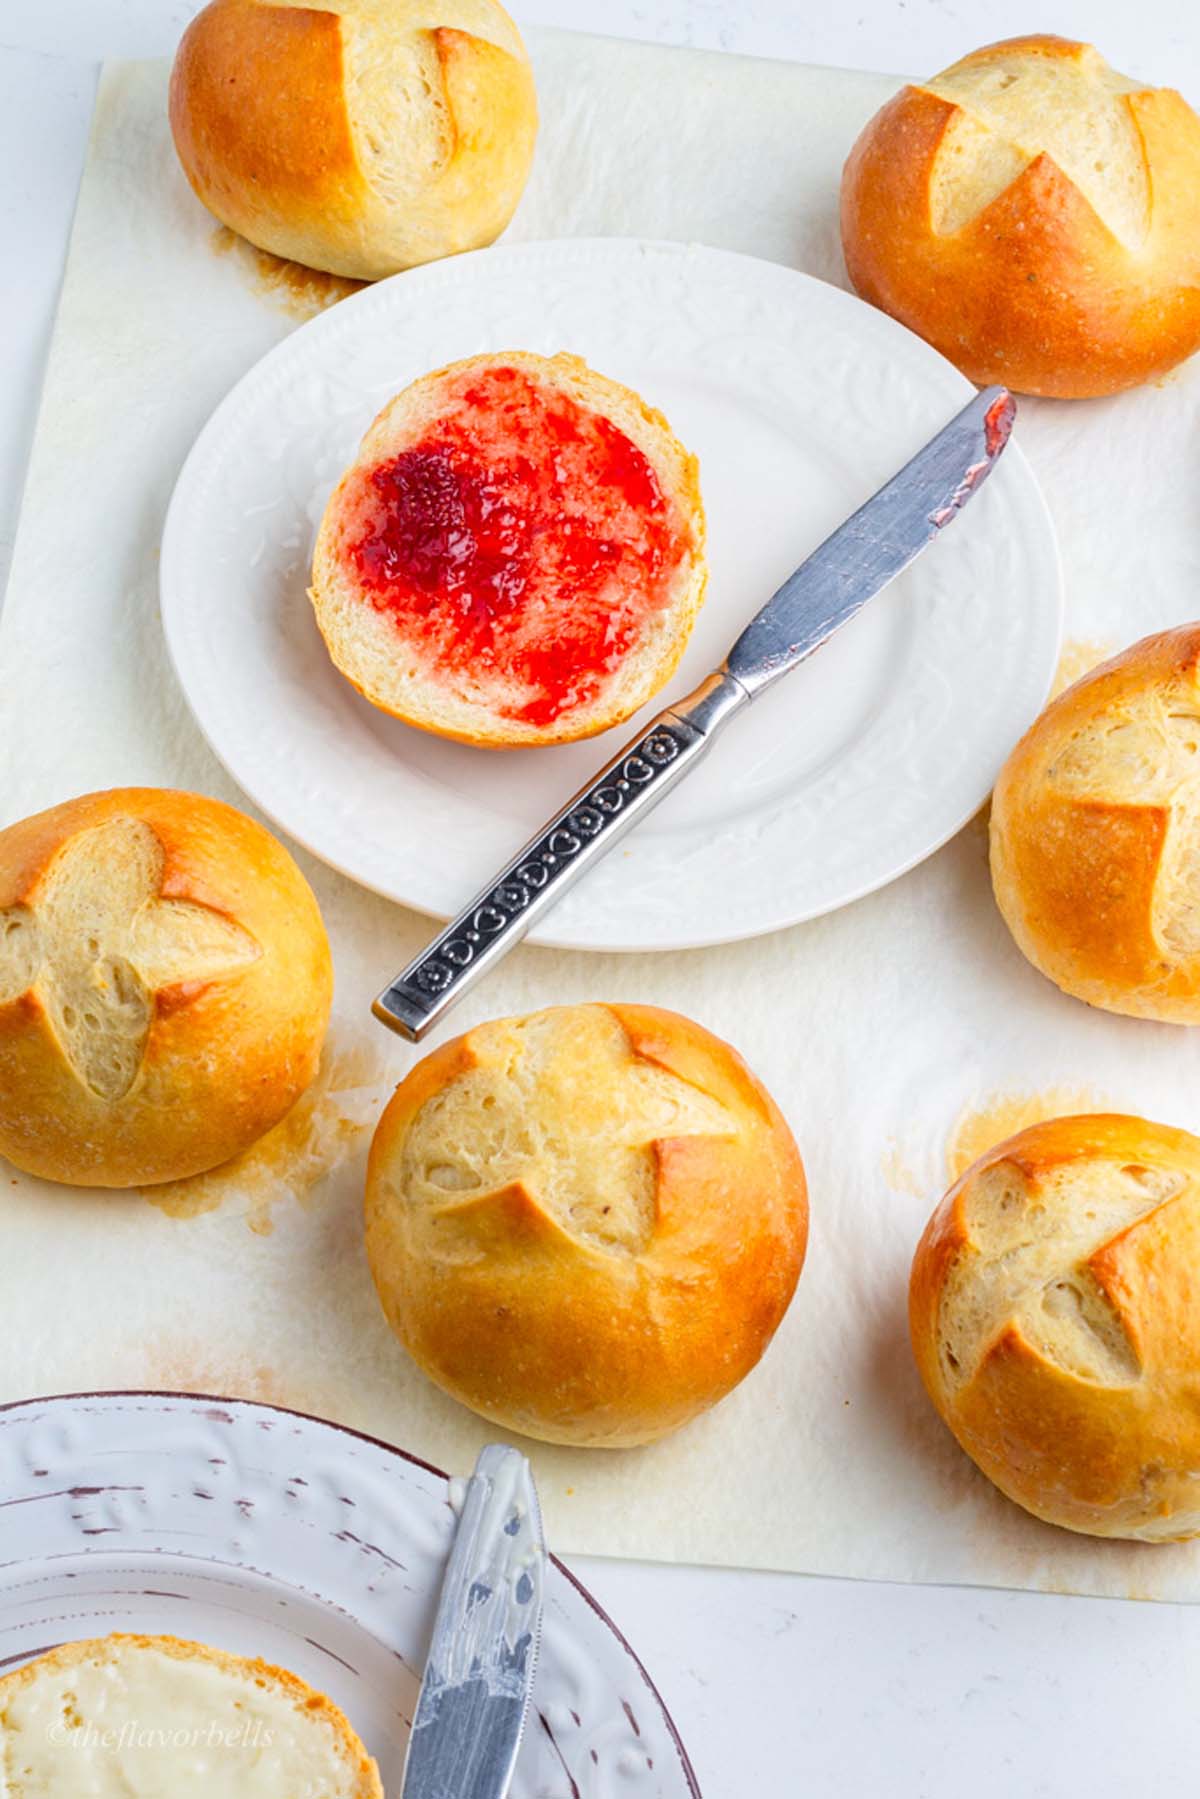
There’s something magical about biting into these freshly baked Danish buns are sweet, soft, and pillowy breakfast rolls infused with warm spices. This recipe is my take on the Rundstykker, delicately spiced with cardamom that will fill your kitchen with an irresistible aroma, making your morning feel special.
You can recreate this Scandinavian delight at home and enjoy bakery-style results! Follow along with this and many more bread recipes on the blog.
Jump to:
👩🏽🍳What are Danish Buns?
Danish buns are a delightful category of Scandinavian baked goods known for their soft, slightly sweet dough and rich, aromatic flavors. Traditionally made with milk, butter, rye, or wheat flour, these Danish breakfast buns have a pillowy texture that pairs beautifully with coffee or tea. They can be enhanced with warm spices like cinnamon, nutmeg, or cardamom.
There are many variations of Danish buns, like Rundstykker, Fødselsdagsboller, Kanelbullar, etc each with its unique twist. Rundstykker are classic breakfast rolls with a crisp crust, often topped with or without poppy or sesame seeds. Kanelbullar or cinnamon buns are spiraled with a buttery cinnamon-sugar filling, while Tebirkes feature a flaky, laminated dough sprinkled with poppy seeds. Another popular type is Skoleboller, a sweet bun filled with vanilla custard and topped with coconut. Whether soft and buttery or crisp and chewy, Danish buns are a staple in Nordic baking, perfect for cozy mornings or indulgent treats!
🧂Ingredient Notes & Substitutes for Danish Breakfast Buns
1. Flour Choices for the Best Texture
For this Danish Sweet Buns recipe, all-purpose flour is ideal as it provides the perfect balance of softness and structure. However, if you want a chewier texture, you can substitute up to 30% of the flour with bread flour. If using whole wheat flour, mix it with white flour (50:50) to maintain a light and fluffy consistency. For a gluten-free option, use a high-quality 1:1 gluten-free baking flour, but expect a slightly denser result.
2. Yeast Options for Perfect Rise
Instant yeast is the most convenient choice since it can be mixed directly into the dough without proofing. If using active dry yeast, or fresh yeast dissolve it in warm milk (not hot) and let it sit for 5–10 minutes until foamy before adding it to the dough. Sourdough bakers can replace yeast with 80g of active sourdough starter, adjusting the flour and liquid slightly to maintain the dough consistency.
3. Milk for Richness and Softness
Whole milk enhances the softness of Danish buns, but you can use 2% milk if needed. For a dairy-free alternative, unsweetened almond milk, oat milk, or soy milk works well. If using plant-based milk, opt for one with a higher fat content to mimic the richness of whole milk in your vegan Danish Buns.
4. Oil vs. Butter – What’s Best?
This morning buns recipe uses oil for a softer texture, but you can substitute melted unsalted butter for a richer flavor. If using salted butter, slightly reduce the salt to balance the taste. For a dairy-free version, coconut oil or a neutral vegetable oil like avocado oil is a great alternative.
5. The Role of Cardamom in Flavor
Cardamom is the signature spice in traditional Scandinavian buns, offering a warm, citrusy aroma. If using whole cardamom pods, crush, separate seeds, and grind them for the freshest flavor. Pre-ground cardamom is convenient but less aromatic. If cardamom isn’t available, try substituting it with a mix of cinnamon and a pinch of nutmeg for a similar warmth.
6. Sugar Adjustments and Alternatives
Granulated sugar adds a subtle sweetness to balance the spices. Brown sugar can be used for a deeper caramel-like flavor, while honey or maple syrup are good natural substitutes (though they may slightly alter the dough's moisture content). For a refined sugar-free option, coconut sugar works well.
7. Salt for Flavor Balance
Fine sea salt is recommended as it distributes evenly in the dough, enhancing flavor. If using kosher salt, slightly increase the quantity as it is less dense than table salt.
By understanding these ingredient options and adjustments, you can easily customize your Danish buns while ensuring they turn out perfectly soft, flavorful, and aromatic every time!
🔪 Step by Step Instructions
Step 1: Combining Ingredients
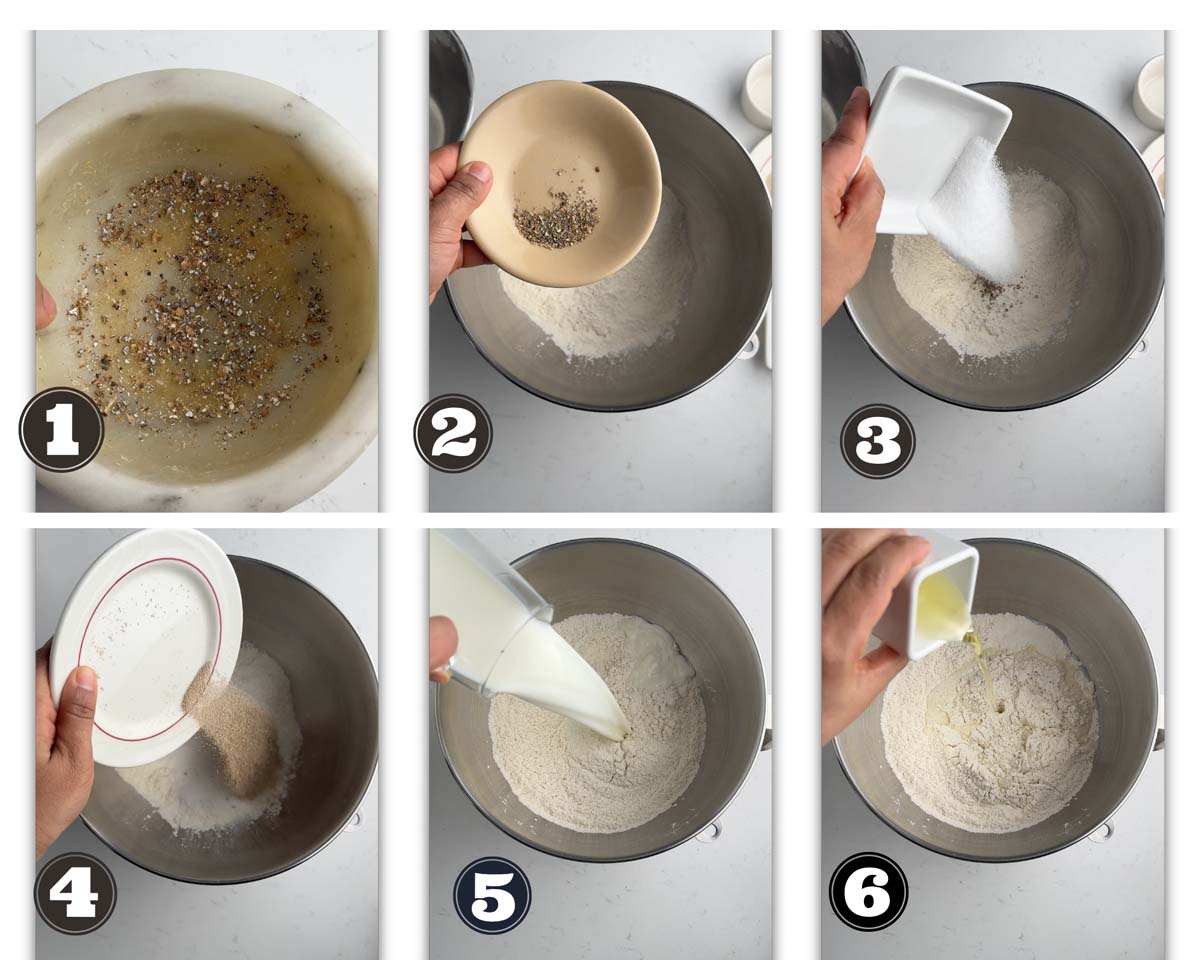
Start by warming the milk until it’s slightly above room temperature 700 F to 790 F—this helps in optimum yeast activity. If you do not have a kitchen thermometer, just immerse your finger in the milk, it should not feel cold or warm.
In a large mixing bowl, combine the flour, yeast, sugar, salt, and cardamom. Stir everything together to evenly distribute the ingredients. Then, pour in the warm milk and oil, and mix with a spoon or your hands until a shaggy dough forms. At this stage, it will look rough and slightly sticky, but that’s completely normal.
Step 2: Kneading the Dough
If using a stand mixer, attach the dough hook and knead on medium speed for about 8–10 minutes until the dough becomes smooth, elastic, and not at all sticky. The dough should pull away from the sides of the bowl but still feel soft. If it sticks too much, add a tiny bit of flour; if it feels dry, add a teaspoon of milk.
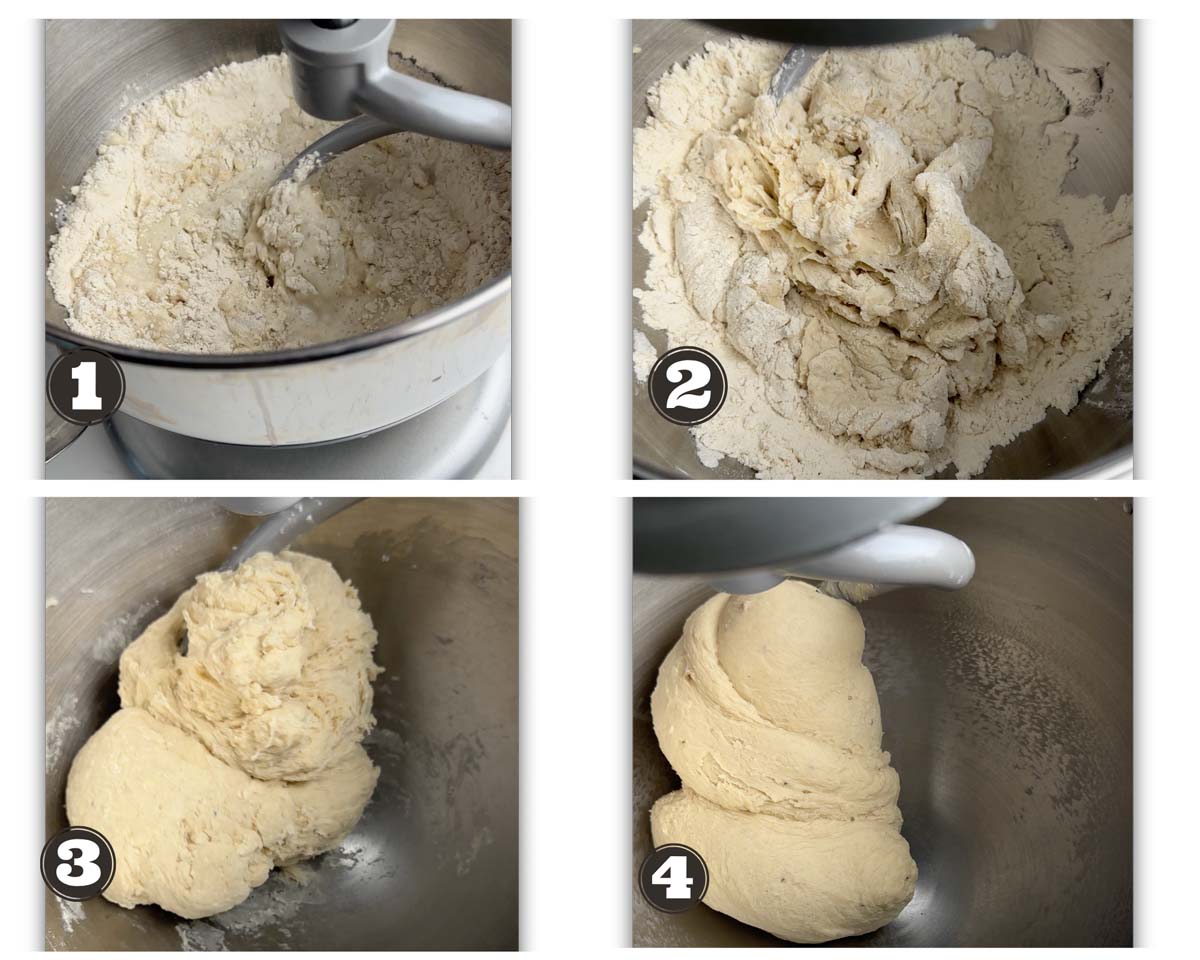
For hand kneading, transfer the dough onto a lightly floured surface and use the push, fold, and turn method. Push the dough away with the heel of your hand, fold it back, then rotate slightly before repeating. Knead for 12–15 minutes until it feels soft, stretchy, and smooth. A good way to test readiness is the windowpane test—stretch a small piece of dough between your fingers; if it becomes thin enough to see light through without tearing, it’s ready!
Step 3: Bulk Fermentation
Place the dough in a lightly greased bowl, cover it with a clean towel or plastic wrap, and let it rise in a warm place (75–80°F/24–27°C) for about 1.5 to 2 hours, or until doubled in size. If your kitchen is cold, place the bowl in the oven with the light on or near a warm spot.
Step 4: Shaping the Buns
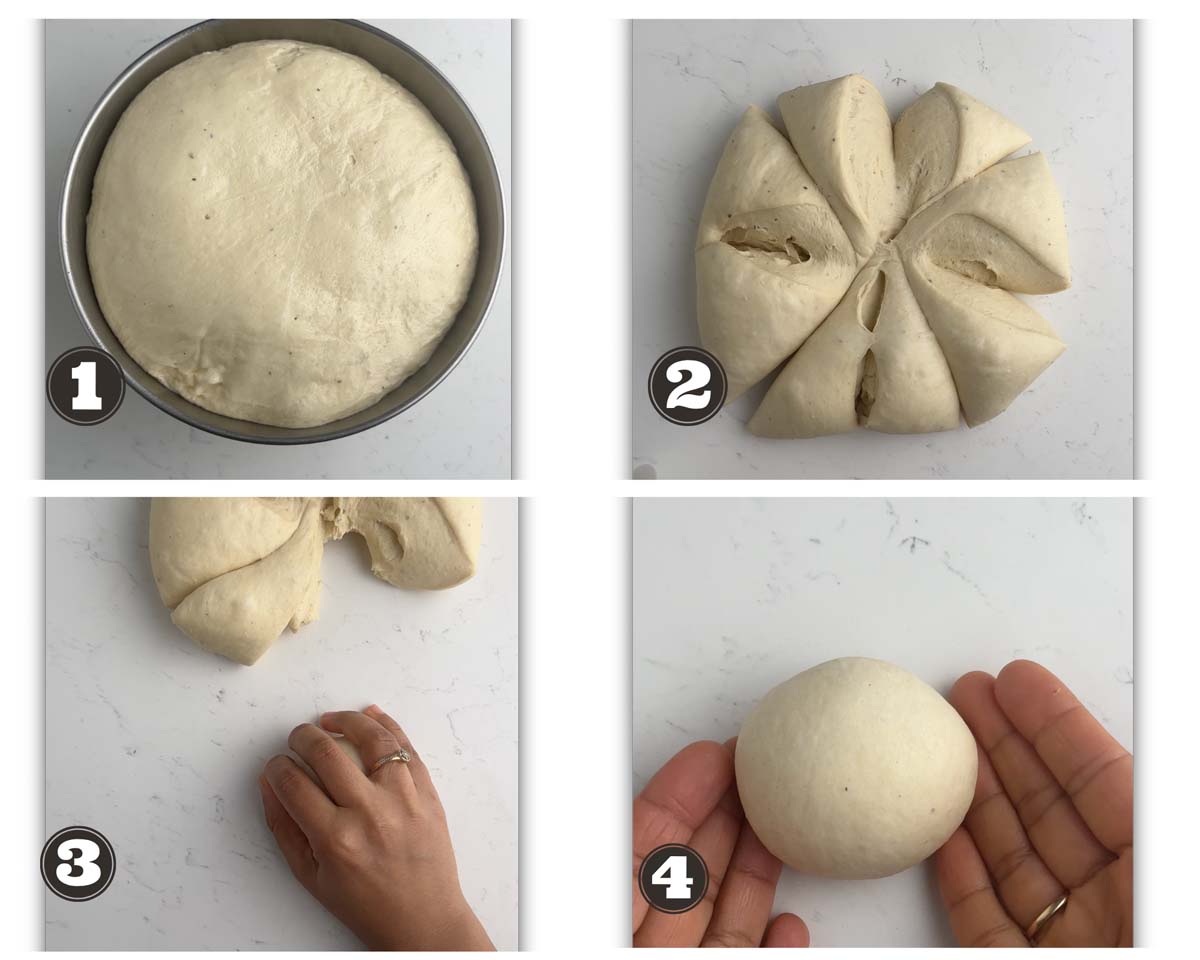
Once the dough has risen, gently deflate it and transfer it to a floured surface. Divide it into eight equal portions, around 90g each. Shape each piece into a smooth ball by tucking the edges underneath and rolling it against the counter using the palm of your hand. Place them on a parchment-lined baking sheet, leaving enough space to expand.
Step 5: Proofing the Buns
Cover the shaped buns with a clean towel or plastic wrap and let them proof for 45–60 minutes at around 75°F (24°C). They should become puffy and slightly larger, but not over-proofed. A good test is gently pressing a bun—if it springs back slowly, it's ready to bake.
Step 6: Scoring, Spraying & Baking
Its time to bake these Danish breakfast rolls. Preheat your oven to 380°F (193°C). Just before baking, lightly score the top of each bun with a sharp knife or lame for a decorative touch. Spray them with water to create steam, which helps with the oven spring. Bake for 18 minutes or until golden brown.
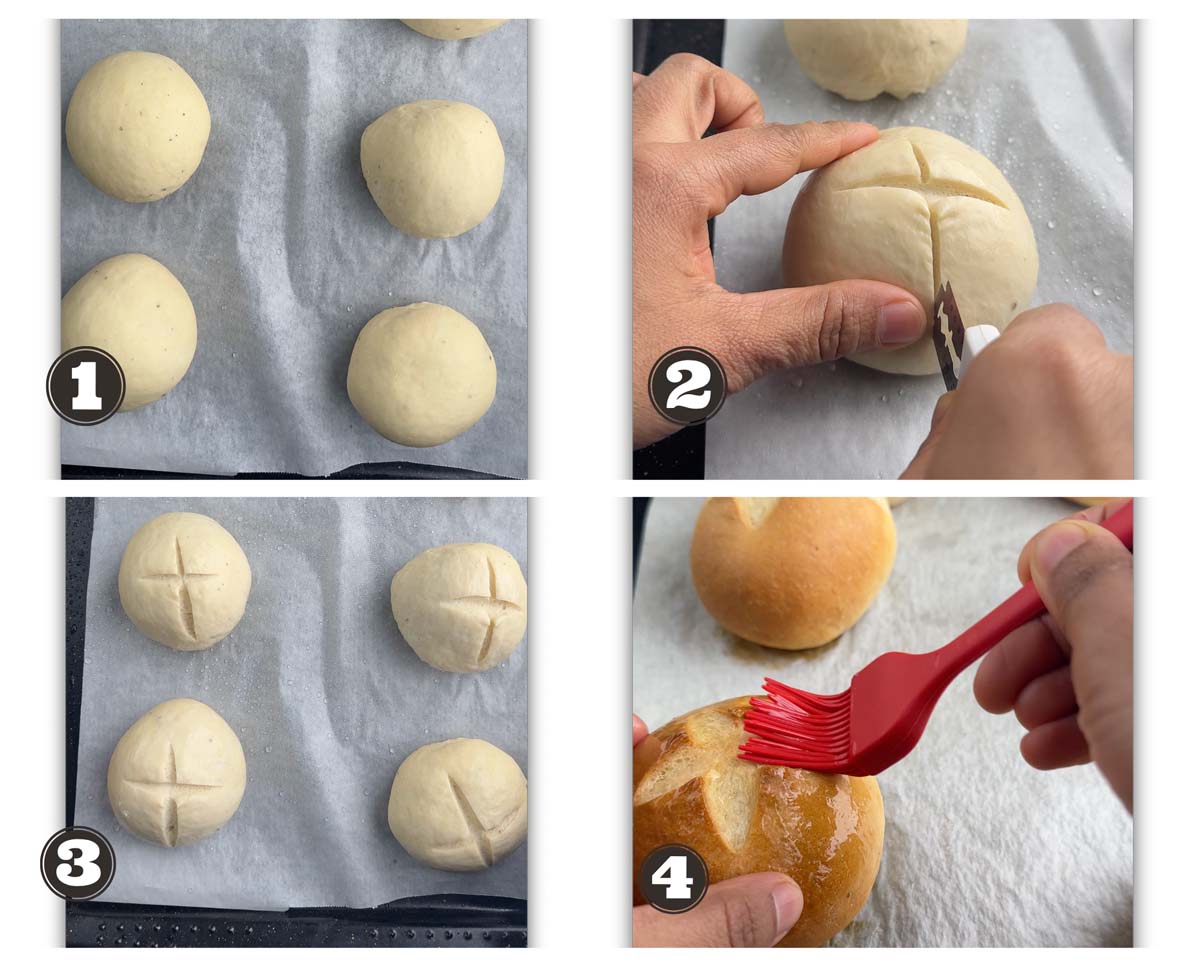
Step 7: Finishing Touch
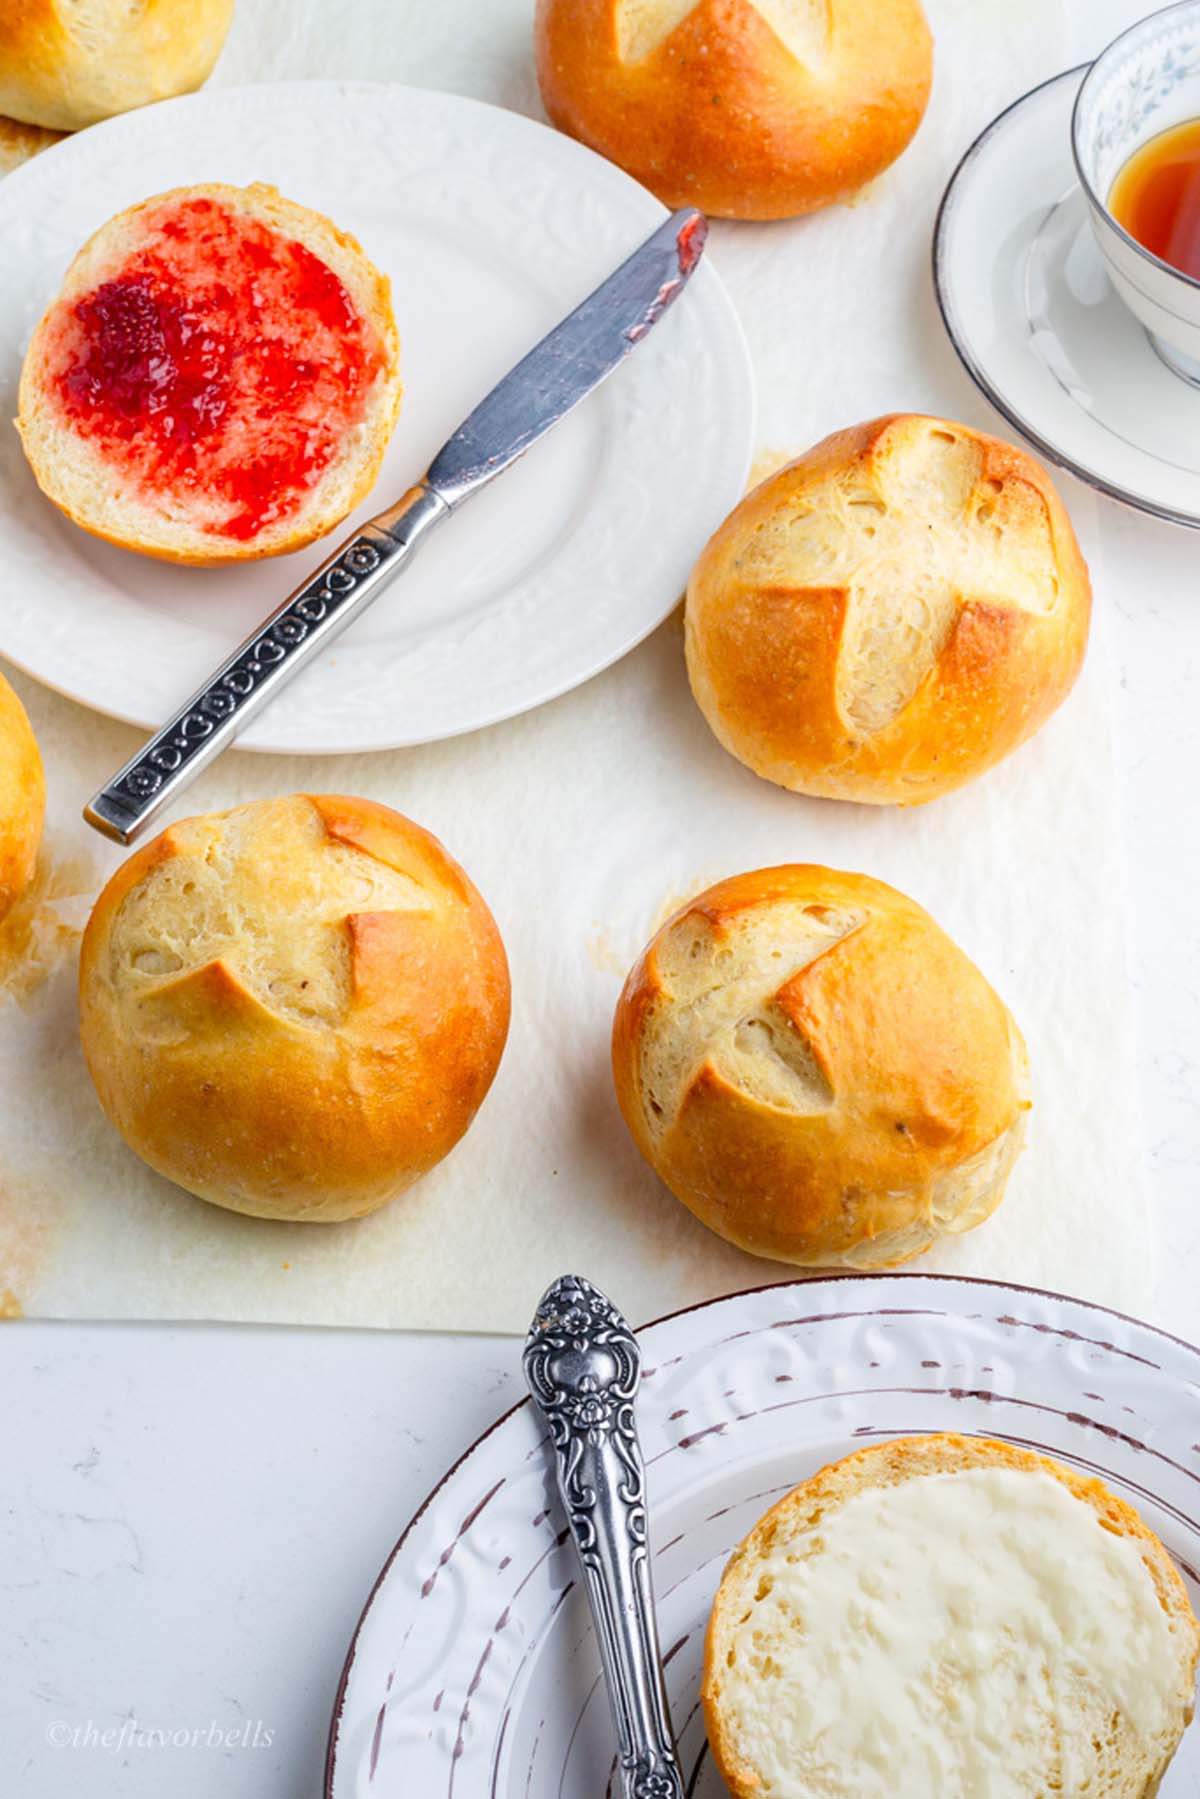
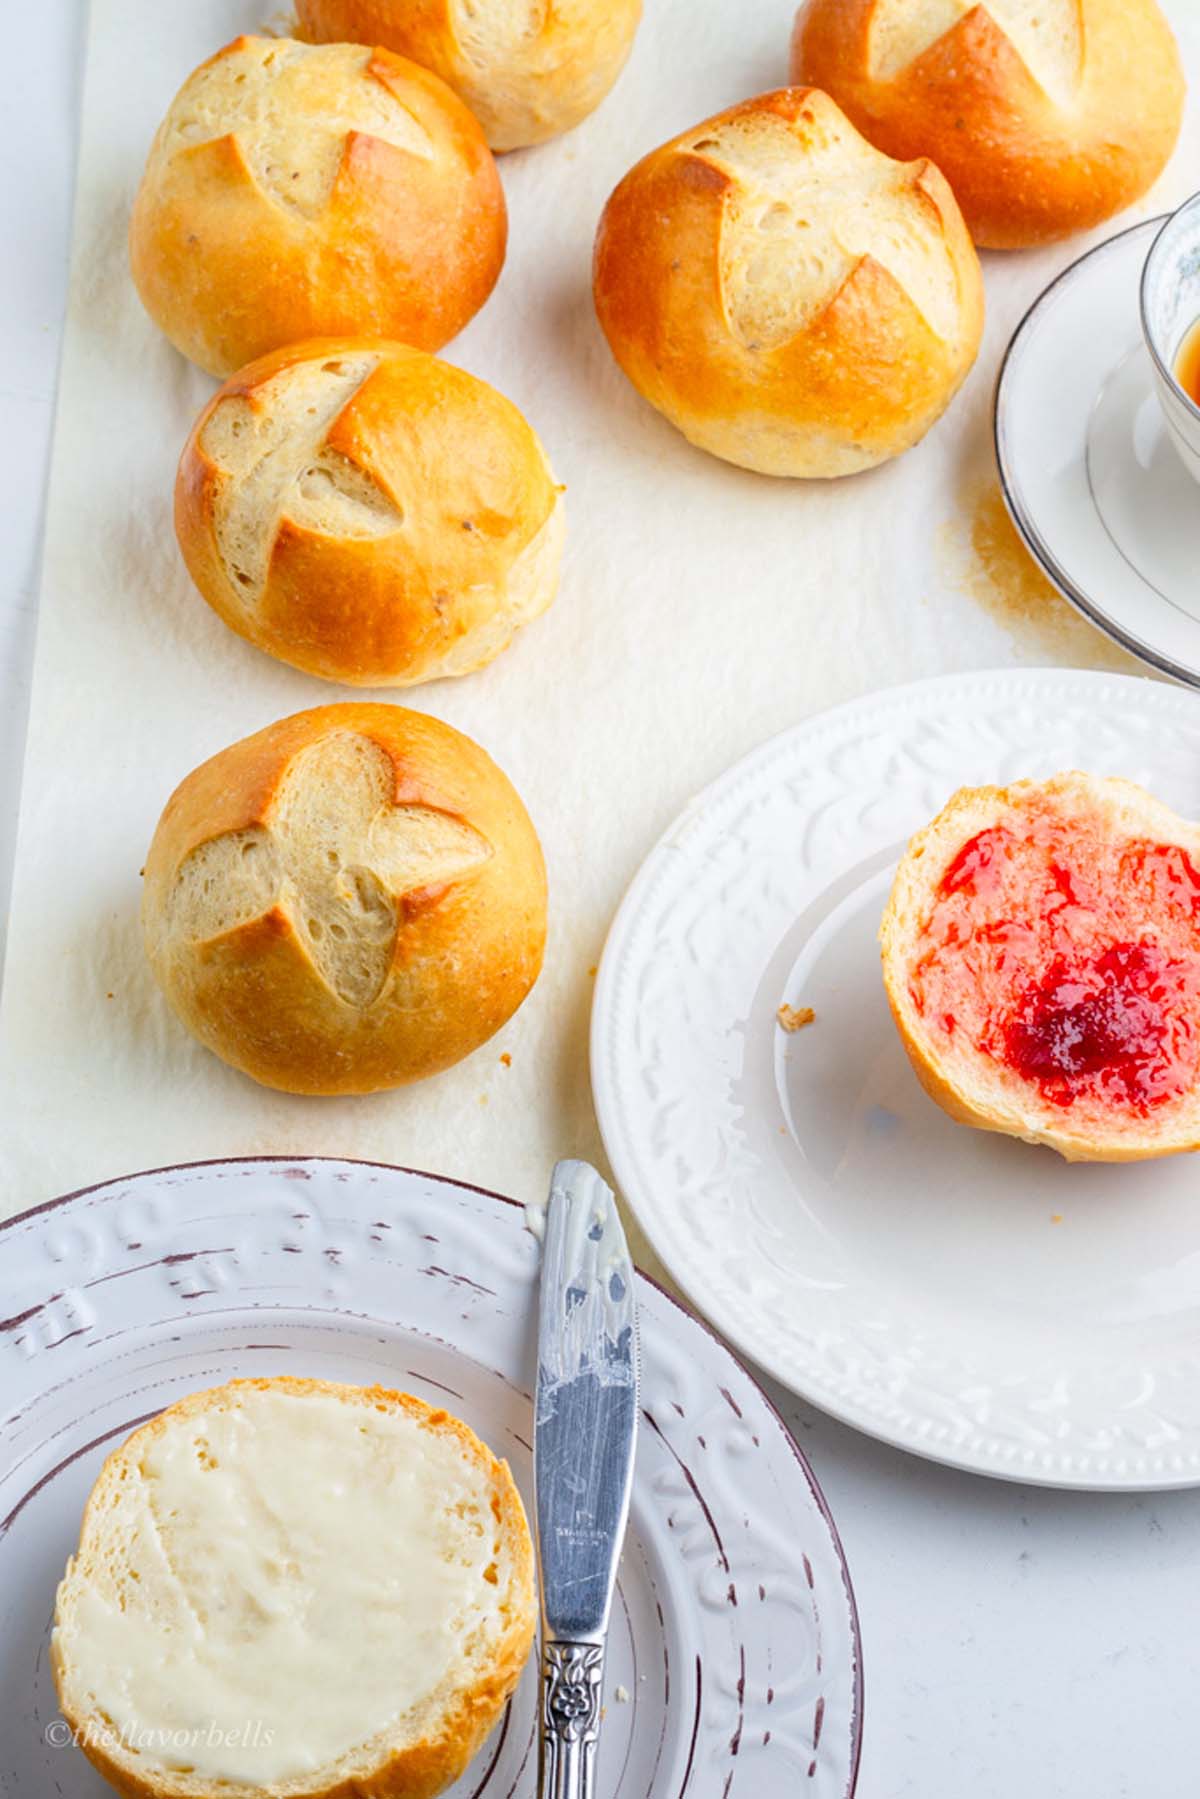
As soon as the buns come out of the oven, brush them with melted butter to give them a soft, glossy crust and a slightly richer flavor. This step helps keep the exterior tender and enhances the overall texture. However, if you prefer a crispier crust, more like traditional Danish Rundstykker breakfast buns, skip the butter brushing and let them cool naturally. Enjoy warm with butter, jam, or cheese your favorite toppings!
📝 Recipe Notes
- Use all-purpose flour (10–11% protein) for soft buns; up to 30% bread flour for chewiness.
- Avoid 100% bread flour (too firm) or >50% whole wheat (dense).
- Instant yeast can be mixed directly; active dry yeast needs proofing in lukewarm milk (110°F/43°C max).
- Freshly ground cardamom gives the best flavor. Substitute with cinnamon/nutmeg if needed.
- Let dough rise in a warm place (75–80°F) until doubled (~1.5–2 hrs).
- Slow-proof in fridge overnight for better flavor.
- Fix over-proofed dough by reshaping & reproofing briefly.
- Fix under-proofed dough with extra warm time.
- For soft buns: Brush with butter post-baking.
- For crispy crust (Rundstykker-style): Spray with water before baking and skip butter brushing
- Rotate the baking tray halfway through the baking time for even color.
🫙How to store the Danish Sweet Buns
At Room Temperature (Best for 1–2 Days)
- Let the buns cool completely before storing—trapping steam makes them soggy.
- Place in an airtight container or a resealable bag with as little air as possible.
- For extra freshness, tuck in a paper towel to absorb excess moisture.
- Keep in a cool, dry place (not the fridge—this dries them out faster!).
Freezing for Long-Term Storage (Up to 3 Months)
- Wrap individually in plastic wrap or aluminum foil.
- Place in a freezer bag, pressing out excess air to prevent freezer burn.
- Label with the date so you remember when they were baked!
- Thawing: Leave at room temperature for 1–2 hours or warm straight from frozen (see reheating tips below).
🔥 Reheating Danish Buns for That Just-Baked Goodness
Oven Method (Best for Crispy Crust Revival)
- Preheat oven to 300°F (150°C).
- Place buns on a baking sheet—lightly sprinkle with water, if you want a softer crust.
- Warm for 5–8 minutes (10–12 if frozen) until heated through.
Toaster or Air Fryer (Quick & Easy)
- Slice bun in half (if large) and toast lightly—just 15–30 seconds to avoid drying out.
- In an air fryer, 300°F for 2–3 minutes restores a nice crispness.
Microwave (Fast but Softens Crust)
- Wrap bun in a damp paper towel to add moisture.
- Heat on medium power for 10–15 seconds—check to avoid overheating!
❓Frequently Asked Questions
Danish buns stand out because of their soft, pillowy texture and subtle sweetness, often enhanced with warm spices like cardamom. Unlike basic dinner rolls, these buns are enriched with milk and a bit of fat (oil or butter), making them more tender and flavorful. Traditional Danish buns, such as Rundstykker, often have a crisp crust, while others like Kanelbullar (cinnamon buns) or Tebirkes (poppy seed buns) incorporate laminated dough techniques for flakiness. The use of yeast fermentation also contributes to their lightness, making them perfect for breakfast or a cozy afternoon snack.
Absolutely! Cardamom is just my take on the traditional Danish buns, you can leave it out or substitute it with cinnamon, nutmeg, or a blend of both for a different flavor profile. If you prefer a more neutral taste, simply omit the spices altogether, and the buns will still be delicious.
To achieve a crispy, golden crust like Danish Rundstykker, follow these key steps:
1. Skip the Butter Brush – Avoid brushing baked buns with butter, as it softens the crust.
2. Use Steam – Spray buns with water before baking or place a pan of boiling water in the oven. Ice cubes on a hot tray also create steam for a crackly crust.
3. Higher Oven Temp – Bake at 400°F (200°C) for better oven spring and crispiness.
4. Extend Baking Time – Bake 2–3 minutes longer, monitoring to prevent over-browning.
5. Cool Uncovered – Let buns cool on a wire rack without covering to keep the crust crisp.
These techniques help replicate the perfect crispy, airy Danish-style buns at home.
🔗 More Exotic Bread Recipes
- Spanish buns
- Tiger Rolls
- Coconut Buns
- Chocolate buns
- Coffee buns
- Hokkaido milk buns
- Beet Root Bread
- Ube rolls
- Matcha bread

I hope you love this Danish Cardamom Buns recipe as much as I do—there’s nothing quite like that first bite of a warm, buttery bun fresh from the oven! If you try it, let me know how it turns out in the comments below—I’d be thrilled to hear about your baking adventures.
Happy Baking !

Danish Buns: Sweet Cardamom Buns
Ingredients
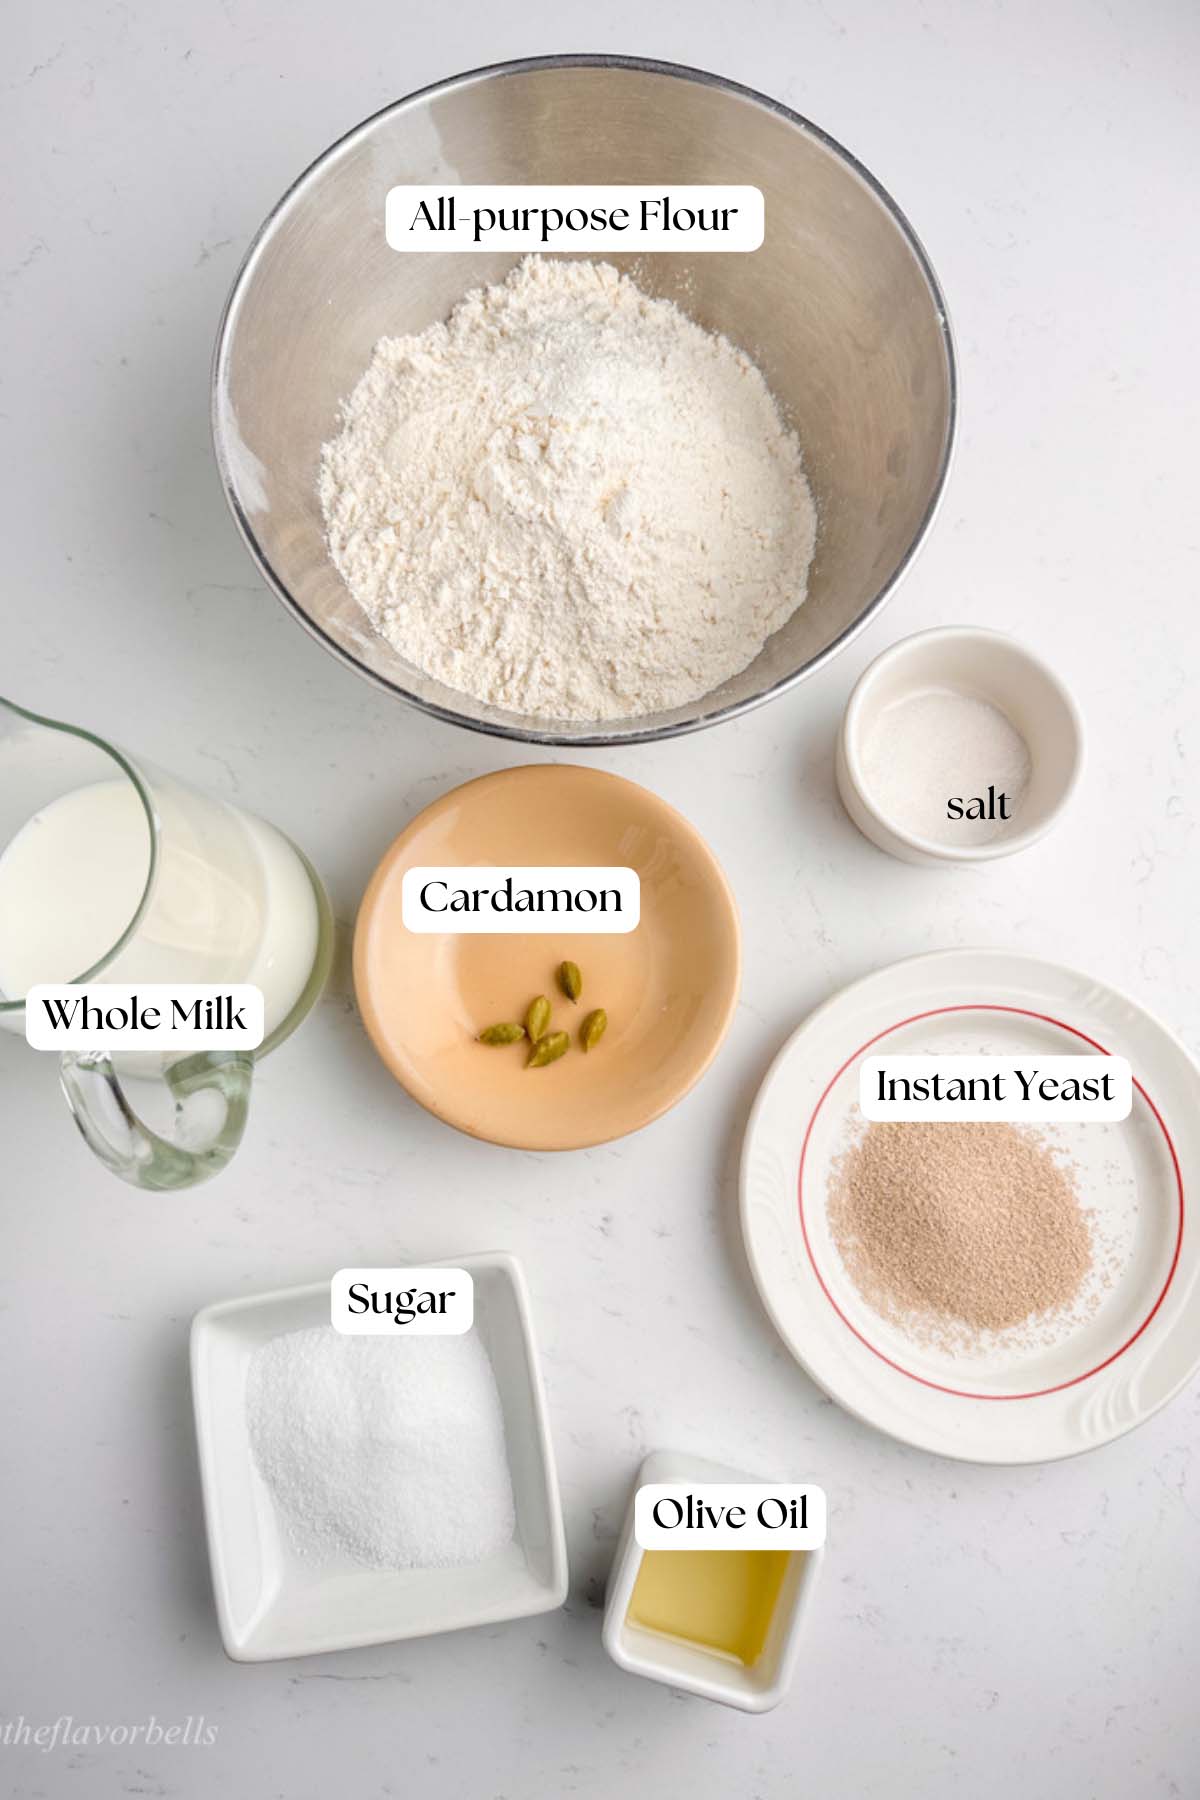
- 400 g All purpose Flour (3 ¼ cups approx.)
- 6 g Instant Yeast (2 Tsp)
- 285 g Whole milk (1 ¼cups)
- 20 g Oil (1 ½ tbsp)
- 5 Whole green Cardamoms or ground cardamom (½ tsp)
- 6 g Salt (1 tsp)
- 22 g Sugar ( 4 tsp)
Instructions
Step 1: Combining Ingredients
- Bring milk to slightly above room temperature by giving it a quick run in a microwave 70-79°F (21-26°C) for optimal yeast activation (finger test: should feel neither cold nor hot).
- In a large bowl, mix flour, yeast, sugar, salt, and cardamom evenly.
- Add warm milk and oil, stir until a shaggy, slightly sticky dough forms.
Step 2: Kneading the Dough
- Stand Mixer: Attach the dough hook attachment and knead on low to medium speed for about 8–10 minutes until the dough becomes smooth, elastic, and not at all sticky. The dough should pull away from the sides of the bowl but still feel soft. If it sticks too much, add a tiny bit of flour; if it feels dry, add a teaspoon of milk.
- Hand Kneading:Transfer the dough onto a lightly floured surface and use the push, fold, and turn method. Push the dough away with the heel of your hand, fold it back, then rotate slightly before repeating. Knead for 12–15 minutes until it feels soft, stretchy, and smooth. A good way to test readiness is the windowpane test—stretch a small piece of dough between your fingers; if it becomes thin enough to see light through without tearing, it’s ready!
Step 3: Bulk Fermentation
- Place dough in a greased bowl, cover with a towel/plastic wrap.
- Let rise in a warm spot (75–80°F/24–27°C) for 1.5–2 hours until doubled.
- Cold kitchen tip: Use the oven with light on or a warm area.
Step 4: Shaping the Buns
- Gently deflate the risen dough and divide it into 8 equal portions (~90g each).
- Shape each into smooth balls by tucking edges underneath and rolling against the counter.
- Place on a parchment-lined tray, spaced apart for expansion.
Step 5: Proofing the Buns
- Cover with a towel/plastic wrap; proof at 75°F (24°C) for 45–60 mins until puffy.
- Test readiness: Press lightly—dough should spring back slowly.
Step 6: Scoring, Spraying & Baking
- Preheat oven to 380°F (193°C).
- Lightly score bun tops with a sharp knife/lame.
- Spray with water for steam (better oven spring).
- Bake for 18 mins until golden brown.
Step 7: Finishing Touch
- For soft buns: Brush with melted butter right after baking.
- For crispy crust (like Rundstykker): Skip butter; cool uncovered.
- Serve warm with butter, jam, or cheese!
Notes
- Use all-purpose flour (10–11% protein) for soft buns; include up to 30% bread flour for added chewiness.
- For yeast:
o Instant yeast can be mixed directly into the dough.
o Active dry yeast requires proofing in lukewarm milk (maximum 110°F/43°C). - Enhance flavor with freshly ground cardamom; substitute with cinnamon or nutmeg if needed.
- Proofing:
o Let dough rise in a warm place (75–80°F) until doubled (about 1.5–2 hours).
o For better flavor, slow-proof the dough in the fridge overnight. - Fixing dough issues:
o Over-proofed dough: Gently reshape and allow a brief second proofing.
o Under-proofed dough: Extend proofing time in a warm area. - Baking:
o For soft buns: Brush with butter immediately after baking.
o For crispy buns (Rundstykker-style): Mist with water before baking and skip the butter brushing. - Rotate the baking tray halfway through for even coloring.
📋 Nutrition Facts


Leave a Reply