When I first started baking sourdough, I was baffled by terms like coil fold, stretch and fold—were they really that different, and did they matter? Turns out, mastering these gentle gluten-building techniques completely transformed the texture of my bread, giving it that open crumb and chewy bite we all dream of.
In this post, I’m breaking down the art of coil folding, stretching and folding in bread baking, so you can build a strong gluten structure without kneading like crazy.
Jump to:
What is Stretching and Folding in Sourdough Bread Baking?
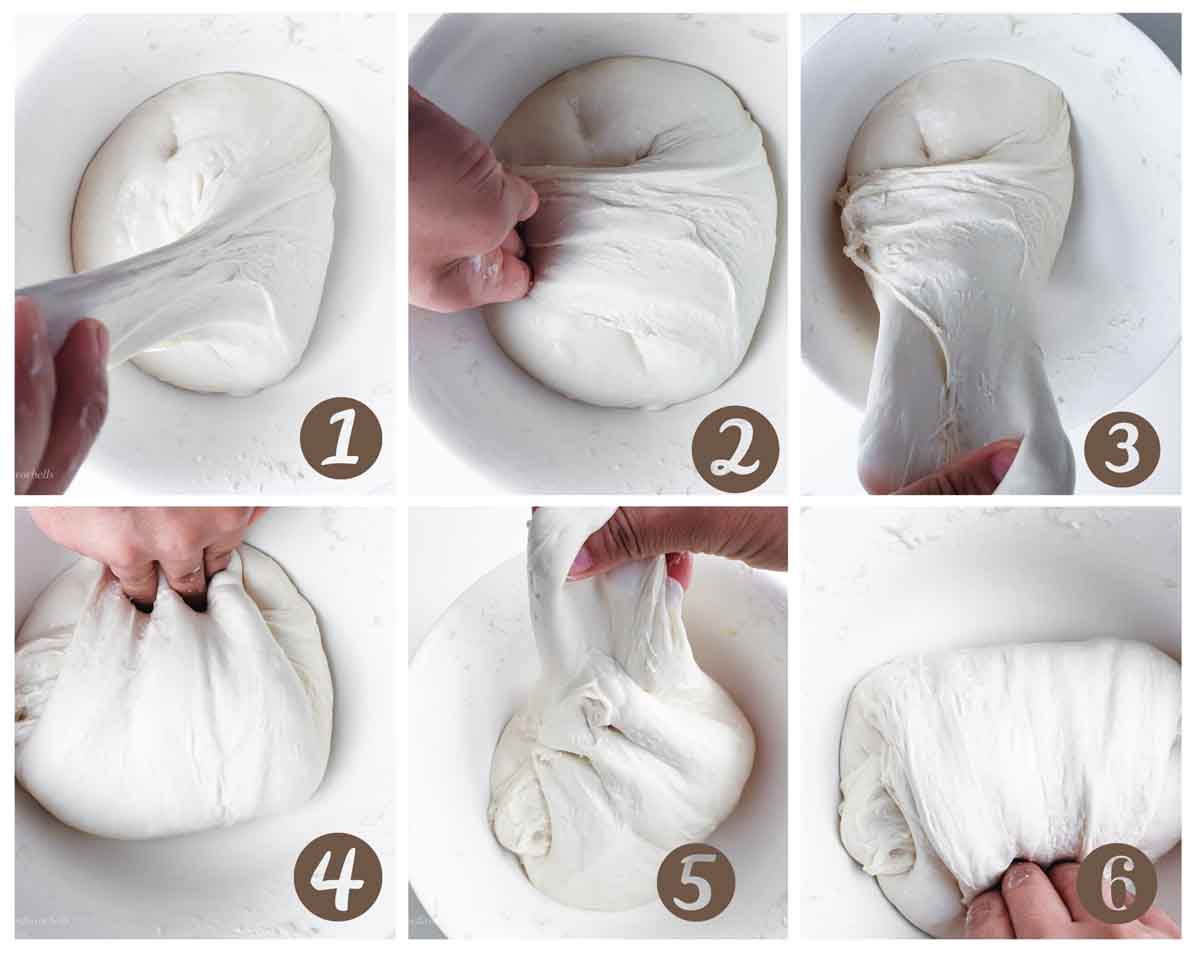
Stretching and folding is a gentle gluten development technique used in sourdough and artisan bread baking. Instead of kneading the bread dough vigorously, this method involves pulling (stretching) the dough and then folding it over itself. It’s especially helpful for high-hydration doughs where traditional kneading isn't effective or necessary.
How to Do Stretch and Fold – Step-by-Step in Sourdough bread recipe?
- First Rest (Autolyse or Initial Fermentation):
After mixing your flour and water (and possibly starter), let the dough rest for 30 minutes to 1 hour. This relaxes the gluten and starts the development passively. - First Stretch and Fold Set:
- Wet your hands to prevent sticking.
- Gently lift one side of the dough from the bowl, stretch it upwards (but not to the point of tearing), and fold it over to the opposite side.
- Rotate the bowl 90 degrees and repeat on all four sides (like folding a blanket).
- That’s one full set.
- Rest and Repeat:
- Cover and let the dough rest for 20–45 minutes at room temperature (bulk fermentation continues during this time).
- Perform 3–4 sets in total, depending on dough strength and hydration. The dough should feel more elastic and structured with each set.
How does Stretching and Folding Helps Gluten Development?
This method gently strengthens the gluten network without tearing or overworking the dough in making sourdough bread.
🔬 The Science Behind Stretching and Folding
- Mechanical Alignment:
When you stretch the dough and fold it over, you’re manually aligning gluten strands in the same direction. Each stretch helps the proteins elongate, and each fold stacks the gluten layers, giving the dough structure and elasticity. - Gentle Strengthening:
Unlike kneading, which aggressively works the dough, stretch and folds allow gluten to form gradually with minimal tearing. This is especially helpful for doughs with higher hydration, where over-kneading would lead to a sticky mess. - Oxygen Incorporation:
These folds also lightly incorporate oxygen, which supports yeast activity and can slightly strengthen the gluten bonds (though too much oxygenation can oxidize flavor—so gentle is key).
Each stretch elongates the gluten strands, and each fold layers them, helping to build structure. Over time, this leads to:
- Better gas retention (hello airy crumb!)
- A smoother, more elastic dough
- An open, even crumb structure in the final loaf
It’s a low-effort but high-reward technique that gives you better control over the dough’s development, especially useful for sourdough baking, where patience is key.
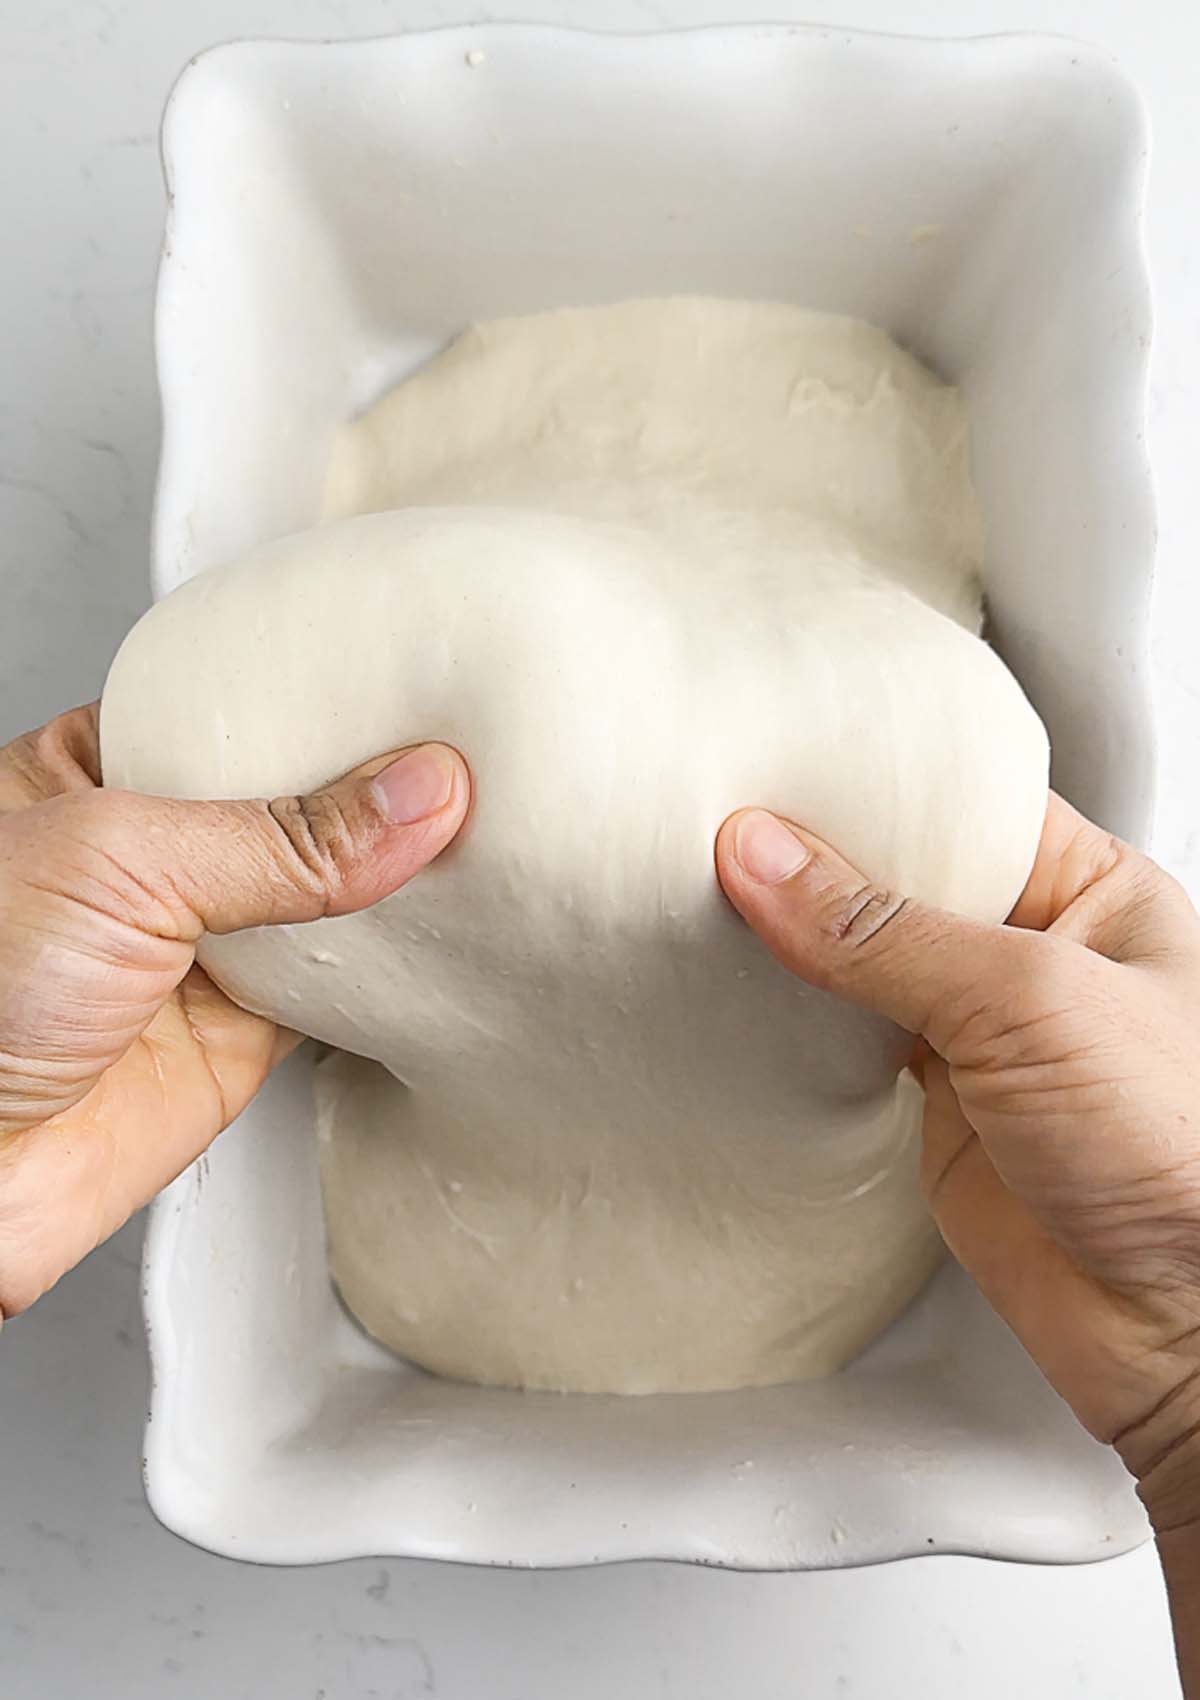
What is Coil Folding in Sourdough?
Coil fold is another gentle technique used during the bulk fermentation stage of sourdough bread baking to build gluten strength and structure, especially in high-hydration doughs. Unlike the traditional stretch and fold, the coil fold lifts the dough from underneath, allowing it to fold over itself naturally, almost like a coiled rope, hence the name.
How to Do a Coil Fold – Step-by-Step?

- Prepare the Dough:
Make sure the dough has rested for at least 30–60 minutes after mixing. Coil folds work best when the dough is starting to hold some shape but is still soft. - Lightly Wet Your Hands:
This helps prevent sticking. You can also very lightly dampen the surface of your container. - Lift from the Center:
- Slide both hands under the middle of the dough from each side (imagine lifting it from the belly).
- Gently lift the dough upward until the ends start to release from the surface.
- Let the Dough Fold Itself:
- As you lift, the front edge of the dough will naturally tuck under and “coil” over itself.
- Lower the dough back down gently.
- Rotate the container 90° and repeat on the other side.
- Rest and Repeat:
Wait 30–45 minutes between coil folds. Depending on your dough strength, hydration, and ambient temperature, 2–4 rounds of coil folding are usually enough.
How Coil Folding Helps Gluten Development:
Coil folding is incredibly effective for building strength without deflating the dough or tearing gluten strands.
The Technique Behind Coil Folds
- Vertical Lift & Self-Tensioning:
Coil folds lift the dough from underneath, encouraging natural tension to build from within as the dough coils and folds under itself. This motion stretches the gluten gently in all directions and creates layered strength without forcing it. - Minimal Degassing:
Coil folds don’t compress the dough as much as stretch and folds do, preserving internal gas bubbles. These bubbles help the dough "self-laminate" and support an open crumb structure later on. - Progressive Strength Building:
As the dough ferments and becomes more extensible, coil folds become even more effective. The lift gets easier, and the dough responds with more bounce and less spread.
It works by:
- Encouraging gradual tension in the dough with minimal handling
- Strengthening the gluten network over multiple folds
- Preserving gas bubbles, contributing to an airy, open crumb
- Maintaining the dough’s hydration and preventing stickiness through gentle motion
This method is especially loved by sourdough bakers for its ability to build structure without stress. As the dough becomes stronger, you’ll notice it stands taller in the bowl and feels bouncier to the touch.
Stretching and folding vs Coil Fold
When it comes to building gluten structure in sourdough, both stretch and fold and coil fold techniques play a crucial role—but they each shine in different ways. Here's how they compare:
- Technique:
Stretch and fold involves pulling each side of the dough and folding it over itself, one side at a time. Coil folding, on the other hand, lifts the dough from the center and lets it naturally fold under itself like a coiled rope. - Best For:
Coil folds are ideal for high-hydration doughs that are too sticky or loose to handle easily. Stretch and folds work well for medium to high hydration doughs and are often easier for beginners to grasp. - Gentleness:
Coil folding is more delicate and excellent for preserving air pockets in the dough, which helps achieve that open, airy crumb. Stretch and folds are still gentle but can release a bit more gas if over-handled. - Dough Strength:
Stretch and folds build structure more quickly in the early stages of fermentation. Coil folds are great for continuing gluten development later on without flattening the dough. - Ease for Beginners:
Most bakers find stretch and folds more intuitive at first. Coil folds may take a bit of practice to master the lifting motion, especially with soft dough. - Frequency and Timing:
Both methods are typically done every 30 to 45 minutes during the bulk fermentation phase. You can use 3–4 rounds depending on the dough’s strength and feel. - Visual Signs of Progress:
With each round, the dough becomes stronger, smoother, and more elastic. Coil folds in particular will help the dough hold its shape and gain volume with minimal deflation.
Pro tip: I often use stretch and folds for the first two rounds to kickstart gluten development, then switch to coil folds for the last one or two rounds to strengthen without losing any of those precious air bubbles.
🥖 Coil Fold vs. Stretch and Fold in Sourdough
| Feature | Coil Fold | Stretch and Fold |
| Technique | Lift dough from the center, let it fold under itself like a coil | Stretch dough out and fold it over from each side |
| Best For | High hydration doughs | Medium to high hydration doughs |
| Gentleness | Very gentle – ideal for preserving air bubbles | Gentle, but slightly more hands-on |
| Dough Strength | Builds strength gradually with minimal disturbance | Builds strength more directly, quicker initial results |
| Gas Retention | Excellent – minimal degassing | Good – can cause slight degassing if overdone |
| Ease for Beginners | May take practice to master lifting motion | Easier to learn early on |
| Timing | Every 30–45 minutes during bulk fermentation | Same – every 20–45 minutes during bulk |
| Signs It's Working | Dough gets tighter, smoother, holds shape | Dough becomes less sticky, more elastic |
Why These Techniques Work Better Than Kneading (for Sourdough)?
Sourdough doughs are usually wetter, bulk fermented longer, and rely heavily on wild yeast and bacteria. This makes passive gluten development ideal. Stretching and folding (both classic and coil) aligns gluten fibers without disrupting fermentation or over-oxidizing the dough.


Leave a Reply