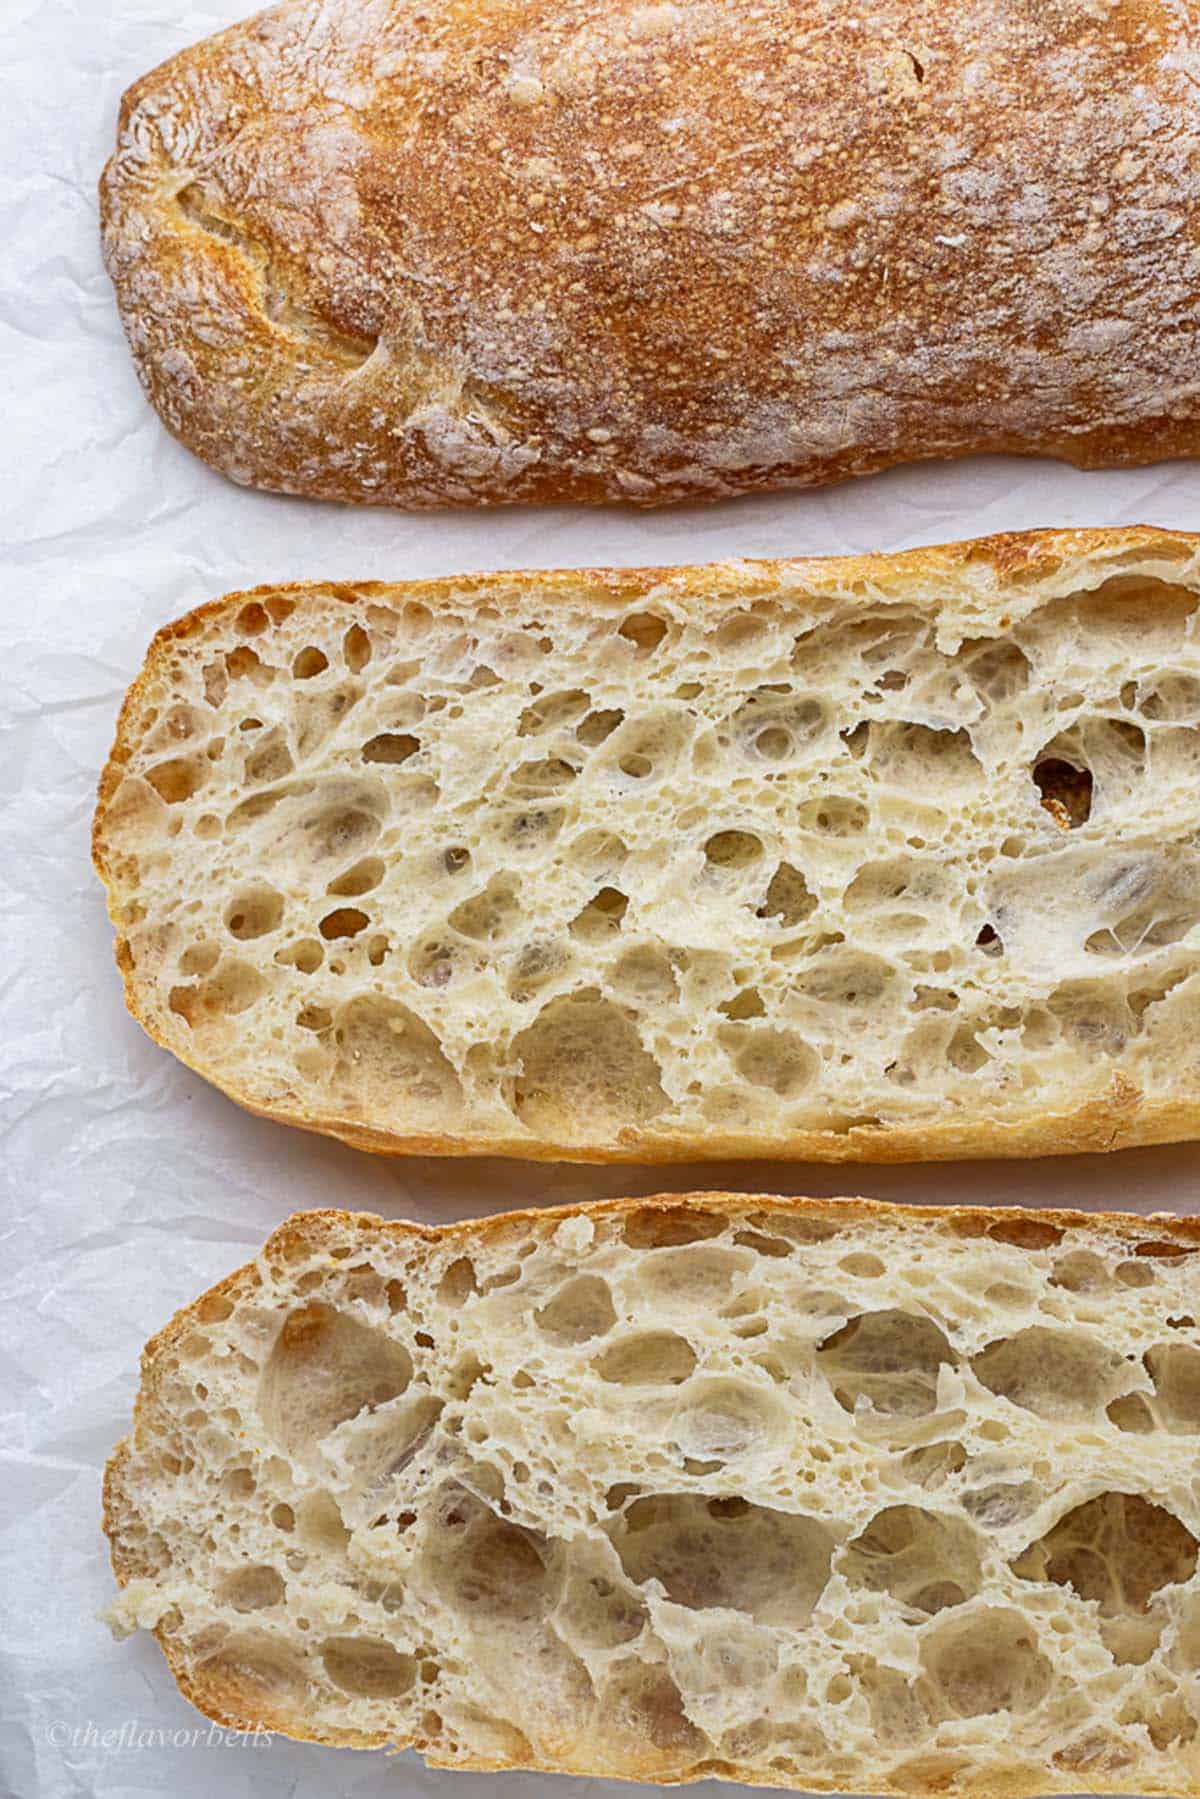
With its crispy crust, airy open crumb, and deep flavor developed from a slow-fermented biga, this homemade ciabatta bread recipe is everything you love about rustic Italian baking. Crafted from just bread flour, salt, water, yeast, and patience, it transforms your kitchen into a cozy, flour-dusted artisan bakery.
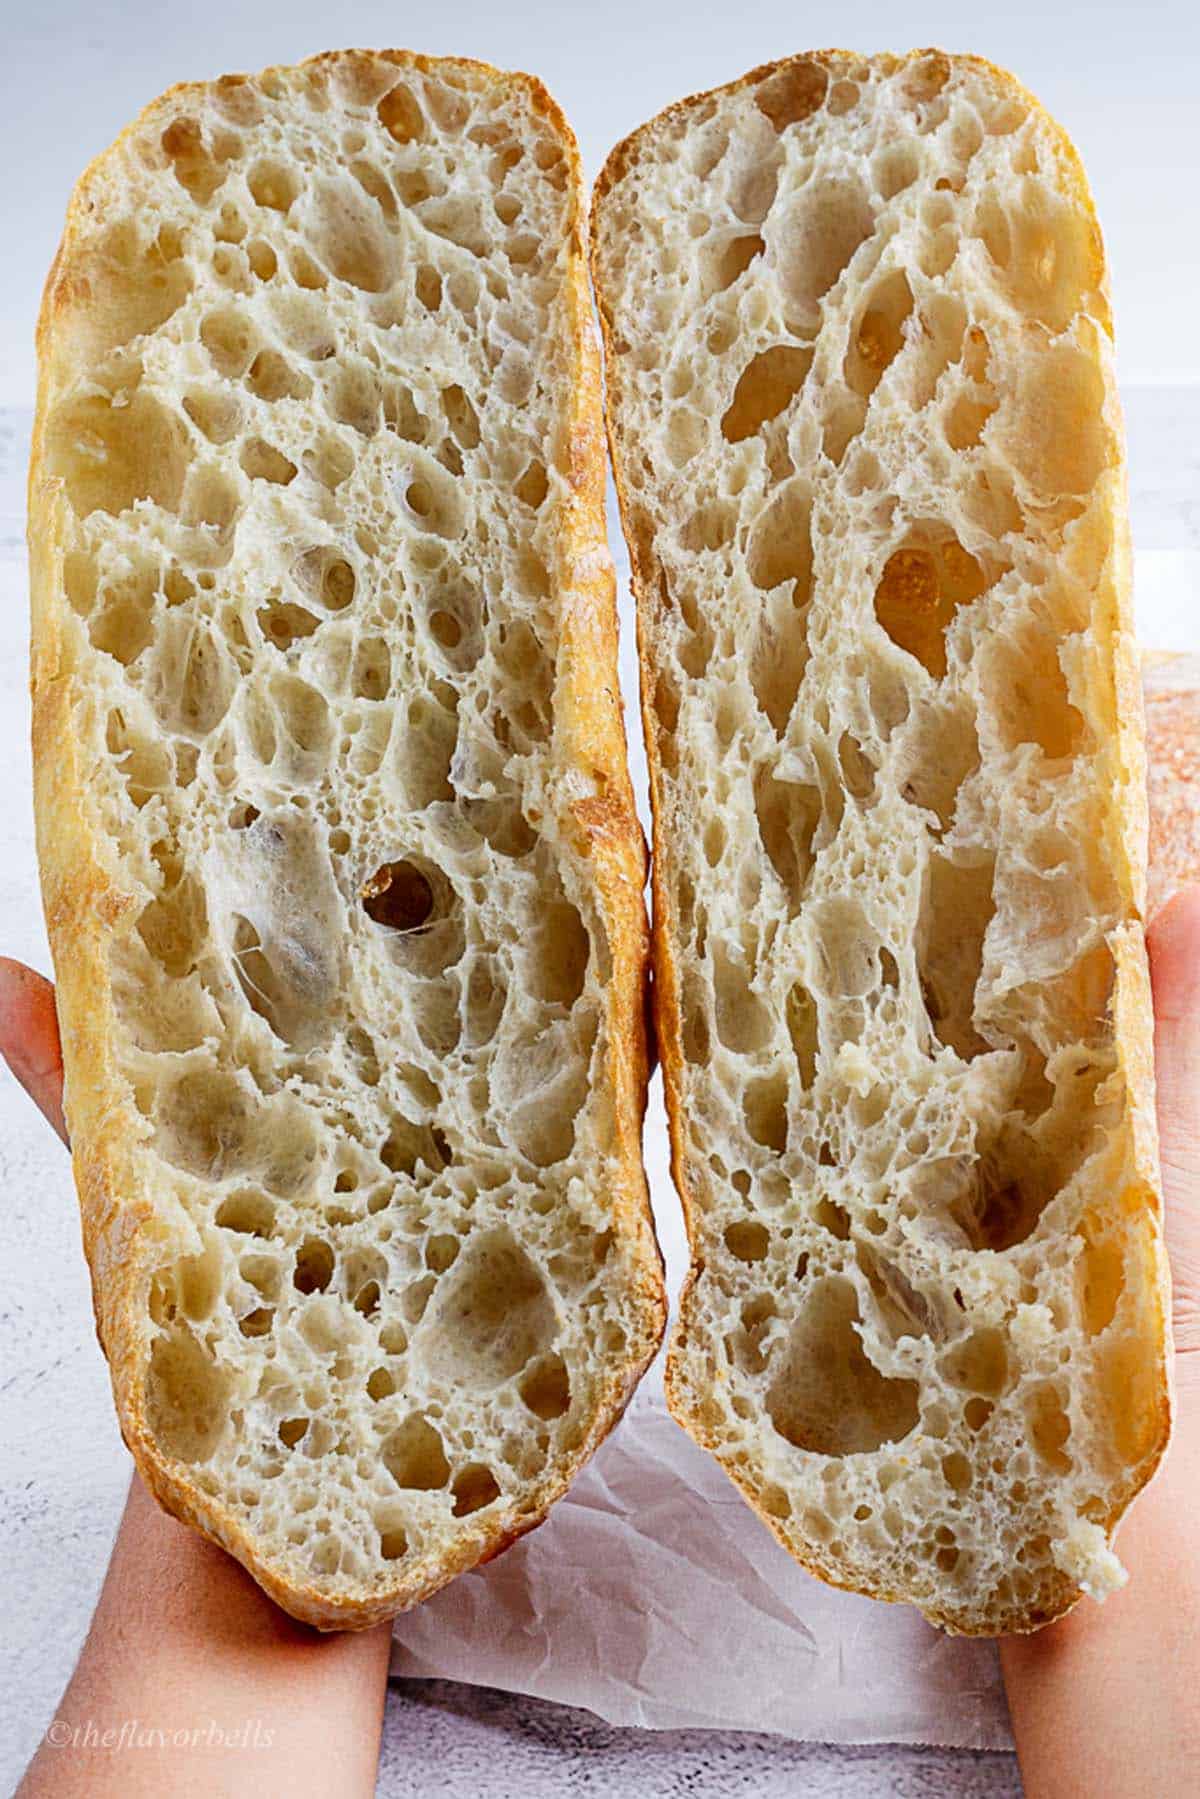
Inspired by the traditional Italian ciabatta recipe and refined over many batches, this version captures that perfect balance of chew and airiness.
Jump to:
👩🏽🍳 Why You Should Make This Recipe
- Bakery-style at home: This recipe delivers the authentic texture and flavor of traditional ciabatta bread—with a crispy crust and chewy, airy interior—without needing professional equipment.
- Beginner-friendly: Although it uses a biga (pre-ferment) and a sticky dough, the method is easy to follow, making it great for anyone baking ciabatta bread for the first time.
- Versatile use: Wondering what to make with ciabatta bread? From paninis to ciabatta dinner rolls, bruschetta, or simply with a drizzle of olive oil and herbs, it’s endlessly adaptable.
- Better than store-bought: This homemade ciabatta tastes far superior to store-bought loaves—plus, no additives!
- Learn artisan bread skills: Mastering a wet dough recipe like this builds confidence for tackling other breads, including sourdough ciabatta and ciabatta buns.
🧂 Ingredient Notes for Ciabatta Bread Recipe
Understanding your ingredients helps you get the most out of this Italian ciabatta bread recipe. Let’s break down the key components:
- Bread Flour
Use high-protein bread flour for best gluten development, which is crucial in this recipe for creating the open crumb and chewy texture. Avoid using only all-purpose flour, though you can mix a bit of it if you're short. Some bakers also experiment with purpose flour in small proportions. - Water
Always use room temperature water unless specified otherwise. Cold water will slow down fermentation, while hot water can kill the yeast. - Instant Dry Yeast
Instant yeast or active dry yeast both work, but make sure it's fresh and active. If using active dry yeast, dissolve it in water first before mixing into the dough. - Salt
Not just for taste—salt controls yeast activity and strengthens the gluten network. Don't skip it. - Biga (Pre-ferment)
Made ahead of time, this is the soul of any handmade ciabatta bread recipe. It contributes tanginess, structure, and a rustic quality to the bread. - Bench Scraper
You’ll need this tool for managing the sticky dough. It’s a lifesaver when working on a floured work surface. - Parchment Paper
Ideal for transferring the dough into the oven and preventing sticking, especially when working with ciabatta rolls or ciabatta buns.
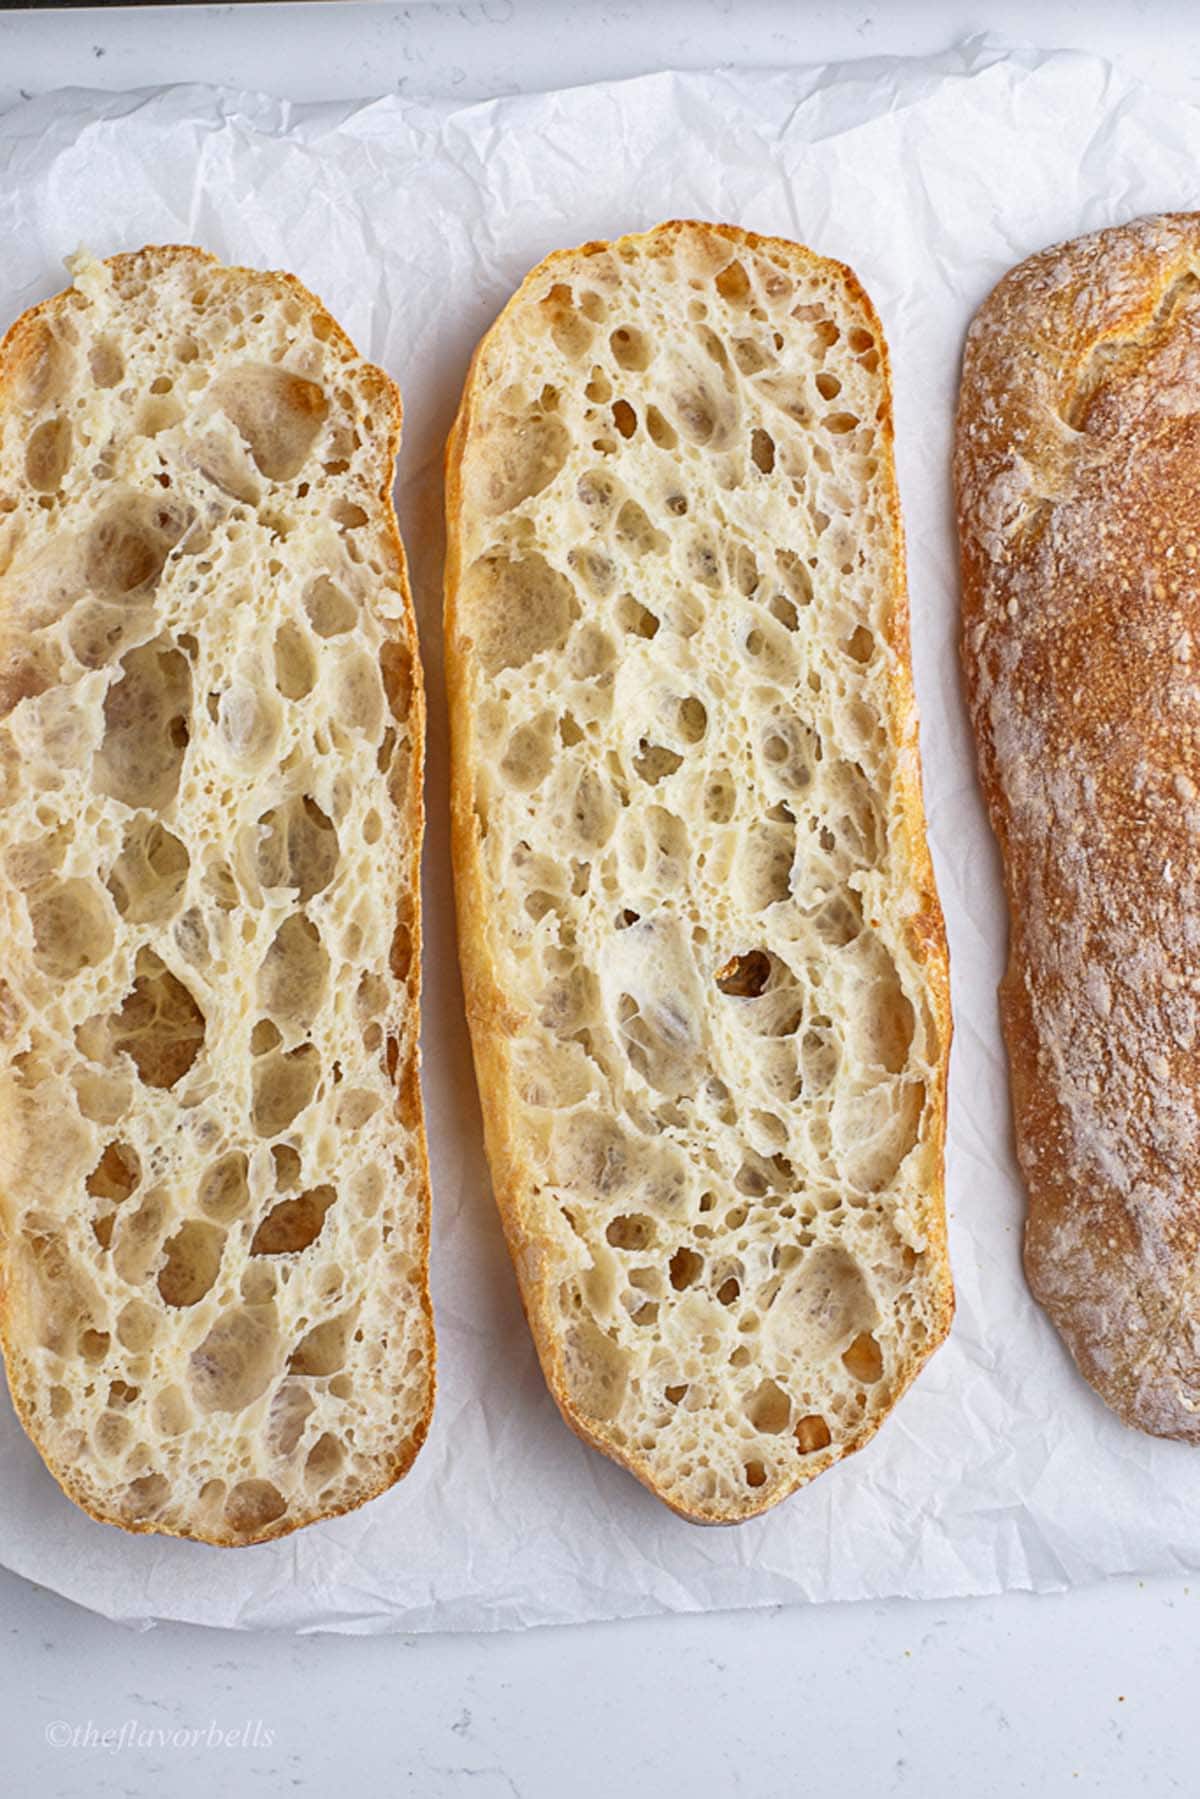
🔪Instructions
Now that we’ve covered the ingredients, let’s dive into how to make ciabatta bread step by step.
Step 1: Prepare the Biga
Make biga the night before baking. Use a digital kitchen scale for precise measurement. This is especially important at such low hydration levels, where even a few grams of water can significantly alter the consistency.
In a small bowl, add the pinch of instant yeast (or active dry yeast) to the room-temperature water. Stir until fully dissolved. If you're using active dry yeast, let it sit for 5 minutes to activate.
Note: Even at such a tiny amount, the yeast will multiply slowly and ferment the dough over many hours.
Now, add it to the bread flour and salt. Using a wooden spoon or your hand, mix until the flour is fully hydrated. The dough will feel firm, slightly crumbly at first, but keep mixing until it comes together into a dense, cohesive mass.
Don’t be tempted to add more water. Biga is meant to be dry and firm.
Cover loosely and let it sit at room temperature overnight (8–12 hours). It should look bubbly and slightly domed by morning. This step is essential for developing deep flavor in your rustic ciabatta.
Step 2: Mix the Dough
In a large bowl, combine the risen biga with additional bread flour, water, and yeast. Use your hand or a sturdy spoon to mix until you get a shaggy, wet dough. Don’t worry—it will be sticky. Let it rest for 15 minutes to autolyse and hydrate the flour fully.
Step 3: Stretch and Fold
Over the next 1 hour, perform four sets of stretches and folds, one every 15 minutes. To do this, dip your hand in water, grab one side of the dough, stretch it upward, and fold it over itself. Rotate the bowl and repeat 3 more times. This strengthens the gluten and helps the dough hold its shape.
Step 4: Bulk Fermentation
Overnight Fermentation
After the last fold, cover the bowl and let the dough ferment for about 1–2 hours or until puffed and seem domed. If your kitchen is cold, this might take longer. The dough should be wobbly and airy, not over-proofed. Now, take it and let it cold retard in the fridge for enhanced flavor development.
For Baking Same Day
Allow the dough to bulk ferment until it doubles in size. It can take 2-2.5 hours.
Step 5: Shaping the Ciabatta
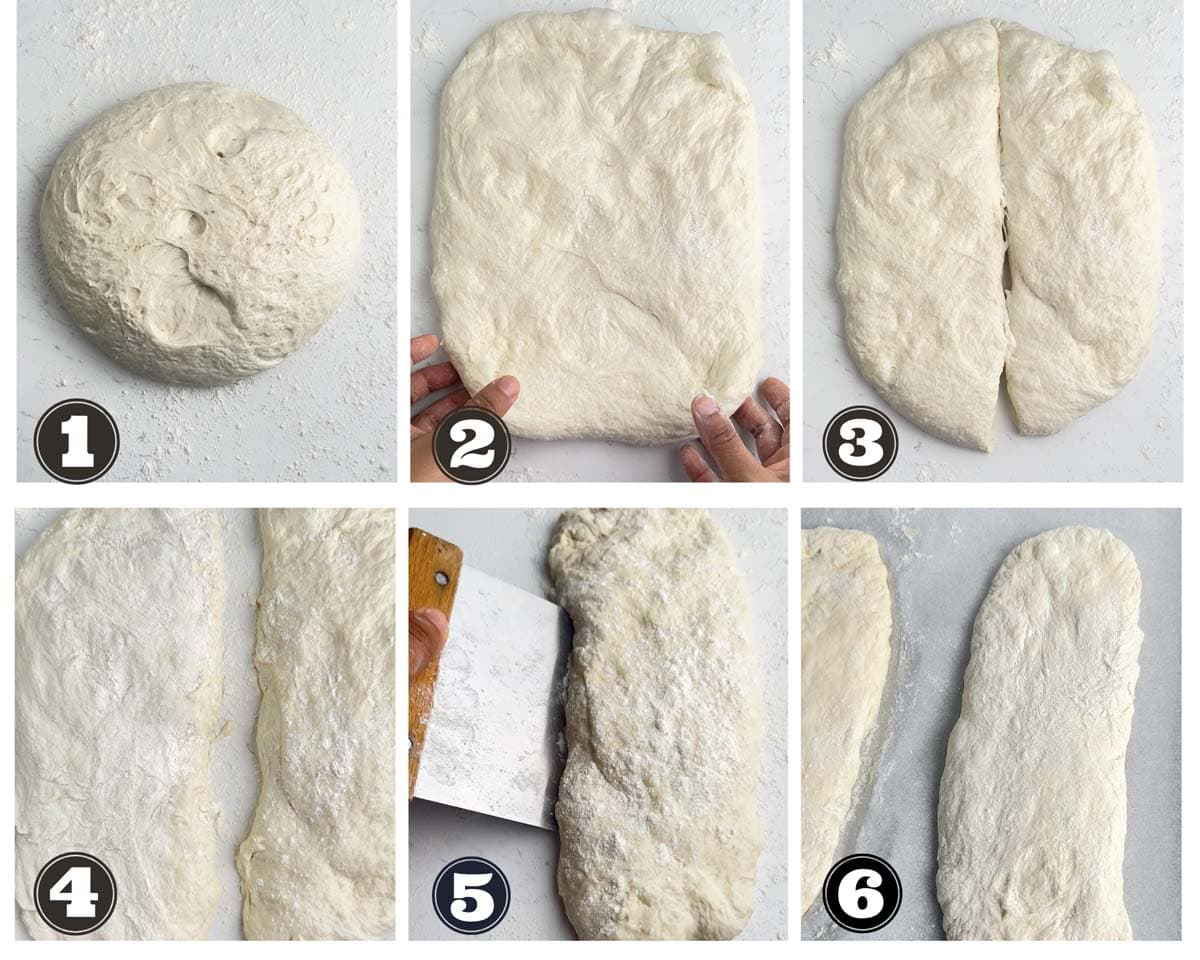
Dust your work surface generously with flour and gently turn out the dough. Be careful not to deflate it. Using a bench scraper, divide the dough into two long rectangles for ciabatta loaves or several smaller portions for ciabatta rolls or buns. Gently shape without working the dough much. Just use a bench scarper to tuck in the edges of the loaf and sprinkle more flour as you go.
Step 6: Final Rise
Gently transfer the dough onto parchment paper and cover with a damp towel. Let it rise for 45–60 minutes until puffy but not over-proofed.
Step 7: Bake
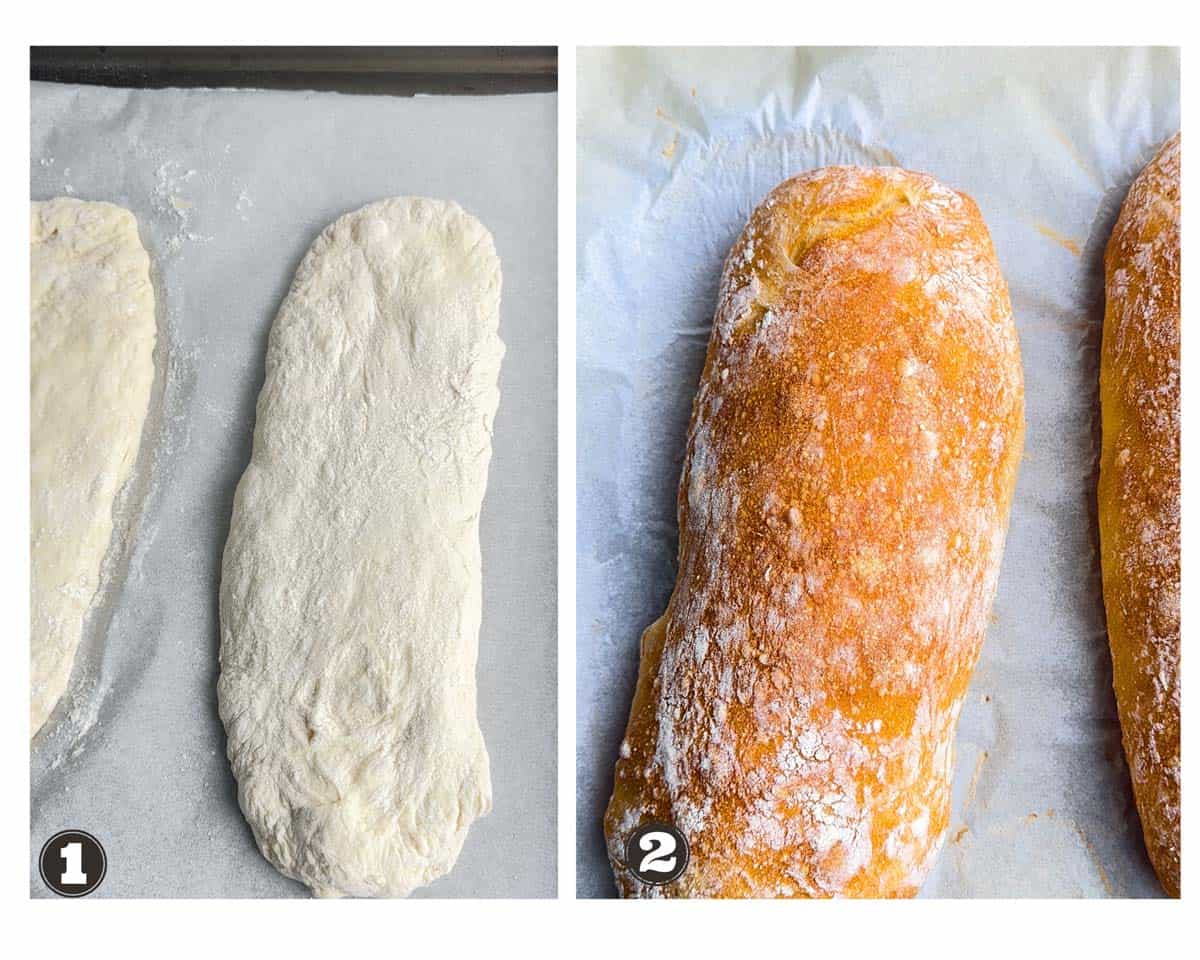
Preheat your oven to 475°F (245°C) with a baking stone or steel if you have one. Slide the parchment with the dough onto the hot surface and create steam using a tray of hot water or spritzing the oven walls. Bake for 20–25 minutes until golden brown and hollow-sounding when tapped.
Let the ciabatta cool completely on a wire rack before slicing. Resist the urge to cut while hot—this bread needs time to set.
📝 Recipe Notes or Tips
This ciabatta bread recipe works wonderfully with a little care and practice. Here are a few useful tips and substitutions:
- The dough is meant to be very sticky and wet. Don’t add more flour unless it's absolutely unworkable.
- If you don't have bread flour, you can use all-purpose flour with a tablespoon of vital wheat gluten added per cup.
- For a deeper flavor, add a spoonful of sourdough starter to your biga (optional).
- If using instant yeast, add it directly to the dough. If using active dry yeast, dissolve it in water first.
- For a gluten-free ciabatta bread recipe, you’ll need a completely different formula—this one relies heavily on gluten development.
- Avoid over-proofing. Watch the dough—don't go strictly by time. Look for a soft, airy rise.
- If your crust is softening after cooling, place the loaf back in the oven for 5 minutes to crisp up.
🔗More Bread Recipes
This ciabatta bread recipe brings together everything you love about homemade ciabatta—crispy crust, soft interior, and that unmistakable artisan feel. Whether you're making ciabatta rolls, buns, or a crusty loaf to pair with a hearty pasta dish, this is one bread recipe you'll come back to again and again. Try it out, and don’t forget to tag me if you share your bakes!
Ciabatta Bread Recipe
Ingredients
Biga/ pre- ferment ingredient
- 100 g bread flour
- 60 g water
- a pinch of yeast
Dough Ingredient
- all of Biga
- 300 g bread flour
- 260 g water
- 2 teaspoon yeast
- 1 teaspoon salt
Instructions
Step 1: Prepare the Biga (Preferment)
- To get that authentic flavor and airy texture of homemade ciabatta bread, start by preparing the biga the night before. Use a digital kitchen scale—accuracy is key when working with 60% hydration.
- In a bowl, combine a pinch of yeast with room temperature water. Stir well to dissolve the yeast. If using active dry yeast, let the mixture sit for 5 minutes to activate.
- Next, add this yeast-water mixture to the bread flour and salt combined in a large mixing bowl. Mix with a wooden spoon or your hand until the dough comes together into a dense, firm mass. It will feel slightly crumbly and dry at first, but don’t add extra water—biga is meant to be stiff.
- Once mixed, cover the bowl loosely and leave the biga to ferment at room temperature for 8–12 hours. By morning, it should look puffed, slightly domed, and have a few bubbles on the surface—your biga is ready to use!
Step 2: Mix the Dough
- In a large mixing bowl, add your risen biga along with the rest of the bread flour, water, and yeast. Mix with your hand or a sturdy spoon until you get a shaggy, sticky dough—this is completely normal.
- Cover the dough and let it rest for 15 minutes to allow the flour to fully hydrate. This autolyse step helps improve dough elasticity and flavor.
Step 3: Stretch and Fold the Dough
- Now it’s time to build structure in this wet dough. Over the next 1 hours, perform 4 sets of stretch and folds, one every 15 minutes.
- Wet your hand to prevent sticking. Grab one side of the dough, stretch it upward, and fold it over itself. Rotate the bowl and repeat on all four sides.
- Each round of folds will help strengthen the gluten, making the dough more elastic and able to hold its shape—essential for this rustic ciabatta recipe.
Step 4: Bulk Fermentation
- 🕒 Option 1: Cold Fermentation (Recommended)
- After the final fold, cover the bowl and let the dough ferment at room temperature for 1–2 hours, or until it looks puffed and wobbly. Then transfer the dough to the refrigerator for an overnight cold retard. This enhances the flavor and results in a better oven spring.
- 🕐 Option 2: Same-Day Baking
- Let the dough rise at room temperature until doubled in size—this typically takes 2 to 2.5 hours, depending on your kitchen's warmth. The dough should be airy and jiggly, not over-proofed.
Step 5: Shape the Ciabatta
- Generously dust your work surface with flour and gently turn the dough out. Handle it carefully to preserve the airy structure.
- Using a bench scraper, divide the dough into two long rectangles for ciabatta loaves or several smaller portions for ciabatta rolls or buns. You don’t need to shape them tightly—just tuck the sides slightly with your scraper and dust with flour as needed.
- Avoid over-handling. The goal is to retain the open crumb by minimizing deflation.
Step 6: Final Proof
- Carefully place the shaped dough onto parchment paper and cover with a damp towel. Let it rise for 45–60 minutes, or until it looks puffy. Be mindful not to overproof—it should feel light and airy, not flat.
Step 7: Bake the Ciabatta
- Preheat your oven to 475°F (245°C). If using a baking stone or steel, place it in the oven to preheat.
- Once the dough has completed its final rise, transfer the parchment (with the dough) directly onto the hot surface.
- For steam, you can place a tray of hot water in the bottom rack, or spritz the oven walls with water just after loading the dough.
- Bake for 20–25 minutes, or until the ciabatta is golden brown, crusty, and sounds hollow when tapped on the bottom.
- Transfer the loaves to a wire rack and let them cool completely before slicing. This helps the crumb set and prevents it from becoming gummy inside.
Notes
- Flour Type Matters: Always use bread flour instead of all-purpose flour. Bread flour has a higher protein content, which helps create the chewy texture and supports the high hydration of ciabatta dough. If you're looking for a substitute, you can mix all-purpose flour with a tablespoon of vital wheat gluten per cup to get closer to the structure of bread flour.
- Don’t Skip the Biga: The biga not only adds complexity of flavor but also improves the dough’s strength. If you forget to prepare it, you can use a quick sponge (equal parts flour and water with a pinch of yeast, fermented for 1–2 hours), but it won’t have the same depth.
- Hydration Is Key: This is a wet dough, and that’s part of what gives ciabatta its signature texture. Don’t panic if it feels too sticky—avoid the urge to add more flour. Use wet hands or a bench scraper to handle the dough instead. Mastering how to work with sticky dough is part of making the best ciabatta bread recipe.
- Fermentation Timing: Depending on room temperature, fermentation times may vary. If your kitchen is cold, proofing can take longer. If it’s too warm, keep a close eye to avoid over-proofing. An over-proofed ciabatta will spread too much and lack oven spring.
- Shape with Care: Ciabatta is known for its rustic look. Don’t stress about perfection. Be gentle during shaping—use a bench scraper to move and divide the dough without degassing it. If you want ciabatta rolls or ciabatta buns, just cut smaller portions and follow the same process.
- Parchment Paper Is Your Friend: Transferring high-hydration dough to the oven can be tricky. Always proof and bake on parchment paper to keep things manageable. It prevents sticking and makes transferring the dough much easier.
- Crust Not Crispy Enough? Try baking the bread directly on a preheated baking stone or steel and add steam to your oven. You can do this by placing a pan of hot water on the lower rack or spraying the oven walls right after loading the dough. This mimics a professional steam-injected oven.
- Substituting Yeast: If you prefer a more natural rise, you can adapt this into a sourdough ciabatta bread recipe by replacing the commercial yeast with sourdough starter. Fermentation and proofing times will be longer, and you may need to tweak the hydration slightly to match your starter’s consistency.
- Troubleshooting Flat Loaves: If your ciabatta turns out flat, the dough may have over-proofed or been over-handled. Stick to the suggested proofing time, and be extra gentle when shaping. Also, make sure your oven is fully preheated to ensure a good rise.
Nutrition
🫙🔥 Storage and Reheating Instructions
Store the cooled ciabatta bread in a bread basket or paper bag at room temperature for up to 2 days. Avoid sealing in plastic unless you want a softer crust. For longer storage, wrap tightly and freeze for up to 2 months.
To reheat, thaw (if frozen), then warm in a 350°F oven for 10–12 minutes to revive that crispy crust. Perfect for making a ciabatta sandwich recipe or pairing with a dipping oil for bread recipe.
❓Frequently Asked Questions
While both breads are similar in shape and hydration, sourdough ciabatta bread recipes use a sourdough starter as the leavening agent, whereas this one uses commercial yeast. Sourdough versions often take longer to ferment and develop a more tangy flavor. That said, if you’re already comfortable working with wild yeast, you can absolutely adapt this homemade ciabatta bread to include a sourdough starter—just adjust rise times accordingly. The flavor will be more complex and the texture slightly denser.
Ciabatta dough is known for being sticky and wet—that’s what creates the open crumb and airy texture. If your dough feels unmanageable, wet your hands instead of flouring them. Avoid adding more flour unless necessary, as it will toughen the bread. Use a bench scraper on a well-floured surface to move and shape the dough. This is especially helpful for first-time bakers dealing with high-hydration doughs.




Leave a Reply