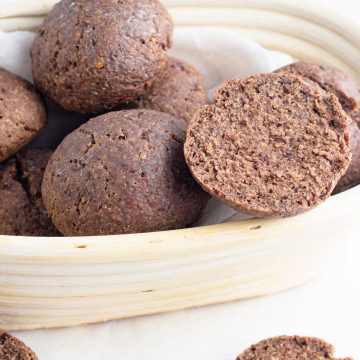
Looking for a soft, fluffy, and nutritious gluten-free bun recipe? These Oats and Millets Gluten-Free Buns are the perfect blend of wholesome oat flour, protein-rich finger millet (ragi), and tapioca starch for a light, airy texture. Whether you need a healthy bread alternative or a delicious gluten-free option for burgers and sandwiches, these buns are easy to make and packed with fiber, making them perfect for a balanced diet.

In this recipe, I have used simple ingredients. If you like such recipes, you can find more interesting bread recipes here.
Jump to:
❓Why You’ll Love This Recipe
- Gluten-Free & Nutrient-Rich – Oats and millet provide fiber, protein, and essential minerals.
- Soft, filling and delicious – Thanks to psyllium husk and tapioca starch, these buns hold their shape and stay soft.
- Easy to Make – No complicated steps, just mix, proof, and bake!
- Perfect for Burgers & Sandwiches – Holds up well to fillings without falling apart.
Ingredient Notes & Substitutions
Understanding your ingredients is key to making delicious oats and millets gluten-free buns. Here’s a breakdown of ingredient availability, sourcing, and substitutes to help you customize this recipe.

Oats Flour
- Why It’s Used: Adds a mild sweetness and soft texture while providing a lot of fiber and nutrients.
- Substitutes: Sorghum flour or brown rice flour can be used, but the texture may slightly change.
- Availability: Easily available in most grocery stores or can be made at home by grinding gluten-free rolled oats.
Finger Millet Flour (Ragi Flour)
- Why It’s Used: Provides structure, protein, and a deep, slightly nutty flavor.
- Substitutes: If unavailable, replace it with sorghum flour, buckwheat flour, or teff flour.
- Availability: Common in Indian grocery stores or online retailers.
Flax Meal
- Why It’s Used: Helps with moisture retention and acts as a natural binder.
- Substitutes: Chia seed meal can work as an alternative.
- Availability: Found in health food sections of grocery stores or online.
Tapioca Starch
- Why It’s Used: Adds elasticity and helps improve the chewiness of the buns.
- Substitutes: Arrowroot starch or potato starch can be used, though results may vary slightly.
- Availability: Available in most supermarkets or Asian grocery stores.
Instant Yeast
- Why It’s Used: Leavens the buns and helps them rise.
- Substitutes: Active dry yeast can be used but needs to be proofed separately before mixing.
- Availability: Found in baking aisles of supermarkets.

Sugar
- Why It’s Used: Feeds the yeast and enhances flavor.
- Substitutes: Honey, maple syrup, or coconut sugar can be used in small amounts.
- Availability: Easily available in any grocery store.
Psyllium Husk
- Why It’s Used: Acts as a binder and improves the dough’s elasticity, replacing gluten.
- Substitutes: Xanthan gum (½ teaspoon per 1 tablespoon of psyllium) or ground flaxseed (though it won’t provide the same structure).
- Availability: Found in health food stores and online.
Olive Oil
- Why It’s Used: Adds moisture and richness to the buns.
- Substitutes: Any neutral oil (avocado oil, melted coconut oil, or vegetable oil).
- Availability: Easily found in grocery stores.
Warm Water & Warm Milk
- Why It’s Used: Warm liquids help hydrate the finger millet flour, which absorbs liquid slower than wheat flour. This also activates the yeast for a better rise.
- Substitutes: For a dairy-free version, replace warm milk with almond milk, soy milk, or coconut milk.
Step by Step Instructions?
1. Prep Before kneading the dough

Before we start kneading the dough for our oats and millets gluten free buns, there are a couple of quick prep steps to ensure the best texture. First, soak the flax meal in ¼ cup of water and let it sit for about five minutes—it should turn thick and slightly slimy, which will act as a natural binder for the dough.
At the same time, dissolve the psyllium husk in the measured warm water (about one cup). Within a minute or so, it will thicken into a gel-like consistency, helping to improve the dough’s elasticity. Once both mixtures are ready, we can move on to making the dough!
2. Making Dough
In a large mixing bowl, whisk together the oat flour, ragi flour, tapioca starch, instant yeast, sugar, and salt. Using a whisk ensures that all the dry ingredients are well combined and evenly distributed.

Next, pour in the flax meal mixture, the thickened psyllium husk solution, and olive oil. Using a dough whisk or the back of a wooden spoon, stir everything together until it starts forming a sticky dough. At this stage, it might seem a bit messy, but that’s completely normal.
Now, wet your hands lightly and start bringing the dough together by hand. Work it gently until all the flour is hydrated, and there are no dry patches left. Once it comes together into a soft, slightly tacky dough, shape it into a round ball and place it in a greased bowl.
This step ensures that the dough remains moist and doesn’t dry out while resting. Now, we’re all set for the next step—letting the dough rise!
3. First Rise
Once the dough is ready, it’s time for the first rise. Cover the bowl with a damp kitchen towel and let it rest in a warm spot for about an hour, or until the dough doubles in size. This step is crucial for developing a light and airy texture, so be patient and let the yeast do its magic.
4. Shape the Buns

Once the dough has risen, it's time to shape the buns! Transfer the dough to a lightly floured surface and divide it into 11 equal portions—if you want to be precise, each should weigh about 87 grams. Roll each portion into a smooth ball and place them on a parchment-lined baking sheet, making sure to leave some space between them for expansion.
5. Second Rise
Now, let’s give them a second rise. Cover the shaped buns with a towel and let them rest for another 30 to 40 minutes. This additional proofing allows them to become even softer and fluffier when baked. Meanwhile, preheat your oven to 375°F (190°C) so it’s ready when the buns have fully risen.
6. Bake
Once they look nice and puffy, pop the tray into the oven and bake for about 25 to 30 minutes, or until the tops turn a beautiful golden brown. Your kitchen will be filled with the warm, nutty aroma of oats and ragi flour—pure bliss! After baking, transfer the buns to a wire rack and let them cool for at least 10 minutes before slicing. This helps set the texture and makes them easier to handle. Now, they’re ready to enjoy—perfect for sandwiches, burgers, or just slathered with butter!

💭Pro Tips for Perfect Gluten-Free Buns
- Measure your ingredients accurately – Use a kitchen scale for the best result.
- Psyllium husk helps with structure – Don’t skip it!
- For extra softness, brush the buns with melted butter or olive oil after baking.
- Make them vegan – Use dairy-free milk and maple syrup instead of sugar.
Variations & Additions
- Seeded Buns – Sprinkle sesame or flax seeds on top before baking.
- Herb-Infused – Add dried rosemary or oregano for extra flavor.
- Sweeter Buns – Increase sugar to 25g for a slightly sweet bun.
🫙Storage & Freezing
- Room Temperature: Store in an airtight container for up to 3 days.
- Freezing: Wrap individually and freeze for up to 3 months. Reheat in the oven at 350°F (175°C) for 5-7 minutes.
🍽How to serve
Followings are a few suggestions to serve oats and millets gluten-free buns:
🥑 Avocado Toast: Spread mashed avocado on top.
🍔 Gluten-Free Burgers: Use these as a base for a juicy veggie or bean burger patty.
🥪 Sandwich Buns: Fill with hummus, veggies, and cheese for a hearty meal.

❓Frequently Asked Questions (FAQs)
Yes! You can substitute baking powder (1½ tsp) and baking soda (½ tsp) for yeast. The texture will be slightly different but still delicious.
There are a few possible reasons your buns may have turned out dense:
* Not Enough Liquid: The texture of oat flour determines how much water it absorbs. Finer oat flour requires less water, while coarser flour absorbs more. Your dough should start off very sticky—this is normal. As the flour absorbs water, it will become more manageable. If your dough feels too easy to handle from the start, try adding a little more water.
* Insufficient Rising Time: If the dough hasn’t risen fully, the buns may not be light and airy. Be patient and allow the dough to double in size.
* Inactive Yeast: Old or inactive yeast won’t create the necessary rise. Always check that your yeast is fresh and active before using it.
By ensuring the right hydration, proper proofing time, and active yeast, you’ll get soft, fluffy buns every time!
Yes, you can use sorghum flour or buckwheat flour, but the texture and taste will slightly vary.
🔗Suggested Bread Recipes
- Homemade Mini Hot Dog Buns
- Homemade Coconut Buns
- Chocolate buns
- Potato Hamburger Buns
- Challah Buns | Vegan Challah Rolls
- Coffee Buns ( Eggless Mexican Bun Recipe)
- Rye sourdough Bread Recipe

These Gluten-Free Oats and Millet Buns are a game-changer if you’re looking for a wholesome, nutritious, and soft gluten-free bread option. Whether you enjoy them for breakfast, lunch, or dinner, they are easy to make and incredibly delicious!
👉 Tried this recipe? Let me know in the comments below! Don't forget to share and pin this post for later.
Gluten free Oats and millet buns
Ingredients
- 120 g Oats flour ≈ 1 cup
- 180 g Finger millet flour (ragi flour ≈ 1½ cups)
- 14 g Flax meal 2 tbsp
- 65 g Tapioca starch ½ cup
- 4 g Instant yeast 1 ¼ tsp
- 16 g Sugar 1 tbsp
- 5 g Psyllium husk 1 tbsp
- 24 g Olive oil 2 tbsp
- 230 g Warm water ≈ 1 cup
- 70 g Warm milk ≈ ¼ cup + 1 tbsp
Instructions
Prep Before Kneading
- Soak flax meal in ¼ cup of water for 5 minutes until thick and slimy (acts as a natural binder).
- Dissolve psyllium husk in 1 cup of warm water; it will form a gel-like consistency (improves dough elasticity).
Making the Dough
- In a large mixing bowl, whisk together oat flour, ragi flour, tapioca starch, instant yeast, sugar, and salt for even distribution.
- Add flax meal mixture, psyllium husk gel, and olive oil.
- Mix with a dough whisk or wooden spoon until a sticky dough forms.
- Wet hands and gently bring the dough together, ensuring all flour is hydrated.
- Shape into a round ball and place in a greased bowl to prevent drying.
First Rise
- Cover the bowl with a damp towel and let the dough rise in a warm place for about 1 hour, or until doubled in size.
Shape the Buns
- Transfer the risen dough to a lightly floured surface.
- Divide into 11 equal portions (about 87g each).
- Roll each portion into a smooth ball and place on a parchment-lined baking sheet, leaving space for expansion.
Second Rise
- Cover shaped buns with a towel and let them rise for another 30-40 minutes.
- Preheat the oven to 375°F (190°C) while waiting.
Bake
- Once buns are puffy, bake for 25-30 minutes until golden brown.
- Transfer to a wire rack and let cool for 10 minutes before slicing.
- Enjoy warm with butter, or use for sandwiches and burgers!
Notes
- Measure your ingredients accurately – Use a kitchen scale for the best result.
- Psyllium husk helps with structure – Don’t skip it!
- For extra softness, brush the buns with melted butter or olive oil after baking.
- Make them vegan – Use dairy-free milk and maple syrup instead of sugar.
📋Nutrition Facts


Leave a Reply