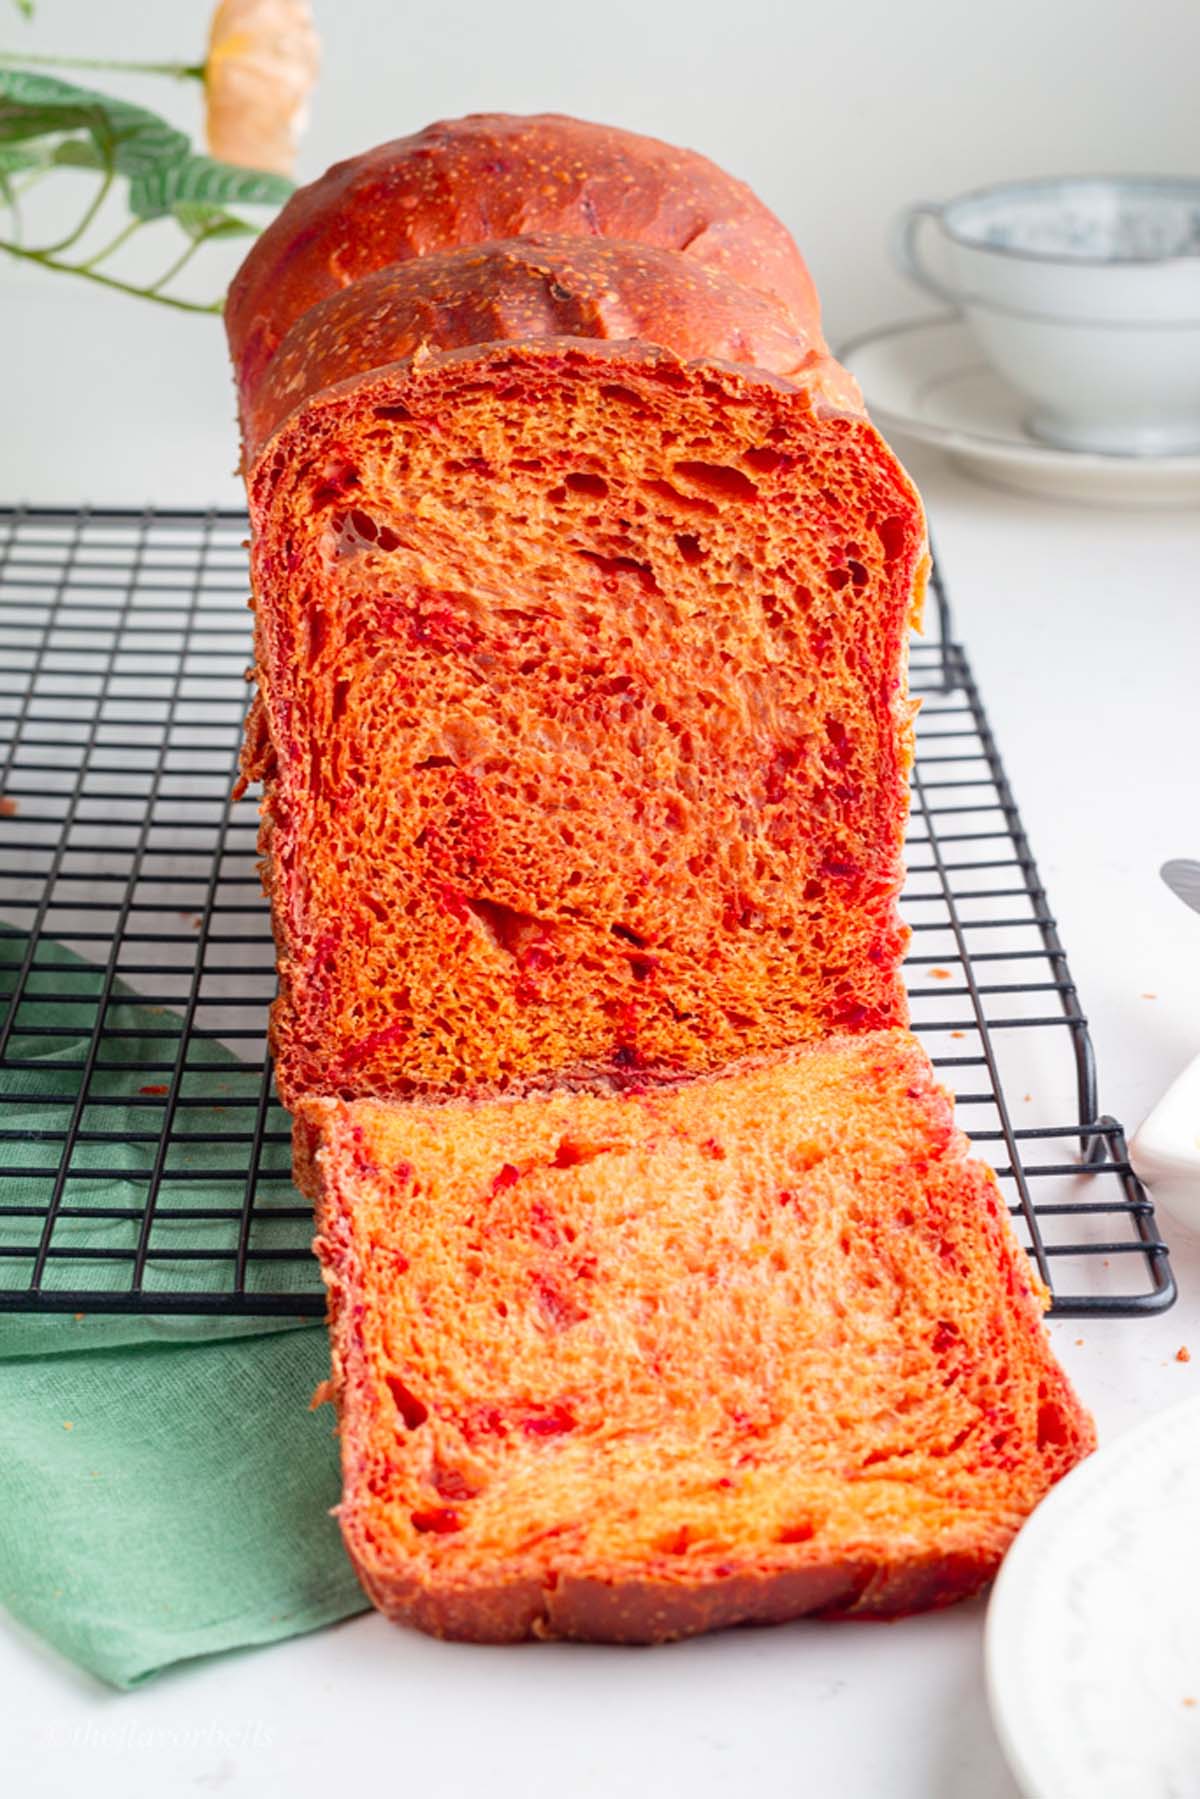
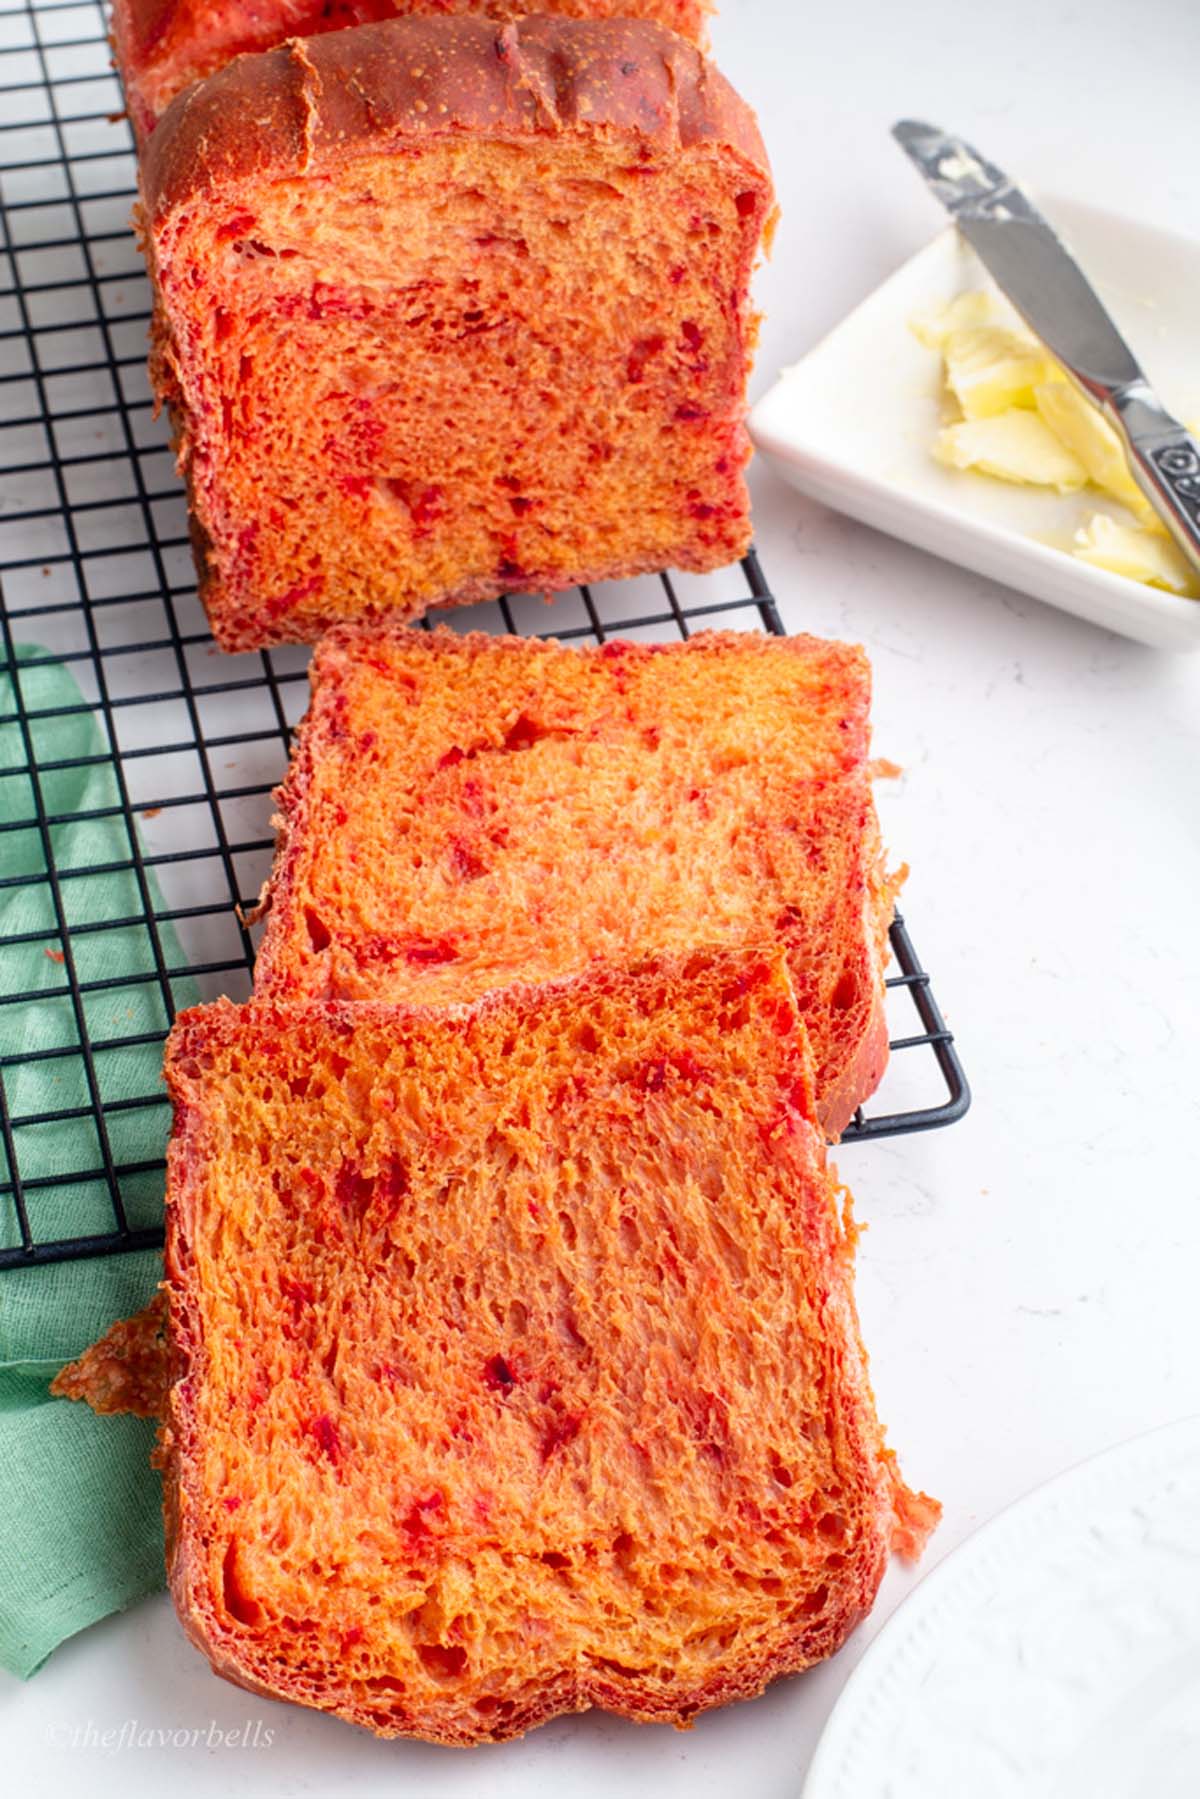
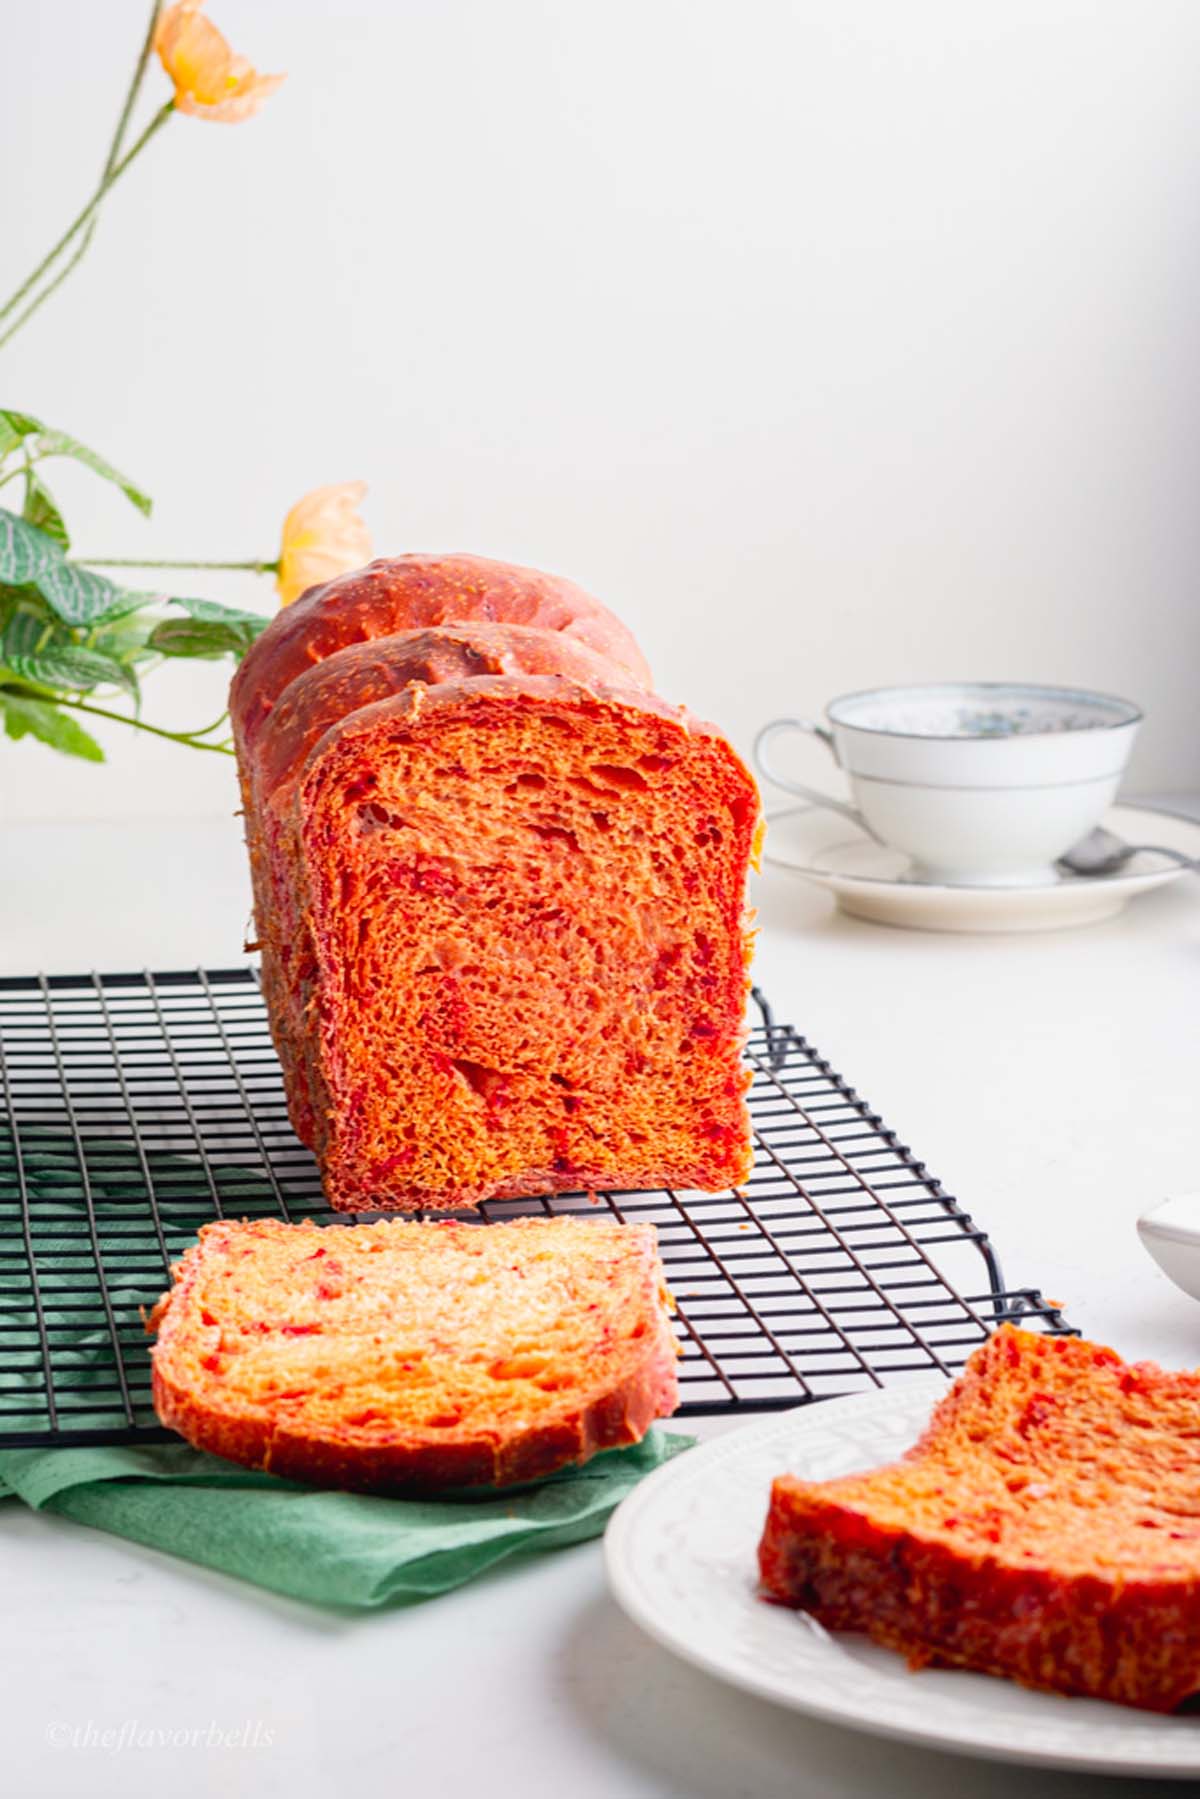
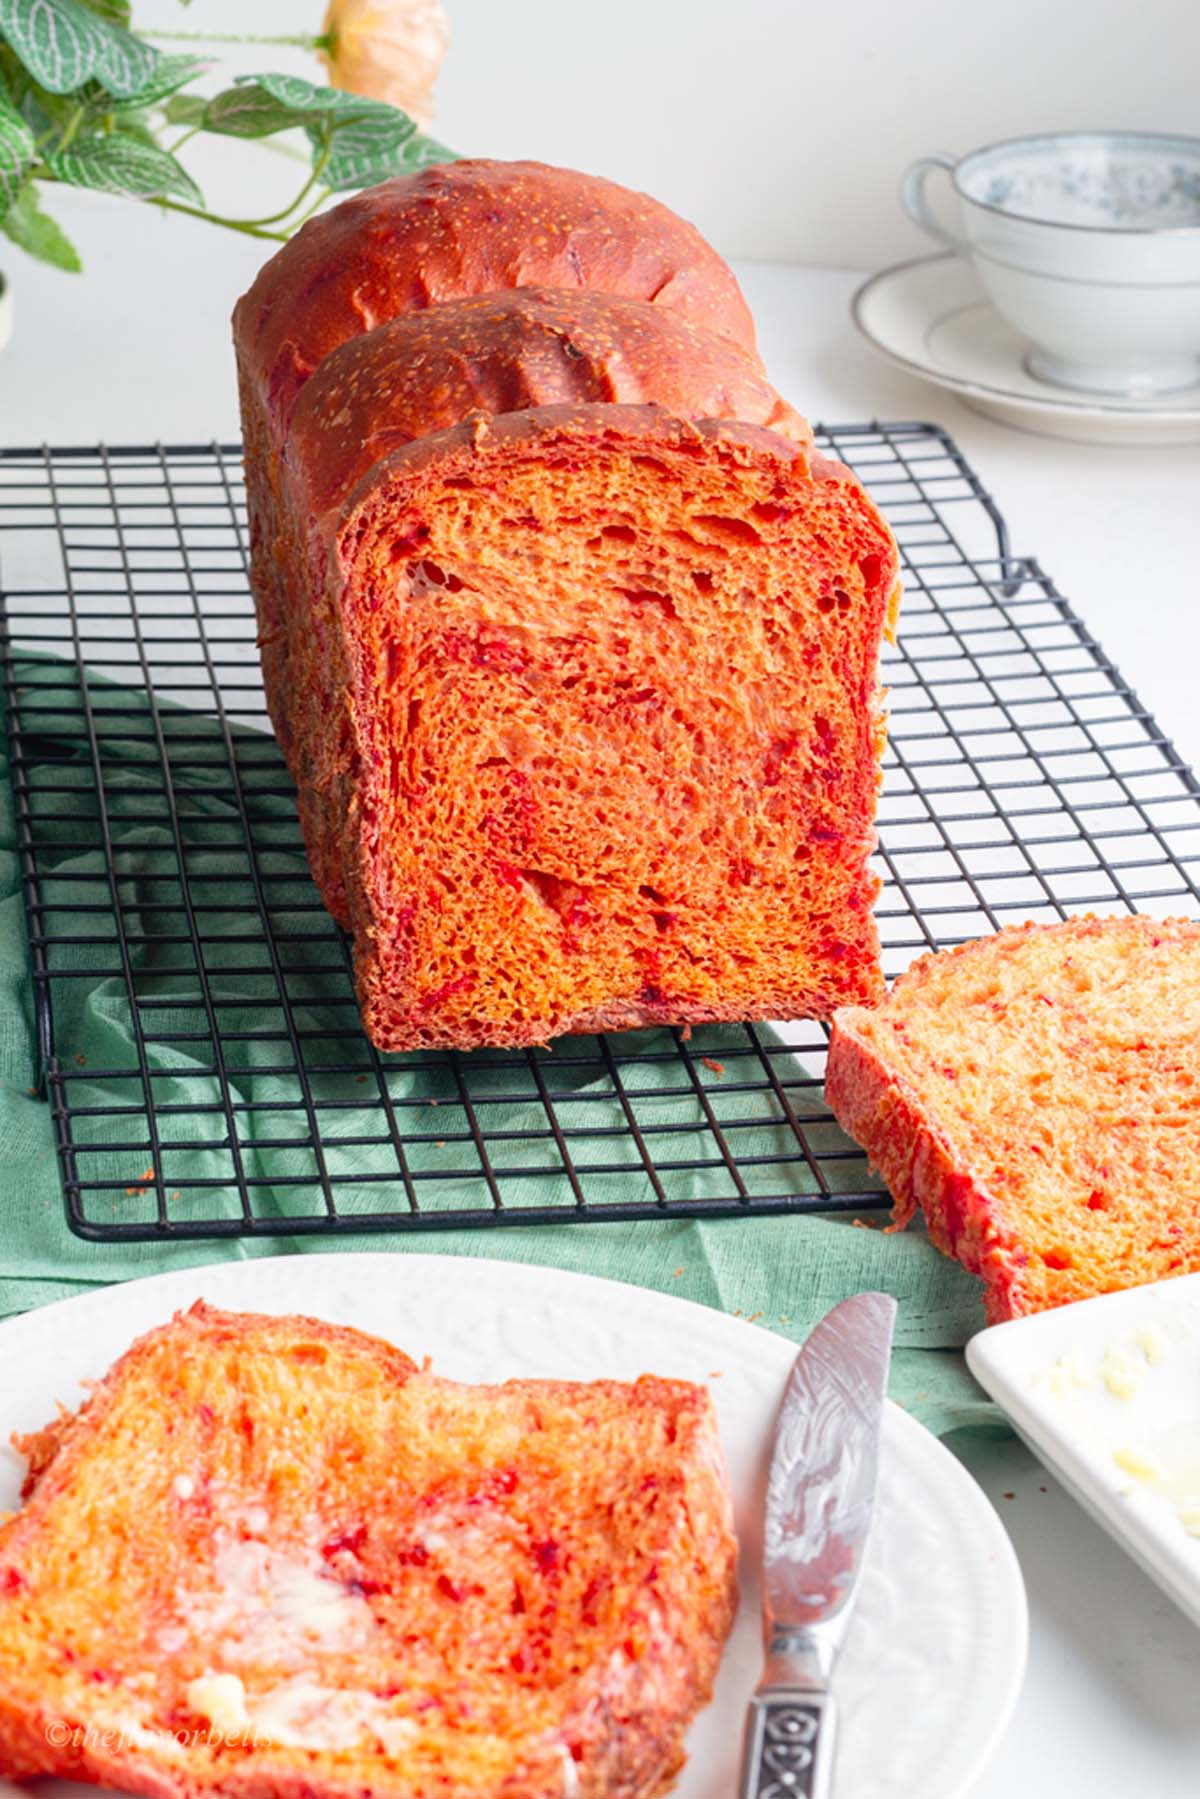
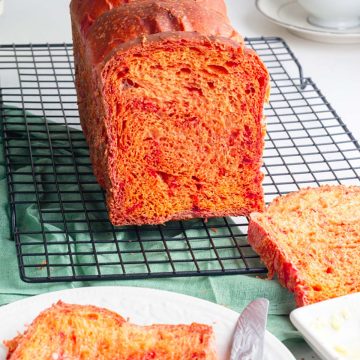
With its naturally vibrant orangish-pink hue and subtle earthy sweetness, this beet root bread is not only visually stunning but also packed with nutrients. The addition of beetroot keeps the bread loaf soft and moist while adding a mild, slightly nutty flavor that pairs perfectly with both sweet and savory toppings.
Whether you're a home baker experimenting with new ingredients or someone who loves colorful, wholesome foods, this beetroot bread recipe is sure to impress. Plus, it’s an easy way to sneak in extra veggies into your diet—without compromising on taste!
Jump to:
👩🏽🍳Why Should You Try This Beet Bread Recipe?
Beetroot bread isn’t just about its striking color—it’s packed with benefits that make it a great addition to your baking repertoire. Here’s why you should give this recipe a try:
- Naturally Moist & Soft – Beets add extra moisture to the dough, resulting in a tender and fluffy crumb that stays fresh for longer.
- Nutrient-Rich – Beetroots are a powerhouse of vitamins and minerals, including folate, fiber, and antioxidants, making this bread a more nutritious choice.
- Mild Sweetness & Earthy Flavor – The natural sugars in beets provide a subtle sweetness, perfectly balancing the hearty taste of the bread.
- No Artificial Colors Needed – If you love colorful food, this bread naturally boasts a vibrant pink or reddish hue, without the need for synthetic food dyes.
- Versatile & Unique – Whether served with butter and honey, paired with cheeses, or used for sandwiches, beetroot bread adds a delicious twist to any meal. This recipe is very neutral sandwich bread but you can easily make it sweet beet bread or a savory beet bread by adding additives of your choice.
With its perfect blend of taste, texture, and health benefits, this beetroot bread is a must-try for both home bakers and adventurous food lovers!
🧂Ingredient Notes & Substitutions
- Beetroot Preparation – This beet bread recipe uses fresh grated beetroot, which provides natural moisture and vibrant color. If you prefer a smoother texture, you can puree the beetroot after steaming or roasting it. Roasted beets bring out a deeper sweetness, while steamed beets retain more of their natural earthiness.
- Flour Options – The recipe calls for all-purpose flour, but you can substitute bread flour for a chewier texture or use a mix of whole wheat and all-purpose flour (50:50) for added fiber. Keep in mind that whole wheat flour absorbs more liquid, so you may need to adjust hydration slightly.
- Milk Alternatives – Whole milk helps create a soft and tender crumb, but you can substitute plant-based milk (such as almond or oat milk) for a dairy-free version. If using non-dairy milk, opt for unsweetened varieties to maintain the vegan beet root bread’s intended flavor.
- Yeast Choices – Instant yeast is used for convenience, as it doesn’t require activation. However, if using active dry yeast, dissolve it in warm milk with a pinch of sugar and let it sit for 5-10 minutes until foamy before adding it to the dough. You can also adapt this recipe to make beetroot sourdough bread recipe by using 20 percent sourdough starter as the leavener.
- Sweetener Variations – Regular white sugar enhances fermentation, but you can substitute honey, maple syrup, or coconut sugar for a more natural alternative. Keep in mind that liquid sweeteners may slightly affect hydration levels.
- Fat Source – Butter adds richness and flavor, while oil (such as olive oil or vegetable oil) gives the bread a softer texture. You can use either depending on your preference. Coconut oil can also be used for a subtle sweetness.
By understanding these ingredient options, you can tweak this beet root bread recipe to fit your dietary preferences or ingredient availability without compromising taste and texture!
🔪 How to Make Beetroot Bread: Detailed Instruction
Step 1: Combine Dough Ingredients
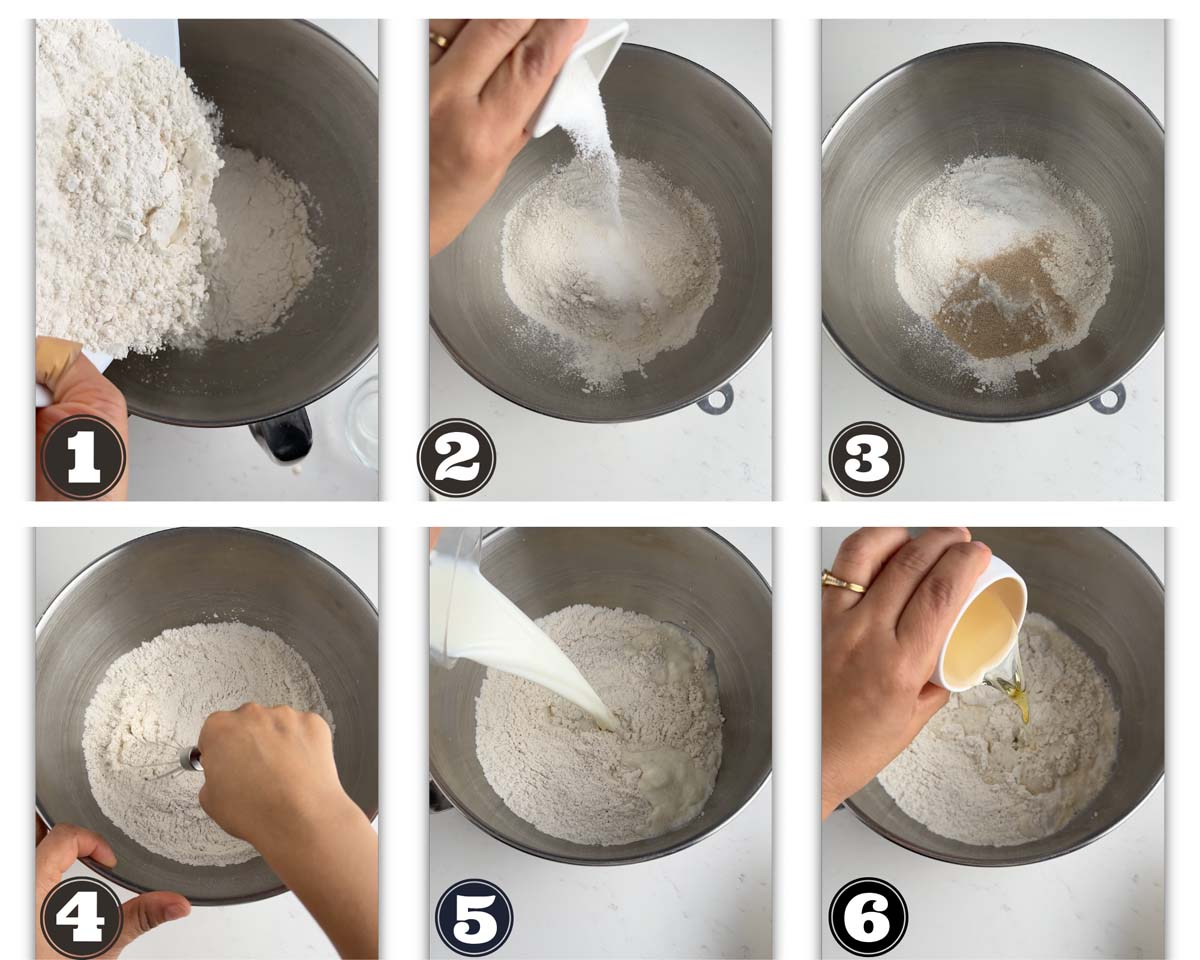
Start by whisking together the flour, salt, sugar, and instant yeast in a large mixing bowl or the bowl of a stand mixer. This ensures the dry ingredients are evenly distributed before adding the wet ingredients. Next, pour in the warm milk (68°F (20°C) -77°F (25°C)) and oil. If kneading with hands, use a dough whisk or back of ladle to combine dough until a shaggy mass is formed.
At this point, the dough might seem a little dry, but don't worry—that's normal! The beetroot will add extra moisture as it's incorporated in the next step.
Step 2: Kneading the Dough
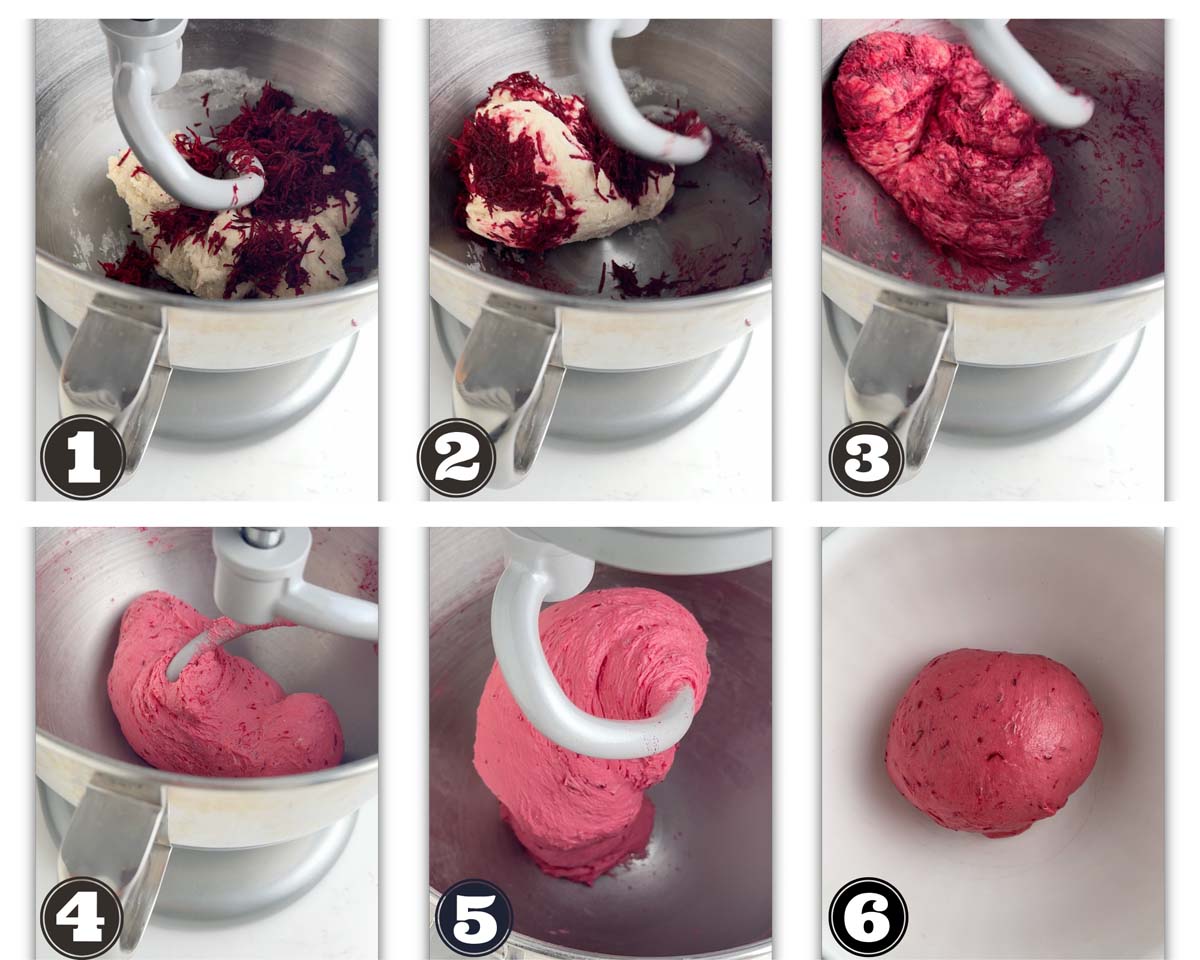
If using a stand mixer, place the bowl on the stand mixer with the dough hook attachment and start kneading at low speed (1) for about 5 minutes until the ingredients come together into a rough dough. Then, increase the speed to 2-3 on a KitchenAid mixer and gradually add the grated beetroot. Knead for a good 12-15 minutes until the dough becomes smooth, elastic, and starts to pull away from the sides and base of the bowl. The beetroot will make the dough feel sticky at first, but as you continue kneading, it will become more manageable.
If kneading by hand, be prepared for a bit of a workout! Knead for about 10-12 minutes, pressing and folding the dough while gradually incorporating the beetroot. The extra moisture from the beetroot can make hand-kneading tricky, so using a stand mixer or bread machine is highly recommended for an even texture. If kneading by hand, take short breaks to let the dough rest, which will make it easier to handle. To perfectly knead the dough with hands, you will need about 30-35 minutes of work.
Step 3: Bulk Fermentation
Once the dough is smooth and elastic, transfer it to a lightly greased bowl, cover it with a damp towel or plastic wrap, and let it rise in a warm spot for about 60-90 minutes, or until doubled in size. If your kitchen is cooler, this might take a little longer. The dough should feel soft and airy when ready for the next step. Also if you are leavening it with dry yeast, it will take slightly longer.
Step 4: Shaping the beet dough
First prepare a loaf pan by greasing all the sides or lining with parchment paper. I have used an 8x4x4 inch pullman loaf pan, but anything around 8-9 inch loaf tin will work just fine.
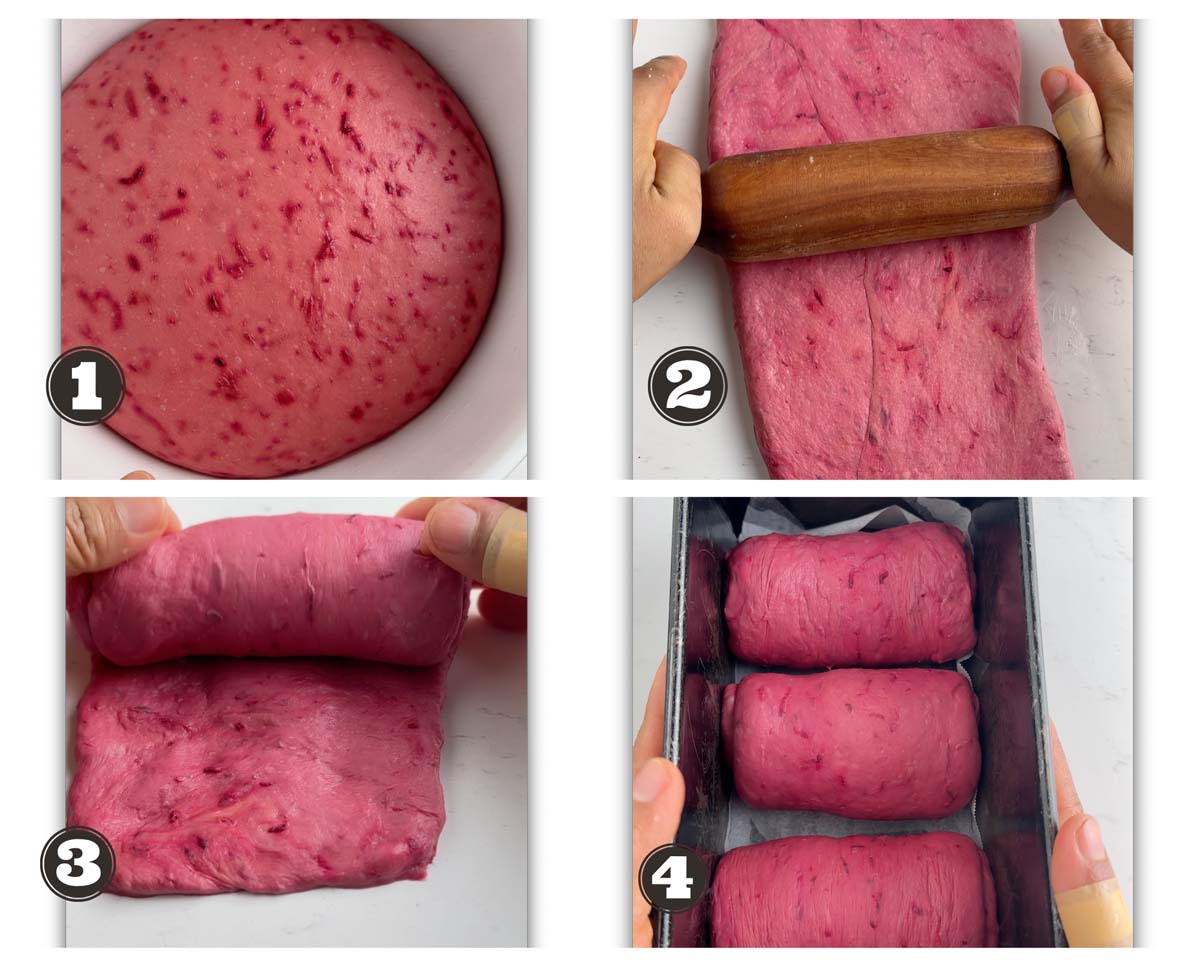
After the first rise, gently deflate the dough and divide it into three equal portions. Roll each portion into a dough strip of even thickness. Then roll it into a smooth and tight ball. then place them side by side in a greased loaf pan. This shaping method creates a lovely, pull-apart loaf structure once baked.
Step 5: Second Rise
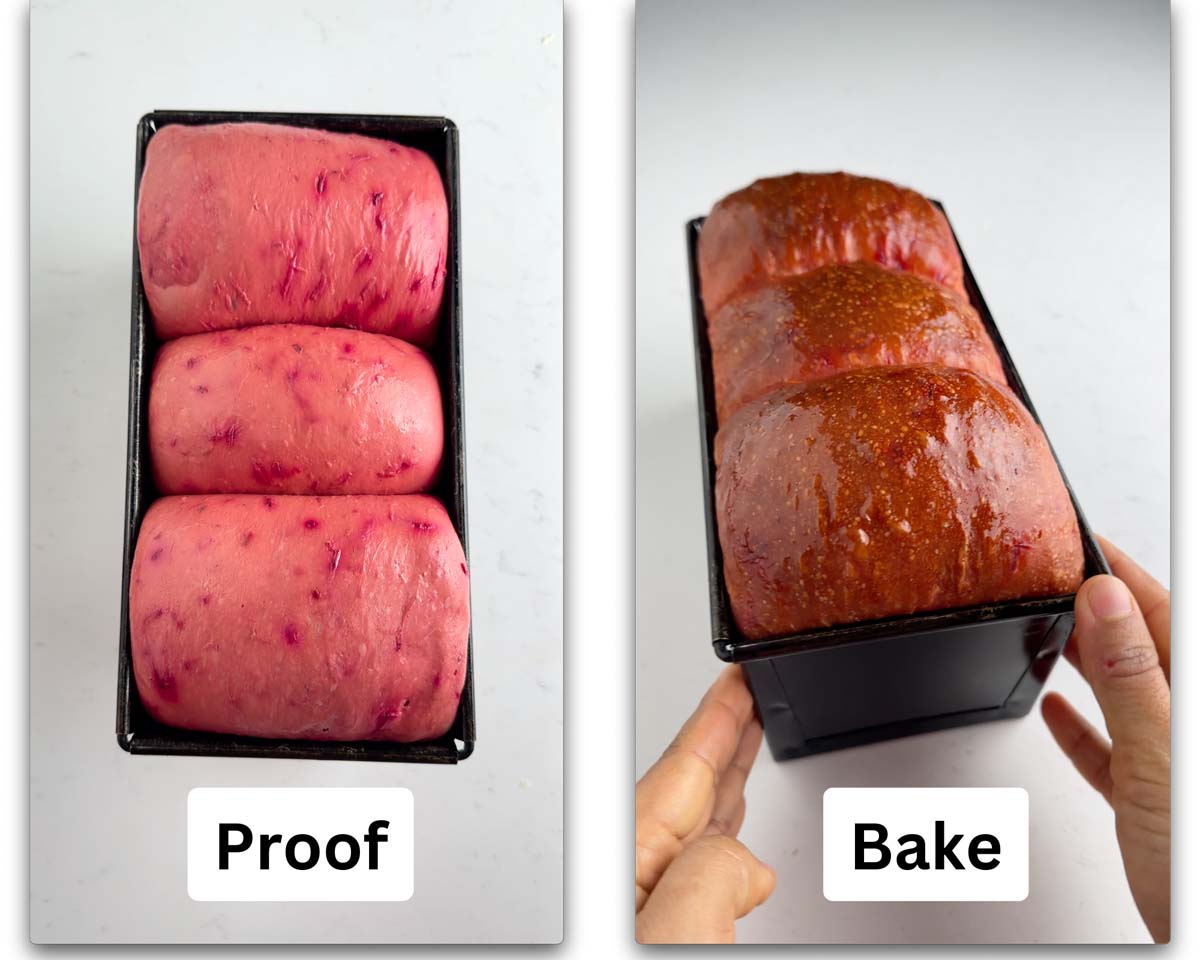
Cover the shaped dough again with a towel or plastic wrap and let it proof for another 45-60 minutes until it puffs up and nearly doubles in size. I know that the loaf is ready to go in the oven when it has risen about at inch above the rim of the loaf pan.
This step ensures a light and airy texture in the final loaf, so don’t rush it!
Step 6: Baking the beet root bread
Preheat your oven to 380°F (193°C) while the dough completes its second rise. This ensures the oven is at the right temperature when your bread is ready to bake, which is crucial for achieving a good rise and even baking.
Before placing the loaf in the oven, I like to give the proofed dough a generous spray of water. This helps keep the surface moist during the initial baking phase, preventing the crust from forming too quickly and allowing the bread to expand properly.
Additionally, for even better oven spring, place an empty baking pan or oven-safe dish on the bottom rack while preheating. As soon as you put the bread in the oven, carefully pour about 1 cup of hot water into this preheated pan. The steam created will increase humidity inside the oven, keeping the crust softer for longer and encouraging a higher rise, resulting in a beautifully domed and well-structured loaf.
Bake the bread made with beet roots for 22-25 minutes, or until the top is a deep golden brown and the loaf sounds hollow when tapped. For a shinier crust, you can brush the top of the beet root bread with melted butter right after baking. Let the bread cool in the pan for about 10 minutes, then transfer it to a wire rack to cool completely before slicing. Enjoy your beautifully vibrant, soft, and flavorful beetroot bread!
📝 Recipe Notes & Troubleshooting
- Dough Stickiness – Due to the moisture content in beetroot, the dough may feel sticky at first. Avoid adding too much extra flour, as this can make the bread dense. Instead, knead longer to allow gluten to develop, and use lightly oiled hands if handling the dough becomes tricky.
- Beetroot Variations – This recipe uses grated raw beetroot, but you can also use roasted or boiled beets or steamed beetroot for a smoother texture. You just need to Puree the beets in the food processor. Keep in mind that pureed beetroot may require a slight flour adjustment if the dough feels too wet.
- Flour Substitutes – All-purpose flour gives a soft texture, but for a chewier loaf, use bread flour. If you prefer a heartier bread, you can replace up to 50% of the flour with whole wheat flour, but you may need to increase the hydration slightly.
- Yeast Activation – If using active dry yeast instead of instant yeast, activate it first by dissolving it in warm milk with a pinch of sugar for 5-10 minutes until frothy before adding it to the dough.
- Second Rise Timing – Avoid over-proofing the dough during the second rise. If the dough rises too much, it may collapse in the oven instead of getting a good oven spring. To check if it’s ready, gently press the dough with your fingertip—if it springs back slowly, it's proofed just right.
- Oven Spring & Steaming – For a better rise in the oven, use steam. Spraying the dough with water before baking and adding a pan of hot water to the oven helps create steam, which keeps the crust softer for longer and allows the bread to expand properly.
🫙 Storage
Since beetroot bread has a high moisture content, it tends to have a shorter shelf life compared to regular bread. To enjoy it at its best, aim to consume it within 3 days. Here’s how to store and reheat it properly:
Short-Term Storage (Up to 3 Days)
Keep the bread at room temperature in an airtight container or wrapped in a clean kitchen towel inside a bread box. This helps retain moisture while preventing the crust from becoming too soft. Avoid storing it in the fridge, as refrigeration can dry out the bread and alter its texture.
Freezing for Longer Storage
If you don’t plan to finish the loaf within 3 days, freezing is the best option. To freeze:
- Slice the beet root bread before freezing so you can easily take out individual slices as needed.
- Wrap each slice (or the whole loaf) in plastic wrap and then place it in a zip-top freezer bag or airtight container.
- Label with the date and freeze for up to 2 months.
🔥 Reheating Instructions
To bring your beetroot bread back to life:
- For Slices: Toast frozen or thawed slices in a toaster or dry pan on low heat until warm and slightly crisp.
- For the Whole Loaf: If you've frozen an entire loaf, let it thaw at room temperature for a few hours, then warm it in a preheated oven at 325°F (163°C) for 10-15 minutes to refresh the texture.
- For Softening Bread: If the bread has become slightly dry, wrap it in foil and place it in the oven with a small oven-safe dish of hot water to reintroduce moisture.
❓ Frequently Asked Questions (FAQ) About Beet Root Bread
Beetroot adds extra moisture to the dough, making it stickier than typical bread dough. This is completely normal! Since beets contain natural sugars and water, they make the dough feel wet initially.
The key to handling sticky dough is proper kneading and allowing the flour to fully absorb the moisture. If you're kneading by hand, it can be tricky to incorporate the beet without making a mess. Instead of adding extra flour (which can make the bread dense), try:
1. Lightly oiling your hands instead of using flour while kneading.
2. Letting the dough rest for 5-10 minutes before continuing to knead—this allows the flour to absorb moisture, making it easier to work with.
3. Using a stand mixer or bread machine for kneading, as they can better incorporate the beet into the dough.
If your dough is still too wet after kneading, you can chill it in the fridge for 30 minutes to firm it up before shaping. However, avoid overloading it with extra flour, as this can reduce the softness of the bread.
Although some fading is inevitable, but if you are somebody bound on getting a fresh vibrant pink colored loaf of beet root bread, here is an answer for you.
The vibrant color is due to betalains, natural pigments that can change under heat and pH changes. If your bread turns brownish or dull after baking, here are a few reasons why:
1. Heat Sensitivity – High oven temperatures can break down the natural pigments. To preserve more color, try baking at a slightly lower temperature for a longer time (e.g., 350°F/175°C instead of 380°F/193°C).
2. Acidity Level – Beetroot maintains its bright color in an acidic environment but fades in an alkaline setting. If your dough is too alkaline, the color may not stay vibrant. Adding a teaspoon of lemon juice or vinegar to the dough can help retain the color.
3. Type of Beet Used – Fresh raw beets provide the best color, while roasted or canned beets may have already lost some of their pigmentation. Using fresh, finely grated beets or beet puree can enhance the final color.
Since beetroot bread has a high moisture content, it can be trickier to judge doneness compared to regular bread. Here are a few ways to check:
1. Tap Test – Remove the bread from the pan and tap the bottom—it should sound hollow.
2. Internal Temperature – The best way to ensure doneness is using a kitchen thermometer. The bread is fully baked when the internal temperature reaches 200-205°F (93-96°C).
3. Visual Check – The crust should be deep golden brown, and the loaf should feel firm when gently pressed.
🔗 Suggested Recipe
Let us dive into more bread recipe that you are bound to like
- Brioche cinnamon rolls
- 3- ingredient bagel recipe
- Banh Mi bread
- Mini Hot Dog Buns
- Spanish Bread
- Bullet Naan
- Coconut Buns
- Potato Buns
- Turmeric bread
With its stunning color and delightful flavor, this beet root bread is bound to elevate your baking game and impress your family and friends. Whether enjoyed fresh out of the oven, as a sandwich base, or simply toasted with your favorite spread, it’s a versatile addition to any table. Ready to create this show-stopping loaf in your own kitchen?
Follow this beetroot bread recipe, and don’t forget to share your baking journey and results with us in the comments below!"
Let me know if you'd like any tweaks!
Happy Baking!
Beet Root Bread
Ingredients
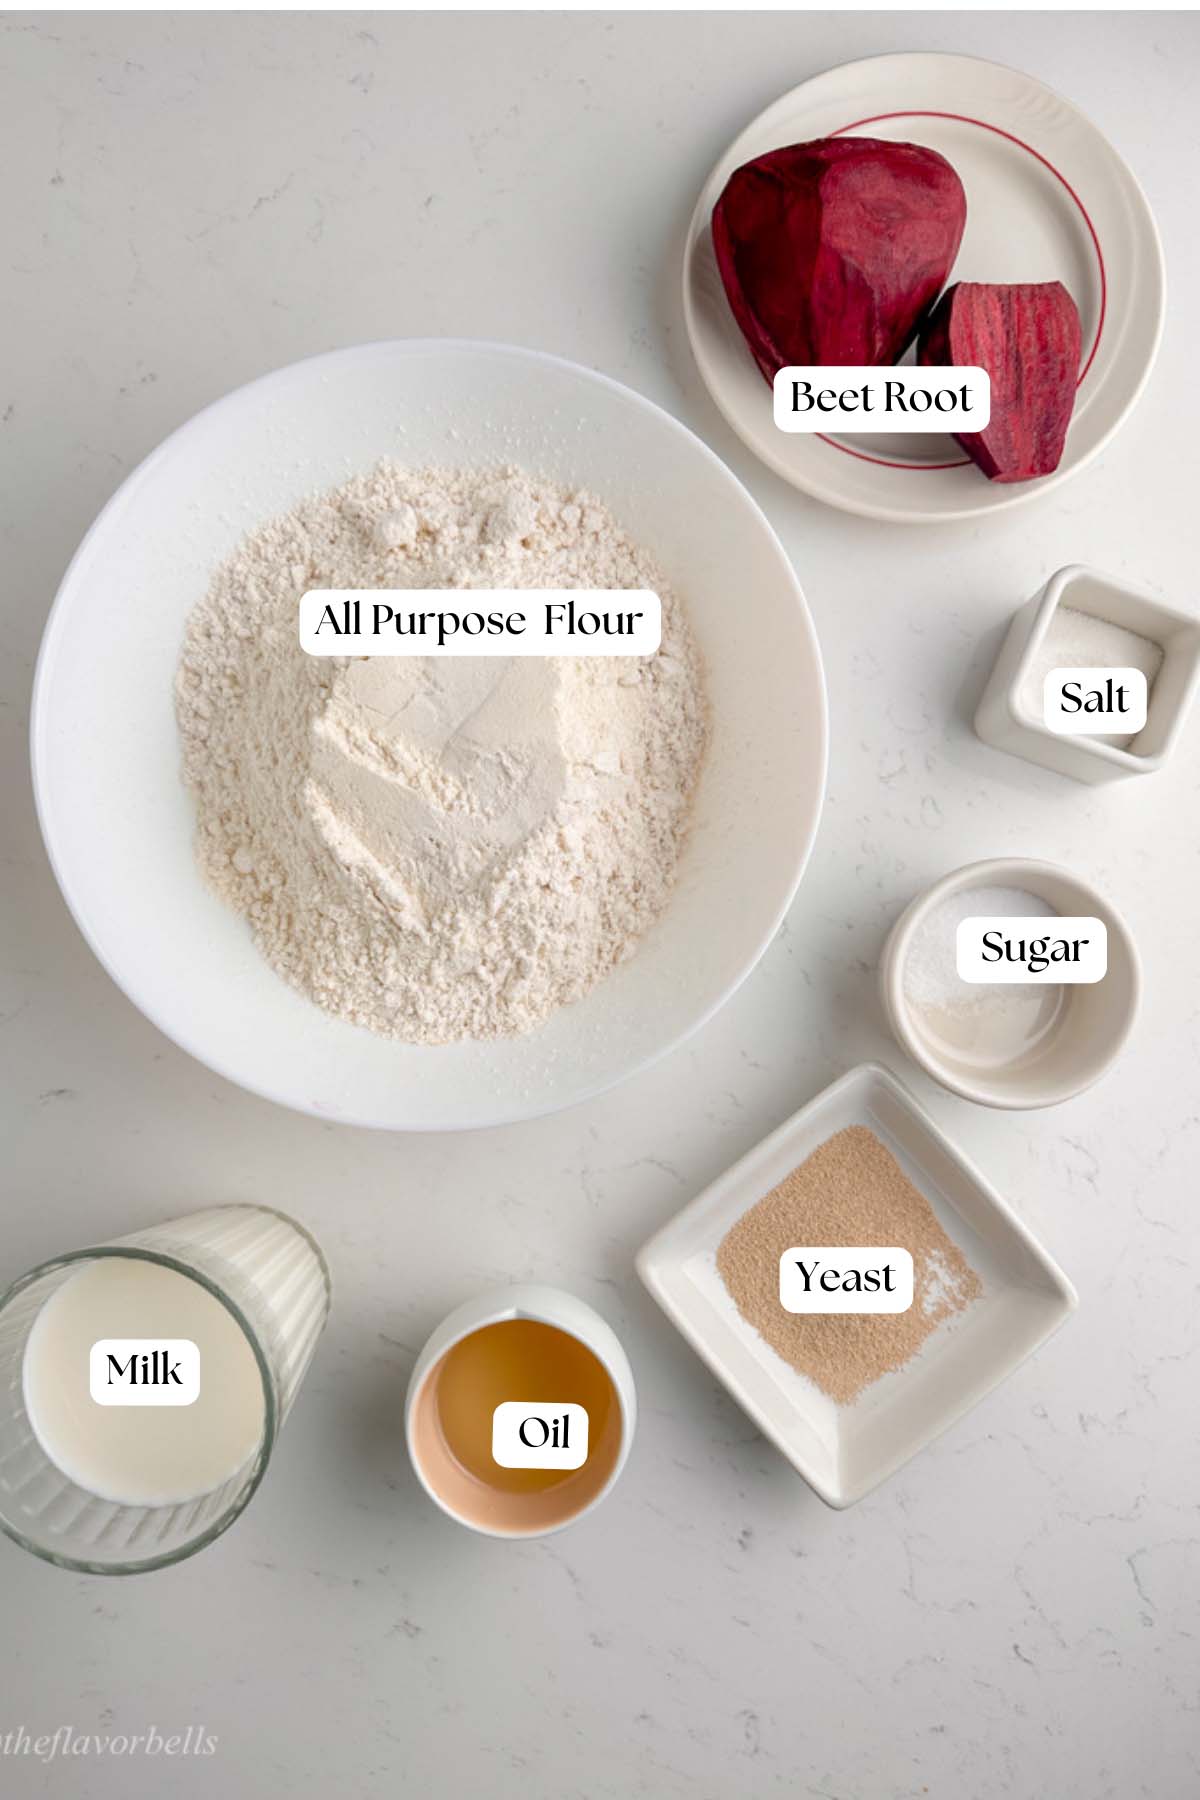
- 375 g All-purpose flour (3 cups + 1 tbsp)
- 230 g Whole milk (≈ 1 cup)
- 1 Whole beet root (grated)
- 6 g Instant yeast ( 2 tsp)
- 8 g Sugar (2 tsp)
- 9 g Salt (1 ½ tsp)
- 30 g Oil or butter (2 ¼ tbsp.)
Instructions
Step 1: Combine Dough Ingredients
- Whisk together the dry ingredients (flour, salt, sugar, and instant yeast) in a mixing bowl to evenly distribute them.
- Add the warm milk and oil to the dry mixture.
- If kneading by hand, use a dough whisk or the back of a ladle to combine the ingredients into a shaggy mass.
- Note that the dough might seem slightly dry initially, but the beetroot will add moisture in the next step.
Step 2: Kneading the Dough
- For stand mixer users: Attach the dough hook and knead at a low speed to bring the ingredients together into a rough dough. Keep kneading until 5-7 minutes. Then gradually add the grated beetroot while kneading. Knead for 12-15 minutes until the dough becomes smooth, elastic, and starts to pull away from the sides and base of the bowl.
- For hand kneading: Knead the dough by pressing and folding, gradually incorporating the beetroot. Take short breaks to rest the dough, making it easier to handle. Note that incorporating the beetroot will make the dough sticky initially but it will become manageable with continued kneading.
Step 3: Bulk Fermentation
- Transfer the smooth, elastic dough to a lightly greased bowl.
- Cover the bowl with a damp towel or plastic wrap and let the dough rise in a warm spot until it doubles in size.
- If the room is cool or dry yeast is used, the rising may take longer. The dough should feel soft and airy when ready.
Step 4: Shaping the Dough
- Prepare a loaf pan by greasing it or lining it with parchment paper.
- Deflate the risen dough gently and divide it into three equal portions.
- Roll each portion into strips of even thickness and then roll them into smooth, tight dough rolls.
- Arrange the three dough rolls in the prepared pan to create a pull-apart loaf structure. (refer to the images in detailed instruction shown in the post)
Step 5: Second Rise
- Cover the shaped dough with a kitchen towel or plastic wrap and let it proof until it nearly doubles in size, with the dough rising about an inch above the pan's rim.
- Allowing sufficient time for this rise ensures a light and airy texture in the baked loaf.
Step 6: Baking
- Preheat the oven to 380°F (193°C) while the dough completes its second rise.
- Spray the proofed dough generously with water before baking to keep the surface moist and allow for proper expansion.
- For even better results, place an empty baking dish on the oven's bottom rack and add hot water to it after placing the bread in the oven. This creates steam for a higher rise and softer crust.
- Bake the bread made with beet roots for 22-25 minutes, or until the top is a deep golden brown and the loaf sounds hollow when tapped.
- Optional: Brush the hot crust with melted butter for extra shine.
- Let the bread cool in the pan briefly before transferring it to a wire rack to cool completely.
Notes
- Tackling Stickiness: Beetroot makes the dough sticky—skip extra flour to prevent density. Instead, knead thoroughly, and lightly oil your hands for easier handling.
- Beetroot Choices: Use grated raw beetroot or go with roasted/steamed puree for smoothness. Adjust flour slightly if the puree makes the dough too wet.
- Flour Options: All-purpose flour ensures softness; bread flour adds chewiness. For a hearty twist, swap up to half the flour for whole wheat, tweaking hydration as needed.
- Activating Yeast: If using active dry yeast, dissolve it in warm milk with sugar and wait until frothy before mixing it in.
- Second Proofing: Keep an eye on the second rise—over-proofing may lead to collapse. Test readiness by pressing gently; dough should spring back slowly.
- Steam for Success: Spraying the dough with water before baking and adding a pan of hot water to the oven helps create steam, which keeps the crust softer for longer and allows the bread to expand properly.
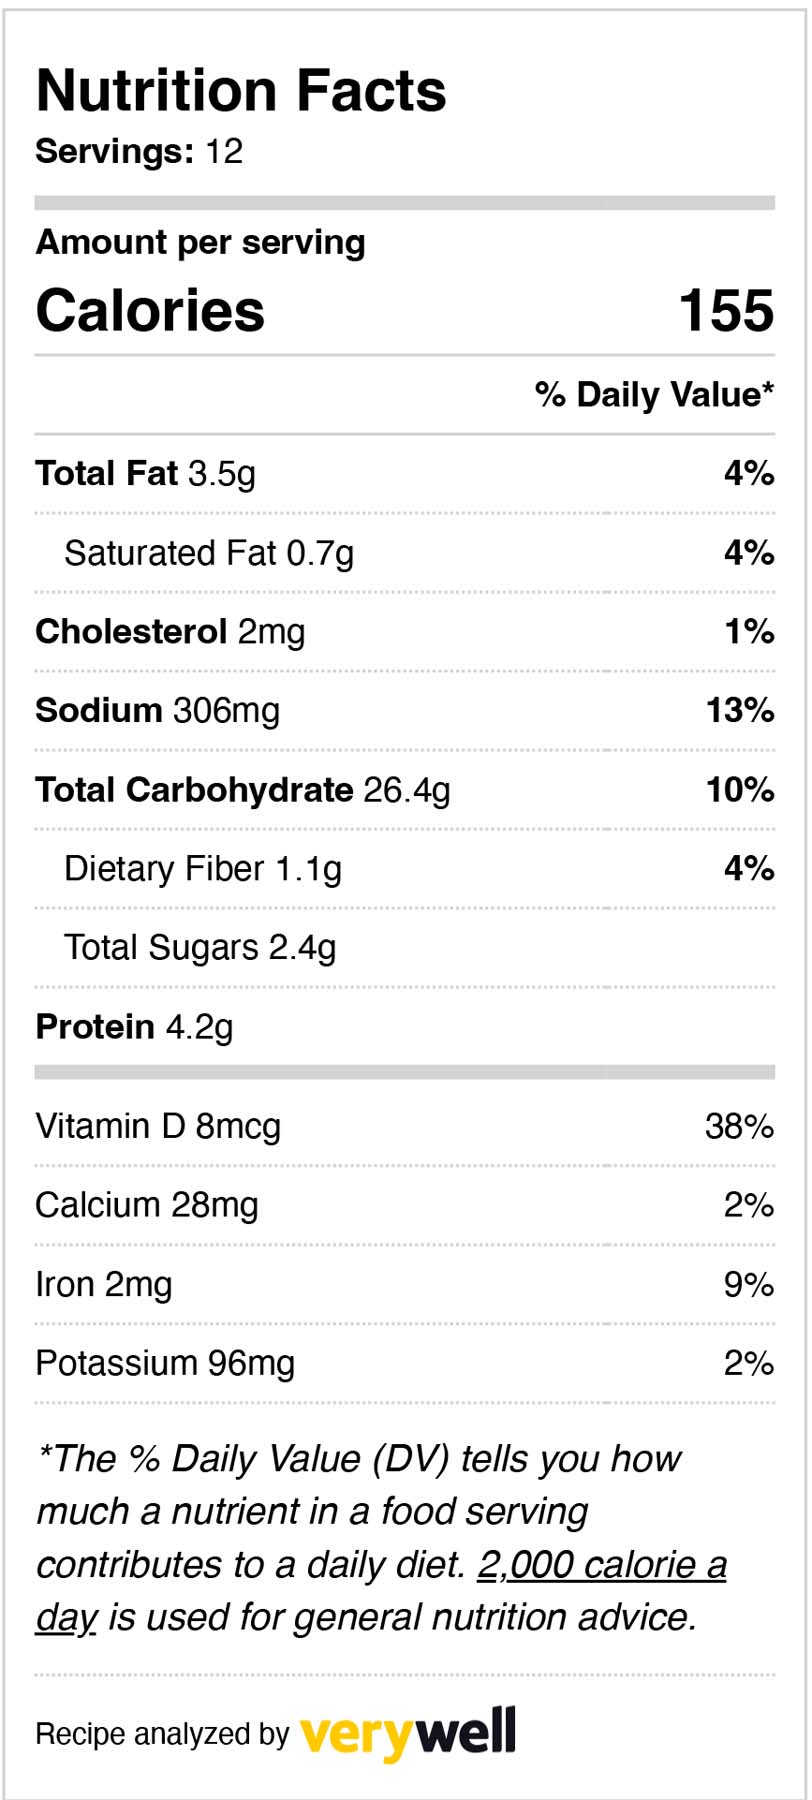
📋Nutrition Facts


Thomas
This Beet Root Bread recipe is such a creative way to incorporate veggies into baking! Thanks for sharing this wholesome and delicious recipe!