A complete guide for wheat pita bread: sourdough/ Yeast
This wheat pita bread recipe explains how to make whole wheat pita pockets from sourdough starter or instant yeast. It is a detailed recipe for making perfect whole-wheat pita pockets on Stovetop or oven.
Ingredients
- 280 g Whole wheat flour (>2 cups)
- 180 g Water
- ¼ oz Dry yeast / 80 g ripe starter
- 1 teaspoon Sugar (only if using yeast fermentation)
- 1 teaspoon Salt
- 1 ½ tablespoon Olive oil
Instructions
Making the dough:
- Add water, yeast, and sugar to a large bowl, stir to combine. Let it sit uncovered for 5- 10 minutes or till the yeast solution becomes frothy. If making with sourdough, measure the starter, add water, and set aside.
- In a big bowl add whole wheat flour, olive oil, and salt.. Mix well and add the yeast mixture or the water- sourdough starter mixture. Stir with a wooden spoon until it comes together as a big lump of dough. Cover and let it rest for 15 minutes.
- Sprinkle a little flour on the countertop. Turn dough onto a floured work surface, knead for 7-8 minutes. Knead till the dough becomes smooth. Add little flour if needed, but try not to use too much.
- Grease a bowl with olive oil and transfer the dough to that bowl. Cover with a wet kitchen towel or plastic wrap.
Bulk rise and shaping and proofing the wheat pita bread
- Allow it to bulk rise until the dough has doubled. They yeast fermented dough (2-3 hours)will bulk rise way faster than the sourdough(3-6 hours).
- Divide dough into six pieces, make each into a ball. Cover and allow it to sit for 30 minutes.
- Working with one dough ball at a time (leave the others covered), use your fingers to start to shape the ball into a disc, being careful not to press all the air out. Finish by using a rolling pin to roll disc into ¼ inch thick rounds.
- Continue the process until all balls are rolled round. Keep the rolled ones covered with a kitchen towel.
- Now let the instant yeast pitas proof for 45-50 minutes. And for the sourdough ones, it may take double the time.
Baking the wheat pitas
If baking them in oven:
- Place a baking tray or a pizza stone on the bottom rack of the oven and preheat the oven to 465 0F.
- Place the rolled pitas on the hot baking stone and bake for about 2-3 minutes until the bread puffs up.
- Then flip it and bake for another minute or so. Take care not to overbake the pitas, this will make the pitas hard. Flip them immediately as you see them puffing.
- Remove from oven and cover immediately with a kitchen towel while other pitas bake.
If making them on a stove top:
- Choose a heavy bottom skillet. Cast iron would work best. Heat the skillet at high flame.
- When you know that the skillet is hot enough, reduce the flame to medium. A trick that I use is to dust some flour on the skillet. If the flour turns brown, you know that the skillet is ready for the pitas.
- Place a rolled pita on the skillet. Flip the bread as soon you observe a first signs of puffing up. Flip immediately as the bread starts to rise.
- Now let the bread cook on the other side until it fully puffs up. Flip and cook the first side again if needed.
- Remove from the heat and cover immediately with a kitchen towel and repeat with the rest of the pita breads.
- Serve hot and as your heart desires!
Notes
- Yeast activation: We definitely don’t want to mess up this step. We need to give it ample food ( Sugar) to feed on, and a favorable environment to reproduce ( warmth and moisture through warm water).
- Don’t kill your yeasts with super-hot water. If you have a thermometer, 90 – 100 0 F is the optimum temperature for fermentation.
- Also, later in the process, we want to keep our yeast happy and growing. So, throughout the bread making, we will take care that our yeast stays happy and multiply well, by giving it a warm and moist environment to rise. In my opinion, an oven with lights on is the best place.
- When baking, don’t keep the oven door open for too long while placing or flipping your pita bread. Also, take care not to burn yourself as we are working at high temperatures here.
- Take care not to overbake the pitas, this will make the pitas hard. Flip them immediately as you see them puffing.
- Remove from oven and cover immediately with a kitchen towel while other pitas bake. This will keep them soft.
Nutrition facts
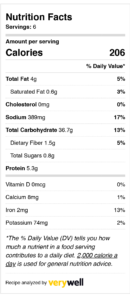
Nutrition
Calories: 206kcal
Tried this recipe?Let us know how it was!