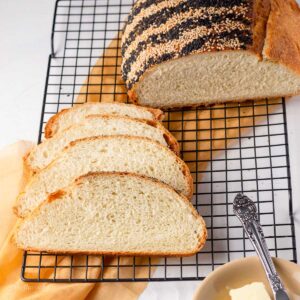
Semolina bread with sesame seeds
This crusty and delicious semolina bread is topped with nutty sesame seeds and has tender and moist crumbs. Semolina flour gives it a unique flavor, color, and texture that makes it a perfect bread for toasting. This classic Italian semolina bread is one of the most hearty and delicious bread to try.
Equipment
- Stand mixer
- Weighing machine/ measuring cups/ measuring spoon
- Dutch oven
- Scoring blade
- Oval Banneton
- Bowls
- Bread lame
Ingredients
- 1 cup Semolina flour (double milled durum wheat semolina (180 g))
- 2 cups bread flour (240 g)
- 2 ¼ teaspoon Active dry yeast (1 pkg)
- 1 teaspoon Salt (6g)
- 2 teaspoon sugar (10g)
- 3 tablespoon olive oil (12g)
- 1 ¼ cup of water
- 4 tablespoon sesame seeds (I used black and golden sesame seeds)
Instructions
Step 1 Blooming the active dry yeast
- In a bowl, take half of the measured water. Place it in a microwave and warm it to about 105o F.
- Dissolve sugar in warm water and then, pour in the dry yeast. Stir it and let it bloom in a warm place. It may take 5-10 minutes, depending on the ambient temperature of the kitchen.
- The yeast water should appear foamy and bubbly (refer to the process images).
Step 2 Kneading the dough
- In the bowl of a stand mixer, add all the dry ingredients and mix to incorporate everything evenly. Now add olive oil and rub it into the flour. In the end, the flour should form into a ball when pressed in your hand.
- Now, add the bloomed yeast mixture to the bowl. Also, add the remaining water. Then combine the dough to hydrate every particle of the flour using the back of a ladle. Cover the dough and let the dough rest for 15 minutes. This rest helps with gluten development.
- Now put the dough hook attachment on the stand mixer and start kneading the dough at low speed for 5-6 minutes. Then, increase the speed to 3-4 and keep kneading for 10-12 more minutes or until the dough comes together. Raise the speed to maximum for the last 3-5 minutes. In the end, the dough will leave the sides of the bowl and wrap itself around the dough hook. The dough will become manageable and smooth.
- If kneading with hands, read the recipe notes.
Step 3 Bulk rising the dough
- Transfer the kneaded dough into a large, greased bowl with enough headroom for the dough to expand. Cover it with a cling wrap or a kitchen towel. Place the bowl in the warm corner of your kitchen and let it double in volume.
- It would take 2 to 4 hours to bulk rise depending on the ambient temperature of your kitchen. It is advisable to look at the rise in the dough instead of following any timeline.
Step 4 Shaping the semolina bread
- When the dough has doubled up in volume, flip the dough onto a dusted surface. Stretch the right side and bring it to the center and seal. Similarly, bring the left side to the center and seal. Now grab the right side and roll over to form a log. Seal the edges by pressing with palms.
- Now to get rid of the dough loaf buts, fold the sides under the loaf and pull it towards yourself.
- Then, let it go and jiggle the batard towards the right and left using cupped hands while trying to build tension on the surface.
- Now on a plate, spread the sesame seeds evenly. (I have used golden and black sesame seeds and made a pattern of them, though you can use either two.)
- Spray the shaped batard with a mist of water so that sesame seeds stick to the dough surface nicely. Now, flip the shaped dough into the sesame seed plate. Gently roll it on the plate to adhere to maximum seeds.
- Now gently flip and transfer it into a banneton basket.
Step 5 Proofing the shaped loaf
- Place the banneton in a plastic bag and fluff it up with air and seal it with a rubber band.
- Let the dough proof at room temperature until it rises well above the rim. Alternately you can also do a poke test to check if the dough is ready to bake.
Step 6 Scoring and baking
- Now preheat the oven to 480o F for about 30 minutes with the Dutch oven placed inside it. ( or simply bake in on a baking sheet)
- When the oven and bread both are ready, gently flip the dough on parchment paper or a bread sling.
- Do multiple decorative scores or a simple slash. Place the bread lame at 45 degrees and make a half-an-inch deep slash across the batard.
- Spray the loaf with water before putting it in the Dutch oven. Close the lid and let the bread bake for 20 minutes. Then open the lid of the Dutch oven and reduce the oven temperature to 450o F. Let the bread cook for 15 minutes more.
- When the bread is ready, remove it onto a cooling rack. Let the bread cool completely before slicing it.
- Share and enjoy!
Notes
- Kneading with hands For kneading with hands combine all the dry ingredients in a bowl. (do not add oil at this stage) Now, add the bloomed yeast mixture to the bowl. Also, add the remaining water. Then combine the dough to hydrate every particle of the flour using the back of a ladle. Cover the dough and let the dough rest for 15 minutes. This rest helps with gluten development. Now, dust a work surface and transfer the dough mass onto the work surface. Now start kneading with your hands. Use the heel of your hands to stretch the dough away from you. Then, bring it back and collect it. Add oil in stages to keep the dough from sticking to your hands and keeping it manageable. Keep repeating this motion to knead the dough until it becomes smooth and stops sticking to the hands and the surface. It would take about 20-22 minutes to knead the dough for semolina bread with hands.
- If you are using regular semolina flour which is not double milled, it will absorb less water. Hence reduce the water quantity by 20 grams. • You can also use rava or sooji instead of semolina. But please note that suji does not have high gluten like semolina, hence it will need less water. So, reduce the hydration accordingly. • Please do not use roasted semolina or roasted rava for making bread.
- I highly recommend using active dry yeast for making this recipe. If you use instant dry yeast, it starts acting very fast. And semolina flour takes time to absorb moisture and become extensible. So, before the optimum gluten development takes place in the dough, the dough starts to rise, and it starts to weaken the glutens before its fully activated.
- Any temperature from 100-110 degrees F (37-43 degree C) would work for blooming the yeast.
- Be patient with kneading the dough. Take your time. The dough might appear wet and sticky in the beginning, but it will come together finally. Semolina takes time to become pliable.
- To bulk rise and proof bread in the Instant pot, yogurt mode is ideal.
- You can shape this semolina bread into semolina rolls, buns, or even a semolina baguette.
- The black sesame seeds have a nuttier flavor whereas the golden and white ones have a stronger sesame seed flavor. If you like toned-down sesame seed flavor, use black sesame seeds generously.
- I use an oval rattan basket, with the lining cloth. If you do not have a proofing basket, just DIY a proofing basket. Use any oval bowl and line it with a naturally breathable cotton cloth. Dust the cloth generously with rice flour and transfer the shaped semolina sesame bread into it with the seam side facing upwards.
- Spray the bread load with water before putting it in the Dutch oven for baking, for getting the best rise.
- Let the bread cool completely or at least for 30 minutes before slicing it.
📋Nutrition Facts

Nutrition
Calories: 151kcal
Tried this recipe?Let us know how it was!