Ragi Roti: Gluten Free Roti
Ragi roti, made from finger millet flour, is not only a gluten-free roti but is also packed with a ton of essential nutrients. Let us make these simple, easy, soft, and flavorful ragi rotis that will leave your taste buds satisfied. Whether you have specific dietary requirements or simply want to explore new culinary options, this flatbread also called nachni roti is a fantastic choice.
Ingredients
- 1 cup ragi flour
- 1 cup water
- ¼ teaspoon salt
- 1 teaspoon ghee
Instructions
Step 1 Hydrating the ragi flour
- Start by combining salt and ragi flour in a bowl.
- Then boil a cup of warm water in a saucepan. As the water starts to boil, turn off the flame and add ragi flour to the boiling water. Use the back of a wooden ladle to mix the flour in boiling water. Just make sure to hydrate most of the flour.
- Leave it covered for 15-20 minutes or until the dough becomes comfortable to touch.
Step 2 Kneading the dough
- Now empty the contents of the saucepan onto a work surface and start kneading the dough. You can add a teaspoon of water if it feels stretchy.
- When the ragi dough comes together as a single ball, add a teaspoon of melted ghee and knead for additional 3-4 minutes.
Step 3 Dividing the dough and roll gluten free ragi roti
- Once the dough is ready, cover it with a damp cloth and let it rest for 5 minutes.
- Now divide it into small portions and roll each portion into a ball.
- Take a dough ball and flatten it slightly. Dust it with some corn starch to prevent sticking. You can use any flour of your choice. Ragi flour is usually not recommended due to its coarse texture.
- Place the flattened dough ball on a clean, flat surface or a rolling board. Using a rolling pin, roll it gently into a circular shape, like a chapati or roti.
- If the dough sticks to the rolling pin or surface, sprinkle some more flour.
Step 4 Cooking the Ragi roti
- Heat a tawa or a flat griddle over medium heat. Place the rolled ragi roti on the hot tawa.
- After a minute or so, when you start to see bubbles forming on the surface, flip the roti to the other side.
- Cook the other side for another minute until you see brown spots and the roti is cooked evenly.
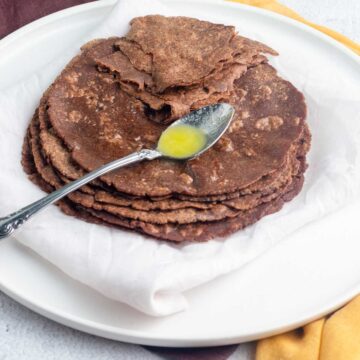
- Remove the ragi roti from the tawa and apply some ghee or oil on top. This step is optional but adds flavor and helps keep the rotis soft.
- Repeat the process with the remaining dough balls until all the ragi rotis are cooked. I made 8 small gluten free rotis from this recipe.
- Serve ragi roti hot with any curry, chutney, or yogurt as per your preference.
Notes
- Do not attempt to knead the dough when added in boiling water. The purpose is to hydrate the flour. Since it is very high in fiber, it needs some time to soak. Otherwise, you will have ragi roti that will become hard and dry quickly after cooking.
- Do not let the dough cool. It is best to start kneading warm dough mass for making soft ragi chapati.
- If you want crack-free roti with smooth edges, knead every dough ball again in your hands before rolling them.
- Adding ghee while kneading makes soft gluten free roti. You can substitute ghee with melted or softened butter.
- Wrap the cooked rotis and put them in a container with a tight lid if you are not consuming them immediately.
📋Nutrition Facts
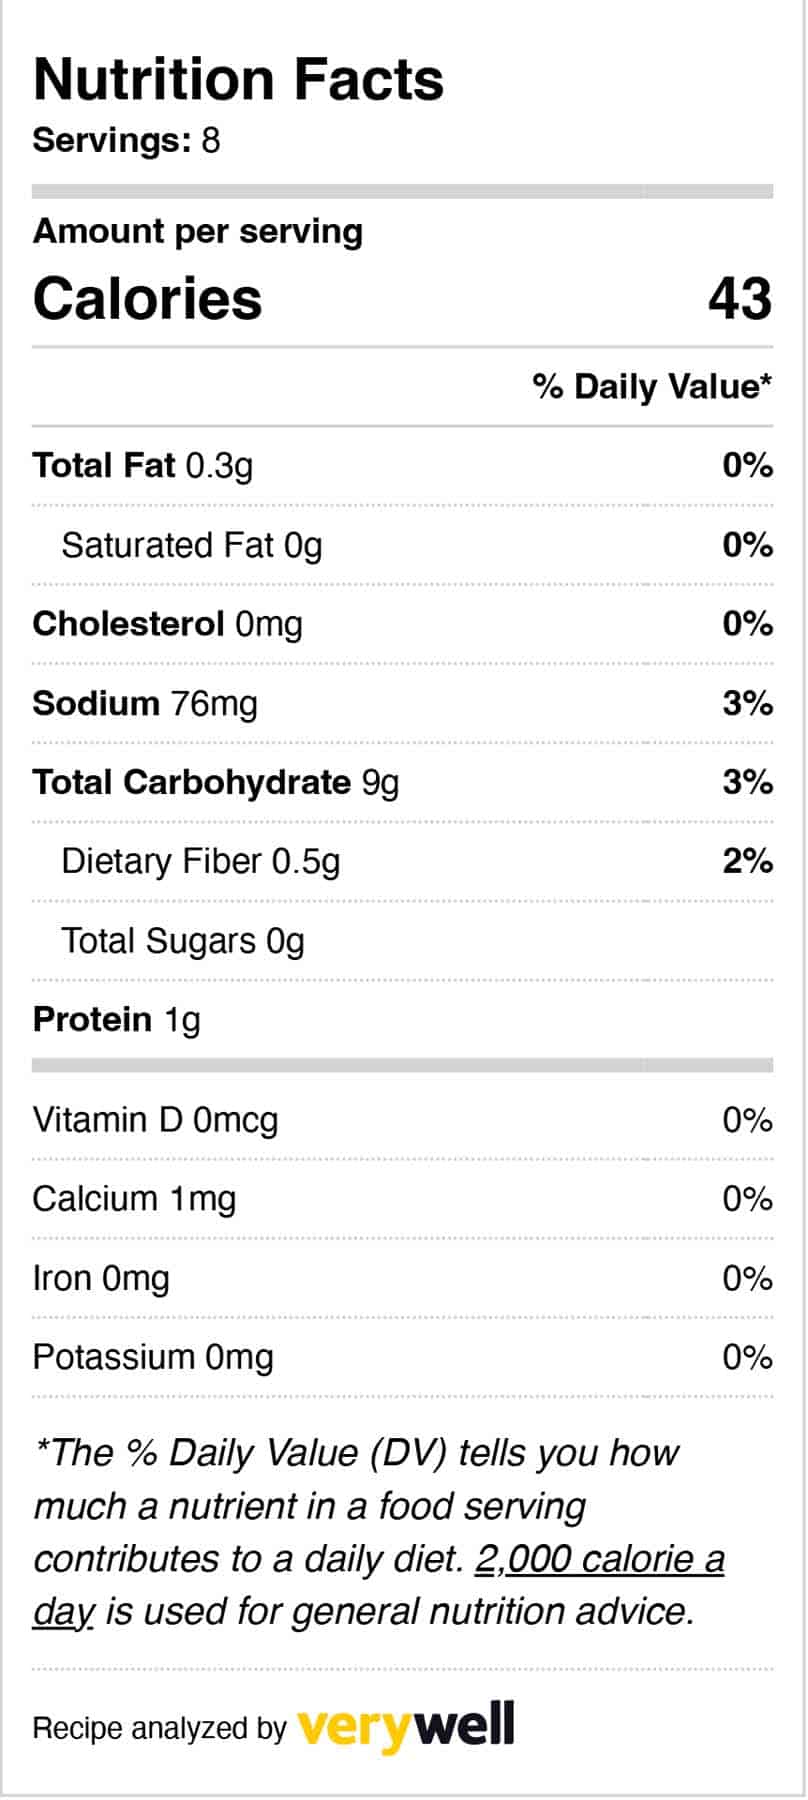
Nutrition
Calories: 43kcal
Tried this recipe?Let us know how it was!