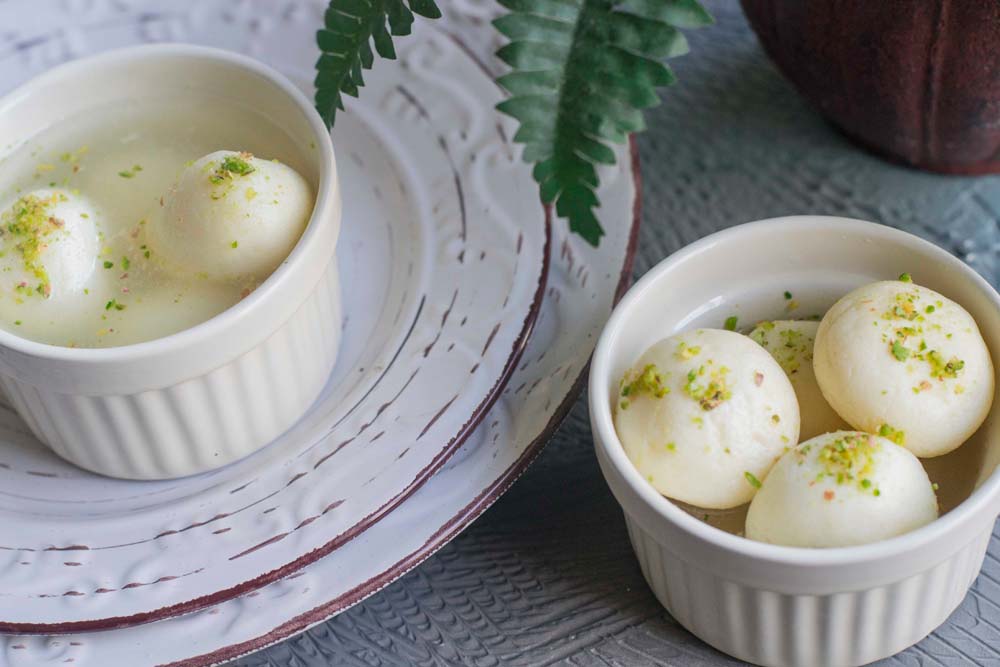
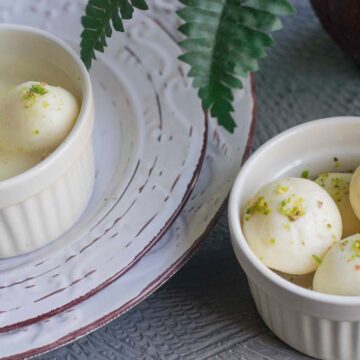
Who does not love these juicy addictive delights.! There are not many Indian sweets that could be enjoyed chilled. Rasgulla is one such exception and I am a sucker for chilled desserts. So, let us make this very simple Rasgulla recipe.
It does not need many ingredients. Just 3 basic things: Milk, lime juice, and sugar. The rest is all optional. See.. how easy Rasgulla recipe is!!
You can flavor Rasgullas with multiple things: rose water, kewra water, Cardamom, saffron, etc. I like to keep it simple. Just some rose water!
This easy and simple looking Rasgulla recipe sometimes gets a little tricky. But just take care of the points mentioned below, and you will never mess the Rasgullas.
I totally empathize with those who have failed this Rasgulla test. I can totally relate to the pain. Cracked Rasgullas to Flat Ragullas to Rubbery Rasgullas to just Dissolved in Syrup Rasgullas (no Rasgullas)! I have been there multiple times. Not in the near past, but I have been there.
I failed multiple times. Every time I learned something new from my mistakes. Now I have been making Rasgullas for many years without fail. In this blog post, I am sharing the experience I gained over the years. Please read the entire blog for no-fail Rasgullas.
Lets go through the procedure to make this super easy Rasgulla recipe.
Procedure for making Soft Rasgullas
Start with cow’s whole milk. I use homogenized whole milk so, the procedure is specific to that. In case you are using raw milk, refer to the troubleshooting point no 8.
Curdle the milk using a coagulant of your choice.
You can use fresh lime juice to store-bought lime concentrate.
Or use any kind of vinegar. I suggest not to use strongly flavored vinegar.
Chose artificial plain vinegar or industrial grade acetic acid or citric acid ( granules). Anything will work.
2 to 2.5 tablespoon of vinegar or lime juice should curdle most types of milk. Just take care to wash the Chena properly to remove any leftover flavor of the coagulant.
To collect the Chena use a cheesecloth or any similar lint-free cloth. We want to squeeze out all possible water. And then knead to make balls.
I do not use any flour or starch to bring together the Chena dough. But if your Chena has some excess moisture add a teaspoon or 2 of cornflour or all-purpose flour.
I like to make 16 medium-sized Rasgullas and mine take a total of 22 minutes to fully cook. If you choose to make 12- 14 large Rasgullas, cook for good 25 minutes. Open the lid halfway to check on the Rasgullas and carefully give them a turn.
Chill and serve….
Sound simple? Yes....
Just make note of the points mentioned below so that this easy peasy Rasgulla recipe never gets complicated.
9 reasons why we mess up easy Rasgulla recipe and troubleshooting these mistakes
- Hard Chena:
While curdling if the milk curdles with a shock and further remains in the boiling water for some time, the Chena hardens. Hence the Rasgullas will turn out hard or rather rubbery.
So, it is must that Chena curdles gradually. It means that there should be at least 30 seconds of time lapse between the appearance of the first curdle and the complete separation of hay. Ideally, it should take good 1-2 minutes. So, if your milk has curdled with a shock, quickly put ice-cold water or ice cubes to bring down the temperature so that the Chena does not get hard.


- Too much water/Moisture in the Chena:
Squeezing out water from Chena is another crucial part of Rasgullas making. It can be done by hanging it overnight or a few hours.
Or one can simply remove water from Chena by turning and squeezing the Chena cloth with hands. Whatever method you choose, just ensure that there is no water left in the Chena. Squeeze with hands till the last drop of water drips out. When you take out Chena from the cloth it should feel brittle. If you have doubts that there might be excess moisture in the Chena. I suggest kneading the Chena in two parts. Eyeball into two equal portions and knead one portion first. Add half teaspoon of flour if adding flour at all.
If it doesn’t come together even after good 5-7 minutes of kneading and it remains a sticky mess, there is definitely excess moisture in the Chena. There are no bright chances of recovering it.
But you can further squeeze the remaining half Chena to remove excess water and continue with the recipe.
- Very dry Chena:
Sometimes we get overwhelmed with the failures caused due to over moist Chena and we totally muscle it out. And we invite another problem!!
When we try to shape the balls from a very dry Chena they will form a lot of cracks and they are very likely to fall apart in the syrup bath.
There is a simple fix. Just add a drop or two of warm water while kneading. But the main challenge is to have the expertise to identify the problem. Though this will come with experience. Though I can give a small tip here. Look for the following signs:
- If Chena is taking too long to come together and is still grainy and brittle,
- It does not form a smooth dough or,
- Chena forms a dough that is breaking easily.
- It is just impossible to make crack free balls.
All these are the signs that indicate Chena is too dry or hard.
So, do not muscle out the Chena. There should be some moisture left in the Chena. It should not be totally dry.
- The inappropriate ratio of sugar to water:
The syrup bath that we prepare for making Rasgullas need to have ideal water to sugar ratio of 1:4. The sweetness at this ratio is perfect. Neither very sweet not very bland.


You can conveniently increase it up to 1: 5 or bring it down to 1: 3. But I suggest you stay somewhere in this limit.
I know people cooking it at higher or diluted concentrations, but in my opinion, the sweetness and the concentration of syrup are just perfect at 1:4. If we further dilute the concentration of syrup, the Rasgullas turn out a little bland.
Normally when we start with a 1:4.25 ratio, it eventually cooks our Rasgullas at 1: 4. Some water is easily evaporated while we heat the water till sugar is dissolved and it reaches a consistent boiling state. And a lot of water is evaporated in the further process. We must start at the right ratio so that the syrup does not get concentrated ever while cooking. So I recommend you start with ¼ cup more. Which means 1 cup sugar to 4 ¼ cups of water. Also, carefully measure the volume of water and sugar.
- Using less volume/ depth of syrup :
Rasgullas need a good volume of syrup to puff up. The depth of the syrup should be at least 2 to 2.5 times the diameter of the Chena balls.
Decide the volume of sugar syrup depending on the size and depth of the pan. If the syrup is not deep enough, the Rasgullas will remain flat from the bottom. Rasgullas would turn out as semicircular disc-shaped.
- Using the wrong type or size pan:
The type of pan used for boiling the Chena balls makes a great difference. It is preferable to use a heavy bottom pan with a tight lid. In a thin pan, with an increase or decrease of flame, a sudden change in temperature occurs, which affects the puffing of Rasgullas.
The pan should be wide enough to give enough space for Rasgullas to move around and puff up. Rasgullas normally increases 2 to 2.5 times from their initial size.


Choose a pan with a tight-fitting lid. It is important to maintain the heat and pressure inside the pan. I like to use ones with glass lids so that I can keep an eye on my Rasgullas without having to open the lid.
So, take all that into account and choose the right pan. Alternately, boil them in two batches. Making in batches is also beneficial because then you don’t have any excess left-over syrup. But while doing so, take care not to remove them immediately from the hot syrup. Let the first batch cool down first, then remove from the pan. Also, replenish the syrup by adding some more water if needed.
- The temperature while Boiling in sugar bath/ Sugar Syrup:
There should be a consistent boil in the syrup while making the Rasgullas. If Rasgullas are made at a very high temperature the Rasgullas will be rubbery. They will puff up very quickly and then, as the temperature drops, they will deflate.
So, take care to maintain a consistent boil without altering the temperature much. If you feel that the syrup is boiling too much, reduce the flame to a level where a consistent boil could be maintained.
Also, do not open the lid for too long. As mentioned above, we have to maintain the temperature for uniform cooking. Just open the lid once in between and quickly flip the Rasgullas if needed.
Also, once the Rasgullas are done do not open the lid immediately. There are chances that Rasgullas can deflate and shrink as they come in contact with cold air. So, let the syrup cool down gradually before removing the Rasgullas into a bowl.
- Type of milk/ type of sugar:
The type of milk is also very important. Choose the whole milk of cow. Low-fat milk is not recommended for Rasgullas.
Also, the temperature for curdling will vary with the type of milk. Pasteurized or raw milk curdles at lower temperatures. So, turn off the flame and let the milk cool for a minute or 2 before adding the coagulant. Whereas homogenized milk needs higher temperatures for curdling. So,
after boiling do not turn off the flame. Reduce the flame and add coagulant. Turn off the flame when the milk starts to curdle. If the Chena is not white but turns out to be pale or yellow, it means that it was overcooked. Not ideal for Rasgullas!
Choose sugar that is white and clean. Yellowish sugar granules tend to have a lot of impurities which changes the color of Rasgullas. Always look for fine white sugar.
- Sourness or smell in the Chena:
Sometimes Rasgullas turn out sour and smelly. This happens when the Chena is not washed well. Once you collect the Chena in a cloth, make sure to wash it well under running water to remove all the acidic flavor. Especially if you are using citric acid or vinegar, give Chena a generous wash under running cold water.
The Rasgulla recipe is easy and very simple, but it just takes a little practice to understand the texture of the Chena. And, once you get it, there is no looking back.
Easy Rasgulla Recipe
Ingredients
- 1 liter Whole milk (Homogenized)
- 2 ½ tablespoon Artificial Vinegar (dilute with 2.5 tablespoon of water)
- 7-8 Ice cubes
- 1 cup Sugar
- 4 ½ cups Water
- 1 tablespoon Rosewater
- 2 tablespoon Crushed pistachio (optional)
Instructions
- In a heavy bottom pan, bring milk to a boil while regularly stirring. Do not let the milk stick to the bottom by regularly stirring with a ladle.
- Once the milk comes to a boil reduce the flame and add diluted vinegar or the coagulant of your choice. If using raw milk, turn off the flame and wait for a minute or two before adding the coagulant.
- Once you see that all the milk has coagulated, curdles have separated and clear hay is left behind, add 7-8 ice cubes, or use ice-cold water.
- Strain the curdled milk on to a cheesecloth by placing it in a colander and collect the milk curdles or Chena.
- Wash the Chena under the running water 2-3 times.
- Remove the excess water from the Chena by squeezing and turning the cloth. Hang overnight and let gravity do the job or manually remove out all water from the Chena. Stop squeezing when water stops to appear on the cloth surface.
- Take out the Chena on a clean countertop or a big plate. Knead using the palm of your hands in a forward motion. ( Eyeball the Chena in two parts and knead them separately. Once they both have become smooth and no graininess is left in the Chena combine it and knead together). It should take 3-4 minutes or longer depending on the texture of the Chena. So, always root for the texture and not the time of kneading. When you see that the Chena has started to become slightly greasy, immediately stop kneading.
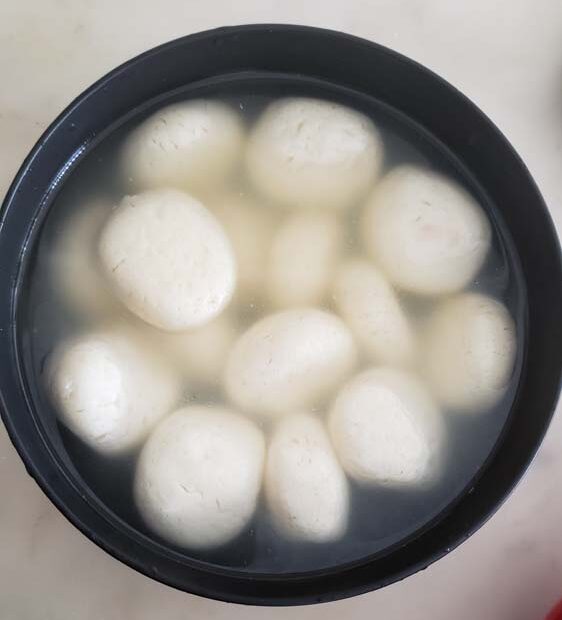
- Divide the dough into 16 equal pieces for medium-sized Rasgullas. Take a portion in hand and press between palms and then gently roll to form crack free ball. Repeat to make all Chena balls.
- Prepare sugar syrup by adding 1 cup of sugar to 4 ¼ cups of water. Bring the sugar syrup to a boil and add Chena balls one by one while maintaining the boil in syrup.
- Cover and boil in a consistently boiling syrup for 10 minutes.
- Then, uncover and quickly flip the cooking Rasgullas using a spoon. Take care to be as gentle as possible while turning the Rasgullas. Make sure to maintain the syrup boil when the lid is open.
- Cover and cook for 12 more minutes.
- When done, keep covered. Open the lid when the syrup has considerably cooled down.
- When the syrup reaches room temperature, remove the Rasgullas into a bowl and chill for 6 hours or overnight.
- Serve chilled with little syrup.
Notes
- They should have doubled in size and look fuller.
- Take one Rasgullas and put it in a bowl of cold water. If it sinks that means the Rasgullas is fully cooked.


Nina
Hi. I followed the recipe exactly. Results were awesome! Thanks so much